Manual 1.1 - LIVEAUDIO.ro
Manual 1.1 - LIVEAUDIO.ro
Manual 1.1 - LIVEAUDIO.ro

You also want an ePaper? Increase the reach of your titles
YUMPU automatically turns print PDFs into web optimized ePapers that Google loves.
FIRNET Cont<strong>ro</strong>ller <st<strong>ro</strong>ng>1.1</st<strong>ro</strong>ng><br />
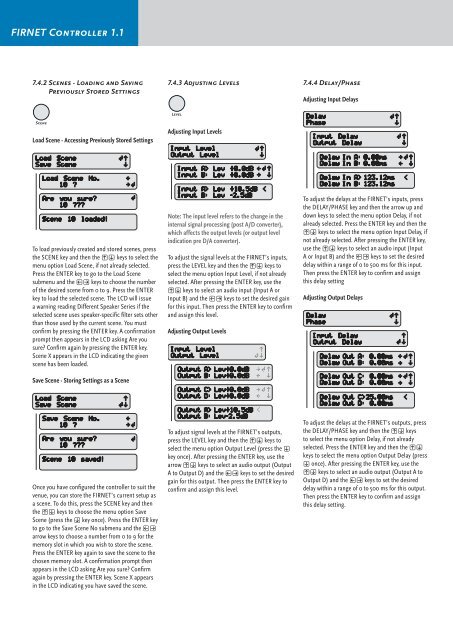
7.4.2 Scenes - Loading and Saving<br />
Previously Stored Settings<br />
7.4.3 Adjusting Levels<br />
7.4.4 Delay/Phase<br />
Adjusting Input Delays<br />
Load Scene - Accessing Previously Stored Settings<br />
Adjusting Input Levels<br />
To load previously created and stored scenes, press<br />
the SCENE key and then the RS keys to select the<br />
menu option Load Scene, if not already selected.<br />
Press the ENTER key to go to the Load Scene<br />
submenu and the QP keys to choose the number<br />
of the desired scene f<strong>ro</strong>m 0 to 9. Press the ENTER<br />
key to load the selected scene. The LCD will issue<br />
a warning reading Different Speaker Series if the<br />
selected scene uses speaker-specific filter sets other<br />
than those used by the current scene. You must<br />
confirm by pressing the ENTER key. A confirmation<br />
p<strong>ro</strong>mpt then appears in the LCD asking Are you<br />
sure Confirm again by pressing the ENTER key.<br />
Scene X appears in the LCD indicating the given<br />
scene has been loaded.<br />
Save Scene - Storing Settings as a Scene<br />
Note: The input level refers to the change in the<br />
internal signal p<strong>ro</strong>cessing (post A/D converter),<br />
which affects the output levels (or output level<br />
indication pre D/A converter).<br />
To adjust the signal levels at the FIRNET’s inputs,<br />
press the LEVEL key and then the RS keys to<br />
select the menu option Input Level, if not already<br />
selected. After pressing the ENTER key, use the<br />
RS keys to select an audio input (Input A or<br />
Input B) and the QP keys to set the desired gain<br />
for this input. Then press the ENTER key to confirm<br />
and assign this level.<br />
Adjusting Output Levels<br />
To adjust the delays at the FIRNET’s inputs, press<br />
the DELAY/PHASE key and then the ar<strong>ro</strong>w up and<br />
down keys to select the menu option Delay, if not<br />
already selected. Press the ENTER key and then the<br />
RS keys to select the menu option Input Delay, if<br />
not already selected. After pressing the ENTER key,<br />
use the RS keys to select an audio input (Input<br />
A or Input B) and the QP keys to set the desired<br />
delay within a range of 0 to 500 ms for this input.<br />
Then press the ENTER key to confirm and assign<br />
this delay setting<br />
Adjusting Output Delays<br />
Once you have configured the cont<strong>ro</strong>ller to suit the<br />
venue, you can store the FIRNET’s current setup as<br />
a scene. To do this, press the SCENE key and then<br />
the RS keys to choose the menu option Save<br />
Scene (press the S key once). Press the ENTER key<br />
to go to the Save Scene No submenu and the QP<br />
ar<strong>ro</strong>w keys to choose a number f<strong>ro</strong>m 0 to 9 for the<br />
memory slot in which you wish to store the scene.<br />
Press the ENTER key again to save the scene to the<br />
chosen memory slot. A confirmation p<strong>ro</strong>mpt then<br />
appears in the LCD asking Are you sure Confirm<br />
again by pressing the ENTER key. Scene X appears<br />
in the LCD indicating you have saved the scene.<br />
To adjust signal levels at the FIRNET’s outputs,<br />
press the LEVEL key and then the RS keys to<br />
select the menu option Output Level (press the S<br />
key once). After pressing the ENTER key, use the<br />
ar<strong>ro</strong>w RS keys to select an audio output (Output<br />
A to Output D) and the QP keys to set the desired<br />
gain for this output. Then press the ENTER key to<br />
confirm and assign this level.<br />
To adjust the delays at the FIRNET’s outputs, press<br />
the DELAY/PHASE key and then the RS keys<br />
to select the menu option Delay, if not already<br />
selected. Press the ENTER key and then the RS<br />
keys to select the menu option Output Delay (press<br />
S once). After pressing the ENTER key, use the<br />
RS keys to select an audio output (Output A to<br />
Output D) and the QP keys to set the desired<br />
delay within a range of 0 to 500 ms for this output.<br />
Then press the ENTER key to confirm and assign<br />
this delay setting.