
You also want an ePaper? Increase the reach of your titles
YUMPU automatically turns print PDFs into web optimized ePapers that Google loves.
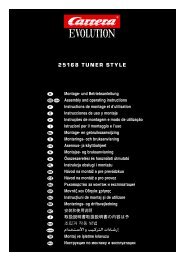
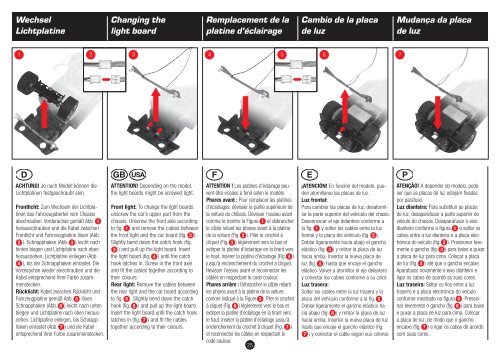
Wechsel<br />
Lichtplatine<br />
1<br />
2<br />
ACHTUNG! Je nach Modell können die<br />
Lichtplatinen festgeschraubt sein.<br />
Frontlicht: Zum Wechseln der Lichtplatinen<br />
das Fahrzeugoberteil vom Chassis<br />
abschrauben. Vorderachse gemäß Abb. 1<br />
herausschrauben und die Kabel zwischen<br />
Frontlicht und Fahrzeugplatine lösen (Abb.<br />
2 ). Schnapphaken (Abb. 3 ) leicht nach<br />
hinten biegen und Lichtplatine nach oben<br />
herausziehen. Lichtplatine einlegen (Abb.<br />
4 ), bis der Schnapphaken einrastet. Die<br />
Vorderachse wieder einschrauben und die<br />
Kabel entsprechend ihrer Farbe zusammenstecken.<br />
Rücklicht: Kabel zwischen Rücklicht und<br />
Fahrzeugplatine gemäß Abb. 5 lösen.<br />
Schnapphaken (Abb. 6 ) leicht nach unten<br />
biegen und Lichtplatine nach oben herausziehen.<br />
Lichtplatine einlegen, bis Schnapphaken<br />
einrastet (Abb. 7 ) und die Kabel<br />
entsprechend ihrer Farbe zusammenstecken.<br />
Changing the<br />
light board<br />
3<br />
ATTENTION! Depending on the model,<br />
the light boards might be screwed tight.<br />
Front light: To change the light boards<br />
unscrew the car’s upper part from the<br />
chassis. Unscrew the front axle according<br />
to fig. 1 and remove the cables between<br />
the front light and the car board (fig. 2 ).<br />
Slightly bend down the catch hook (fig.<br />
3 ) and pull up the light board. Insert<br />
the light board (fig. 4 ) until the catch<br />
hook latches in. Screw in the front axle<br />
and fit the cables together according to<br />
their colours.<br />
Rear light: Remove the cables between<br />
the rear light and the car board according<br />
to fig. 5 . Slightly bend down the catch<br />
hook (fig. 6 ) and pull up the light board.<br />
Insert the light board until the catch hook<br />
latches in (fig. 7 ) and fit the cables<br />
together according to their colours.<br />
Remplacement de la<br />
platine d’éclairage<br />
4<br />
ATTENTION ! Les platines d’éclairage peuvent<br />
être vissées à fond selon le modèle.<br />
Phares avant : Pour remplacer les platines<br />
d’éclairages, dévisser la partie supérieure de<br />
la voiture du châssis. Dévisser l’essieu avant<br />
comme le montre la Figure 1 et débrancher<br />
le câble reliant les phares avant à la platine<br />
de la voiture (Fig. 2 ). Plier le crochet à<br />
cliquet (Fig. 3 ) légèrement vers le bas et<br />
extirper la platine d’éclairage en la tirant vers<br />
le haut. Insérer la platine d’éclairage (Fig. 4 )<br />
jusqu’à enclenchement du crochet à cliquet.<br />
Revisser l’essieu avant et reconnecter les<br />
câbles en respectant le code couleur.<br />
Phares arrière : Débrancher le câble reliant<br />
les phares avant à la platine de la voiture,<br />
comme indiqué à la Figure 5 . Plier le crochet<br />
à cliquet (Fig. 6 ) légèrement vers le bas et<br />
extirper la platine d’éclairage en la tirant vers<br />
le haut. Insérer la platine d’éclairage jusqu’à<br />
enclenchement du crochet à cliquet (Fig. 7 )<br />
et reconnecter les câbles en respectant le<br />
code couleur.<br />
25<br />
5<br />
Cambio de la placa<br />
de luz<br />
6<br />
¡ATENCIÓN! En función del modelo, pueden<br />
atornillarse las placas de luz.<br />
Luz frontal:<br />
Para cambiar las placas de luz, desatornillar<br />
la parte superior del vehículo del chasis.<br />
Desenroscar el eje delantero conforme a<br />
la fig. 1 y soltar los cables entre la luz<br />
frontal y la placa del vehículo (fig. 2 ).<br />
Doblar ligeramente hacia abajo el gancho<br />
elástico (fig. 3 ) y retirar la placa de luz<br />
hacia arriba. Insertar la nueva placa de<br />
luz (fig. 4 ) hasta que encaje el gancho<br />
elástico. Volver a atornillar el eje delantero<br />
y conectar los cables conforme a su color.<br />
Luz trasera:<br />
Soltar los cables entre la luz trasera y la<br />
placa del vehículo conforme a la fig. 5 .<br />
Doblar ligeramente el gancho elástico hacia<br />
abajo (fig. 6 ) y retirar la placa de luz<br />
hacia arriba. Insertar la nueva placa de luz<br />
hasta que encaje el gancho elástico (fig.<br />
7 ) y conectar el cable según sus colores.<br />
Mudança da placa<br />
de luz<br />
7<br />
ATENÇÃO! A depender do modelo, pode<br />
ser que as placas de luz estejam fixadas<br />
por parafuso.<br />
Luz dianteira: Para substituir as placas<br />
de luz, desaparafusar a parte superior do<br />
veículo do chassis. Desaparafusar o eixo<br />
dianteiro conforme a figura 1 e soltar os<br />
cabos entre a luz dianteira e a placa electrónica<br />
do veículo (fig. 2 ). Pressionar levemente<br />
o gancho (fig. 3 ) para baixo e puxar<br />
a placa de luz para cima. Colocar a placa<br />
de luz (fig. 4 ) até que o gancho encaixe.<br />
Aparafusar novamente o eixo dianteiro e<br />
ligar os cabos de acordo as suas cores.<br />
Luz traseira: Soltar os fios entre a luz<br />
traseiro e a placa electrónica do veículo<br />
conforme mostrado na figura 5 . Pressionar<br />
levemente o gancho (fig. 6 ) para baixo<br />
e puxar a placa de luz para cima. Colocar<br />
a placa de luz, de modo que o gancho<br />
encaixe (fig. 7 ) e ligar os cabos de acordo<br />
com suas cores.