TCM Endo III - Dentdeal-shop.de
TCM Endo III - Dentdeal-shop.de
TCM Endo III - Dentdeal-shop.de

Create successful ePaper yourself
Turn your PDF publications into a flip-book with our unique Google optimized e-Paper software.
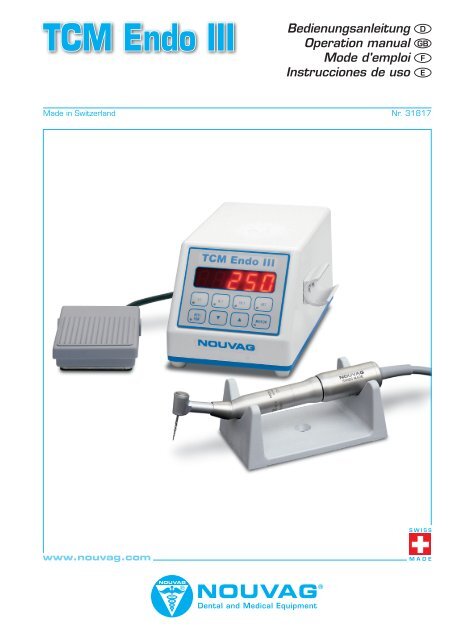
<strong>TCM</strong> <strong>Endo</strong> <strong>III</strong><br />
Bedienungsanleitung D<br />
Operation manual GB<br />
Mo<strong>de</strong> d'emploi F<br />
Instrucciones <strong>de</strong> uso E<br />
Ma<strong>de</strong> in Switzerland Nr. 31817<br />
www.nouvag.com<br />
NOUVAG<br />
®
Herzlichen Glückwunsch zum Kauf eines Produktes <strong>de</strong>r Firma NOUVAG AG. Wir freuen uns, dass<br />
Sie sich für ein NOUVAG Erzeugnis entschie<strong>de</strong>n haben und danken Ihnen für Ihr entgegengebrachtes<br />
Vertrauen.<br />
Diese Bedienungsanleitung wird Sie mit <strong>de</strong>m Gerät und seinen Eigenschaften vertraut machen,<br />
damit eine möglichst lange und problemlose Funktion gewährleistet wer<strong>de</strong>n kann.<br />
Im Anhang fin<strong>de</strong>n Sie die Konformitätserklärung und unsere autorisierten Servicestellen.<br />
• Bitte lesen Sie diese Anleitung vor Inbetriebnahme aufmerksam durch!<br />
Congratulations on your purchase of a NOUVAG AG product. Thank you for the confi<strong>de</strong>nce shown<br />
in our products.<br />
Please consult the instruction manual for the use and maintenance of the <strong>de</strong>vice in or<strong>de</strong>r to ensure<br />
that it will function properly and efficiently for many years.<br />
You will find the conformity statement and list of authorized service representatives attached.<br />
• Before operating, please read instructions carefully!<br />
Félicitations vous venez d’acheter un produit NOUVAG AG. Merci <strong>de</strong> la confiance que vous<br />
montrez en nos produits.<br />
Merci <strong>de</strong> consulter le mo<strong>de</strong> d’emploi pour l’utilisation et l’entretien <strong>de</strong> cet appareil <strong>de</strong> manière à<br />
vous assurer qu’il fonctionnera correctement et efficacement pendant <strong>de</strong> nombreuses années.<br />
Vous trouverez ci-joint les déclarations <strong>de</strong> conformité et la liste <strong>de</strong>s agents agréés pour l’entretien.<br />
• Lire soigneusement les instructions avant utilisation!<br />
Muchas gracias por la compra <strong>de</strong> un producto NOUVAG AG.<br />
Felicida<strong>de</strong>s por la elección y la confianza <strong>de</strong>positada en nuestros productos.<br />
Para garantizar una función dura<strong>de</strong>ra y eficiente <strong>de</strong>l aparato, por favor consultar el manual <strong>de</strong><br />
instrucciones.<br />
El Certificado <strong>de</strong> Conformidad y la lista <strong>de</strong> Centros <strong>de</strong> Servicio se encuentran en el apéndice.<br />
• Por favor leer las instrucciones <strong>de</strong>tenidamente antes <strong>de</strong> poner en marcha el aparato!
<strong>TCM</strong> <strong>Endo</strong> <strong>III</strong><br />
INHALTSVERZEICHNIS<br />
1 Produktebeschreibung 2<br />
1.1 Einsatz und Funktionsweise 2<br />
1.2 Technische Daten 2<br />
1.3 Umgebungsbedingungen für Betrieb 2<br />
1.4 Umgebungsbedingungen für Transport und Lagerung 2<br />
1.5 Geräteaufschriften 2<br />
2 Sicherheitshinweise 3<br />
3 Lieferumfang 3<br />
4 Inbetriebnahme 3<br />
5 Bedienung 4<br />
5.1 Das Steuergerät <strong>TCM</strong> <strong>Endo</strong> <strong>III</strong> 4<br />
5.2 Das Fusspedal 5<br />
5.3 Automatic Limiter (AL) 5<br />
5.4 Automatic Protection (AP) 5<br />
5.5 Speichern <strong>de</strong>r Einstellungen 6<br />
6 Reinigung, Desinfektion und Sterilisation 6<br />
6.1 Steuergerät und Fusspedal 6<br />
6.2 Mikromotor <strong>Endo</strong> 7<br />
7 Störungen und Fehlersuche 8<br />
8 Hinweis zur Entsorgung 8<br />
No. 31817 40/10 1
<strong>TCM</strong> <strong>Endo</strong> <strong>III</strong><br />
1 Produktebeschreibung<br />
1.1 Einsatz und Funktionsweise<br />
Der <strong>TCM</strong> <strong>Endo</strong> ist ein mikroprozessorgesteuertes <strong>Endo</strong>dontie-Gerät, das die Drehzahl und das<br />
Drehmoment <strong>de</strong>s Motors regelt.<br />
Die Drehzahl wird bei je<strong>de</strong>r Belastung konstant gehalten bis das maximal eingestellte Drehmoment<br />
erreicht wird. Der Drehmomentschutz (AP) gibt die Sicherheit, dass die Rimmer nicht brechen. Bei<br />
Erreichen <strong>de</strong>s vorgewählten Drehmoments schaltet die Drehrichtung <strong>de</strong>s Motors sofort in <strong>de</strong>n<br />
Rückwärtslauf. Nach einer Umdrehung wird wie<strong>de</strong>r in <strong>de</strong>n normalen Vorwärtslauf geschaltet.<br />
Damit wird eine schnelle und effektive Wurzelkanalaufbereitung garantiert.<br />
1.2 Technische Daten<br />
Spannung: ...................................... 115 V∼/ 50-60 Hz o<strong>de</strong>r 230 V∼/ 50-60 Hz (Siehe Geräteaufkleber!)<br />
Sicherung Stromversorgung:........................................... 2 x T2A (bei 115 V∼) und 2 x T1A (bei 230 V∼)<br />
Leistung: ..........................................................................................................................................40 VA<br />
Typ: ......................................................................................................................................................... B<br />
Drehzahl: .................................................................................................................. 1´200 - 16´000 Upm<br />
Masse (H x B x T): ......................................................................................................90 x 100 x 170 mm<br />
Nettogewicht: ......................................................................................................................................2 kg<br />
1.3 Umgebungsbedingungen für<br />
Betrieb<br />
Feuchtigkeit: ............................. max. 80 %<br />
Temperatur: .............................10 bis 30°C<br />
Druck: ............................ 800 bis 1060 hPa<br />
1.4 Umgebungsbedingungen für<br />
Transport und Lagerung<br />
Rel. Luftfeuchtigkeit:.........................max. 90%<br />
Temperatur:..................................... 0 bis 60°C<br />
Luftdruck:..............................700 bis 1060 hPa<br />
1.5 Geräteaufschriften<br />
: Achtung: Begleitpapiere beachten<br />
: Anwendungsteil <strong>de</strong>s Typs B<br />
: Zertifiziert von Canadian Standards<br />
Associaton (CSA) für Kanada und<br />
USA<br />
1275 : EU-Konformitätszeichen<br />
: Alte Elektro- und Elektronikgeräte<br />
müssen getrennt entsorgt wer<strong>de</strong>n<br />
und dürfen nicht <strong>de</strong>m Hausmüll<br />
zugeführt wer<strong>de</strong>n.<br />
2 No. 31817 40/10
<strong>TCM</strong> <strong>Endo</strong> <strong>III</strong><br />
2 Sicherheitshinweise<br />
Ihre Sicherheit, die Ihres Teams und selbstverständlich die Sicherheit Ihrer Patienten ist uns ein<br />
grosses Anliegen. Daher ist es unerlässlich, die folgen<strong>de</strong>n Hinweise zu beachten:<br />
• Der <strong>TCM</strong> <strong>Endo</strong> <strong>III</strong> darf nur von fachkundigem und geschultem Personal bedient<br />
wer<strong>de</strong>n!<br />
• Vergewissern Sie sich, dass die Betriebsspannung und die Netzspannung<br />
übereinstimmen!<br />
• Die Verwendung von Fremdprodukten liegt in <strong>de</strong>r Verantwortung <strong>de</strong>s<br />
Betreibers!<br />
• Reparaturen dürfen nur durch autorisierte NOUVAG Service-Techniker<br />
vorgenommen wer<strong>de</strong>n!<br />
• Unsachgemässer Gebrauch und Reparatur <strong>de</strong>s Gerätes, sowie die<br />
Nichteinhaltung unserer Anweisungen, entbin<strong>de</strong>t uns von je<strong>de</strong>r<br />
Garantieleistung o<strong>de</strong>r an<strong>de</strong>ren Ansprüchen!<br />
3 Lieferumfang<br />
1520. Steuergerät <strong>TCM</strong> <strong>Endo</strong> <strong>III</strong> ................................................................................................... 1 Stück<br />
1823. Mikromotor <strong>Endo</strong>................................................................................................................. 1 Stück<br />
1488. On / Off - Fussschalter ........................................................................................................ 1 Stück<br />
4 Inbetriebnahme<br />
1) On/Off-Fusspedal bei Buchse “FOOT“ anschliessen<br />
(→ Falls Motorsteuerung durch Fusspedal erwünscht)<br />
2) Motor bei Buchse “MOTOR“ anschliessen.<br />
3) Hand- o<strong>de</strong>r Winkelstück mit Werkzeugspitze auf Motor stecken.<br />
4) Netzverbindung herstellen.<br />
5) Steuergerät mit grünem “ON / OFF“-Hauptschalter auf <strong>de</strong>r Rückseite einschalten.<br />
6) Untersetzung und gewünschte Drehzahl einstellen.<br />
7) “MOTOR“-Taste drücken o<strong>de</strong>r Trittplatte runterdrücken (falls Fusspedal angeschlossen) um Motor<br />
in Betrieb zu setzen.<br />
No. 31817 40/10 3
<strong>TCM</strong> <strong>Endo</strong> <strong>III</strong><br />
5 Bedienung<br />
5.1 Das Steuergerät <strong>TCM</strong> <strong>Endo</strong> <strong>III</strong><br />
Gerät einschalten:<br />
Mit <strong>de</strong>m grünen Hauptschalter “ON/OFF“ (Rückseite!) wird das Steuergerät ein- respektiv<br />
ausgeschaltet.<br />
Display:<br />
Digitalanzeige <strong>de</strong>r aktuellen Drehzahl und <strong>de</strong>s Drehmoments <strong>de</strong>s Werkzeugs.<br />
<strong>TCM</strong> <strong>Endo</strong><br />
1 :1 8 :1 16:1 ATC<br />
REV/<br />
FORW<br />
MOTOR<br />
Tastenfunktionen:<br />
„Motor“:<br />
„▲“:<br />
„▼“:<br />
Motor ein- und ausschalten (Lampe leuchtet wenn Motor in Betrieb)<br />
Drehzahl o<strong>de</strong>r Drehmoment erhöhen<br />
Drehzahl o<strong>de</strong>r Drehmoment reduzieren<br />
„Rev/Forw“: Drehrichtung vom Motor än<strong>de</strong>rn → Bei Betrieb im Rückwärtsmodus ertönt ein<br />
akustisches Signal<br />
„1:1“: für Arbeit mit 1:1-Handstück<br />
Drehzahl: 1´200 bis 16´000 Upm<br />
Drehmoment: 1, 2, 3, 4, 5, 7, 10, 13, 16, 19 Nmm<br />
„8:1“: für Arbeit mit 8:1-Winkelstück<br />
Drehzahl: 150 bis 2’000 Upm<br />
Drehmoment: 2, 4, 6, 10, 15, 20, 25, 30, 40, 50 Nmm<br />
„16:1“: für Arbeit mit 16:1-Winkelstück<br />
Drehzahl: 75 bis 1’000 Upm<br />
Drehmoment: 5, 10, 15, 20, 25, 30, 40, 50, 75, 100 Nmm<br />
„ATC“:<br />
AL- und AP- Funktion einstellen<br />
<br />
Die<br />
Taste „Motor“ funktioniert nur wenn Fusspedal nicht angeschlossen ist.<br />
4 No. 31817 40/10
<strong>TCM</strong> <strong>Endo</strong> <strong>III</strong><br />
5.2 Das Fusspedal<br />
Der <strong>TCM</strong> <strong>Endo</strong> <strong>III</strong> kann mit o<strong>de</strong>r ohne Fusspedal betrieben wer<strong>de</strong>n. Mit <strong>de</strong>r Trittplatte <strong>de</strong>s Fusspedals<br />
wird <strong>de</strong>r Motor gestartet und gestoppt:<br />
Trittplatte nicht gedrückt: ................Motor ausgeschaltet<br />
Trittplatte runtergedrückt: ...............Motor eingeschaltet<br />
Die Drehgeschwindigkeit <strong>de</strong>s Werkzeugs entspricht <strong>de</strong>rjenigen, die beim Steuergerät eingestellt wird.<br />
5.3 Automatic Limiter (AL)<br />
Mit <strong>de</strong>m Automatic Limiter (AL) wird das Drehmoment am Werkzeug begrenzt. Wenn <strong>de</strong>r eingestellte<br />
Drehmomentwert erreicht ist, fällt die Drehzahl bis auf Null Umdrehungen ab, die Kraft am Werkzeug<br />
bleibt jedoch bestehen.<br />
Die Werte sind immer in Nmm angegeben (Bsp. [AL 20] → Werkzeug wird mit max. 20 Nmm<br />
belastet).<br />
<br />
AL<br />
ist in folgen<strong>de</strong>n Bereichen einstellbar:<br />
1:1 → 1 bis 19 Nmm<br />
8:1 → 2 bis 50 Nmm<br />
16:1 → 5 bis 100 Nmm<br />
Einstellen <strong>de</strong>s AL:<br />
1) Taste “ATC SET” drücken. Im Display erscheint die Drehmomentauswahl (z.B. [AL 20]).<br />
2) Mit <strong>de</strong>n Tasten “▲” und “▼” können Sie <strong>de</strong>n gewünschten Drehmomentwert einstellen.<br />
3) Taste “ATC SET” drücken damit Drehzahlanzeige wie<strong>de</strong>r im Display erscheint.<br />
<br />
Falls<br />
im Display [AP.....] erscheint:<br />
Taste “▼” drücken bis [AL.....] im Display erscheint.<br />
Wenn AL-Modus aktiv ist, leuchtet grüne Lampe bei Taste “ATC” nicht.<br />
5.4 Automatic Protection (AP)<br />
Der Automatic Protection (AP) ist eine spezielle Funktion für Rimmer, um diese vor <strong>de</strong>m Brechen zu<br />
schützen. Bei Erreichen <strong>de</strong>s vorgewählten Drehmoments schaltet die Drehrichtung <strong>de</strong>s Motors sofort in<br />
<strong>de</strong>n Rückwärtslauf. Nach einer Umdrehung <strong>de</strong>s Werkzeugs wird wie<strong>de</strong>r automatisch in <strong>de</strong>n<br />
Vorwärtslauf geschaltet. Die Werte sind immer in Nmm angegeben (Bsp. [AP 20] → Werkzeug wird<br />
mit max. 20 Nmm belastet).<br />
<br />
AP<br />
ist in folgen<strong>de</strong>n Bereichen einstellbar:<br />
1:1 → 1 bis 19 Nmm<br />
8:1 → 2 bis 50 Nmm<br />
16:1 → 5 bis 100 Nmm<br />
No. 31817 40/10 5
<strong>TCM</strong> <strong>Endo</strong> <strong>III</strong><br />
Einstellen <strong>de</strong>r AP:<br />
1) Taste “ATC” drücken. Im Display erscheint die Drehmomentauswahl (z.B. [AP 20]).<br />
2) Mit <strong>de</strong>n Tasten “▲” und “▼” können Sie <strong>de</strong>n gewünschten Drehmomentwert einstellen.<br />
3) Taste “ATC SET” drücken damit Drehzahlanzeige wie<strong>de</strong>r im Display erscheint.<br />
<br />
Falls<br />
im Display [AL.....] erscheint:<br />
Taste “▼” drücken bis [AP.....] im Display erscheint.<br />
Wenn AP-Modus aktiv ist, leuchtet grüne Lampe bei Taste “ATC”.<br />
AP-Modus funktioniert nur, wenn Motor vorwärts dreht (LED bei “Rev/Forw“<br />
leuchtet nicht).<br />
5.5 Speichern <strong>de</strong>r Einstellungen<br />
Beim Einschalten <strong>de</strong>s Gerätes erscheinen automatisch die Einstellungen <strong>de</strong>s letzten Gebrauchs.<br />
6 Reinigung, Desinfektion und Sterilisation<br />
Für die Pflege <strong>de</strong>s Materials sind insbeson<strong>de</strong>re folgen<strong>de</strong> wichtige Punkte zu beachten:<br />
• Reinigung, Desinfektion und Sterilisation nach je<strong>de</strong>r Behandlung durchführen!<br />
• Keine lösungsmittelhaltigen Reinigungsmittel verwen<strong>de</strong>n!<br />
• Material immer in Sterilgut - Einzelverpackung autoklavieren!<br />
• Sterilisationsverpackungen dürfen nur bis zu 80% gefüllt sein!<br />
• Material bei maximal 135°C autoklavieren!<br />
• Falls sterilisiertes Material nicht sofort zum Einsatz kommt, sollte es auf <strong>de</strong>r<br />
Verpackung mit Sterilindikator und Sterildatum beschriftet wer<strong>de</strong>n!<br />
6.1 Steuergerät und Fusspedal<br />
Steuergerät und Fusspedal kommen mit <strong>de</strong>m Patienten nicht in Berührung:<br />
Nur äusserliche Wisch<strong>de</strong>sinfektion mit mikrobiologisch geprüften Flächen<strong>de</strong>sinfektionsmitteln o<strong>de</strong>r<br />
80%-igem Äthyl-Alkohol verwen<strong>de</strong>n.<br />
Steuergerät nur mit Lappen abwischen. Keine Sprüh<strong>de</strong>sinfektion, da Gerät nicht<br />
abgedichtet!<br />
6 No. 31817 40/10
<strong>TCM</strong> <strong>Endo</strong> <strong>III</strong><br />
6.2 Mikromotor <strong>Endo</strong><br />
Einschränkung <strong>de</strong>r<br />
Wie<strong>de</strong>raufbereitung<br />
Häufiges Wie<strong>de</strong>raufbereiten hat nur geringe Auswirkungen auf die Mikromotoren.<br />
Das En<strong>de</strong> <strong>de</strong>r Produktlebensdauer wird normalerweise von Verschleiss und<br />
Beschädigung durch Gebrauch bestimmt.<br />
ANWEISUNGEN<br />
Am Gebrauchsort<br />
Aufbewahrung und<br />
Transport<br />
Reinigungsvorbereitung<br />
Automatische<br />
Reinigung und<br />
Desinfektion<br />
Manuelle Reinigung<br />
Manuelle Desinfektion<br />
Trocknung<br />
Kontrolle und Wartung<br />
Oberflächenverschmutzung mit einem Einmaltuch/Papiertuch entfernen.<br />
Keine beson<strong>de</strong>ren Anfor<strong>de</strong>rungen. Lange Wartezeiten bis zur Aufbereitung wegen<br />
Antrocknungs- und Korrosionsgefahr vermei<strong>de</strong>n.<br />
Anschmutzungen an Mikromotor und Kabel mit Einmaltuch/Papiertuch<br />
entfernen.<br />
Die automatische Reinigung <strong>de</strong>s Mikromotors mittels Reinigungs-<br />
/Desinfektionsgerät ist nicht gestattet.<br />
Ausstattung: neutrales Reinigungsmittel, weiche Bürste, fliessen<strong>de</strong>s Wasser<br />
Verfahren:<br />
1) Oberflächenverschmutzung von Mikromotor, Motorkappe mit Kabel spülen<br />
und wegbürsten.<br />
2) Reinigungsmittel mit Bürste auf alle Oberflächen und Zwischenräume<br />
auftragen.<br />
3) Mikromotor und Motorkappe mit Kabel unter fliessen<strong>de</strong>m Wasser gründlich<br />
abspülen.<br />
Für die manuelle Desinfektion Mikromotor und Motorkappe mit Kabel mit<br />
Desinfektionsspray auf Äthylalkoholbasis einsprühen.<br />
Wenn kein Trocknungsprogramm im Reinigungs-/Desinfektionsgerät zur<br />
Verfügung steht, ist <strong>de</strong>r Mikromotor manuell o<strong>de</strong>r im Trockenschrank zu trocknen.<br />
Sichtprüfung auf Beschädigung, Korrosion und Verschleiss durchführen.<br />
Sterilisierzapfen aufsetzen.<br />
Verpackung<br />
Sterilisation<br />
Lagerung<br />
Einzeln: Mikromotor in Sterilgut-Einzelverpackung verpacken. Der Beutel muss<br />
gross genug sein, damit die Versiegelung nicht unter Spannung steht.<br />
Sets: Mikromotoren in dafür vorgesehene Trays einsortieren o<strong>de</strong>r auf Allzweck-<br />
Sterilisationstrays legen.<br />
Im Vakuum-Autoklav bei max. 135°C während min<strong>de</strong>stens 5 Minuten*<br />
autoklavieren. Bei <strong>de</strong>r Sterilisation von mehreren Instrumenten in einem<br />
Sterilisationszyklus darf die Maximalbeladung <strong>de</strong>s Sterilisators nicht überschritten<br />
wer<strong>de</strong>n. Bei Autoklaven ohne Nachvakuum muss Trocknungsphase erfolgen.<br />
Mikromotor im Beutel min<strong>de</strong>stens 1 Stun<strong>de</strong> bei Raumtemperatur, mit Papierseite<br />
nach oben, trocknen lassen.<br />
* Die Temperaturhaltezeiten richten sich nach <strong>de</strong>n län<strong>de</strong>rgültigen Richtlinien und<br />
Normen.<br />
Keine beson<strong>de</strong>ren Anfor<strong>de</strong>rungen. Falls sterilisierter Mikromotor nach erfolgter<br />
Sterilisation nicht sofort zum Einsatz kommt, sollte er auf <strong>de</strong>r Verpackung mit<br />
Sterilindikator und Sterildatum beschriftet wer<strong>de</strong>n.<br />
Die vorgängig aufgeführten Anweisungen wur<strong>de</strong>n von <strong>de</strong>r NOUVAG AG für die Vorbereitung eines Medizinprodukts zu <strong>de</strong>ssen Wie<strong>de</strong>rverwendung<br />
als geeignet validiert. Dem Aufbereiter obliegt die Verantwortung, dass die tatsächlich durchgeführte Aufbereitung mit verwen<strong>de</strong>ter Ausstattung,<br />
Materialien und Personal in <strong>de</strong>r Aufbereitungseinrichtung die gewünschten Ergebnisse erzielt. Dafür sind normalerweise Validierung und Routineüberwachung<br />
<strong>de</strong>s Verfahrens erfor<strong>de</strong>rlich. Ebenso sollte je<strong>de</strong> Abweichung von <strong>de</strong>n bereitgestellten Anweisungen durch <strong>de</strong>n Aufbereiter sorgfältig<br />
auf ihre Wirksamkeit und möglichen nachteiligen Folgen ausgewertet wer<strong>de</strong>n.<br />
No. 31817 40/10 7
<strong>TCM</strong> <strong>Endo</strong> <strong>III</strong><br />
7 Störungen und Fehlersuche<br />
Störung Ursache Behebung<br />
Gerät läuft nicht Netzstecker nicht eingesteckt Netzstecker einstecken<br />
Falsche Betriebsspannung<br />
Fusspedal funktioniert nicht Fusspedal nicht richtig<br />
angeschlossen<br />
Mikromotor läuft nicht<br />
Steuergerät nicht eingeschaltet<br />
Motor nicht eingeschaltet<br />
Motor nicht angeschlossen<br />
Motor nicht richtig montiert<br />
Netzspannung überprüfen<br />
→ siehe Kennzeichnung auf<br />
Gerätekleber<br />
Fusspedalkabel an Rückseite <strong>de</strong>s<br />
Steuergerätes einstecken<br />
Hauptschalter “ON/OFF“ auf ”ON”-<br />
Position schalten<br />
Motor durch „Motor“-Taste o<strong>de</strong>r durch<br />
Fusspedal einschalten<br />
Motorkabel an Steuergerät<br />
anschliessen<br />
Mikromotor fest an Handteil drücken bis<br />
er einschnappt<br />
Kann ein Fehler nicht behoben wer<strong>de</strong>n, wen<strong>de</strong>n Sie sich bitte an <strong>de</strong>n Lieferanten o<strong>de</strong>r an eine<br />
autorisierte Servicestelle. Die Anschriften fin<strong>de</strong>n Sie auf <strong>de</strong>r letzten Seite <strong>de</strong>r Bedienungsanleitung.<br />
8 Hinweis zur Entsorgung<br />
Bei <strong>de</strong>r Entsorgung von Gerät, Gerätbestandteilen und Zubehör müssen die erlassenen Vorschriften<br />
<strong>de</strong>s Gesetzgebers befolgt wer<strong>de</strong>n.<br />
Im Sinne <strong>de</strong>s Umweltschutzes können Altgeräte an <strong>de</strong>n Händler o<strong>de</strong>r <strong>de</strong>n Hersteller zurückgegeben<br />
wer<strong>de</strong>n.<br />
8 No. 31817 40/10
<strong>TCM</strong> <strong>Endo</strong> <strong>III</strong><br />
TABLE OF CONTENTS<br />
1 Description 2<br />
1.1 Operation and functions 2<br />
1.2 Technical Data 2<br />
1.3 Operating Environment 2<br />
1.4 Transport and Storage Environment 2<br />
1.5 Description on <strong>de</strong>vice 2<br />
2 Safety measures 3<br />
3 Shipping contents 3<br />
4 Set-up 3<br />
5 Operation 4<br />
5.1 The <strong>TCM</strong> <strong>Endo</strong> <strong>III</strong> unit 4<br />
5.2 The footswitch 5<br />
5.3 Automatic Limiter (AL) 5<br />
5.4 Automatic Protection (AP) 5<br />
5.5 Memory 6<br />
6 Disinfection, Cleaning and sterilization 6<br />
6.1 Control unit and footswitch 6<br />
6.2 Mikromotor <strong>Endo</strong> 7<br />
7 Troubleshooting 8<br />
8 Disposal 8<br />
No. 31817 40/10 1
<strong>TCM</strong> <strong>Endo</strong> <strong>III</strong><br />
1 Description<br />
1.1 Operation and functions<br />
The <strong>TCM</strong> <strong>Endo</strong> is a microprocessor controlled endodontic electronic motor system.<br />
The slow speed, high torque rotary instrument uses an electronic torque controlled motor to achieve<br />
a faster and easier root canal preparation. The speed is held constant un<strong>de</strong>r varying loads until the<br />
selected torque level is reached.<br />
The protection mo<strong>de</strong> (AP) provi<strong>de</strong>s an automatic protection against file breakage. When the file<br />
reaches the selected torque level, the motor reverses immediately to protect the file, and then returns to<br />
forward to finish the root canal preparation. With use of the (AP) mo<strong>de</strong>, file stress is greatly reduced.<br />
1.2 Technical Data<br />
Voltage: ........................................................ 115 V∼ / 50-60 Hz or 230 V∼/ 50-60 Hz (see <strong>de</strong>vice label!)<br />
Fuses:............................................................................... 2 x T2A (for 115 V∼) and 2 x T1A (for 230 V∼)<br />
Power: ..............................................................................................................................................40 VA<br />
Type: ..................................................................................................................... Application part type B<br />
Speed: ....................................................................................................................... 1,200 – 16,000 rpm<br />
Dimension: ..................................................................................................................90 x 100 x 170 mm<br />
Net weight: ..........................................................................................................................................2 kg<br />
1.3 Operating Environment<br />
Relative Humidity:....................... max. 80%<br />
Temperature: ............................. 10 to 40°C<br />
Barometric Pressure:........800 to 1060 hPa<br />
1.4 Transport and Storage Environment<br />
Relative Humidity: ............................max. 90%<br />
Temperature:.....................................0 to 60°C<br />
Barometric Pressure: ............ 700 to 1060 hPa<br />
1.5 Description on <strong>de</strong>vice<br />
: Attention: Read instructions first<br />
: Application part Type B<br />
: Certified by the Canadian<br />
Standards Association (CSA) for<br />
Canada and USA<br />
1275 : Sign of EU-Conformity<br />
: Old electrical and electronic<br />
equipment must be disposed<br />
separately and may not be<br />
inclu<strong>de</strong>d in regular domestic<br />
waste.<br />
2 No. 31817 40/10
<strong>TCM</strong> <strong>Endo</strong> <strong>III</strong><br />
2 Safety measures<br />
Your safety, the safety of your team, and, it goes without saying, the safety of your patients is for<br />
Nouvag AG the first priority. It is therefore vital that the following measures be strictly observed:<br />
• The <strong>TCM</strong> <strong>Endo</strong> <strong>III</strong> should be operated by qualified personnel only!<br />
• Check the correct operation voltage on the rating plate!<br />
• Responsibility for the use of accessories, parts or assemblies from other<br />
manufacturers rest solely with the user!<br />
• Repairs are to be carried out by authorized Nouvag AG service technicians<br />
only!<br />
• Nouvag AG cannot be held liable for any malfunction of the <strong>TCM</strong> <strong>Endo</strong> <strong>III</strong>, or<br />
performance failure and/or its <strong>de</strong>signed or <strong>de</strong>sired utility, nor can Nouvag AG<br />
be held liable for any injuries to persons or animals, in any case when the<br />
<strong>de</strong>vice is miss-used or not operated, applied or maintained in strict<br />
accordance with the user/owner instructions set out in the operating manual.<br />
In the event of any doubt or question, the user is to contact Nouvag AG or its<br />
lawful representative for clarification or assistance!<br />
3 Shipping contents<br />
1520.... Control unit <strong>TCM</strong> <strong>Endo</strong> <strong>III</strong> ..................................................................................................1 piece<br />
1823.... Micromotor <strong>Endo</strong> ...............................................................................................................1 piece<br />
1488.... On / Off -Footswitch...........................................................................................................1 piece<br />
4 Set-up<br />
1) Connect On/Off-footswicht to “FOOT“<br />
(→ when operating unit with footswitch)<br />
2) Connect the micromotor to “MOTOR“<br />
3) Attach handpiece or contra angle<br />
4) Attach AC cord into the plug in the back of the unit and the electrical outlet<br />
5) Turn on green power “ON / OFF“ switch (rear of unit)<br />
6) Adjust <strong>de</strong>sired reduction and speed.<br />
7) Press “MOTOR“-key or step on the foot switch (if foot switch is connected) to start the micromotor.<br />
No. 31817 40/10 3
8)<br />
<strong>TCM</strong> <strong>Endo</strong> <strong>III</strong><br />
5 Operation<br />
5.1 The <strong>TCM</strong> <strong>Endo</strong> <strong>III</strong> unit<br />
Starting the <strong>de</strong>vice:<br />
Press green “ON/OFF“ switch (rear of unit).<br />
Display:<br />
The digital display indicates the current drill speed or the selected torque level.<br />
<strong>TCM</strong> <strong>Endo</strong><br />
1 :1 8 :1 16:1 ATC<br />
REV/<br />
FORW<br />
MOTOR<br />
Keypad/Control functions:<br />
„Motor“:<br />
„▲“:<br />
„▼“:<br />
„Rev/Forw“:<br />
Switch On/Off for micromotor (green light illuminates when the motor is in operation)<br />
Speed up or increase torque<br />
Speed down or reduce torque<br />
To change motor direction of rotation → a warning tone will sound when the motor<br />
operates in reverse mo<strong>de</strong><br />
„1:1“: Press this key if using handpiece 1:1<br />
Speed : from 1,200 to 16,000 rpm<br />
Torque: 1, 2, 3, 4, 5, 7, 10, 13, 16, 19 Nmm<br />
„8:1“: Press this key if using contra angle 8:1<br />
Speed: from 150 to 2,000 rpm<br />
Torque: 2, 4, 6, 10, 15, 20, 25, 30, 40, 50 Nmm<br />
„16:1“: Press this key if using contra angle 16:1<br />
Speed: from 75 to 1’000 Upm<br />
Torque: 5, 10, 15, 20, 25, 30, 40, 50, 75, 100 Nmm<br />
„ATC“:<br />
AL- and AP- mo<strong>de</strong> selection for <strong>de</strong>sired torque function<br />
<br />
The<br />
„Motor“ key functions only when the foot switch is not connected<br />
4 No. 31817 40/10
<strong>TCM</strong> <strong>Endo</strong> <strong>III</strong><br />
5.2 The footswitch<br />
The <strong>TCM</strong> <strong>Endo</strong> <strong>III</strong> can be operated with or without footswitch. Press footswitch to start the motor.<br />
Footswitch not pressed:..................Motor off<br />
Footswitch fully pressed: ................Motor on<br />
The tool speed corresponds to the speed adjusted on the control unit.<br />
5.3 Automatic Limiter (AL)<br />
The Automatic Limiter (AL) limits the torque level applied to the instrument. If the selected torque level<br />
is reached, the speed will drop to zero rpm. A torque level equal to the selected setting will still be<br />
exerted against the file.<br />
All torque values are shown in Nmm (for example a setting of AL 20→ indicates that the instrument can<br />
be loa<strong>de</strong>d to maximum of 20 Nmm before rotations stops).<br />
<br />
The<br />
Automatic Limiter (AL) can be adjusted in the following ranges:<br />
1:1 → from 1 to 19 Nmm<br />
8:1 → from 2 to 50 Nmm<br />
16:1 → from 5 to 100 Nmm<br />
Adjusting the AL mo<strong>de</strong>:<br />
1) Press the key “ATC SET”. In the display appears the torque mo<strong>de</strong> set (for example [AL 20]).<br />
2) Pressing the keys “▲” and“▼” will increase and <strong>de</strong>crease the torque level respectively.<br />
3) By pressing the “ATC SET” briefly once more the digital display switches back automatically.<br />
<br />
If<br />
the display says [AP.....] :<br />
press the key “▼” to get back to [AL.....].<br />
The green light will illuminate when the AP - mo<strong>de</strong> is activated, the green light<br />
does not illuminate on the AL- mo<strong>de</strong>.<br />
5.4 Automatic Protection (AP)<br />
The automatic protection (AP) mo<strong>de</strong> is a special function against file breakage.<br />
When the selected torque level is reached, the motor reverses immediately to free the file and then<br />
returns automatically to forward operation.<br />
All torque values are shown in Nmm (for example a setting of AL 20→ indicates that the instrument can<br />
be loa<strong>de</strong>d to maximum of 20 Nmm before rotations stops).<br />
<br />
The<br />
automatic protection AP can be adjusted in the following ranges:<br />
1:1 → from 1 to 19 Nmm<br />
8:1 → from 2 to 50 Nmm<br />
16:1 → from 5 to 100 Nmm<br />
No. 31817 40/10 5
<strong>TCM</strong> <strong>Endo</strong> <strong>III</strong><br />
Adjusting the AP:<br />
1) Press the “ATC” key. In the display appears the torque mo<strong>de</strong> set (for example [AL 20]).<br />
2) Pressing the keys “▲” and“▼” will increase and <strong>de</strong>crease the torque level respectively.<br />
3) By pressing the “ATC SET” briefly once more the digital display switches back automatically.<br />
<br />
If<br />
the display says [AL.....] :<br />
press the key “▼” to get back to [AP.....].<br />
The green light “ATC” will illuminate when the AP-Modus is activated.<br />
The AP-Modus works only when the motor runs forward (the green light LED<br />
“Rev/Forw“ does not illuminate).<br />
5.5 Memory<br />
Once programmed, the preselected speed, torque and value setting will remain stored in memory, even<br />
when the motor is turned off.<br />
6 Disinfection, Cleaning and sterilization<br />
Please pay attention to the following important points for the maintenance of the <strong>de</strong>vice:<br />
• Clean, disinfect and sterilize the <strong>de</strong>vice and components after each use!<br />
• Do not use dissolving agents for cleaning<br />
• Autoclave material in transparent packaging!<br />
• Do not fill the sterilization bag more than 80%.<br />
• Autoclave material at 135°C maximum.<br />
• Sterilized material should be stored and tagged with sterilization date!<br />
6.1 Control unit and footswitch<br />
The control unit and the pedal do not come into contact with patients. Only clean the surface of the unit,<br />
do not use harsh cleaners or solvents for cleaning. Use 80% ethyl alcohol or microbiologically effective<br />
disinfectants.<br />
The control unit should be wiped with a clean, damp cloth only. No spray cleaners<br />
or disinfecting agents should be employed, as the control unit face is not<br />
watertight!<br />
6 No. 31817 40/10
<strong>TCM</strong> <strong>Endo</strong> <strong>III</strong><br />
6.2 Mikromotor <strong>Endo</strong><br />
Limitations on<br />
reprocessing<br />
Frequent reprocessing has only minimal effects on the micromotors. The end of product<br />
service life is normally <strong>de</strong>termined by wear and tear and damage through use.<br />
INSTRUCTIONS<br />
At the place of use<br />
Remove surface dirt with a disposable cloth/paper towel.<br />
Storage and transport No special requirements. Avoid long waiting times until processing due to risk of surface<br />
drying and corrosion.<br />
Preparation for<br />
cleaning<br />
Automatic cleaning<br />
and disinfection<br />
Remove any dirt on micromotor and cable with a disposable cloth/paper towel.<br />
Automatic cleaning of the micromotor using a cleaning/disinfection <strong>de</strong>vice is not permitted.<br />
Manual cleaning<br />
Manual disinfection<br />
Drying<br />
Inspection and<br />
maintenance<br />
Equipment required: neutral cleaning agent, soft brush, running water<br />
Procedure:<br />
1) Rinse and brush off surface dirt from micromotor, motor cover including cable.<br />
2) Apply cleaning agent with brush onto all surfaces and gaps.<br />
3) Thoroughly rinse off micromotor and motor cover including cable un<strong>de</strong>r running water.<br />
For the manual disinfection of micromotor and motor cover with cable, spray with ethyl<br />
alcohol-based disinfection spray.<br />
If no drying program is available in the cleaning/disinfection <strong>de</strong>vice, the micromotor should<br />
be dried manually or in the drying cabinet.<br />
Perform visual test for damage, corrosion and wear and tear. Put on sterilizing stopple.<br />
Packing<br />
Sterilization<br />
Storage<br />
Single: Pack micromotor in single sterile item pack. The bag must be big enough to<br />
prevent the seal from being live.<br />
Sets: Sort micromotors into the trays provi<strong>de</strong>d or place on all-purpose sterilization trays.<br />
Autoclave in the vacuum autoclave at a maximum of 135°C for at least 5 minutes*. When<br />
sterilizing several instruments in one sterilization cycle the maximum load of the sterilizer<br />
may not be excee<strong>de</strong>d. When autoclaving without a post vacuum a drying phase must<br />
follow. Allow micromotor to dry in the bag for at least 1 hour at room temperature, with<br />
paper si<strong>de</strong> facing up.<br />
* Temperature holding times follow the gui<strong>de</strong>lines and standards applicable in each<br />
country.<br />
No special requirements. Once sterilization is completed, if the sterilized micromotor<br />
cannot be used immediately it should be written on the pack with sterile indicator and<br />
sterile date.<br />
The instructions given above have been validated as suitable by NOUVAG AG for preparing a medical product for reuse. The onus is on the<br />
processor to ensure that the processing actually carried out with the equipment, materials and personnel used achieves the <strong>de</strong>sired results in the<br />
processing <strong>de</strong>vice. To this end, validation and routine monitoring of the procedure are normally required. Likewise, any <strong>de</strong>parture from the<br />
instructions provi<strong>de</strong>d by the processor should be evaluated carefully in terms of its effectiveness and possible <strong>de</strong>trimental consequences.<br />
No. 31817 40/10 7
<strong>TCM</strong> <strong>Endo</strong> <strong>III</strong><br />
7 Troubleshooting<br />
Problem Cause Solution<br />
Device does not operate at all<br />
Plug is not inserted properly<br />
Insert plug and check fitting<br />
Footswitch fails to function<br />
Micromotor does not run<br />
Wrong operating voltage<br />
Pedal not connected<br />
Control unit not turned on<br />
Motor not turned on<br />
Motor not connected<br />
Motor incorrectly attached<br />
Check mains voltage output<br />
→ please see operating voltage on the<br />
rating plate<br />
Plug pedal cable into rear of control unit<br />
Turn main switch ON/OFF<br />
Turn motor with „Motor“-key on or with<br />
footswitch<br />
Connect motor cable to control unit<br />
Press handpiece firm on motor until<br />
handpiece snaps in<br />
In the event a problem cannot be solved, contact <strong>de</strong>aler or authorized service technicians, as listed on<br />
the last page of your Operating Instruction Manual.<br />
8 Disposal<br />
Disposal of <strong>de</strong>vice, components and accessories must strictly conform to local laws and regulations as<br />
set out by the relevant authorities.<br />
With regard to the preservation of the environment old equipment may be returned to the distributor or<br />
manufacturer.<br />
8 No. 31817 40/10
<strong>TCM</strong> <strong>Endo</strong> <strong>III</strong><br />
TABLE DES MATIERES<br />
1 Description 2<br />
1.1 Utilisation et fonctionnement 2<br />
1.2 Données techniques 2<br />
1.3 Environnement d’utilisation 2<br />
1.4 Environnement <strong>de</strong> Transport et stockage 2<br />
1.5 Description <strong>de</strong> l’appareil 2<br />
2 Mesures <strong>de</strong> sécurité 3<br />
3 Contenu <strong>de</strong> l’expédition 3<br />
4 Mise en service 3<br />
5 Fonctionnement 4<br />
5.1 L’unité <strong>TCM</strong> <strong>Endo</strong> <strong>III</strong> 4<br />
5.2 La pédale 5<br />
5.3 Limite automatique (AL) 5<br />
5.4 Protection automatique (AP) 5<br />
5.5 Mémoire 6<br />
6 Désinfection, nettoyage et stérilisation 6<br />
6.1 L’unité <strong>de</strong> contrôle et la pédale 6<br />
6.2 Le micro moteur <strong>Endo</strong> 7<br />
7 Dépannage 8<br />
8 Mise au rebut 8<br />
No. 31817 40/10 1
<strong>TCM</strong> <strong>Endo</strong> <strong>III</strong><br />
1 Description<br />
1.1 Utilisation et fonctionnement<br />
Le <strong>TCM</strong> <strong>Endo</strong> est un moteur électronique pour l’endodontie dont la vitesse et le couple sont réglés par<br />
un microprocesseur. Garantissant ainsi une préparation rapi<strong>de</strong> et efficace du canal radiculaire. La<br />
vitesse est maintenue constante sous <strong>de</strong>s charges variables jusqu’à ce que le niveau du couple choisi<br />
soit atteint.<br />
Le mo<strong>de</strong> <strong>de</strong> protection (AP) fourni une protection automatique pour prévenir la casse <strong>de</strong> la lime.<br />
Lorsque la lime atteint le niveau du couple choisi, le moteur part en arrière immédiatement pour<br />
protéger la lime puis repart en avant pour terminer la préparation du canal radiculaire. En utilisant le<br />
mo<strong>de</strong> (AP), la sollicitation <strong>de</strong> la lime est très réduite.<br />
1.2 Données techniques<br />
Voltage : .............................................. 115 V∼ / 50-60 Hz ou 230 V∼/ 50-60 Hz (voir étiquette appareil)<br />
Fusibles : ...................................................................... 2 x T2A (pour 115 V∼) et 2 x T1A (pour 230 V∼)<br />
Tension : ......................................................................................................................................... 40 VA<br />
Type : .............................................................................................................. Pièce d’application type B<br />
Vitesse : ................................................................................................................. 1,200 – 16,000 tr/min<br />
Dimension : ................................................................................................................ 90 x 100 x 170 mm<br />
Poids net : .......................................................................................................................................... 2 kg<br />
1.3 Environnement d’utilisation<br />
Humidité relative :....................... maxi 80%<br />
Température : ............................ 10 à 40°C<br />
Pression barométrique : ... 800 à 1060 hPa<br />
1.4 Environnement <strong>de</strong> Transport et<br />
stockage<br />
Humidité relative : ........................... maxi 90%<br />
Température :.................................... 0 à 60°C<br />
Pression barométrique :........ 700 à 1060 hPa<br />
1.5 Description <strong>de</strong> l’appareil<br />
: Attention : Lire les instructions<br />
: Pièce d’application type B<br />
: Certifié par la Canadian Standards<br />
Association (CSA) pour le Canada<br />
et les USA<br />
1275 : Conforme aux normes <strong>de</strong> l’UE<br />
: De vieux appareils électriques et<br />
d'électronique doivent être<br />
éliminés séparé et ne peuvent pas<br />
être amenés aux ordures<br />
ménagères.<br />
2 No. 31817 40/10
<strong>TCM</strong> <strong>Endo</strong> <strong>III</strong><br />
2 Mesures <strong>de</strong> sécurité<br />
Votre sécurité, la sécurité <strong>de</strong> votre équipe et, il va sans dire, la sécurité <strong>de</strong> vos patients est pour<br />
Nouvag AG la première <strong>de</strong>s priorités. Il est donc vital que les mesures suivantes soient strictement<br />
respectées:<br />
• Le <strong>TCM</strong> <strong>Endo</strong> <strong>III</strong> doit être utilisé uniquement par du personnel qualifié!<br />
• Vérifier le voltage d’utilisation sur la plaque signalétique!<br />
• Toute responsabilité pour l’utilisation d’accessoires, pièces ou montages<br />
d’autres fabricants est entièrement celle <strong>de</strong> l’utilisateur!<br />
• Les réparations doivent être effectuées uniquement par <strong>de</strong>s techniciens<br />
agréés par Nouvag AG!<br />
• Nouvag AG ne peut être tenu pour responsable d’aucun disfonctionnement,<br />
défaillance et/ou <strong>de</strong> l’utilisation prévue ou souhaitée du <strong>TCM</strong> <strong>Endo</strong> <strong>III</strong>, Nouvag<br />
AG ne peut pas être tenu pour responsable, non plus, pour toute blessure aux<br />
personnes ou animaux, ni lorsque l’appareil est mal utilisé ou non utilisé,<br />
appliqué ou entretenu suivant les instructions utilisateur/propriétaire du<br />
manuel d’utilisation. En cas <strong>de</strong> doute ou question, l’utilisateur peut contacter<br />
Nouvag AG ou ses représentants légaux pour clarification ou assistance!<br />
3 Contenu <strong>de</strong> l’expédition<br />
1520...Unité <strong>de</strong> contrôle <strong>TCM</strong> <strong>Endo</strong> <strong>III</strong>...........................................................................................1 pièce<br />
1823...Micro moteur <strong>Endo</strong>..............................................................................................................1 pièce<br />
1488...Pédale On / Off ..................................................................................................................1 pièce<br />
4 Mise en service<br />
1) Brancher la pédale On/Off sur «FOOT»<br />
(→ pour utilisation <strong>de</strong> l’unité avec la pédale).<br />
2) Brancher le micro moteur sur «MOTOR».<br />
3) Brancher la pièce à main ou le contre angle.<br />
4) Brancher le fil <strong>de</strong> CA dans la prise <strong>de</strong>rrière l’unité et dans la prise <strong>de</strong> courant.<br />
5) Mettre sous tension le bouton vert «ON / OFF» (à l’arrière <strong>de</strong> l’unité).<br />
6) Régler la réduction et la vitesse désirée.<br />
7) Appuyer sur la touche «MOTOR» ou appuyer sur la pédale (si la pédale est branchée) pour<br />
démarrer le micro moteur.<br />
No. 31817 40/10 3
8)<br />
<strong>TCM</strong> <strong>Endo</strong> <strong>III</strong><br />
5 Fonctionnement<br />
5.1 L’unité <strong>TCM</strong> <strong>Endo</strong> <strong>III</strong><br />
Mise en marche <strong>de</strong> l’appareil :<br />
Appuyer sur le bouton vert «ON/OFF» (à l’arrière <strong>de</strong> l’unité).<br />
Affichage :<br />
L’affichage digital indique la vitesse <strong>de</strong> forage actuelle ou le niveau du couple choisi.<br />
<strong>TCM</strong> <strong>Endo</strong><br />
1 :1 8 :1 16:1 ATC<br />
REV/<br />
FORW<br />
MOTOR<br />
Clavier/Fonction <strong>de</strong>s comman<strong>de</strong>s :<br />
«Motor» :<br />
fonctionne)<br />
«▲» :<br />
«▼» :<br />
Interrupteur On/Off pour micro moteur (la lumière verte s’allume lorsque le moteur<br />
Augmentation <strong>de</strong> la puissance ou du couple<br />
Réduction <strong>de</strong> la puissance ou du couple<br />
«Rev/Forw» : Pour changer le sens <strong>de</strong> rotation du moteur → un signal sonore retentit lorsque le<br />
moteur tourne dans le sens inverse<br />
«1:1» : Appuyer sur cette touche si vous utilisez une pièce à main 1:1<br />
Vitesse : <strong>de</strong> 1,200 à 16,000 tr/min<br />
Couple : 1, 2, 3, 4, 5, 7, 10, 13, 16, 19 N/mm<br />
«8:1» : Appuyer sur cette touche si vous utilisez un contre angle 8:1<br />
Vitesse : <strong>de</strong> 150 à 2,000 tr/min<br />
Couple : 2, 4, 6, 10, 15, 20, 25, 30, 40, 50 N/mm<br />
«16:1» : Appuyer sur cette touche si vous utilisez un contre angle 16:1<br />
Vitesse : <strong>de</strong> 75 à 1’000 tr/min<br />
Couple : 5, 10, 15, 20, 25, 30, 40, 50, 75, 100 N/mm<br />
«ATC» :<br />
AL et AP choix du mo<strong>de</strong> pour la fonction couple souhaitée<br />
<br />
La<br />
touche «Motor» fonctionne uniquement lorsque la pédale n’est pas branchée<br />
4 No. 31817 40/10
<strong>TCM</strong> <strong>Endo</strong> <strong>III</strong><br />
5.2 La pédale<br />
Le <strong>TCM</strong> <strong>Endo</strong> <strong>III</strong> peut être utilisé avec ou sans pédale. Appuyer sur la pédale pour démarrer le moteur.<br />
Pédale non enfoncée : ................... Moteur arrêté<br />
Pédale complètement enfoncée : .. Moteur en marche<br />
La vitesse <strong>de</strong> l’instrument correspond à la vitesse réglée sur l’unité <strong>de</strong> contrôle.<br />
5.3 Limite automatique (AL)<br />
La limite automatique (AL) limite le niveau du couple appliqué à l’instrument. Si le niveau du couple<br />
choisi est atteint, la vitesse <strong>de</strong>scendra à zéro tr/min. Un niveau du couple égale à celui sélectionné sera<br />
encore exercé sur la lime.<br />
Toutes les valeurs du couple sont indiquées en N/mm (par exemple un réglage <strong>de</strong> AL 20→ indique que<br />
l’instrument peut atteindre 20 N/mm au maximum avant que la rotation ne s’arrête).<br />
<br />
La<br />
limite automatique (AL) peut être réglée dans les limites suivantes :<br />
1:1 → <strong>de</strong> 1 à 19 N/mm<br />
8:1 → <strong>de</strong> 2 à 50 N/mm<br />
16:1 → <strong>de</strong> 5 à 100 N/mm<br />
Réglage du mo<strong>de</strong> AL :<br />
1) Appuyer sur la touche «ATC SET». La série <strong>de</strong> mo<strong>de</strong> couple s’affiche (par exemple [AL 20]).<br />
2) Appuyer sur les touches «▲» et «▼» augmentera ou baissera le niveau du couple<br />
respectivement.<br />
3) En appuyant brièvement une fois <strong>de</strong> plus sur «ATC SET» l’affichage digital revient<br />
automatiquement.<br />
<br />
Si<br />
[AP.....] s’affiche :<br />
appuyer sur la touche «▼» pour revenir à [AL.....].<br />
La lumière verte s’allume lorsque le mo<strong>de</strong> AP est activé, la lumière verte ne<br />
s’éclaire pas en mo<strong>de</strong> AL.<br />
5.4 Protection automatique (AP)<br />
Le mo<strong>de</strong> <strong>de</strong> protection automatique (AP) est une fonction spéciale pour prévenir la casse <strong>de</strong> la lime.<br />
Lorsque le niveau du couple est atteint, le moteur part en arrière pour libérer la lime et ensuite retourne<br />
automatiquement en marche avant. Toutes les valeurs du couple sont indiquées en N/mm (par<br />
exemple un réglage <strong>de</strong> AL 20→ indique que l’instrument peut atteindre 20 N/mm maximum avant que<br />
la rotation ne s’arrête).<br />
<br />
La<br />
protection automatique AP peut être réglé dans les limites suivantes :<br />
1:1 → <strong>de</strong> 1 à 19 N/mm<br />
8:1 → <strong>de</strong> 2 à 50 N/mm<br />
16:1 → <strong>de</strong> 5 à 100 N/mm<br />
No. 31817 40/10 5
<strong>TCM</strong> <strong>Endo</strong> <strong>III</strong><br />
Réglage <strong>de</strong> AP :<br />
1) Appuyer sur la touche «ATC». Le mo<strong>de</strong> choisi s’affiche (par exemple [AL 20]).<br />
2) Appuyer sur les touches «▲» et «▼» augmentera ou baissera respectivement le niveau du<br />
couple.<br />
3) En appuyant brièvement un fois <strong>de</strong> plus sur «ATC SET» l’affichage digital revient<br />
automatiquement.<br />
<br />
Si<br />
[AL.....] s’affiche :<br />
appuyer sur “▼” pour revenir à [AP.....].<br />
La lumière verte “ATC” s’allumera lorsque le mo<strong>de</strong> AP est activé.<br />
Le mo<strong>de</strong> AP fonctionne uniquement lorsque le moteur tourne vers l’avant (la<br />
lumière verte LED “Rev/Forw“ ne s’allume pas).<br />
5.5 Mémoire<br />
Lors du branchement <strong>de</strong> l’appareil, apparaissent automatiquement les réglages faits lors <strong>de</strong> la <strong>de</strong>rnière<br />
intervention.<br />
6 Désinfection, nettoyage et stérilisation<br />
Merci <strong>de</strong> faire attention aux points suivants, très importants pour l’entretien <strong>de</strong> l’appareil :<br />
• Nettoyer, désinfecter et stériliser l’appareil et les composants après chaque<br />
utilisation !<br />
• Ne pas utiliser d’agents dissolvants pour le nettoyage !<br />
• Stériliser l’équipement dans un emballage transparent !<br />
• Ne pas remplir le sac <strong>de</strong> stérilisation à plus <strong>de</strong> 80% !<br />
• Stériliser le matériel à l’autoclave à 135°C maximum !<br />
• Le matériel stérilisé doit être stocké et étiqueté avec la date <strong>de</strong> stérilisation !<br />
6.1 L’unité <strong>de</strong> contrôle et la pédale<br />
L’unité <strong>de</strong> contrôle et la pédale ne sont pas en contact avec les patients. Nettoyer simplement la<br />
surface <strong>de</strong> l’unité, ne pas utiliser <strong>de</strong> nettoyants abrasif ou <strong>de</strong> solvant. Utiliser 80% d’alcool éthylique ou<br />
<strong>de</strong>s désinfectants antimicrobiens.<br />
L’unité <strong>de</strong> contrôle doit être essuyée uniquement avec un chiffon propre et<br />
humi<strong>de</strong>. Ne pas vaporiser d’agent nettoyant ou désinfectant car le <strong>de</strong>vant <strong>de</strong> l’unité<br />
<strong>de</strong> contrôle n’est pas étanche !<br />
6 No. 31817 40/10
<strong>TCM</strong> <strong>Endo</strong> <strong>III</strong><br />
6.2 Le micro moteur <strong>Endo</strong><br />
Limitation <strong>de</strong> la<br />
repréparation<br />
Une repréparation fréquente n’exerce qu’une influence limitée sur les micromoteurs. La<br />
durée <strong>de</strong> vie <strong>de</strong> l’appareil est normalement déterminée par l’usure et les dommages dus à<br />
l’utilisation.<br />
INSTRUCTIONS<br />
Sur le lieu<br />
d’utilisation<br />
Conservation et<br />
transport<br />
Préparation du<br />
nettoyage<br />
Nettoyage et<br />
désinfection<br />
automatiques<br />
Eliminer les souillures superficielles avec une lingette à usage unique ou du papier.<br />
Pas <strong>de</strong> consignes particulières. Eviter d’attendre trop longtemps avant <strong>de</strong> repréparer<br />
l’appareil à cause du danger <strong>de</strong> séchage et <strong>de</strong> corrosion.<br />
Eliminer les souillures sur le micromoteur et le câble avec une lingette à usage unique ou<br />
du papier.<br />
Le nettoyage automatique du micromoteur avec un appareil <strong>de</strong> nettoyage/désinfection<br />
n’est pas autorisé.<br />
Nettoyage manuel<br />
Désinfection<br />
manuelle<br />
Séchage<br />
Contrôle et entretien<br />
Equipement: détergent neutre, brosse douce, eau courante<br />
Procédure:<br />
1) Rincer et nettoyer avec la brosse les souillures superficielles sur le micromoteur et le<br />
cache avec le câble.<br />
2) Appliquer le détergent avec la brosse dans tous les recoins et sur toutes les surfaces.<br />
3) Rincer soigneusement le micromoteur et le cache sous l’eau courante.<br />
Pour la désinfection manuelle, pulvériser le micromoteur et le cache avec le câble avec un<br />
spray désinfectant à base d’éthanol.<br />
En l’absence <strong>de</strong> programme <strong>de</strong> séchage dans l’appareil et nettoyage et <strong>de</strong> désinfection, il<br />
convient <strong>de</strong> sécher le micromoteur manuellement ou dans une étuve.<br />
Examiner visuellement à la recherche <strong>de</strong> dommages, usure et corrosion. Placer le<br />
bouchon <strong>de</strong> stérilisation.<br />
Emballage<br />
Stérilisation<br />
Individuel: emballer le micromoteur dans un emballage stérile. Le sachet doit être assez<br />
grand afin <strong>de</strong> ne pas forcer sur le scellé.<br />
Sets: placer les micromoteurs dans les plateaux spéciaux ou <strong>de</strong>s plateaux <strong>de</strong> stérilisation<br />
universels.<br />
Autoclaver en autoclave sous vi<strong>de</strong> à 135°C au max, pendant 5 minutes* au moins. Lors<br />
<strong>de</strong> la stérilisation <strong>de</strong> plusieurs instruments avec un cycle <strong>de</strong> stérilisation, la charge<br />
maximale du stérilisateur ne doit pas être dépassée. Avec les autoclaves sans post-vi<strong>de</strong>,<br />
une phase <strong>de</strong> séchage est nécessaire. Laisser sécher le micromoteur dans le sachet<br />
pendant au moins 1 heure à température ambiante avec la face papier vers le haut.<br />
* Les températures et les durées correspon<strong>de</strong>nt aux directives et aux normes en vigueur<br />
au niveau national.<br />
Conservation<br />
Pas <strong>de</strong> consignes particulières. Si le micromoteur stérilisé n’est pas utilisé immédiatement<br />
après la stérilisation, il doit être emballé stérilement avec un indicateur et une date <strong>de</strong><br />
stérilité.<br />
Les instructions relatives à la procédure ci-<strong>de</strong>ssus ont été validées par NOUVAG AG pour la préparation d’un produit médical et sa réutilisation.<br />
La responsabilité <strong>de</strong> vérifier que la procédure <strong>de</strong> stérilisation réellement suivie conduit aux résultats escomptés avec l’équipement, le matériel,<br />
le personnel à disposition dans les installations <strong>de</strong> préparation utilisées revient au préparateur. Pour ce faire, une validation et une surveillance<br />
en routine <strong>de</strong> la procédure sont normalement nécessaires. De même, tout écart avec les instructions fournies doit être soigneusement évalué<br />
par le préparateur afin d’en déterminer les conséquences et les inconvénients éventuels.<br />
No. 31817 40/10 7
<strong>TCM</strong> <strong>Endo</strong> <strong>III</strong><br />
7 Dépannage<br />
Problème Cause Solution<br />
L’appareil ne fonctionne pas<br />
du tout<br />
La pédale ne fonctionne pas<br />
Le micro moteur ne<br />
fonctionne pas<br />
La prise n’est pas correctement<br />
branchée<br />
Mauvais voltage<br />
La pédale n’est pas branchée<br />
L’unité <strong>de</strong> contrôle n’est pas en<br />
marche<br />
Le moteur n’est pas en marche<br />
Le moteur n’est pas branché<br />
Le moteur mal fixé<br />
Mettre la prise et vérifier l’installation<br />
Vérifier le voltage du secteur<br />
→ merci <strong>de</strong> vérifier le voltage<br />
d’utilisation sur la plaque signalétique<br />
Brancher le câble <strong>de</strong> la pédale à<br />
l’arrière <strong>de</strong> l’unité <strong>de</strong> contrôle<br />
Tourner l’interrupteur principal<br />
«ON/OFF» sur ON<br />
Mettre en marche avec la touche<br />
«Motor» ou la pédale<br />
Brancher le câble du moteur à l’unité<br />
<strong>de</strong> contrôle<br />
Appuyer fermement la pièce à main sur<br />
le moteur jusqu’au clic<br />
En cas <strong>de</strong> problème non résolu, contacter votre reven<strong>de</strong>ur ou les service techniques agréés, dont la<br />
liste se trouve sur la <strong>de</strong>rnière page <strong>de</strong> votre mo<strong>de</strong> d’emploi.<br />
8 Mise au rebut<br />
La mise au rebut d’appareils, composants et accessoires doit être strictement conforme aux lois et<br />
règles locales comme fixées par les autorités compétentes.<br />
Dans le sens <strong>de</strong> la protection <strong>de</strong> l'environnement, <strong>de</strong> vieux appareils peuvent être rendus au<br />
commerçant ou au fabricant.<br />
8 No. 31817 40/10
<strong>TCM</strong> <strong>Endo</strong> <strong>III</strong><br />
Contenido<br />
1 Descripción 2<br />
1.1 Funciones 2<br />
1.2 Datos técnicos 2<br />
1.3 Condiciones <strong>de</strong> operación 2<br />
1.4 Almacenaje y transporte 2<br />
1.5 Descripción <strong>de</strong>l aparato 2<br />
2 Medidas <strong>de</strong> seguridad 3<br />
3 Contenido <strong>de</strong>l envío 3<br />
4 Puesta en marcha 3<br />
5 Operación 4<br />
5.1 La unidad <strong>de</strong> control <strong>TCM</strong> <strong>Endo</strong> <strong>III</strong> 4<br />
5.2 El interruptor <strong>de</strong> pedal 5<br />
5.3 Limitador automático (AL) 5<br />
5.4 Protección automática (AP) 5<br />
5.5 Memoria 6<br />
6 Desinfección, Limpieza y Esterilización 6<br />
6.1 Unidad <strong>de</strong> Control y Pedal 6<br />
6.2 Micromotor <strong>Endo</strong> 7<br />
7 Problemas y anomalías 8<br />
8 Eliminación 8<br />
No. 31817 40/10 1
<strong>TCM</strong> <strong>Endo</strong> <strong>III</strong><br />
1 Descripción<br />
1.1 Funciones<br />
El <strong>TCM</strong> <strong>Endo</strong> es un motor sistema electrónico para <strong>Endo</strong>doncia, controlado por un microprocesador. El<br />
motor electrónico proporciona baja velocidad y alto torque en el instrumento <strong>de</strong> rotación y <strong>de</strong> esa<br />
manera se obtiene un fácil y rápido tratamiento <strong>de</strong> conducto. La velocidad se mantiene constante bajo<br />
todas las circunstancias, hasta alcanzar el nivel <strong>de</strong> torque programado.<br />
El modo <strong>de</strong> protección <strong>de</strong> torque (AP) evita que el ensanchador se rompa. Al alcanzar el torque<br />
programado, la dirección <strong>de</strong> torque se invierte para proteger el ensanchador y <strong>de</strong>spués <strong>de</strong> un giro, el<br />
motor cambia <strong>de</strong> nuevo hacia a<strong>de</strong>lante para finalizar el tratamiento <strong>de</strong> conducto. El modo AP garantiza<br />
un rápido y efectivo procedimento.<br />
1.2 Datos técnicos<br />
Voltaje: ............................................... 115 V∼ / 50-60 Hz ó 230 V∼/ 50-60 Hz (ver etiqueta <strong>de</strong>l aparato)<br />
Fusibles <strong>de</strong> alimentación:................................................. 2 x T2A (para115V∼) y 2 x T1A (para 230 V∼)<br />
Potencia: ..........................................................................................................................................40 VA<br />
Tipo: .......................................................................................................................aplicación <strong>de</strong> partes B<br />
Velocidad: .................................................................................................................. 1,200 – 16,000 rpm<br />
Dimensión: ..................................................................................................................90 x 100 x 170 mm<br />
Peso neto: ........................................................................................................................................ 2 Kg.<br />
1.3 Condiciones <strong>de</strong> operación<br />
Humedad relativa: ...................... Max. 80%<br />
Temperatura: ............................. 10 to 30°C<br />
Presión: ...................... 800 hasta 1060 hPa<br />
1.4 Almacenaje y transporte<br />
Humedad relativa: ............................Max. 90%<br />
Temperatura:...............................0 hasta 60°C<br />
Presión .............................700 hasta 1060 hPa<br />
1.5 Descripción <strong>de</strong>l aparato<br />
: Atención a documentos adjuntos<br />
: Utilización <strong>de</strong> partes tipo B<br />
: Certificado por la Asociación<br />
Canadiense <strong>de</strong> normas (CSA) para<br />
Canada y EE.UU<br />
1275 : Signo <strong>de</strong> Conformidad <strong>de</strong> la UE<br />
: Viejos aparatos eléctricos y<br />
electrónicos <strong>de</strong>ben <strong>de</strong> ser<br />
eliminados separadamente y no<br />
ser incluidos en los <strong>de</strong>sperdicios<br />
domésticos.<br />
2 No. 31817 40/10
<strong>TCM</strong> <strong>Endo</strong> <strong>III</strong><br />
2 Medidas <strong>de</strong> seguridad<br />
Su seguridad, la seguridad <strong>de</strong> su grupo y por supuesto la seguridad <strong>de</strong> sus pacientes, es para Nouvag<br />
AG la mayor prioridad. Por lo tanto es indispensable acatar las siguients medidas:<br />
• El <strong>TCM</strong> <strong>Endo</strong> <strong>III</strong> <strong>de</strong>be ser operado solo por personal calificado y especializado.<br />
• Controlar que el voltaje sea el a<strong>de</strong>cuado.<br />
• El uso <strong>de</strong> otros productos, por ejemplo piezas <strong>de</strong> mano o contrángulos que no<br />
sean <strong>de</strong> la marca Nouva AG, es resposabilidad <strong>de</strong>l operador.<br />
• La reparaciones se <strong>de</strong>ben llevar a cabo solo por los Centros <strong>de</strong> Servicios<br />
autorizados.<br />
• El uso habitual o corriente así como el <strong>de</strong>terioro producido por una utilización<br />
no apropiada o un cuidado incorrecto <strong>de</strong>l aparato y sus componentes, no está<br />
cubierto por la garantía. En lo referente al cuidado <strong>de</strong>l aparato, es importante<br />
seguir las instrucciones proporcionadas en este manual <strong>de</strong> operación o sino<br />
contactar a Nouvag AG para más información.<br />
3 Contenido <strong>de</strong>l envío<br />
1520.... Unidad <strong>de</strong> control <strong>TCM</strong> <strong>Endo</strong> <strong>III</strong> ................................................................................................. 1<br />
1823.... Micromotor <strong>Endo</strong> ........................................................................................................................ 1<br />
1488.... Interruptor <strong>de</strong> pedal On / Off ..................................................................................................... 1<br />
4 Puesta en marcha<br />
1) Conectar el Interruptor <strong>de</strong> pedal On/Off a “ FOOT“.<br />
(→ Cuando se opera la unidad con el Interruptor <strong>de</strong> pedal).<br />
2) Conectar el micromotor a “MOTOR“.<br />
3) Conectar la pieza <strong>de</strong> mano o contra ángulo.<br />
4) Conectar la conexión principal en el enchufe <strong>de</strong>trás <strong>de</strong> la unidad y luego a la toma <strong>de</strong> corriente.<br />
5) Encen<strong>de</strong>r el interruptor ver<strong>de</strong> “ON / OFF“(<strong>de</strong>trás <strong>de</strong> la unidad).<br />
6) Seleccionar la reducción y velocidad requeridas.<br />
7) Presionar la tecla “MOTOR“- o pisar el interruptor <strong>de</strong> pedal (si el pedal está conectado) para poner<br />
en marcha el micromotor.<br />
No. 31817 40/10 3
<strong>TCM</strong> <strong>Endo</strong> <strong>III</strong><br />
5.1 La unidad <strong>de</strong> control <strong>TCM</strong> <strong>Endo</strong> <strong>III</strong><br />
5 Operación<br />
Modo <strong>de</strong> empleo:<br />
Presionar el interruptor “ON/OFF“(<strong>de</strong>trás <strong>de</strong> la unidad).<br />
Display:<br />
El display indica la actual velocidad <strong>de</strong>l instrumento o el nivel <strong>de</strong> torque programado.<br />
<strong>TCM</strong> <strong>Endo</strong><br />
1 :1 8 :1 16:1 ATC<br />
REV/<br />
FORW<br />
MOTOR<br />
Funciones <strong>de</strong>l panel <strong>de</strong> teclado:<br />
„Motor“: Interruptor On/Off para micromotor (la luz ver<strong>de</strong> se ilumina cuando el motor está en<br />
operación)<br />
„▲“: Para aumentar la velocidad o el torque<br />
„▼“: Para reducir la velocidad o el torque<br />
„Rev/Forw“: Para cambiar la dirección <strong>de</strong> rotación <strong>de</strong>l motor → una señal acústica suena cuando<br />
motor opera en sentido contrario<br />
„1:1“: Seleccionar cuando se usa pieza <strong>de</strong> mano 1:1<br />
Velocidad : 1,200 hasta 16,000 rpm<br />
Torque: 1, 2, 3, 4, 5, 7, 10, 13, 16, 19 Nmm<br />
„8:1“: Seleccionar cuando se usa contra ángulo 8:1<br />
Velocidad: 150 hasta 2,000 rpm<br />
Torque: 2, 4, 6, 10, 15, 20, 25, 30, 40, 50 Nmm<br />
„16:1“: Seleccionar cuando se usa contra ángulo 16:1<br />
Speed: 75 hasta 1,000 Upm<br />
Torque: 5, 10, 15, 20, 25, 30, 40, 50, 75, 100 Nmm<br />
„ATC“:<br />
AL y AP: modo <strong>de</strong> selección para la función <strong>de</strong> torque requerida<br />
<br />
La<br />
tecla „Motor“ funciona sólo cuando el interruptor <strong>de</strong> pedal no está conectado.<br />
4 No. 31817 40/10
<strong>TCM</strong> <strong>Endo</strong> <strong>III</strong><br />
5.2 El interruptor <strong>de</strong> pedal<br />
El <strong>TCM</strong> <strong>Endo</strong> <strong>III</strong> pue<strong>de</strong> ser operado con o sin interruptor <strong>de</strong> pedal. Presionar el interruptor <strong>de</strong> pedal<br />
para poner en marcha el motor.<br />
Interruptor <strong>de</strong> pedal sin presionar: .Motor apagado<br />
Interruptor <strong>de</strong> pedal presionado: ....Motor encendido<br />
La velocidad <strong>de</strong>l instrumento correspon<strong>de</strong> a la velocidad ajustada en la unidad <strong>de</strong> control.<br />
5.3 Limitador automático (AL)<br />
El limitador automático (AL) limita el nivel <strong>de</strong> torque en el instrumento. Si se alcanza el nivel <strong>de</strong> torque<br />
programado, la velocidad disminuye hasta cero rpm pero la potencia en el instrumento se mantiene.<br />
Todos los valores <strong>de</strong> torque son indicados en Nmm (por ejemplo: AL 20→ significa que el instrumento<br />
pue<strong>de</strong> trabajar hasta 20 Nmm antes que se <strong>de</strong>tenga).<br />
<br />
El<br />
limitador automático (AL) pue<strong>de</strong> ajustarse en los siguientes alcances:<br />
1:1 → <strong>de</strong> 1 a 19 Nmm<br />
8:1 → <strong>de</strong> 2 a 50 Nmm<br />
16:1 → <strong>de</strong> 5 a 100 Nmm<br />
Ajuste <strong>de</strong>l modo AL:<br />
1) Presionar la tecla “ATC SET”. En el display aparece el modo <strong>de</strong> seleción <strong>de</strong> torque (por ejemplo<br />
[AL 20]).<br />
2) Presionar las teclas “▲” y “▼” para aumentar y reducir el nivel <strong>de</strong> torque respectivamente.<br />
3) Al presionar brevemente la tecla “ATC SET” una vez más, el display cambia automaticamente <strong>de</strong><br />
nuevo.<br />
<br />
Si<br />
el display indica [AP.....] :<br />
presionar la tecla “▼” para regresar a [AL.....].<br />
La luz ver<strong>de</strong> se ilumina cuando se activa el AP- modo, la luz ver<strong>de</strong> no se ilumina<br />
en el AL- modo.<br />
5.4 Protección automática (AP)<br />
El modo <strong>de</strong> protección automática (AP), es una función especial para evitar que los ensanchadores se<br />
rompan.<br />
Sí el torque programado es alcanzado, el motor cambia inmediatamente <strong>de</strong> dirección. Después <strong>de</strong> un<br />
giro, regresa inmediatamente hacia a<strong>de</strong>lante.<br />
Todos los valores <strong>de</strong> torque son indicados en Nmm (por ejemplo: AL 20→ significa que el instrumento<br />
pue<strong>de</strong> trabajar hasta 20 Nmm antes que se <strong>de</strong>tenga).<br />
<br />
La<br />
protección automática AP pue<strong>de</strong> ajustarse en los siguientes alcances:<br />
1:1 → <strong>de</strong> 1 a 19 Nmm<br />
8:1 → <strong>de</strong> 2 a 50 Nmm<br />
16:1 → <strong>de</strong> 5 a 100 Nmm<br />
No. 31817 40/10 5
<strong>TCM</strong> <strong>Endo</strong> <strong>III</strong><br />
Ajuste <strong>de</strong>l modo AP :<br />
1) Presionar la tecla “ATC”. En el display aparece el modo <strong>de</strong> selección <strong>de</strong> torque (por ejemplo [AL<br />
20]).<br />
2) Presionar las teclas “▲” y “▼” para aumentar y disminuir el nivel <strong>de</strong> torque respectivamente.<br />
3) Al presionar brevemente la tecla “ATC SET” una vez más, el display cambia automaticamente <strong>de</strong><br />
nuevo.<br />
<br />
Sí<br />
el display indica [AL.....] :<br />
presionar la tecla “▼” para regresar a [AP.....].<br />
La luz ver<strong>de</strong> “ATC” se ilumina cuando el AP-Modus se activa.<br />
El AP-Modus funciona solo cuando el motor opera hacia a<strong>de</strong>lante (la luz ver<strong>de</strong><br />
LED “Rev/Forw“ no se ilumina).<br />
5.5 Memoria<br />
Una vez programada la velocidad y el torque, permanecen en la memoria aún cuando el motor se<br />
apaga.<br />
6 Desinfección, Limpieza y Esterilización<br />
Por favor prestar atención a los siguientes puntos importantes para el mantenimiento <strong>de</strong>l equipo:<br />
• No usar materiales ni <strong>de</strong>tergentes abrasivos para la limpieza.<br />
• Poner el material en el autoclave siempre en empaque transparente.<br />
• Poner el material en el autoclave a un máximo <strong>de</strong> 135°C.<br />
• El material ya esterilizado <strong>de</strong>be ser guardado indicando la fecha <strong>de</strong> la<br />
esterilización.<br />
6.1 Unidad <strong>de</strong> Control y Pedal<br />
La unidad <strong>de</strong> control y el pedal, no entran en contacto directo con los pacientes. No usar limpiadores o<br />
solventes abrasivos para la limpieza. Usar alcohol <strong>de</strong> etilo 80% ó <strong>de</strong>sinfectantes comprobados<br />
microbiologicamente.<br />
Sólo limpiar la superfcie <strong>de</strong> la Unidad con un paño húmedo. No utilizar rociadores<br />
o <strong>de</strong>sinfectantes abrasivos, ya que la consola no es impermeable.<br />
6 No. 31817 40/10
<strong>TCM</strong> <strong>Endo</strong> <strong>III</strong><br />
6.2 Micromotor <strong>Endo</strong><br />
Limitaciones por el<br />
reacondicionamiento<br />
El reacondicionamiento frecuente tiene una influencia mínima sobre los micromotores.<br />
Normalmente, el final <strong>de</strong> la vida útil <strong>de</strong>l producto es <strong>de</strong>terminado por el <strong>de</strong>sgaste y por<br />
los daños originados por el uso.<br />
INSTRUCCIONES<br />
En el lugar <strong>de</strong><br />
utilización<br />
Almacenamiento y<br />
transporte<br />
Preparativos para la<br />
limpieza<br />
Limpieza y<br />
<strong>de</strong>sinfección<br />
automáticas<br />
Limpieza manual<br />
Desinfección manual<br />
Secado<br />
Comprobación y<br />
mantenimiento<br />
Elimine la suciedad superficial con una toallita <strong>de</strong>sechable o con una toallita <strong>de</strong> papel.<br />
Ningún requisito especial. No <strong>de</strong>je transcurrir <strong>de</strong>masiado tiempo hasta el<br />
reacondicionamiento para evitar el secado <strong>de</strong> la suciedad y la corrosión.<br />
Elimine la suciedad <strong>de</strong>l micromotor y <strong>de</strong>l cable con una toallita <strong>de</strong>sechable o con una<br />
toallita <strong>de</strong> papel.<br />
No se permite la limpieza automática <strong>de</strong>l micromotor mediante equipos <strong>de</strong> limpieza y<br />
<strong>de</strong>sinfección.<br />
Medios necesarios: producto <strong>de</strong> limpieza neutro, cepillo blando, agua corriente<br />
Procedimiento:<br />
1) Lave y cepille el micromotor y el capuchón <strong>de</strong>l motor para eliminar la suciedad<br />
superficial.<br />
2) Aplique el producto <strong>de</strong> limpieza con el cepillo a todas las superficies e intersticios.<br />
3) Enjuague minuciosamente el micromotor junto con el cable bajo agua corriente.<br />
Para la <strong>de</strong>sinfección manual, rocíe el micromotor y el capuchón <strong>de</strong>l motor con un aerosol<br />
<strong>de</strong>sinfectante basado en alcohol etílico.<br />
Si el equipo <strong>de</strong> limpieza y <strong>de</strong>sinfección no dispone <strong>de</strong> un programa <strong>de</strong> secado, <strong>de</strong>berá<br />
secar el micromotor manualmente o en el armario secador.<br />
Realice una comprobación visual <strong>de</strong>l micromotor con respecto a daños, corrosión y<br />
<strong>de</strong>sgaste. Inserte la clavija <strong>de</strong> esterilización.<br />
Embalaje<br />
Esterilización<br />
Individual: Embale el micromotor en un envase individual para materiales estériles. La<br />
bolsa <strong>de</strong>be ser suficientemente gran<strong>de</strong> para que el sellado no esté sometido a tensión.<br />
Juegos <strong>de</strong> micromotores: Introduzca los micromotores en las ban<strong>de</strong>jas previstas o<br />
colóquelos en ban<strong>de</strong>jas <strong>de</strong> esterilización universales.<br />
Esterilícelo en autoclave a una temperatura máx. <strong>de</strong> 135°C durante al menos 5 minutos<br />
*. Si se esterilizan varios instrumentos en un ciclo <strong>de</strong> esterilización, no se <strong>de</strong>be exce<strong>de</strong>r<br />
la carga máxima <strong>de</strong>l esterilizador. En los autoclaves con vacío posterior se <strong>de</strong>berá<br />
realizar a continuación una fase <strong>de</strong> secado. Deje secar el micromotor en la bolsa como<br />
mínimo durante 1 hora a temperatura ambiente, con el lado <strong>de</strong>l papel dirigido hacia<br />
arriba.<br />
* Los tiempos <strong>de</strong> mantenimiento <strong>de</strong> la temperatura <strong>de</strong>pen<strong>de</strong>n <strong>de</strong> las directrices y normas<br />
válidas en el país correspondiente.<br />
Almacenamiento<br />
Ningún requisito especial. Si el micromotor esterilizado no se utiliza directamente<br />
<strong>de</strong>spués <strong>de</strong> la esterilización, se <strong>de</strong>berá rotular el envase con el indicador <strong>de</strong> esterilidad y<br />
la fecha <strong>de</strong> esterilidad.<br />
Las instrucciones anteriores han sido validadas por NOUVAG AG como a<strong>de</strong>cuadas para la preparación <strong>de</strong> un producto sanitario para su<br />
reutilización. La persona que realice el reacondicionamiento será responsable <strong>de</strong> la obtención <strong>de</strong> los resultados <strong>de</strong>seados mediante el<br />
reacondicionamiento realizado con el equipo, los materiales y el personal en la instalación <strong>de</strong> reacondicionamiento. Para ello son normalmente<br />
necesarias la validación y la vigilancia <strong>de</strong> rutina <strong>de</strong>l procedimiento. Asimismo, la persona que realice el reacondicionamiento <strong>de</strong>berá evaluar<br />
cuidadosamente si cualquier <strong>de</strong>sviación <strong>de</strong> las instrucciones proporcionadas afecta a la eficacia <strong>de</strong>l procedimiento y produce posibles<br />
consecuencias negativas.<br />
No. 31817 40/10 7
<strong>TCM</strong> <strong>Endo</strong> <strong>III</strong><br />
7 Problemas y anomalías<br />
Problema Causa Solución<br />
El aparato no funciona<br />
Interruptor <strong>de</strong> pedal no<br />
funciona<br />
El micromotor no funciona<br />
El enchufe no se ha insertado<br />
correctamente<br />
Voltaje equivocado<br />
El pedal no está conectado<br />
La unidad <strong>de</strong> control no está<br />
encendida<br />
El motor no está encendido<br />
El motor no está conectado<br />
El motor no se ha conectado<br />
correctamente<br />
Insertar el enchufe correctamente<br />
Revisar voltaje<br />
→ ver voltaje <strong>de</strong> operación en la unidad<br />
<strong>de</strong> control<br />
Enchufar el cable <strong>de</strong>l pedal en la parte<br />
trasera <strong>de</strong> la unidad <strong>de</strong> control<br />
Encen<strong>de</strong>r el interruptor principal<br />
ON/OFF<br />
Encen<strong>de</strong>r el motor con la tecla „Motor“-<br />
o con el interruptor <strong>de</strong> pedal<br />
Conectar el cable <strong>de</strong>l motor a la unidad<br />
<strong>de</strong> control<br />
Presionar fuertemente la pieza <strong>de</strong><br />
mano en el motor hasta que la pieza<br />
encaje<br />
Para servicio, mantenimiento, partes o cualquier información, por favor contactar al distribuidor o<br />
representante en su área.<br />
8 Eliminación<br />
Para la eliminación <strong>de</strong>l aparato y sus componentes, se <strong>de</strong>ben seguir las indicaciones y reglamentos <strong>de</strong><br />
las Autorida<strong>de</strong>s competentes.<br />
En relación a la preservación <strong>de</strong>l medio ambiente, los equipos viejos se <strong>de</strong>ben retornar al distribuidor<br />
o al fabricante.<br />
8 No. 31817 40/10
Anhang<br />
Appendix<br />
Appendice<br />
Apéndice
Electromagnetic compatibility (EMC)<br />
Remark:<br />
The Product subsequently referred to herein always <strong>de</strong>notes the <strong>TCM</strong> <strong>Endo</strong> <strong>III</strong> / <strong>TCM</strong> <strong>Endo</strong> IV.<br />
Changes or modifications to this product not expressly approved by the manufacturer may result in increased emissions or <strong>de</strong>creased immunity<br />
performance of the product and could cause EMC issues with this or other equipment. This product is <strong>de</strong>signed and tested to comply with<br />
applicable regulations regarding EMC and shall be installed and put into service according to the EMC information stated as follows.<br />
WARNING<br />
Use of portable phones or other radio frequency (RF) emitting equipment near the product may cause unexpected or adverse<br />
operation.<br />
WARNING<br />
The product shall not be used adjacent to, or stacked with, other equipment. If adjacent or stacked use is necessary, the product<br />
shall be tested to verify normal operation in the configuration in which it is being used.<br />
Compliant Cables and Accessories<br />
WARNING<br />
The use of accessories, transducers and cables other than those specified may result in increased emissions or <strong>de</strong>creased immunity<br />
performance of the product.<br />
The table below lists cables, transducers, and other applicable accessories for which the manufacturer claims EMC compliance.<br />
NOTE: Any supplied accessories that do not affect EMC compliance are not listed.<br />
Description<br />
Length max.<br />
Micromotor 20mm <strong>TCM</strong> <strong>Endo</strong><br />
2m<br />
Foot switch 2.95m<br />
Guidance and manufacturer’s <strong>de</strong>claration – electromagnetic emissions<br />
The Product is inten<strong>de</strong>d for use in the electromagnetic environment specified below. The customer or the user of the Product should<br />
assure that it is used in such an environment.<br />
Emissions test Compliance Electromagnetic environment - guidance<br />
RF emissions<br />
CISPR 11<br />
RF emissions<br />
CISPR 11<br />
Harmonic emissions<br />
IEC 61000-3-2<br />
Voltage fluctuations/flicker emissions<br />
IEC 61000-3-3<br />
Group 1<br />
Class B<br />
Not Applicable (power consumption<br />
< 75W)<br />
Not Applicable (power consumption<br />
< 75W)<br />
The Product uses RF energy only for its<br />
internal function. Therefore, its RF emissions<br />
are very low and are not likely to cause any<br />
interference in nearby electronic equipment.<br />
The Product is suitable for use in all<br />
establishments, including domestic<br />
establishments and those directly connected to<br />
the public low-voltage power supply network<br />
that supplies buildings used for domestic<br />
purposes.<br />
Guidance and manufacturer’s <strong>de</strong>claration – electromagnetic immunity<br />
The Product is inten<strong>de</strong>d for use in the electromagnetic environment specified below. The customer or the user of the Product should<br />
assure that it is used in such an environment.<br />
Immunity tests IEC 60601<br />
Compliance level Electromagnetic environment - guidance<br />
Test level<br />
Electrostatic discharge<br />
(ESD)<br />
IEC 61000-4-2<br />
+/- 6 kV contact<br />
+/- 8 kV air<br />
+/- 6 kV contact<br />
+/- 8 kV air<br />
Floors should be wood, concrete or ceramic<br />
tile. If floors are covered with synthetic<br />
material, the relative humidity should be at<br />
least 30 %.<br />
Electrical fast<br />
transient/burst<br />
+/- 2 kV for power supply<br />
lines<br />
+/- 2 kV for power supply<br />
lines<br />
Mains power quality should be that of a typical<br />
commercial or hospital environment.<br />
IEC 61000-4-4<br />
Surge<br />
IEC 61000-4-5<br />
Voltage dips, short<br />
interruptions and voltage<br />
variations on power<br />
supply input lines<br />
IEC 61000-4-11<br />
+/- 1 kV for input/output<br />
lines<br />
+/- 1 kV differential mo<strong>de</strong><br />
+/- 2 kV common mo<strong>de</strong><br />
< 5 % U T<br />
(> 95 % dip in U T )<br />
for 0,5 cycle<br />
40 % U T<br />
(60 % dip in U T )<br />
for 5 cycles<br />
+/- 1 kV for input/output<br />
lines<br />
+/- 1 kV differential mo<strong>de</strong><br />
+/- 2 kV common mo<strong>de</strong><br />
< 5 % U T<br />
(> 95 % dip in U T )<br />
for 0,5 cycle<br />
40 % U T<br />
(60 % dip in U T )<br />
for 5 cycles<br />
Mains power quality should be that of a typical<br />
commercial or hospital environment.<br />
Mains power quality should bet hat of a typical<br />
commercial or hospital environment.<br />
If the user of the Product requires continued<br />
operation during power mains interruptions, it<br />
is recommen<strong>de</strong>d that the Product be powered<br />
from an uninterruptible power supply or a<br />
battery.<br />
70 % U T<br />
(30 % dip in U T )<br />
for 25 cycles<br />
70 % U T<br />
(30 % dip in U T )<br />
for 25 cycles<br />
Power frequency<br />
(50/60Hz) magnetic field<br />
IEC 61000-4-8<br />
< 5 % U T<br />
(> 95 % dip in U T )<br />
for 5 sec<br />
< 5 % U T<br />
(> 95 % dip in U T )<br />
for 5 sec<br />
3 A/m 30 A/m Power frequency magnetic fields should be at<br />
levels characteristic of a typical location in a<br />
typical commercial or hospital environment.<br />
Note: U T is the a.c. mains voltage prior to application of the test level.
Guidance and manufacturer’s <strong>de</strong>claration – electromagnetic immunity for not life support equipment<br />
The Product is inten<strong>de</strong>d for use in the electromagnetic environment specified below. The customer or the user of the Product should<br />
assure that it is used in such an environment.<br />
Immunity tests IEC 60601<br />
Test level<br />
Compliance level Electromagnetic environment - guidance<br />
Portable and mobile RF communications<br />
equipment should be used no closer to any part of<br />
the Product, including cables, than the<br />
recommen<strong>de</strong>d separation distance calculated from<br />
the equation applicable to the frequency of the<br />
transmitter.<br />
Conducted RF<br />
IEC 61000-4-6<br />
Radiated RF<br />
IEC 61000-4-3<br />
3 V rms<br />
150 kHz to 80 MHz<br />
outsi<strong>de</strong> ISM bands<br />
3 V/m<br />
80 MHz to 2.5 GHz<br />
3 V rms<br />
150 kHz to 80 MHz<br />
outsi<strong>de</strong> ISM bands<br />
3 V/m<br />
80 MHz to 2.5 GHz<br />
Recommen<strong>de</strong>d separation distance:<br />
d = 1,2<br />
d = 1,2<br />
P<br />
P 80 MHz to 800 MHz<br />
d = 2,3<br />
P 800 MHz to 2,5 GHz<br />
where P is the maximum output power rating in the<br />
transmitter in watts (W) according to the transmitter<br />
manufacturer and d is the recommen<strong>de</strong>d<br />
separation distance in metres (m).<br />
Field strengths from fixed RF transmitters, as<br />
<strong>de</strong>termined by an electromagnetic site survey a ,<br />
should be less than the compliance level in each<br />
frequency range b .<br />
Interference may occur in the vicinity of equipment<br />
marked with the following symbol:<br />
Note 1:<br />
Note 2:<br />
a<br />
b<br />
At 80 MHz and 800 MHz, the higher frequency range applies.<br />
These gui<strong>de</strong>lines may not apply in all situations. Electromagnetic propagation is affected by absorption and reflection from<br />
structures, objects and people.<br />
Fixed strengths from fixed transmitters, such as base stations for radio (cellular/cordless) telephones and land mobile radios,<br />
amateur radio, AM and FM radio broadcast and TV broadcast cannot be predicted theoretically with accuracy. To access the<br />
electromagnetic environment due to fixed RF transmitters, and electromagnetic site survey should be consi<strong>de</strong>red. If the<br />
measured field strength in the location in which the Product is used exceeds the applicable RF compliance level above, the<br />
Product should b observed to verify normal operation. If abnormal performance is observed, additional measures may be<br />
necessary, such as reorienting or relocating the Product.<br />
over the frequency range 150 kHz to 80 MHz, field strengths should be less than 3 V/m.<br />
Recommen<strong>de</strong>d separation distances between<br />
portable and mobile RF communications equipment and the not life support equipment<br />
The Product is inten<strong>de</strong>d for use in an electromagnetic environment in which radiated RF disturbances are controlled. The customer or<br />
the user of the Product can help prevent electromagnet interference by maintaining a minimum distance between portable and mobile<br />
RF communications equipment (transmitters) and the Product as recommen<strong>de</strong>d below, according to the maximum output power of the<br />
communications equipment.<br />
Rated maximum output power<br />
of transmitter<br />
W<br />
Separation distance according to frequency of transmitter<br />
m<br />
150 kHz to 80 MHz<br />
80 MHz to 800 MHz<br />
800 MHz to 2.5 GHz<br />
P<br />
d = 1,2<br />
d = 1,2<br />
d = 2,3<br />
0,01 0,12 0,12 0,23<br />
0,1 0,38 0,38 0,73<br />
1 1,2 1,2 2,3<br />
10 3,8 3,8 7,3<br />
100 12 12 23<br />
For transmitters rated at a maximum output power not listed above, the recommen<strong>de</strong>d separation distance d in metres (m) can be<br />
estimated using the equation applicable to the frequency of the transmitter, where P is the maximum output power rating of the<br />
transmitter in watts (W) according to the higher frequency range applies.<br />
P<br />
P<br />
Note 1:<br />
Note 2:<br />
At 80 MHz and 800 MHz, the separation distance fort the higher frequency range applies.<br />
These gui<strong>de</strong>lines may not apply in all situations. Electromagnetic propagation is affected by absorption and reflection from<br />
structures, objects and people.
Servicestellen / Servicecenter / Service /<br />
Assistenza tecnica / Centro <strong>de</strong> Servicio<br />
SWITZERLAND (Hersteller/ Producer/ Producteur/ Produttore/ Productor)<br />
NOUVAG AG<br />
St. Gallerstrasse 23-25 Phone: +41 (0)71 846 66 00<br />
CH - 9403 Goldach Fax: +41 (0)71 845 35 36<br />
Switzerland E-Mail: info@nouvag.com<br />
GERMANY<br />
NOUVAG GmbH<br />
Schulthaißstrasse 15 Phone: +49 (0)7531 1290-0<br />
D - 78462 Konstanz Fax: +49 (0)7531 1290-12<br />
Germany E-Mail: info-<strong>de</strong>@nouvag.com<br />
USA<br />
NOUVAG USA Inc.<br />
18058 Albyn Court Phone: +1 (661) 724 0217<br />
Lake Hughes Fax: +1 (661) 724 1590<br />
CA 93532 Toll Free: (800) 673 7427<br />
USA E-Mail paul@nouvagusa.com<br />
Alle NOUVAG-Servicestellen weltweit siehe<br />
All NOUVAG-Servicecenters worldwi<strong>de</strong> see at<br />
Tous nos centres <strong>de</strong> service mondial visitez<br />
Per tutti i servizi tecnici mondiale di NOUVAG ve<strong>de</strong>re sul<br />
Nouvag Centros <strong>de</strong> Servicio autorizados ver<br />
www.nouvag.com<br />
D Wir bitten Sie, bei Benötigung von Service, Reparatur o<strong>de</strong>r Ersatzteilen, <strong>de</strong>n Händler o<strong>de</strong>r Vertreter<br />
Ihres Lan<strong>de</strong>s zu kontaktieren.<br />
GB In case of service, maintenance and spare part questions – we kindly ask you to contact your <strong>de</strong>aler or<br />
representitiv in your area.<br />
F En cas <strong>de</strong> <strong>de</strong>man<strong>de</strong>s regar<strong>de</strong>nt le service technique, l’entretien ou pièces détachées, nous vous prions<br />
<strong>de</strong> contacter le reven<strong>de</strong>ur ou représentant dans votre région.<br />
I La preghiamo di contattare il suo rivenditore o il nostro rappresentante <strong>de</strong>lla sua zona, riguardo<br />
l’assistenza technica, la manuntenzione o per richie<strong>de</strong>re pezzi di ricambio.<br />
E Por favor contactar al distribuidor en su area, para preguntas concernientes a servicio, mantenimento<br />
y repuestos.