Snom 320 IP Phone Quick Start Guide - Use-IP
Snom 320 IP Phone Quick Start Guide - Use-IP
Snom 320 IP Phone Quick Start Guide - Use-IP
Create successful ePaper yourself
Turn your PDF publications into a flip-book with our unique Google optimized e-Paper software.
XXXYY88888899999 0 0 0 4 1 3 2 A 0 0 4 4N146476. Print content:Serial Number (5 digits)Serial Number (5 digits)• for wall mounting• für die Wandbefestigung• pour l'installation sur le mur• para el montaje en pared• per il montaggio a parete• para montagem na parede1139.5139.5AXXXYY88888899999 0 0 4 1 3 2 A 0 4 XXXYY88888899999 0 0 0 4 1 3 2 A 0 0 4 4N14647N1464739.539.5B1. Bar code System: Code 1282. 1. Material: Bar code white System: ART paper Code 1282. Material: white ART paper3. Black printing / SIZE: 139.5(W)X39.5(H)mm4. 3. Tolerence: Black printing ±0.2mm / SIZE: 139.5(W)X39.5(H)mm4. Tolerence: ±0.2mm6. Print content:A.A.DDMMYY day, month, year (only last two digits)Product DDMMYY of factory day, month, abbreviation year (only - provided last two by digits)snom (2 digits)7. attach onto B. the Bar backside code: MAC of the Address phonesame as mainboard labelProduct of of factory abbreviation -- provided by snom (2 (2 digits)Country Product of of Origin factory - ISO abbreviation 3166-1 alpha-3 - provided (3 digits) by snom (2 digits)Country of Origin - ISO 3166-1 alpha-3 (3 digits)B. Bar code: MAC Address same as mainboard label7. attach onto the backside of the phone21company snom technology AGcompany snom technology AGmodel snom 370 5 4.12. 00001438 1:1 1product LABEL TYPE prepared by Martin Taubemodel snom 370 5 4.12. 00001438 1:1 1filename type_label_snom370_rev5.pdf checked byproduct LABEL TYPE prepared by Martin Taube3filename type_label_snom370_rev5.pdf checked bycreated 2007-10-09 approved bycreated 2007-10-09 approved bylast saved 2009-11-04 statuslast saved 2009-11-04 statussnom technical datasheet (P-DIN_A4) Version 1.2.1. /// Nov 2009snom technical datasheet (P-DIN_A4) Version 1.2.1. /// Nov 2009revision revision PS No. PS No. ERP No. ERP scaleNo. scaletotalpages totalpagepages page1124C1.Detaching the Footstand - Fuß abmontieren - Démonter le pied -Desmontar el soporte - Smantellare il supporto - Destacandar o Suporte2.3
DWall Mounting - Wandmontage - Fixation murale -Montaje en pared - Montaggio a parete - Montagem na paredeNot included in delivery:Nicht im Lieferumfang enthalten:Non inclus:No incluidos:Non inclusos:Não incluído:4 xø max8 mm(0.315")ø max4,5 mm(0.177")Distance to wallAbstand zur WandDistance au murDistanza dalla pareteDistancia a la paredDistância à parede∼ 5 mm (0.197")EAdjusting the display - Den Displaywinkel einstellen - Ajuster l'ecran -Ajustar el visualizador - Aggiustare il display - Ajustar um display4
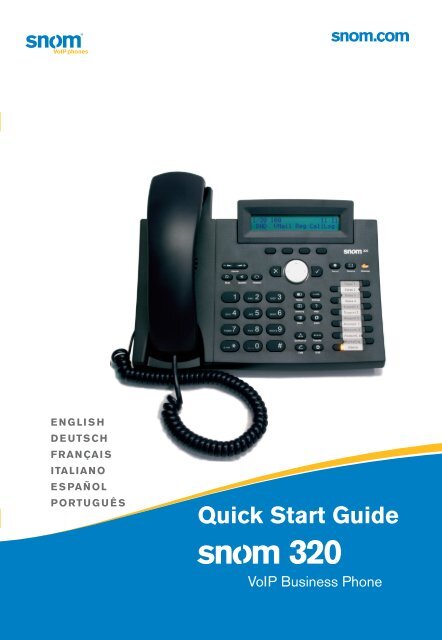
ENGLISH<strong>Quick</strong> <strong>Start</strong> <strong>Guide</strong>This quick start guide describes the installation, setup, and operation of thesnom <strong>320</strong>. For further information please refer to the manual on our webpage,http://wiki.snom.com/<strong>Snom</strong><strong>320</strong>.ENGLISHENGLISHCopyright, Trademarks, GPL, Legal Disclaimers© 2010 snom technology AktiengesellschaftAll Rights Reserved.snom, the names of snom products, and snom logos are trademarks owned by snom technologyAG. All other product names and names of enterprises are the property of their respectiveowners.snom technology AG reserves the right to revise and change this document at any time, withoutbeing obliged to announce such revisions or changes beforehand or after the fact.Texts, images, and illustrations and their arrangement in this document are subject to theprotection of copyrights and other legal rights worldwide. Their use, reproduction, and transmittalto third parties without express written permission may result in legal proceedings in the criminalcourts as well as civil courts.Although due care has been taken in the compilation and presentation of the information in thisdocument, the data upon which it is based may have changed in the meantime. snom thereforedisclaims all warranties and liability for the accurateness, completeness, and currentness of theinformation published, except in the case of intention or gross negligence on the part of snom orwhere liability arises due to binding legal provisions.Our firmware includes some source code that may be used and modified by anyone and everyoneunder the GNU Public License (GPL) (see Appendix on page ), provided they, in turn, make itavailable to everyone else with the same licensing agreement. Please go to http://www.snom.com/en/support/download/gpl-quellcode/ for the original GPL license and the source code ofcomponents licensed under GPL and used in snom products.Important InformationPlease read the instructions on safety and disposal and on how to set up and use thedevice before using it and also give them to other users to read or inform those users oftheir contents. Save this manual and do not give the device to third parties without it.Safety InstructionsFollow the instructions in this manual and other applicable documentation of the device.• If the phone is not supplied with power via an Ethernet cable, use only thepower adapter included in the package or one expressly recommended by snomtechnology. Other power supplies may damage or destroy the phone, affect itsbehavior, or induce noise.7
ENGLISHsnom <strong>320</strong> <strong>Quick</strong> <strong>Start</strong> <strong>Guide</strong>• Avoid placing the cables where people may trip over them or where they may beexposed to mechanical pressure as this may damage them.• This device is for indoor use only! Do not install outdoors - NOT FOR OUTDOORUSE!• Do not install the device in rooms with high humidity (for example, in bathrooms,laundry rooms, damp basements). Do not immerse the device in water and do notspill or pour liquids of any kind onto or into the device.• Do not install the device in surroundings at risk for explosions (paint shops, forexample). Do not use the device if you smell gas or other potentially explosive fumes.• Do not use the device during thunderstorms. Lightning striking the power grid maycause electric shocks.SELV (Safety Extra Low Voltage) ComplianceSafety status of Input/Output connections comply with SELV requirements.Warning: To avoid electric shock, do not connect safety extra-low voltage (SELV)circuits to telephone-network voltage (TNV) circuits. LAN ports contain SELVcircuits, and PSTN ports contain TNV circuits. Some LAN and PSTN ports both useRJ-45 (8P8C) connectors. <strong>Use</strong> caution when connecting cables.Standards conformanceThis device is CE and FCC-certified and meets European and US health,safety, and environmental standards.Unauthorized opening, changing, or modifying the device will cause thewarranty to lapse and may also result in the lapse of the CE and FCCcertifications. In case of malfunction contact authorized service personnel,your seller, or snom.• Safety: IEC 60950-1:2001, CB Test Certificate: DE 2-013297• Certifications: FCC Class B, CE Mark• Power consumption: 2.1 – 2.4 watts• Power: 5 V DC• 1 x LAN, 1 x PC: RJ45 (Ethernet)• Ethernet: 2 x IEEE 802.3 10/100 Mbps switch• Power over Ethernet: IEEE 802.3af, Class 1Disposal of the device8This device is subject to European Directive 2002/96/EC and maynot be disposed of with general household garbage.If you do not know where you may dispose of the device at the end ofits lifespan, contact your municipality, your local waste managementprovider, or your seller.CleaningTo clean the device, use an anti-static cloth. Please avoid cleaning liquids as they mightdamage the surface or internal electronics of the device.
Initializing and registering the phone<strong>Quick</strong> <strong>Start</strong> <strong>Guide</strong>Please note: You will need the registration information received from yourInternet service provider or your network administrator - normally the phone orextension number, the password, and the registrar.After you have set up the phone and connected it to the network as shown on pages2 - 5, the phone begins to initialize.Normally the initialization is completely automatic, using DHCP. If your network does notsupport DHCP, you must obtain the <strong>IP</strong> address, netmask, <strong>IP</strong> gateway, and DNS serverfrom your Internet service provider or your network administrator and enter them manuallywhen you are asked to do so on the display.ENGLISHENGLISHWatch the display and, when asked to, make selections with and save with .1. Language. The default is English. Other languages are available if the phone/network is connected to the Internet during initialization, so that they can be providedfrom the snom server automatically (fi rmware 7 and higher).2. Dial tone3. Time zone4. Enter the account number. Save with P.5. Enter the registrar. Save with P . The display now shows the idle screen:Date:Account = identity (NR: not registered)Context-sensitiveTimefunction symbolsContext-sensitivefunction keysEntering numerals, letters, and special charactersPress any key on the alphanumeric keypad.Text fi eldTo the left of : Currentinput modeTo the right of : Press tochange to input mode> > >Editing the directory:Press to delete characterto the left of the cursorPress to cleartext fi eldPress key to activate/open/execute thefunction above itTo move cursor to the leftor to the right, press:Input modes:: Numerals: Small letters: Capital lettersDelete character tothe left of the cursor:Current input mode: Press to change:abc > ABC > 123 > abcabc - small lettersABC - capital letters 123 - numeralsEntering special characters and symbols in input modes small or capital letters: Press"1" key one or more times quickly, with a pause after each character.Examples: 1x = "." 2x = "+" 3x = "@" 4x = "1" 5x = ":" 6x = ","9
ENGLISHNavigation key - idle screen functions:: Select identity for outgoing call: Settings menuDisplay -idle screenIdentity<strong>Quick</strong> <strong>Start</strong> <strong>Guide</strong>Cancel & OK keysCancelling actions & inputConfi rming actions & input, savingMWI, missed calls• Red LED: Message waiting - pressto listen to message (if supported by PBX)• Yellow LED, steady light: Missed call -press to turn LED off• Yellow LED, blinking fast: Incoming callRecord call (if supported by PBX)At a glanceContext-sensitive functionsContext-sensitive functionkeys (programmable)AlphanumerickeypadAudio control keys• Adjust ringer volumeof incoming call or loudspeakervolume when in call• Turn microphone on/off• Turn speakerphone on/off• Turn headset on/offStar key• Switching between upper& lower case when pressedbriefl y while in editing mode• Locking and unlocking thekeyboard when pressed fora few secondsFreely programmable function keyswith LEDs: .Default mapping: line. Line LED:• Blinking fast: Incoming call. Press keyto accept call.• Steady light: In call• Blinking slowly: Call on holdDedicatedprogrammable function keysSettings menu<strong>IP</strong> address, MAC address, fi rmware versionFreely programmableTransfer current callTurn DND (do not disturb) on/offRedial last callDirectoryFreely programmable<strong>Start</strong>/end conferenceHold/unhold callPound key(hash key)10
<strong>Quick</strong> <strong>Start</strong> <strong>Guide</strong> ENGLISHENGLISHSettings menu • <strong>Use</strong> to scroll through submenus• Press the function key underneath the function symbol to select the function• Press P to save the setting• Press to return to the previous screen or to the idle screenAdministrator mode: <strong>Use</strong>r mode:The submenus and thesettings shaded darkgrayare not availablewhen the phone isrunning in user mode.xxxxx> P* Asteriskpreceding an option:Currently active selectionCallForwarding<strong>Phone</strong>BehaviorGeneralSettingsConfigurationHeadsetDeviceOff CWIContrastRegOnTime FkeysLangResetOffAlwaysRebootBusyDHCPVolumeSettingsHandHeadSpeakerOtherSettingsSystem InfoNetworkMemoryTimeZoneDialToneWebInterfaceServerHTTPHTTPSVLANSettingsIDPriorityReset11
ENGLISH<strong>Quick</strong> <strong>Start</strong> <strong>Guide</strong>Administrator/user modeThe factory setting is administrator mode. The default administrator password is 0000(4 x zero).• Switch from administrator mode to user mode: Web interface > Advanced > Qos/Security > Security > Administrator Mode: Off > Save.• Switch from user mode to administrator mode: Web interface > Advanced >Administrator Login > enter administrator password > Save.The phone's web interface1. Look up the phone's <strong>IP</strong> address: > <strong>IP</strong> adr. Example: 192.168.10.115.2. Open a web browser on your PC. Enter http:// and the <strong>IP</strong> address in the addressbar and press ENTER. The "welcome" screen opens.3. Click on an item in the menu on the left side of the screen to open that window.4. If a window contains several pages, click on the tab at the top to open the page.The font weight of the characters on the tab of the visible page is bold.5. Any changes you make will not take effect until you click on "Save". Changes will belost if you open another page of the web interface without first clicking on "Save" .Clock/time formatWeb interface > Preferences > General Information > 24 Hour Clock:On: 24-hour format, 00:01 to 24:00Off: 12-hour AM/PM format, 0:01 AM to 12:00 PMDate formatWeb interface > Preferences > General Information > US date format:On: 3/8/2010 Off: 8.3.2010Configuring & modifying identityWeb interface > Identity 1-12 >12
Using the phoneSelect outgoing identityFrom the idle screen, press pqto select one of the configured identities.Making calls• Enter the number on the alphanumeric keypad and pick up the handset or• pick up the handset, enter the number, P or• , enter the number, PAccepting calls• With the handset: Pick up the handset• With a headset: Press P or blinking line key• With the speakerphone: PressPutting calls on hold<strong>Quick</strong> <strong>Start</strong> <strong>Guide</strong>ENGLISHENGLISHPress or the line key of the call. The LED starts toblink slowly. Press to resume the call. With more thanone call on hold: Press line key of a call to resume it.Conference (3 parties)1. Your phone number: 154. Put first caller (Jane Doe) onhold.2. Call second party (158). With second party on the line:3. Press to start conference. In conference:4. Press to stop conference and put both parties onhold.5. Resume conference: Press line key of one of the calls on hold > then .Call transferAttended transferPut the call on hold. Dial the number that you wish to transfer the call to. If the thirdparty wishes to accept the call > press > press P.Blind transferWhen the incoming call is ringing or with the call on the line: Pressphone number the call is to be transferred to > press P.Call forwarding1. Turn call forwarding on.> dial thea. All incoming calls: Call forwarding > [Always] > Always target: entertarget phone number > P.13
ENGLISH<strong>Quick</strong> <strong>Start</strong> <strong>Guide</strong>b. When busy: Call forwarding > [Busy] > Busy target: enter targetphone number > P.c. When call is not picked up: Call forwarding > [Time] > Timeouttarget: enter target phone number > P > Call Fwd time: enter number ofseconds after which call will be forwarded > P.d. Call forwarding is on: .2. Turn call forwarding off: Call forwarding > [Off].Call lists1. From the idle screen, press [CHist] to open.2. Select list with function key: [Missed], [Received], [Dialed] calls.3. Scroll through list: . Dial selected number: P.Directory• Open: Press . Scroll: . Dial number of selected entry: P.• : Press > .• Editing entries: See "Entering numerals, letters, and special characters" on page 9.Trouble shootingReboot> Configuration > [Reboot] > Reboot? > PHard rebootDisconnect power, wait for a few seconds, reconnect.Never disconnect the power during a firmware update!Reset to factory valuesAll customized settings will be lost!> Configuration > [Reset] > enter administrator password > P. Thedefault administrator password is 0000 (4 x zero).14
DEUTSCH<strong>Quick</strong> <strong>Start</strong> <strong>Guide</strong>Diese Kurzanleitung beschreibt die Installation, Einrichtung und den Betriebdes snom <strong>320</strong>. Weitere Informationen finden Sie auf unserer Webseite,http://wiki.snom.com/<strong>Snom</strong><strong>320</strong>.Copyright, Markenrechte, GNU Lizenz, Haftung© 2010 snom technology AktiengesellschaftAlle Rechte reserviert.snom sowie die Namen der snom-Produkte und die snom logos sind gesetzlich geschützte Markender snom technology AG. Alle anderen Produkt- und Firmennamen sind Marken der jeweiligenInhaber.snom technology AG behält sich jederzeit das Recht auf Überarbeitung und Änderung diesesDokumentes vor, ohne verpflichtet zu sein, die vorgenommenen Änderungen anzukündigen odermitzuteilen.Texte, Bilder, Grafiken und deren Anordnung in diesem Dokument unterliegen weltweit dem Schutzdes Urheberrechts und anderen Schutzgesetzen. Ihre Verwendung, Reproduktion oder Weitergabeohne ausdrückliche schriftliche Zustimmung der snom technology AG können sowohl straf- alsauch zivilrechtlich verfolgt werden.Trotz der angewandten Sorgfalt bei der Zusammenstellung und Präsentation der Informationen indiesem Dokument können sich Daten zwischenzeitlich geändert haben. Daher übernimmt snomkeine Gewähr für die Richtigkeit, Vollständigkeit oder Aktualität der zur Verfügung gestelltenInformationen. Jegliche Haftung für Schäden ist ausgeschlossen, sofern diese nicht auf Vorsatzoder grober Fahrlässigkeit auf seiten von snom beruhen oder sofern keine Haftung aufgrundzwingender gesetzlicher Bestimmungen eintritt.Unsere Firmware enthält teilweise Quellcodes, die unter der GNU Public License (GPL)von jedermann genutzt und modifiziert werden dürfen, solange sie wiederum mit denselbenLizenzbedingen zur allgemeinen Nutzung veröffentlicht werden. Die Quellcodes der von snomgenutzten und der GPL unterliegenden Komponenten können Sie auf der Supportseite unsererWebseite auf www.snom.com, den Wortlaut der GPL auf http://www.snom.com/de/support/download/gpl-quellcode/ herunterladen.DEUTSCHWichtige HinweiseLesen Sie bitte vor Inbetriebnahme die Sicherheitshinweise und die Bedienungsanleitung.Lassen Sie sie auch von den Mitbenutzern des Gerätes lesen oder informierenSie sie über deren Inhalt. Bewahren Sie diese Bedienungsanleitung auf und geben Siedas Telefon nur mit der Bedienungsanleitung an Dritte weiter..SicherheitBefolgen Sie die Anweisungen in dieser Bedienungsanleitung und in der sonstigenDokumentation des Geräts.• Falls die Stromversorgung nicht über das Ethernetkabel erfolgt, verwenden Sie nurdas mitgelieferte Netzteil. Die Verwendung anderer Netzteile könnte das Telefonbeschädigen oder gar zerstören.• Vermeiden Sie es, die Netz- und Stromkabel so zu verlegen, dass sie durchmechanischen Druck beschädigt werden oder dass Personen darüber stolpernkönnten.15
snom <strong>320</strong> <strong>Quick</strong> <strong>Start</strong> <strong>Guide</strong>DEUTSCH• Dieses Gerät ist nur für den Gebrauch in Innenräumen bestimmt - NICHT FÜR DENAUSSENBEREICH!• Stellen Sie das Telefon nicht in Räumen mit hoher Luftfeuchtigkeit wie z.B.Badezimmern, Waschküchen, feuchten Kellerräumen auf. Tauchen Sie das Telefonnicht in Wasser und gießen Sie keine Flüssigkeiten auf oder in das Gerät.• Stellen Sie das Telefon nicht in explosionsgefährdeten Umgebungen (z.B. Lackiereien)auf. Benutzen Sie das Telefon nicht, wenn Sie Gas oder andere möglicherweiseexplosionsgefährliche Dämpfe riechen.• Telefonieren Sie nicht während eines Gewitters (Stromschlaggefahr bei Blitzeinschlagins Netz).SELV (Safety Extra Low Voltage) EinhaltungDie Eingangs-/Ausgangsverbindungen halten die SELV-Richtlinien für Kleinspannungsgeräteein.Warnung: Um elektrische Schläge zu vermeiden, verbinden Sie keine SELV-Gerätemit Geräten, die Telefon-/Netzwerk-Spannung (TNV) führen. Nur an LAN-Portsanschließen!NormkonformitätDieses Gerät ist CE- und FCC-geprüft und entspricht den geltendeneuropäischen und US-amerikanischen Richtlinien.Die eigenmächtige Öffnung des Geräts sowie Änderungen und Modifizierungenam Gerät führen zum Erlöschen der Gewährleistungspflicht und könnendarüberhinaus zum Erlöschen der Zulassungen führen. Wenden Sie sich beiBetriebsstörungen oder Defekten an authorisiertes Servicepersonal, an IhrenVerkäufer oder an snom.• Sicherheit: IEC 60950-1:2001, CB Test-Zertifikat: DE 2-013297• Zertifikate: FCC Class B, CE Mark• Stromspeisung: Über Netzwerk (PoE, IEEE 802.3af, Klasse 1) oder Netzteil 5 V DC• Leistungsaufnahme: 2,1 – 2,4 Watt• 1 x LAN, 1 x PC: RJ45 (Ethernet) • Ethernet: 2 x IEEE 802.3 10/100 Mbps switchEntsorgung des ProduktsReinigungDieses Gerät unterliegt der europäischen Richtlinie 2002/96/EG und darfnicht im Hausmüll entsorgt werden. Wenn Sie nicht wissen, wo Sie IhrAltgerät entsorgen können, wenden Sie sich bitte an Ihre Kommune, Ihrenörtlichen Müllentsorger oder Ihren Fachhändler.Benutzen Sie ein antistatisches Tuch. Benutzen Sie kein Wasser und keineReinigungsflüssigkeiten, da sie die Oberfläche und die Elektronik des Gerätesbeschädigen könnten.16
<strong>Quick</strong> <strong>Start</strong> <strong>Guide</strong>Initialisierung und Registrierung des TelefonsBeachten Sie bitte: Sie benötigen die von Ihrem Netzwerkadministrator oderIhrem Vo<strong>IP</strong>-Provider erhaltenen Zugangsdaten für die Registrierung und NutzungIhres Accounts (Kontos), normalerweise Telefonnummer, Passwort und Registrar.Sobald Sie das Telefon - wie auf den Seiten 2-5 gezeigt - an das Netzwerkangeschlossen haben, beginnt es mit der Initialisierung und Registrierung.Die Initialisierung erfolgt normalerweise automatisch über DHCP. Falls Ihr NetzworkDHCP nicht unterstützt, benötigen Sie außerdem die <strong>IP</strong>-Addresse, den <strong>IP</strong>-Gateway undden DNS Server, die Sie ebenfalls von Ihrem Netzwerkadministrator oder Vo<strong>IP</strong>-Providererhalten, um sie manuell einzugeben, wenn Sie auf dem Display dazu aufgefordert werden.Treffen Sie bei Aufforderung auf dem Display Ihre Auswahl mit . Speichern Sie mit P.DEUTSCH1. Sprache. Die Einstellung ab Werk ist Englisch. Andere Sprachen stehen zurVerfügung, wenn Ihr Telefon/Netzwerk bei der Initialisierung mit dem Internetverbunden ist, so dass sie automatisch vom snom-Server heruntergeladen werdenkönnen (Firmware 7 und höher).2. Rufton3. Zeitzone4. Geben Sie den Account/die Telefonnummer ein > P5. Geben Sie den Registrar ein > P. Bei erfolgreicher Anmeldung sehen Sie jetztden Ruhebildschirm:Datum:Account = Identität (NR: nicht registriert)KontextsensitiveFunktionssymboleKontextsensitiveFunktionstastenZeitFunktionstaste drückenzum Aktivieren/Ausführen/Öffnen der FunktionZahlen, Buchstaben und Sonderzeichen eingebenNehmen Sie den Hörer ab oder drücken Sie eine beliebige alfanumerische Taste.TextfeldLinks vom Pfeil :Jetziger EingabemodusRechts vom Pfeil : Taste drückenzum Ändern des Eingabemodus> > >Telefonbucheinträge editieren:Zeichen links vomCursor löschen:Das Zeichen links vomCursor löschenTaste drückenzum Löschen desgesamten TextesEingabemodi:: Ziffern: Kleinbuchstaben: GroßbuchstabenDen Cursor nach linksbzw. nach rechts bewegen:Jetziger Eingabemodus. Ändern mit :abc > ABC > 123 > abcabc - KleinbuchstabenABC - Großbuchstaben 123 - ZiffernEingabe von Sonderzeichen in den Eingabemodi Klein- u. Großbuchstaben: Taste "1"schnell drücken, mit einer Pause nach jedem Zeichen.Beispiele: 1x = "." 2x = "+" 3x = "@" 4x = "1" 5x = ":" 6x = ","17
<strong>Quick</strong> <strong>Start</strong> <strong>Guide</strong>DEUTSCHNavigationstaste - Funktionen bei Ruhebildschirm:: Identität für ausgehende Anrufe: Menü EinstellungenAuf einen Blick18Display -RuhebildschirmIdentitätBeenden- & OK-TastenAktionen & Eingaben beenden/löschenKontextsensitive FunktionenAktionen & Eing. bestätigen, speichernKontextsensitive Funktionstasten(programmierbar)Neue Nachricht + verpasste Anrufe• Rote LED: Neue Nachricht - zum Abhörendrücken (falls von Tel.-Anlageunterstützt)• LED leuchtet gelb: Verpasster Anruf -zum Ausschalten der LED drücken• LED gelb & schnell blinkend: EingehenderAnrufAufzeichnung (falls v. Tel-Anlage unterstützt)AlphanumerischeTastaturAudiotasten• Lautstärkeregelungder Klingel bei läutendemAnruf bzw. des Lautsprechers,wenn im Gespräch• Mikrofon ein-/ausschalten• Gehäuselautsprecher ein/aus• Headset ein-/ausschaltenFrei programmierbare Funktionstastenmit LEDs: . Standardeinstellung:Leitung. Leitungs-LED:• Schnell blinkend: Eingehender Anruf. ZurAnnahme Taste drücken.• Leuchtend: Im Gespräch• Langsam blinkend: Gehaltener AnrufVorprogrammierteFunktionstastenSternchentaste• Kurz gedrückt: Bei der Texteingabezwischen Groß-u.Kleinbuchstaben wechseln• Einige Sekunden gedrückt:Tastatur verriegeln/entriegelnMenü Einstellungen<strong>IP</strong>-Adresse, MAC-Adresse, Firmware-VersionFrei programmierbarAnruf weiterleiten"Nicht stören"-Funktion an/ausErneut wählenTelefonbuchFrei programmierbarKonferenz starten/beendenAnruf auf Halten setzenRautetaste
<strong>Quick</strong> <strong>Start</strong> <strong>Guide</strong>Menü Einstellungen • Mit die Untermenüs durchblättern• Drücken Sie auf die Funktionstaste unter dem Funktionssymbol, um die Funktion aufzurufen• Drücken Sie auf P, um die Einstellung zu speichern• Drücken Sie auf , um zum vorherigen Bildschirm oder zum Ruhebildschirm zurückzukehrenAdministratormodus: Benutzermodus:KopfhörerKonfigurationAllgem.EinstellungenTelefonverhaltenUmleitungbeiAus Anklopfen KontrastRegAnZeit F-Tasten SpracheResetAus* Vorangestelltes Sternchen:Zur Zeit aktive AuswahlNeustartImmerDHCPBesetztLautstärke WebinterfaceSystem InfoVLANEinstellungenAndereEinstellungenNetzwerkIDServerZeitzoneHörerSpeicherPrioritätHTTPTöne (Wählton)KopfhörerDie Untermenüs unddie Einstellungen indunkelgrau sind imBenutzermodus nichtverfügbarResetHTTPSxxxxx> PLautsprecherDEUTSCH19
<strong>Quick</strong> <strong>Start</strong> <strong>Guide</strong>DEUTSCHAdministrator- und BenutzermodusDie Einstellung ab Werk ist Administratormodus. Das werkseitig eingestellteAdministrator-Kennwort lautet: 0000 (4 x Null).• Vom Administrator- in den Benutzermodus wechseln: Webbrowser des Telefons >Erweitert > Qos Sicherheit > Sicherheit > Administratormodus: Aus > Speichern• Vom Benutzer- in den Administratormodus wechseln: Webbrowser des Telefons >Erweitert > Administratorlogin: Administratorkennwort eingeben > SpeichernDer Webbrowser des Telefons1. Im Display die <strong>IP</strong>-Adresse anzeigen: > <strong>IP</strong> Adr, z.B. 192.168.10.115.Öffnen Sie den Webbrowser Ihres PCs, tippen Sie http://und die <strong>IP</strong>-Adresse in dieAdresszeile und drücken Sie auf die Bestätigen-Taste, um auf die <strong>Start</strong>seite desTelefon-Webbrowsers zu gelangen.2. Klicken Sie auf einen Menüpunkt auf der linken Seite, um das dazugehörige Fensterzu öffnen, z.B. Präferenzen.3. Enthält das Fenster mehrere Seiten, klicken Sie auf einen Tab (“Karteireiter”) amoberen Rand, um die Seite sichtbar zu machen. Der Schriftschnitt der Textzeichenauf der sichtbaren Seite ist fett.4. Vor dem Schließen des Telefonbrowsers oder dem Anklicken eines anderenMenüpunktes immer auf "Speichern" klicken, wenn die vorgenommenen Änderungenwirksam werden sollen.ZeitformatWebbrowser > Präferenzen > Allgemeine Informationen > 24-Stundenuhr:An: 24-Stundenformat, 00:01 - 24:00Aus: 12-Stundenformat AM/PM, 0:01 AM - 12:00 PMDatumsformatWebbrowser > Präferenzen > Allgemeine Informationen > US Datumsformat:An: 3/8/2010 Aus: 8.3.2010Identitäts-/KontoeinstellungenWebbrowser > Identität 1-1220
<strong>Quick</strong> <strong>Start</strong> <strong>Guide</strong>Die Bedienung des TelefonsIdentität für ausgehende Anrufe wählenVom Ruhebildschirm mit p q eine der konfigurierten Identitäten auswählen.Anrufen• Nummer auf der alphanumerischen Tastatur eingeben und Hörer abheben oder• Hörer abheben, Nummer eingeben, P oder• , Nummer eingeben, P.Anrufe annehmenDEUTSCH• Mit dem Hörer: Hörer abheben• Mit einem Headset: P oder blinkende Leitungstaste drücken• Mit dem Gehäuselautsprecher/-mikrofon: drücken.Anruf auf Halten setzenoder die Leitungstaste des Anrufs drücken. Die LEDblinkt jetzt langsam. Erneut drücken, um den Anrufwieder aufzunehmen. Wenn mehr als ein Anruf gehaltenwird: Die Leitungstaste eines Anrufes drücken, um dasGespräch wieder aufzunehmen.Konferenz (3-er)1. Ihre Telefonnummer: 154. Setzen Sie den ersten Anrufer(Jane Doe) auf Halten.2. Rufen Sie den zweiten Teilnehmer (158) an. Mit demzweiten Teilnehmer in der Leitung:3. Konferenz starten: drücken. Während der Konferenz:4. Mit die Konferenz stoppen und beide Teilnehmer aufHalten setzen:5. Konferenz erneut starten: Leitungstaste eines Teilnehmers drücken, dann .WeiterleitungMit AnkündigungAnruf auf Halten setzen. Telefonnummer wählen, an die weitergeleitet werden soll. Willder Teilnehmer den Anruf entgegennehmen: > P drücken.Ohne AnkündigungWenn ein eingehender Anruf läutet oder mit einem Anruf in der Leitung:> Telefonnummer, an die weitergeleitet wird, wählen > P drücken.drücken21
<strong>Quick</strong> <strong>Start</strong> <strong>Guide</strong>DEUTSCHRufumleitung1. Rufumleitung einschalten.a. Alle eingehenden Anrufe: Umleitung > [Immer] > Ziel Immer:Telefonnummer eingeben > P.b. Bei Besetzt: Umleitung > [Besetzt] > Ziel Besetzt: Telefonnummereingeben > P.c. Wenn der Anruf nicht angenommen wird: Umleitung > [Zeit] > Ziel beiTimeout: Telefonnummer eingeben > Umleitung Zeit: Anzahl der Sekundeneingeben, nach deren Verstreichen umgeleitet wird > P.d. Umleitungshinweis auf dem Ruhebildschirm:2. Rufumleitung ausschalten: Umleitung > [Aus]Anruflisten1. Vom Ruhebildschirm öffnen: [Listen].2. Anrufliste mit Funktionstaste auswählen: [Verpasst], [Angen.], [Gewählt]3. Listeneintrag suchen: . Nummer des markierten Eintrags wählen: P.Telefonbuch• Öffnen: . Scrollen: . Nummer des markierten Eintrags wählen: P.• : > • Einträge bearbeiten: Siehe "Zahlen, Buchstaben und Sonderzeichen eingeben" aufSeite 17.FehlerbehebungNeustart (Reboot): > Konfiguration > [Neustart] > "Neustart?" > PHarter Neustart: Netzstecker ziehen. Telefon nach ein paar Sekunden wiederanschließen.Nie während eines Firmware-Updates die Stromzufuhr unterbrechen!Werte zurücksetzen: > Konfiguration > [Reset] > Administrator-Kennwort eingeben > P. Das werkseitig eingestellte Kennwort ist 0000 (4x Null).Alle persönlichen Einstellungen werden gelöscht!22
<strong>Quick</strong> <strong>Start</strong> <strong>Guide</strong>FRANÇAISCe manuel abrégé décrit l'installation, l'initialisation et la mise en service dusnom <strong>320</strong>. Consultez notre site web pour des informations complémentaires:http://wiki.snom.com/<strong>Snom</strong><strong>320</strong>.Copyright, Marques Déposées, GPL, Non Responsabilitée© 2010 snom technology AktiengesellschaftTous droits réservés.snom, les noms des produits snom et les logos snom sont des marques déposées par snomtechnology AG. Tous les autres noms de produits et noms d'entreprises sont les propriétés deleurs détenteurs respectifs.snom technology AG se réserve le droit de modifier et de changer ce document à n'importe quelmoment, sans devoir annoncer de telles modifications ou changements avant ou après leur miseen place.Les textes, images et illustrations ainsi que leur mise en page dans ce document sont protégéspar les copyrights et autres dispositions légales internationales. Leur utilisation, leur reproductionet leur transmission à des parties tierces sans accord express écrit peut induire des poursuitesdevant les cours criminelles et civiles.Bien que le plus grand soin ait été apporté à la compilation et à la présentation des informationscontenues dans ce document, les données sur lesquelles elles sont basées peuvent entretempsavoir été modifiées. snom doit donc décliner toute garantie et toute responsabilité quand àl'exactitude et à l'exhaustivité des informations publiées excepté en cas de négligence flagrante dela part de snom ainsi que des les cas ou la responsabilité de snom est engagée de par la loi.Notre firmware inclus des éléments de code source qui peuvent être utilisés et modifié parquiconque selon les termes des licences GPL (cf. page 110), à condition qu'à leurs tours ils lesrendent disponibles selon les mêmes termes. Veuillez vous rendre sur http://www.snom.com/de/support/download/gpl-quellcode/ pour consulter la licence GPL originelle et le code source descomposants couverts par la licence GPL qui sont utilisé dans les produits snom.FRANÇAISInformations importantesVeuillez lire les informations concernant la sécurité et la mise au rebut de l'appareilainsi que celles concernant son installation et son utilisation avant d'utiliser l'appareil.Communiquez également ces informations aux autres utilisateurs ou faites-les leur lire.Conservez ce manuel et ne cédez pas l'appareil à une tierce partie sans y joindre lemanuel.SécuritéSuivez les instructions présentes dans ce manuel et dans les autres documentsconcernant l'appareil.• Evitez de placer le câble d'alimentation de l'appareil dans un endroit ou il estpossible de trébucher dessus. Evitez également de le placer là ou il pourraitêtre exposé à un écrasement car il pourrait en être endommagé. Si le cordond'alimentation ou la fiche sont endommagés, débranchez l'appareil et contactez dupersonnel d'entretien qualifié.• Cet appareil est destiné à une utilisation en intérieur uniquement! Ne l'installezpas au dehors!23
snom <strong>320</strong> <strong>Quick</strong> <strong>Start</strong> <strong>Guide</strong>• N'installez pas l'appareil dans des pièces très humides (par exemple, dans une sallede bain, une buanderie ou un sous-sol humide). N'immergez pas l'appareil dans l'eauet ne versez pas de liquides d'aucune sorte sur ou dans l'appareil.• N'installez pas l'appareil dans un lieu présentant un risque d'explosion (un magasinde peinture par exemple). N'utilisez pas l'appareil si vous sentez une odeur de gaz oud'autres émanations potentiellement explosives.• N'utilisez pas l'appareil durant les orages, le choc d'un éclair sur les circuitsélectriques peut provoquer une électrocution.FRANÇAISConforme à T.B.T.S (Très Basse Tension de Sécurité)Le niveau de sécurité des connexions d'entré/sortie est conforme aux recommandationsT.B.T.S (SELV).Avertissement : Pour éviter les électrocutions, ne connectez pas les circuitsde SELV / TBTS aux circuits sous tension du réseau téléphonique (TNV). Neconnectez le câble NET/Ethernet qu'à un port LAN!Conformité au standardsCet appareil est certifié CE et FCC et répond aux standardsenvironnementaux, de sécurité et de santé européens et américains.L'ouverture, la modification ou le remplacement sans autorisation del'appareil annule la garantie et peut également annuler les certificationsCE et FCC. En cas de mauvais fonctionnement, veuillez contacterle personnel d'entretien agrée, votre revendeur ou bien snom.• Sécurité: IEC 60950-1:2001, Certificat CB Test: DE 2-013297• Certificat: FCC Class B, CE Mark• Consommation d´énergie: 2,1 – 2,4 Watts• Alimentation: Par transformation 5 V DC ou PoE (Power over Ethernet) IEEE 802.3af,Classe 1• 1 x LAN, 1 x PC: RJ45 (Ethernet)• Ethernet: 2 x IEEE 802.3 10/100 Mbps switchMise au Rébut du ProduitNettoyage24Cet appareil est soumis à la Directive 2002/96/CE et ne peut être misau rebut avec les déchets ménagers normaux.Si vous ne savez pas ou mettre au rebut oú faire recycler l'appareillorsqu'il arrive au terme de son existence, contactez votre municipalité,la société locale en charge de la gestion des déchets ou votrevendeur.Utilisez un tissu antistatique. N'utilisez pas de l'eau ou un produit de nettoyage liquideou solide. Ils peuvent endommager l'éléctronique ou les sufaces de l'appareil.
Initialisation et enrégistration<strong>Quick</strong> <strong>Start</strong> <strong>Guide</strong>Renseignement: Vous devez également disposer des données pour laregistration et l'utilisation de votre compte que vous avez reçu de votreadministrateur réseau ou de votre fournisseur de Vo<strong>IP</strong>, normalement la numéro detéléphone, le mot de passe et le régistraire.Une fois que l'appareil est connecté avec le réseau comme indiqué sur les pages 2-5, ilcommence à s'initialiser et se registrer.L'initialisation est normalement fait automatiquement via DHCP. Si votre réseau nesupporte pas le protocole DHCP, vous devez également saisir l'adresse <strong>IP</strong>, la passerelle<strong>IP</strong> et le serveur DNS manuellement. Demandez-les de votre administrateur réseau ou devotre fournisseur de Vo<strong>IP</strong> et suivez les instruction qui s'affi chent à l'ecran.Sélectionnez une option avec et sauvegardez chaque sélection avec P.1. Langue. Le paramètre par défaut est Anglais. D'autres langues sont disponibles sivotre téléphone est connecté à l'internet lors de l'initialisation. Dans ce cas ils sonttéléchargés à partir du serveur snom (Firmware 7 et supérieur).2. Tonalité3. Fuseau horaire4. Saisissez votre numéro de téléphone/compte + appuyez sur P5. Saisissez votre registraire + P . Si l'enregistrement a réussi l'écran d'attentes'affi che:Date:Compte = Identité (NR: pas enregistrée)Symboles de fonctioncontextuellesTouches de fonctioncontextuellesL‘heureAppuyez sur la touche defonction pour activer lafonctionFRANÇAISSaisie de lettres, chiffres et caractères spéciauxAppuyez sur l'une quelconque des touches alphanumeriques.Champs de saisieÀ gauche de la flêche:Mode de saisie actuelleÀ droite de la flêche: Appuyez sur latouche pour changer la mode de saisieà: > > >Modifi er l'annuaire:Supprimer la lettre à lagauche du curseurAppuyez poursupprimer toutesles saisiesModes de saisie:: Chiffres: Lettres minuscules: Lettres majusculesDéplacer le curseur vers lagauche ou vers la droite:Supprimer la lettre àla gauche du curseur:Mode de saisie actuel. Appuyez surpour le changer: abc > ABC > 123 > abcabc - Lettres minusculesABC - Lettres majuscules123 - ChiffresSaisie de caractères spéciaux en mode de saisie lettres: Appuyez rapidementplusieurs fois sur la touche "1", avec une petite pause après chaque caractère.Examples: 1x = "." 2x = "+" 3x = "@" 4x = "1" 5x = ":" 6x = ","25
<strong>Quick</strong> <strong>Start</strong> <strong>Guide</strong>FRANÇAISTouche de navigation - ses fonctions enétat inactif:: Sélectionner une identité: Menu ParamètresD'un seul coup d'oeil26Écran -en état inactifIdentitéTouches annulation & confirmationAnnuler / Confi rmer des actions &xxxxxxxxxxxxxxxxxxxxentrées, sauvegarderSymboles contextuellesdes fonctions personnalisablesTouches de fonction, contextuelleset personnalisablesNouvel message + appels manqués• Diode rouge: Nouvel message - appuyersur pour l'écouter (si soutenu par lePABX)• Diode jaune: Appel manqué -appuyez surpour l'éteindre• Diode jaune clignote rapidement: AppelentrantTouches audio• Réglage du volume• Microphone (mise enmarche/arrêt)• Haut-parleur (marche/arrêt)• Casque (marche/arrêt)ClavieralphanumériqueEnregistrement (si soutenu par le PABX)Touches de fonction programmableavec diodes: . Défaut: Ligne.LED de la ligne:• Clignotement rapide: Appel entrant.Accepter l'appel: Appuyez sur la touche.• Allumé: Appel en cours• Clignotement lent: Appel en attenteTouche dièseTouches de fonction programméesTouche asterisque• Appuyé brièvement en modede saisie: Passer entre modemajuscule et mode minuscule• Appuyé pour quelquessecondes: Verrouiller/déverrouiller le clavierMenu ParamètresAdresse <strong>IP</strong>, Adresse MAC, version du micrologicielLibrement programmableTransférer un appelFonction "Ne pas déranger" (mettre en marche/arrêt)RecomposerAnnuaireLibrement programmableConference: Démarr./fermerMettre un appel en attente
<strong>Quick</strong> <strong>Start</strong> <strong>Guide</strong>Menu Paramètres • Scroller les sous-menus avec • Appuyez sur la touche de fonction au-dessous le symbole pour activer la fonction• Appuyez sur P pour sauvegarder le paramètre• Appuyez sur pour retourner a l'écran préalable ou à l'écran d'attenteEn mode administrateur: En mode utilisateur:CasqueConfigurationRéglagegéneralPersonnalisationRenvoid'appelArrêt LED Présentation 1 ContrasteRegArrêtTemps 2 FkeysLangueReset 3Marche* Astérisque antéposé:Sélection active en cours3Tous lesparamètrespersonnalisésseront écrasésRedémmarrageDHCP1LED présentation:Appel en attente2Temps: Apres un délai deréponseToujoursOccupéInfoSystemeParametresVLANInterfaceWebAutresréglagesContrôle duvolumeReseauIDServeurFuseauCombinéMémoirePrioritéHTTPTonalitéCasqueLes sous-menus et lesparamètres en gris foncéne sont pas disponiblesen mode utilisateurHaut-parleur xxxxx> PHTTPS RedémarrageFRANÇAIS27
<strong>Quick</strong> <strong>Start</strong> <strong>Guide</strong>Mode administrateur/mode utilisateurLa réglage par défaut est le mode administrateur. Le mot de passe administrateur pardéfaut est: 0000 (4 x zéro).• Passer de mode administrateur en mode utilisateur: Interface web du téléphone >Avancés > Qos/Security > Securité > Mode Administrateur: Off > Sauvegarder• Passer de mode utilisateur en mode administrateur: Interface web du téléphone >Avancés > Login Administrateur: Saisissez le mot de passe administrateur dans lechamps de saisie > Sauvegarder.FRANÇAISL'interface Web du téléphone1. Obtenir l'adresse <strong>IP</strong>: , p.ex. 192.168.10.115.2. Ouvrez le navigateur web de votre PC et saisissez http:// suivi de l'adresse <strong>IP</strong> dansla barre d'adresse. Appuyez sur la touche d'entrée pour ouvrir la page d'accueil del'interface Web du téléphone.3. Cliquez sur un élément au menu à gauche pour ouvrir la page correspondante.4. Certaines pages contiennent plusieurs documents. Pour rendre visible un document,cliquez sur 'onglet correspondant. Les lettres de l'onglet actif sont affichées encaractères gras.5. Appuyez toujours sur la touche "Sauvegarder" avant de cliquer sur un menu differentou de refermer l'interface Web si vous désirez appliquer les modifications que vousavez effectuées.Format de l'heureInterface Web > Préférences > Informations générals > Horloge 24 HeuresOn: Format 24 heures, 00:01 - 24:00Off: Format 12 heures AM/PM, 0:01 AM - 12:00 PMFormat de la dateInterface Web > Préférences > Informations générals > Format date U.S. (mm/dd):On: 3/8/2010 Off: 8.3.2010Paramètres d'identité/compteInterface Web > Identité 1-1228
Renvoi d'appel<strong>Quick</strong> <strong>Start</strong> <strong>Guide</strong>1. Activer le renvoi d'appel.a. Tous les appels entrants: Renvoi d'appel > [Touj] ours > Always target:composez le numéro > P.b. Sur occupation: Renvoi d'appel > [Occupé ] > Numéro occupé:composez le numéro > P.c. Après un délai de réponse: Renvoi d'appel > [Tempo] > 5 Cible Timeout:composez le numéro > P > Temporisation (attente en secondes avant detransferer l'appel): saisissez le nombre de secondes > P.FRANÇAISd. L'écran inactif quand le renvoi d'appel est activé:2. Désactiver le renvoi d'appel: Renvoi d'appel > [ARRÊT].Listes des appels1. Ouvrir les listes de l'écran inactif: [Appel].2. Appuyez sur la touche de fonction au-dessous [perdu] (appels manqués), [recu],[appelé]) pour ouvrir la liste.3. Scroller dans la liste: . Composer le numéro de l'entrée choisie: PAnnuaire du téléphone• Ouvrir: Appuyez sur . Faire défiler: . Composer le numéro de l'entréechoisie: P• : Appuyez sur > • Modifier les entrées: Cf. "Saisie de lettres, chiffres et caractères spéciaux", page 25.DépannageRedémarrage (Reboot)> Config > [Redéma]rrage > "Reboot?" > PRedémarrage à froidRetirez la prise de courant. Rebranchez l'alimentation après quelques secondes.Ne coupez pas l'alimentation pendant une mise à jour du firmware !Réinitilasation aux valeurs d'usine> Config > [Reset] > Saisissez le mot de passe administrateur > P.Mot de passe administrateur par défaut: 0000 (4 x zéro)Tous les paramètres personnalisés seront écrasés!30
<strong>Quick</strong> <strong>Start</strong> <strong>Guide</strong>ITALIANOQuesta è la guida rapida per l'installazione, l'impostazione e ilfunzionamento dello snom <strong>320</strong>. Per ulteriori informazioni consultare lanostra pagina web:http://wiki.snom.com/<strong>Snom</strong><strong>320</strong>.Copyright, Marchi registrati, GPL, Declinazione di responsabilita© 2010 snom technology AktiengesellschaftTutti i diritti riservati.snom, i nomi dei prodotti snom, ed i loghi snom sono marchi registrati di proprietà di snomtechnology AG. Tutti gli altri nomi di prodotti e di imprese sono proprietà dei rispettivi proprietari.snom technology AG si riserva il diritto di rivedere e modificare il presente documento in qualsiasimomento senza alcun obbligo di notifica precedente o posteriore a tali cambiamenti.Testi, immagini ed illustrazioni ed il loro ordine in questo documento sono soggetti a protezione deldiritto d’autore ed altri diritti legali a livello mondiale. Il loro utilizzo, riproduzione e trasmissione aterzi senza il permesso scritto potrebbe dar luogo ad azioni legali, in sede penale e civile.Sebbene sia stata prestata la massima attenzione nella stesura e presentazione delle informazioniin questo documento, i dati su cui si basa potrebbero già aver subito variazioni. snom pertantodeclina ogni responsabilità riguardo a tutte le garanzie di affidabilità, accuratezza, completezza edattualità delle informazioni pubblicate, tranne nel caso di grossolana negligenza da parte di snom oladdove per legge è ritenuta responsabile.Il nostro firmware include codice sorgente utilizzabile e modificabile da chiunque. La licenzapubblica GNU (GPL) (cfr. pag. 92), consente di rendere disponibile il software con lo stessoaccordo di licenza. Visitate http://www.snom.com/de/support/download/gpl-quellcode/ per lalicenza GPL originale e per i codici di sorgente di componenti sotto licenza GPL ed utilizzati inprodotti snom.ITALIANOInformazioni importantiPregasi leggere con attenzione le istruzioni inerenti la sicurezza, lo smaltimento el‘installazione del dispositivo prima del suo impiego. Tali informazioni vanno condivisecon gli altri utenti. È altresì necessario conservare questo manuale, consegnandoloinsieme al dispositivo qualora esso venga dato a terzi.SicurezzaSeguite le istruzioni in questo manuale e tutta la documentazione relativa al dispositivo.• Utilizzate solo l’adattatore del dispositivo. Altri adattatori di corrente potrebberodanneggiare, anche irreversibilmente, il dispositivo soggetto a pressione meccanicaed il cavo. Se il cavo o la spina si danneggiano, scollegare il dispositivo e contattareil personale di assistenza qualificato.• Non posizionare il cavo di corrente del telefono dove può essere calpestato.Non posizionare il cavo di corrente del telefono dove può essere soggetto apressione meccanica perchè potrebbe danneggiare il cavo. Se il cavo o la spina si31
<strong>Quick</strong> <strong>Start</strong> <strong>Guide</strong>Menu Impostazioni • Aprire il menu/sottomenu con • Premere il tasto funzione sotto il simbolo per attivare la funzione• Premere P per salvare l'impostazione• Premere per tournare alla scherma precedente o allo schermo inattivoModalità amministratore: Modalità utente:CuffieConfigurazioneImpostazionigeneraliImpostazioniTelefonTrasferisciChiamataSpento Chiamata in 1 ContrastoRegSpentoTempo 2 Tasti funzione LinguaResetta 3Acceso*Asterisco anteposto:Selezione attualmente attivo3Tutte leimpostazionimodifi cateandranno perse!RiavviaDHCP1Chiamata in: Notifi cazioneMWI (acceso-spento)2Tempo: Dopo Timeout (senzoriposto)SempreOccupadoInfoSistemaImpostazioniVLANInterfacciaWebAltreimpostazioniImpostazionivolumeReteIDServerFuso o(rario)CornettaMemoriaPriorityHTTPTono ch(iam)Cu(ffi e)I sottomenu el'impostazioni engrigio scuro non sonodisponibile in modalitàutenteResettareHTTPSxxxxx> PAltoparlantiITALIANO35
<strong>Quick</strong> <strong>Start</strong> <strong>Guide</strong>Modalità utente/Modalità amministratoreL'impostazione di fabbrica è la modalità di amministratore. La password di default perl'amministratore è: 0000 (4 x zero). Cambiare la modalità:• Tra modalità amministratore a modalità utente: Interfaccia web > Avanzate > QoS/Security > Sicurezza > Mod. amministratore: Off > Salva• Tra modalità utente a modalità amministratore: Interfaccia web > Avanzate > Loginamministratore: Digitare la password di amministratore > Salva.L'interfaccia Web del telefono1. Trovare l'indirizzo <strong>IP</strong>: , per esempio 192.168.10.115.2. Aprire il browser web del vostro PC e digitare http:// seguito dall'indirizzo <strong>IP</strong> nellabarra degli indirizzi. Premere Invio per apprire l'interfaccia Web del telefono.3. Cliccare su una voce del menu per aprire la pagina relativa.ITALIANO`4. Alcune pagine contengono svariati documenti. Per rendere visibile un documento,cliccare sulla sua scheda. Il carattere è in grassetto per la scheda attiva.5. Ricordare di premere sempre "Salva" prima di cliccare su un'altra voce del menu o dichiudere l'interfaccia web se volete che le modifiche vengano applicate.Formato oraInterfaccia Web > Preferenze > Informazioni generali > 24 Hour clock:On: Formato 24 ore, 00:01 - 24:00Off: Formato 12 ore AM/PM, 0:01 AM - 12:00 PMFormato della dataInterfaccia Web > Preferenze > Informazioni generali > US date format (mm/dd):On: 3/8/2010 Off: 8.3.2010Impostazioni identità/AccountInterfaccia Web > Identità 1-12Usare il telefonoSelezionare un’identità per la chiamata in uscita in corsodallo display inattivo: qp36
<strong>Quick</strong> <strong>Start</strong> <strong>Guide</strong>Chiamare• Digitare il numero e sganciare la cornetta o• Sganciare la cornetta, digitare il numero e premere P o• , digitare il numero, P.Accettare le chiamate• Usando la cornetta: Sganciare la cornetta• Usando una cuffia: Premere P o il tasto linea lampeggiante• Usando il vivavoce: PremereMettere le telefonate in corso in attesaPremere . Il LED lampeggia lentamente. Riprenderela chiamata: Premere . Con più chiamate in attesa:Premere il tasto della linea per riprendere uno da cui.Conferenza a tre1. Il tuo numero di telefono: 154. Mettere le primachiamata (Jane Doe) in attesa.2. Chiamare il secondo partecipante (158). Con laseconda chiamata sulla linea:3. Avviare la conferenza: . Conferenza in corso:4. Fermare la conferenza e mettere i partecipanti in attesa:.5. Avviare la conferenza di nuovo: Premere il tasto della linea di uno da cui e .TrasferimentoAnnunciatoMettere le chiamata in attesa > Digitare il numero della terza persona. Annunciate lachiamata > Se il terzo desidera accettare la chiamata: Premere > P.Trasferimento diretto (senza annunciare la chiamata): Con la chiamata sullalinea: Premere , digitare il numero della terza persona > premere P.Inoltro di chiamate1. Attivare l'inoltro di chiamatea. Tutte le chiamate in arrivo: Trasferisci Chiamata > [Sempr]e > Sempreinterno: digitare il numero > P.b. Se occupato: Trasferisci Chiamata > [Occupa]to > Interno occupato:digitare il numero > P .c. Dopo timeout (senza risposta): Trasferisci Chiamata > [Temp] >Timeout target: digitare il numero > P > Ora trasferimento: digitare ilITALIANO37
<strong>Quick</strong> <strong>Start</strong> <strong>Guide</strong>numero di secondi precedenti all'inoltro > P.d. Display inattivo con trasferimento automatico attivato:2. Disattivare: Trasferisci Chiamata > [Spen]to > P.Gli elenchi chiamate1. Per aprire in stato di inattività: Premere [Reg.ch.]2. Selezionare un elenco (Lista chiamate: Perse, Entranti (in ingresso), (in) Uscenti) conil tasto funzione3. Scorrere l'elenco: . Chiamare il numero della registrazione selezionata: PElenco del telefono• Per aprire: Premere . Scorrere: . Chiamare il numero selezionata: P• Nuovo indirizzo : Premere > • Modificare indirizzi: Vedi "Inserire lettere, numeri e caratteri speciali", pagina Seite 33.ITALIANORisoluzione dei problemiRiavvio (Reboot) Configurazione > [Riavvia]Riavvio forzato> "Riavviare?" > PStaccare il telefono dalla presa di corrente. Ricollegare il telefono alla corrente dopoalcuni secundi.Non staccare dalla corrente quando il telefono si sta riavviando !Reimpostare i valori di fabbrica Configurazione > [Resetta] > digitare il password amministratore > PTutte le impostazioni modificate andranno perse!38
ESPAÑOL<strong>Quick</strong> <strong>Start</strong> <strong>Guide</strong>Esta es la Guía de Inicio Rápido para la instalación, configuración y uso delsnom <strong>320</strong>. Para más información, consulte el manual en nuestra páginawebhttp://wiki.snom.com/<strong>Snom</strong><strong>320</strong>.Propriedad intelectual, Marcas registradas, GPL, Responsabilidad© 2010 snom technology AktiengesellschaftTodos los derechos reservados.snom, los nombres de los productos snom, y los logos de snom son marcas comerciales propiedadde snom technology AG. Los demás nombres de producto y empresas son propiedad de susrespectivos propietarios.snom technology AG se reserva el derecho de revisar y modificar este documento en cualquiermomento, sin obligación de notificar estas revisiones o modificaciones por adelantado o conposterioridad a sz realización.Los textos, imagines e ilustraciones, y su presentación en este documento, están sujetos a la protecciónde copyright y otros derechos legales internacionales. Su uso, reproducción y transmisióna terceros sin permiso expreso por escrito puede dar lugar al inicio de procedimientos legales enlos tribunales penales y civiles.Aunque se han tomado todas las precauciones posibles en la compilación y presentación de lainformación de este documento, los datos en los que se basa pueden haber cambiado con eltiempo. snom, por lo tanto, renuncia a cualquier garantía y responsabilidad respecto a la precisión,exhaustividad y vigencia actual de la información publicada, excepto en el caso de intencionalidado negligencia grave por parte de snom cuando se deriven responsabilidades de acuerdo con lasdisposiciones legales vinculantes.Nuestro firmware incluye código fuente que puede ser usado y modificado por cualquier personabajo la licencia pública GNU (GPL) (vease la página 55), siempre que, a su vez, lo ponga a disposiciónde cualquier otra persona que tenga el mismo acuerdo de licencia. Acceda a http://www.snom.com/de/support/download/gpl-quellcode/ para obtener la licencia GPL original y el códigofuente de los componentes con licencia en virtud de la GPL y utilizados en productos snom.Información importanteLea las instrucciones sobre seguridad y reciclaje del teléfono, y sobre cómo configurary utilizar el teléfono antes de usarlo, y ofrézcalas igualmente a otros usuarios paraque las lean o se informen de su contenido. Conserve este manual y no entregue elteléfono a terceros sin el mismo.SeguridadSiga las instrucciones de este manual y cualquier otra documentación aplicable deldispositivo.• Si la alimentación del teléfono no se realiza mediante/por Ethernet, use exclusivamenteel adaptador de alimentación entregado con el teléfono o uno recomendadode forma expresa par snom. Otros adaptadores pueden dañar o incluso destruir elteléfono, afectar a su funcionamiento o provocar ruidos.• Evite poner los cables de modo que otras personas puedan tropezar con el mismo.No coloque los cables de forma que pueda verse sometido a presiones mecánicas,ya que eso podría dañar los cables. Si el cable de alimentación o el enchufe están39ESPAÑOL
snom <strong>320</strong> <strong>Quick</strong> <strong>Start</strong> <strong>Guide</strong>dañados, desconecte el teléfono y contacte con personal de servicio cualificado.• Este dispositivo es solamente para uso en interiores.• No instale el teléfono en lugares con humedad elevada (por ejemplo, en baños,lavaderos, o sótanos húmedos). No sumerja el teléfono en agua ni derrame o viertalíquidos de ningún tipo sobre el teléfono.• No instale el teléfono cerca de lugares con riesgo de explosión (talleres de pintura,por ejemplo). No use el teléfono si huele a gas o a otros vapores que puedan serexplosivos.• No use el teléfono durante una tormenta; los rayos que impacten en la red eléctricapueden descargas eléctricas.Cumplimiento de los requisitos SELV (Tensión Extra-Baja de Seguridad)Las condiciones de seguridad de las conexiones de entrada/salida cumplen con losrequisitos SELV.Atención: Para evitar descargas eléctricas, no conecte circuitos de seguridadde tensión extra-baja (SELV) a circuitos de tensión de red telefónica (TNV). Lospuertos LAN contienen circuitos SELV, los puertos PSTN contienen circuitosTNV. Algunos puertos LAN y PSTN utilizan conectores RJ-45 (8P8C). Tomeprecausiones cuando conecte los cables..ESPAÑOLCumplimiento con la normativaEste teléfono tiene certificación CE y FCC, y cumple con los estándaresde salud, seguridad y medioambientales europeos y de Estados Unidos.La apertura, cambio, o modificación no autorizadas del teléfono provocaránque la garantía se cancele, y también pueden resultar en la cancelación delas certificaciones CE y FCC. En caso de avería, contacte con personalde servicio autorizado, su vendedor, o snom.• Seguridad: IEC 60950-1:2001, Certificado de comprobación CB: DE 2-013297• Certificados: FCC Class B, Indicación CE• Consumo eléctrico: 2,1 – 2,4 W • 1 x LAN, 1 x PC: RJ45 (Ethernet)• Alimentación: 5 V DC o PoE (Power over Ethernet) IEEE 802.3af, Clase 1• Ethernet: 2 xIEEE 802.3 conmutador 10/100 MbpsEliminación40Este teléfono está sujeto a la Directriz Europea 2002/96/EC, y no se puededesechar con los residuos domésticos generales.Si no sabe dónde reciclar el dispositivo cuando deje de funcionar, contactecon las autoridades municipales, con su proveedor de gestión de residuoslocal o con su vendedor.Limpieza<strong>Use</strong> una paño antiestático. No utilice agua ni productos de limpieza, ya que podríandañar la superficie o los componentes electrónicos del aparato.
Inizialización y registro<strong>Quick</strong> <strong>Start</strong> <strong>Guide</strong>Importante: La información de registro que le haya proporcionada su proveedorde internet o su administrador de red, normalemente, el número de teléfono, laextensión, la contraseña y el registro.Cuando haya confi gurado el teléfono y lo haya conectado la red como se indica en laspáginas 2-5, el teléfono empezará a inicializar.Normalmente la inicialización es totalmente automática y se realiza a través del protocoloDHCP. Si su red no admite DHCP, debe obtener la dirección <strong>IP</strong>, la máscara de red, el <strong>IP</strong>de la puerta de enlace y el servidor DNS de su proveedor de internet o su administradorde red e introducirlos manualmente cuando se le solicite en la pantalla.Cuando se le indique, seleccione una opción con y guarde los cambios con P.1. Idioma. El idioma por defecto es inglés. Tiene otros idiomas disponibles si elteléfono/red está conectado a internet durante la inicialización, de modo que se lospuede proporcionar el servidor snom automáticamente (fi rmware 7 y superior).2. Tono de marcado3. Huso horario4. Introduzca la cuenta/el número de teléfono y pulse P5. Introduzca el registro (Registrar) y pulse P. Si el registro se realizó correctamente,la pantalla mostrará:Fecha:Cuenta = identidad (NR: no registrado)Símbolos de las funcionesdisponibles eneste contexto particularTeclas de funciónLa horaPulse la tecla de funciónpara activar la funciónIntroducir letras, números y caracteres especialesPulse cualquier tecla.Campo te textoA la izquierda de la flecha:Modo de entrada actualA la derecha de la flecha: Pulse latecla para cambiar el modo de entradaà: > > >Editar el directorio:Eliminar el carácter ala izquierda del cursor:Eliminar el carácter a laizquierda del cursorabc - MinúsculssABC - MayúsculasPulse para eliminarel entrada detexto completoModo de entrada:: Números: Minúsculas: MayúsculasMover el cursor a laizquierda | a la derecha:Modo de entrada actual. Le cambiar:Pulse : abc > ABC > 123 > abc123 - NúmerosIntroducir caracteres especiales y símbolos en modo letras: Pulse la tecla "1" una ovarias veces rápidamente, con una breve pausa después de cada letra.Ejemplos: 1x = "." 2x = "+" 3x = "@" 4x = "1" 5x = ":" 6x = ","ESPAÑOL41
<strong>Quick</strong> <strong>Start</strong> <strong>Guide</strong>ESPAÑOLTecla de navegación - las funciones enestado inactivo:: Selección del identidad: Menu AjustarDe un vistazo42Pantalla -estado inactivoIdentidadTeclas Cancelar & ConfirmaciónCancelar / Confi rmar acciones &entradas, guardarSímbolos de las funcionesdisponibles en este contextoparticularMensajes nuevos + llamad. perdidasTeclas de función, programables• LED rojo: Mensaje nuovo - pulsepara apagarlo (si es compatible con la PBX)• LED ámbar, luz fi ja: Llamada perdida.Apadado el LED: Pulse .• LED ámbar, parpadeo lento: LlamadaentranteTecladoalfanuméricasGrabar una llamada (si es comp. con la PBX)Teclas de audio• Ajuste de volumendel timbre (llam. entrante)o del alta-voz (llamada encurso).• Encendido/apagado:MicrófonoAltavozAuricularesTeclas de función con LEDs, libramenteprogramables: . confi guraciónpredeterminada de fábrica: Línea. LED:• Parpadeo rápido: Llamada entrante• Luz fi ja: Llamada en curso• Parpadeo lento: Llamada en esperaTecla almohadillaTeclas funcionespreprogramada/programableMenú AjustesDirección <strong>IP</strong>, dirección MAC, versión de fi rmwareLibramente programmableTransferenciaFunción "no molestar" encendido/apagadoRellamadaDirectorio telefónicoLibramente programmableConferenciaEsperaTecla asterisco• Pulsado brevementeen modo de edición:Alternar entre minúsculasy mayúsculas• Pulsado durante variossegundos: Bloquear/desbloquear el teclado
<strong>Quick</strong> <strong>Start</strong> <strong>Guide</strong>Menu Ajustes • Desplazar en los menús con • Pulse la tecla de función debajo del símbolo para activar el función• PulseP para guardar la selección• Volver a la pantalla de inactividad con En modo administrador: En modo usuario:ManoslibresConfigurationMenú generalComportamientodel teléfonoDesvíohaciaApagado CWI 1 ContrasteReg ApagadoHora 2 Teclas de función IdiomaReajuste 3 Encendido* Asterisco antepuesto:Opción activa en esemomento3Toda laconfi guraciónse borraráReinicioDHCP1CWI: Activar/desactivar lallamada en espera2Hora: Desvío tras tiempo excedidoSiempreOcupadoInformación delsistemaAjustesVLANInterfaz WebOtrasConfiguracionesControl devolumenRedIDServidorHuso orarioAuricularMemoriaPrioridadHTTPTonos del ti(tonos de marcado)ManosLos submenús e losajustes en gris oscuro noson accesibles en modode usuarioAltavozxxxxx> PHTTPSReajusteESPAÑOL43
<strong>Quick</strong> <strong>Start</strong> <strong>Guide</strong>Modo usuario/modo administradoreLa configuración por defecto de fábrica es el modo de administrador. La contraseña deladministrador es 0000 (4 x cero). Cambiar el modo:• Del modo de adminstradore a modo de usuario: Interfaz web del teléfono >Avanzado > Qos/Security > Seguridad > Modo Administrador: apagado > Salvar.• Del modo de usuario a modo de administradore: Interfaz web del teléfono >Avanzado > Administrador Acceso: introducir la contraseña de administrador en lacaja de texto > Salvar.La interfaz web del telefono1. Obtenga la dirección <strong>IP</strong> del teléfono: , por ejemplo 192.168.10.115.2. Abra el navegador de su PC y teclee http:// seguido de la dirección <strong>IP</strong> en la barrade direcciones. Pulse Enter para abrir la interfaz web del teléfono.3. Haga clic en un elemento del menú de la izquierda para abrir la página.ESPAÑOL4. Si una ventana contiene diversas páginas, haga clic en la pestaña de la partesuperior de la página para abrirla. La fuente de los caracteres de la pestaña activaestá en negrita.5. Los cambios que realice no tendrán efecto hasta que haga clic en "Salvar". Seperderán todos los cambios si abre otra página de la interfaz web o o si cierra lainterfaz web sin haber pulsado antes "Salvar".Formato de horaInterfaz Web > Preferencias > Información General > 24 Hour clock:Encendido: Formato 24 horas, 00:01 - 24:00Apagado: Formato 12 horas AM/PM, 0:01 AM - 12:00 PMFormato de fechaInterfaz Web > Preferencias > Información General > US date format (mm/dd)Encendido: 3/8/2010 Apagado: 8.3.2010Configuración y mocificación de la identidad/CuentaInterfaz Web > Identidad 1-1244
Uso del teléfonoSelección de identidad para la llamada salientedesde la pantalla inactiva: qpRealizar llamadas• Introduzca el número y descuelgue el auricular, o• Descuelgue el auricular, introduzca el número y pulse P o• , introduzca el número, P.<strong>Quick</strong> <strong>Start</strong> <strong>Guide</strong>Aceptar llamadas• Con el auricular: Descuelgue el auricular• Con un auriculares (Headset) : Pulse P o la tecla de línea que parpadee• Con el altavoz: PulsePoner la llamada en curso en esperaPulse o la tecla de línea. El LED empezará a parpadearlentamente. Vuelva a pulsar para retomar lallamada. Con más de una llamada en espera: Pulse la teclade línea de una llamada para la retomar.Conferencia a tres1. Su número de teléfono: 154. Ponga la primera llamada(Jane Doe) en espera.2. Llame al segundo participante (158). Con la segundallamada en línea:3. Pulse para iniciar la conferencia. Conferencia encurso:4. Pulse para parar la conferencia y poner a losparticipantes en espera.5. Retomar la conferencia: Pulse la tecla delínea de una llamada > pulse .Transferencia de llamadasTransferencia asistidaPonga la llamada en espera > Marque el número al que desea transferir la llamada ypulse P > Si el destinatario desea aceptar la llamada, pulse > pulse P.Transferencia directa (sin anunciar la llamada)Con la llamada en la línea: Pulse > marque el número al que se desea transferirla llamada > pulse P.Desvío de llamadas1. Activar el desvío de llamadas.ESPAÑOL45
<strong>Quick</strong> <strong>Start</strong> <strong>Guide</strong>a. Todas las llamadas entrantes: Desvío hacia > [Siempre] > Destinosiempre: introducir el número al que desviar la llamada > P.b. Cuando la línea este ocupada: Desvío hacia > [Ocupado] > Destinoocupado: introducir el número al que desviar la llamada > P .c. Si no responde a la llamada: Desvío hacia > [Hora] > Destino ausente:introducir el número al que desviar la llamada > P > Tiempo de desvío:introducir el número de segundos tras los que se debe desviar la llamada > P.d. Pantalla inactiva con desvío de llamadas activado:2. Desactivar: Desvío hacia > [Apagado] > P.Listas de llamadas1. Para abrir: Pulse [Listas].2. Seleccionar una lista ([Perdidas], [Recibidas], [Marcadas)] con la tecla de función3. Seleccionar un número de teléfono de la lista: > marcar el número con PDirectorio telefónico• Para abrir: Pulse . Desplazar: > marcar el número seleccionado con P• Crear una : Pulse > • Crear/modificare las entradas: Consulte la página Seite 41, "Introducir letras,números y caracteres especiales".ESPAÑOLSolución de problemasReinicio (Reboot) Configuración > Reinicio > P > "Reiniciar?" > PReinicio físicoDesconecte el cable de alimentación del teléfono. Vuelva a conectar la alimentaciónpasados unos segundos.No desconecte el cable de alimentación mientras se está actualizando elFirmware!Restablecer valores de fábrica Configuración > Reajuste > introducir la contraseña de administrador > PToda la configuración se borrará !46
snom <strong>320</strong> <strong>Quick</strong> <strong>Start</strong> <strong>Guide</strong>PORTUGUÊSEste manual de iníciação rápida descreve a instalação, configuração eoperação de snom <strong>320</strong>. Para mais informações, consulte o manual disponívelna nossa página na rede:http://wiki.snom.com/<strong>Snom</strong><strong>320</strong>.Copyright, Marcas Comerciais, GPL, Reclamações Legais© 2010 snom technology AktiengesellschaftTodos os direitos reservados.snom, os nomes dos produtos snom, e logotipos snom são marcas pertencentes à snomtecnologia AG. Todos os outros nomes de produtos e nomes de empresas são propriedade dosseus respectivos proprietários.snom tecnologia AG reserva o direito de rever e alterar este documento a qualquer momento, semser obrigado a anunciar tais revisões ou alterações antes ou depois do facto.Textos, imagens, ilustrações e sua disposição neste documento estão sujeitos à proteção dedireitos autorais e outros direitos legais a nível mundial. A sua utilização, reprodução e transmissãoa terceiros, sem expressa autorização por escrito pode resultar em processos judiciais nostribunais penais, bem como nos tribunais civís.Embora já se tenham tomado os devidos cuidados na elaboração e apresentação das informaçõescontidas neste documento, os dados em que se baseiam podem mudar sem aviso, pelo que,snom rejeita todas as garantias e responsabilidades pela não exactidão, integridade e atualizaçãodas informações publicadas, salvo em caso de ou negligência grosseira por parte da snom ouquando a responsabilidade surge devido à sua ligação a disposições legais.Nosso firmware inclui fonte de código que pode ser usado e modificado por todo e qualquer ummediante Licença Pública GNU (GPL) (ver Anexo na página), desde que, por sua vez, o tornedisponível para todos os outros, sob o mesmo acordo de licenciamento. Por favor, aceda a http://www.snom.com/en/support/download/gpl-quellcode/ para obter a licença GPL original e a fontede código para componentes licenciados sob GPL e usado em produtos snom.Informações ImportantesPor favor, leia as instruções de segurança e de eliminação, bem como as deconfiguração e utilização do aparelho, antes de usá-lo e recomende a outrosutilizadores que as leiam ou informe-os do conteúdo. Guarde este manual e nãotransfira o dispositivo a terceiros sem incluí-lo.Instruções de SegurançaSiga as instruções deste manual e outra documentação aplicável ao dispositivo.• Se o telefone não é fornecido com a corrente através de um cabo Ethernet, useapenas o adaptador de alimentação incluído na embalagem ou outro expressamenterecomendado pela snom tecnologia. Outras fontes de alimentação podem danificarou destruir o telefone, afectar o seu comportamento, ou provocar ruído.• Evite colocar os cabos onde as pessoas, podem tropeçar ou onde podem ficar47PORTUGUÊS
snom <strong>320</strong> <strong>Quick</strong> <strong>Start</strong> <strong>Guide</strong>expostas a pressão mecânica, pois pode danificá-los.• Este dispositivo é apenas para uso doméstico! Não instale ao ar livre - NÃO SEDESTINA A UTILIZAÇÃO AO AR LIVRE!• Não instale o aparelho em ambientes com elevada humidade (por exemplo, embanheiros, lavanderias, cave húmida). Não mergulhe o aparelho em água e não oderrame nem permita o contacto com líquidos seja de qualquer tipo.• Não instale o aparelho em ambientes com risco de explosões (lojas de tintas,por exemplo). Não utilize o dispositivo se sentir cheiro de gás ou outros químicospotencialmente explosivos.• Não utilize o dispositivo durante trovoadas. Raios que atingem a rede eléctricapodem causar choque eléctrico.Conformidade SELV (Tensão Extra Baixa de Segurança)A segurança das ligações de Entrada/Saída cumpre com os requisitos SELV.Atenção: Para evitar choque eléctrico, não ligue a Segurança Extra a Baixa Tensão(SELV) aos circuitos de tensão da rede telefónica (TNV). As entradas LAN contêmcircuitos SELV e as POTS contêm circuitos TNV. Algumas entradas LAN e POTSusam ligações RJ-45 (8P8C). Tenha cuidado ao ligar os cabos.Padrões de ConformidadeEste dispositivo possui a certificação CE e FCC e cumpre as normaseuropeias e dos E.U.A relativos à saúde, segurança e meio ambiente.A abertura não autorizada o ou modificação do aparelho não autorizadafará com que a garantia seja anulada e pode também resultar na extinçãodas certificações CE e FCC. Em caso de mau funcionamento contacte opessoal autorizado, o vendedor, ou a snom.• Segurança: IEC 60950-1:2001, CB Teste Certificação: DE 2-013297• Certificados: FCC Classe B, CE Marca• Consumo de energia: 2,8 – 2,4 Watt• Tensão: 5 V DC ou PoE (Power over Ethernet) IEEE 802.3af, Classe 1• Ethernet: 2 x IEEE 802.3 da 10/100 Mbps • 1 x LAN, 1 x PC: RJ45 (Ethernet)Eliminação do dispositivoPORTUGUÊSEste dispositivo está sujeito à directiva europeia 2002/96/CE e nãopode ser eliminado como lixo doméstico.Se não tem conhecimento do local de eliminação do dispositivo nofinal do ciclo de vida útil, contacte o gestor de resíduos local do seumunicípio ou o vendedor do dispositivo.LimpezaPara limpar o aparelho, use um pano anti-estático. Por favor, evite líquidos de limpeza,já que podem danificar a superfície ou a parte eletrónica no interior do dispositivo.48
Iniciando e Registrando o Telefonesnom <strong>320</strong> <strong>Quick</strong> <strong>Start</strong> <strong>Guide</strong>Por favor note: Terá a informação de registo que recebeu do seu fornecedorde serviços de Internet ou o administrador de rede :normalmente o número detelefone ou de extensão, a senha e do registro.Depois de defi nir o telefone e ligá-lo à rede, conforme indicado nas páginas 2 - 5, otelefone começa a funcionar.Normalmente, a iniciação é completamente automática, utilizando o DHCP. Se a rede nãosuporta DHCP, deve obter o endereço <strong>IP</strong>, netmask, gateway <strong>IP</strong> e servidor DNS do seuprovedor de serviços de Internet ou o administrador da rede e inseri-los manualmente,quando for solicitado a fazê-lo na tela.Assista a exibição e, quando solicitado, faça as e salve-as .1. Lingua. A língua padrão é o Inglês. Outras línguas estão disponíveis se o telefone/rede está ligado à Internet durante a iniciação, para que possam ser fornecidos apartir do servidor snom automaticamente (fi rmware 7 e superior).2. Tom de chamada3. Hora local4. Digite o número da conta. Salve com 5. Entre na secção. Salvar com . Se bem-sucedido o visor apresentará a telaprincipal:Data:Conta = identidade (NR: não registrado)Símbolos de funçõesdisponíveis nestecontexto particularTeclas de funcãoDigitar números, letras e caracteres especiaisPressione qualquer tecla para entrar no modo de entrada.Caixa te textoÀ esquerda da seta:Modo de entrada activoÀ direita da seta: Pressione a teclapara alterar o modo de entradaà: > > >Apagar o caractere àesquerda do cursorHoraPressione a tecla paraactivar a funçãoPressione paraapagar todo eltextoModo de entrada:: Números: Minúsculas: MaiúsculasMove o cursor para aesquerda | para a direita:Editar o directório:Apagar o caractere àesquerda do cursor:Modo de entrada activo. Alterá-lo:Pressione a : abc > ABC > 123 > abcabc - MinúsculssABC - Maiúsculas123 - NúmerosIntroduz os caracteres especiais e símbolos no modo de entrada: Pressione a tecla "1"uma ou mais vezes, rapidamente, com uma pausa depois de cada caracter.Exemplos: 1x = "." 2x = "+" 3x = "@" 4x = "1" 5x = ":" 6x = ","PORTUGUÊS49
<strong>Quick</strong> <strong>Start</strong> <strong>Guide</strong>PORTUGUÊSTecla de navegação - as funções emestado inactivo:: Seleçao de uma identidade: Menú de confi guraçõesNum ápice50Exposição -estado inactivoIdentidadeTeclas Cancelar & CEnterCancelar / Confi rmar ações,seleções e entrada, salvarSímbolos das funções disponíveisneste contexto particularMensagem em espera + chamadas nãoatendidas• LED vermelho: Mensaje nuovo - pulsepara apagarlo (se suportado pelo PBX)• LED âmbar, luz fi xa: Chamada perdida.Desligue LED: Pressione .• LED âmbar, piscando rapidamente: ChamadarecebidaTeclas de função, programávelGração de uma chamada (se suportado pelo PBX)TecladoalfanuméricoTeclas de audio• Ajustar volume dacampainha (chamada recivida)ou o altifalante (em chamada)• Microfone (ligar/desligar)• Altofalante (ligar/desligar)• Auricular (ligar/desligar)Teclas de função com LEDs, livramenteprogramáveis: . Confi guração defábrica: Linha. LED:• Piscando rápidamente: Chamada recibida• Luz fi xa: Em chamada• Piscando lentamente: Chamada em esperaTecla cerquilhaTeclas de funçãopré-programados/programáveisTecla asterisco• Pressionada momentaneamenteno modo de edição:Mudar entre minúsculas ymaiúsculas• Pressionado por algunssegundos: Bloqueia/desbloqueia o tecladoMenú de confi guraçõesEndereço <strong>IP</strong>, endereço MAC, versão do fi rmwareLivremente programáveisTransferênciaFunção "não perturbe" (ligar/desligar)RemarcaçãoDirectórioLivremente programáveisConferênciaEspera
<strong>Quick</strong> <strong>Start</strong> <strong>Guide</strong>Menu de Configurações • Percorrer o menu com • Pressione a tecla de função abaixo do símbolo para activar a função• Pressione a P para salvar a confi guração• Para voltar ao ecrã anterior ou o ecrã inactivo com Em modo de administrador: Em modo de usuário:Comportamentoteléfono Ajustes Sistema HeadsetEventoRedirecionadoOff (desligado) I.C.E. 1 ContrasteReg DesligadoHora 2 FkeysIdiomaReset 3Lidado* Asterisk antecedendo umaopção: Neste momentoselecção activa3Todas asconfi guraçõesperder-se-ãoReinicioDHCP1I.C.E: Indicação de chamadaem espera2Hora: Se a chamada não foratendidaSempreOcupadoInfosistemaConfig. VLANWebInterfaceOutros AjustesAjuste devolumenNetworkIDServidorFuso orárioMãoMemóriaPrioridadeHTTPTomde discagemCabegaOs submenus e asdefi nições em cinzaescuro não estãoacessíveis no modousuárioResetHTTPSxxxxx> PViva-VozPORTUGUÊS51
<strong>Quick</strong> <strong>Start</strong> <strong>Guide</strong>Modo usuário/modo administradorA configuração padrão é o modo administrador. A senha de administrador padrão é0000 (4 x zero). Mudar do modo administrador para o modo utilizador e vice-versa:• Do modo administrador para o modo utilizador: Interface web do telefono >Avançado > Qos Security > Segurança > Modo de Administrador: Desligado> Salvar.• Do modo utilizador para o modo administrador: Interface web do telefono >Avançado > Login do Administrador: digite a senha do administrador > Salvar.A interface web do telefono1. Obter o endereço <strong>IP</strong> do telefone: , por exemplo 192.168.10.115.2. Abre um navegador web em seu PC. Digite http:// seguido pelo endereço <strong>IP</strong> nabarra de endereços e pressione ENTER para abrir a interface web do seu telefone.3. Clique em um item no menu do lado esquerdo da tela para abrir a janela.PORTUGUÊS4. Se uma janela contém várias páginas, clique na aba no topo para abrir a página. Opeso da fonte dos caracteres no guia da página visível está em negrito.5. Quaisquer alterações feitas não terão efeito até que você clique em "Salvar". Asalterações perderão se abrir uma outra página da interface web sem clicar antes em"Salvar".Formato da horaInterface Web > Preferências > Informação Geral > 24 Hour clock:Ligado: Formato de 24 horas, 00:01 - 24:00Desligado: Formato de 12 horas AM/PM, 0:01 A - 12:00 PFormato da dataInterface Web > Preferências > Informação Geral > US date format (mm/dd):Ligado: 3/8/2010 Desligado: 8.3.2010Configuração da identidade/contaInterface Web > Identidad 1-1252
Utilizar o telefoneSelecione uma identidade para as chamadas efectuadasa partir da ecrã inativo: qpFazer chamadas<strong>Quick</strong> <strong>Start</strong> <strong>Guide</strong>• Digite o número através do teclado alfanumérico e pegue no auscultador ou• digite o número e pressione P ou• > digite o número > P.Aceitar chamadas• Com o auscultador: Levantar o auscultador• Com o auricular: Pressione a P ou a tecla de linha e aceite a chamada• Com o altifalante: Pressione aColocar chamadas en curso em esperaPressione a ou a tecla de linha da chamada. O LEDcomeça a piscar lentamente. Pressione a novamentepara retomar a chamada. Com mais de uma chamada emespera: Pressione a tecla de linha e aceite a chamada pararetomar a chamada.Conferência de tres1. O seu número de telefone: 154. Coloque a primeirachamada (Jane Doe) em espera.2. Ligue para o segundo participante (158). Com a segundachamada na linha:3. Iniciar a conferência: . Conferência en curso:4. Pressione a para suspender a conferência e colocaros participantes em espera.5. Iniciar a conferência de nuovo: Pressione a tecla de linha de uma das chamadas e a.Transferir chamadas manualmenteTransferência anunciadoColocar a chamada em espera > disque o número que deseja transferir a chamada >se o terceiro quer aceitar o chamada: Pressione a .Transferência cega (sem anúncio)Com a chamada em linha: Pressionechamada vai ser transferida > P.> disque o número de telefone que aPORTUGUÊS53
<strong>Quick</strong> <strong>Start</strong> <strong>Guide</strong>Encaminhar chamadas1. Activar el encaminhamento de llamadas.a. Todas as chamadas recebidas: Evento Redirecionado > [Sempre] >Redirecionar sempre para: digite o número de telefono > P.b. Se tiver ocupado: Evento Redirecionado > [Ocupado] > Ocup.redirecionar para: digite o número de telefono > P.c. Se a chamada não for atendida: Evento Redirecionado > [Hora] >Timeout target: digite o número de telefono > P > Hora de redirecionamento:digite o número de segundos seguintes que o convite deverá ser enviado > P.d. Ecrã inactivo com desvio de chamadas activado:2. Desactivar: Evento Redirecionado > [Off] > P.Listas de chamadas (histórico de chamadas)1. Para abrir: Pressione [Listas].2. Selecionar uma lista - [Perdida(s)], [R]ecibida(s), [Discada(s)]: Pressione o tecla defunção3. Percorra a lista com . Telefonar para o número destacado com: P.Directório1. Para abrir: Pressione . Localizar uma entrada: . Telefonar para o númerodestacado com: P.2. : Pressione > 3. Alterar/corrigir entradas: Ver página Seite 49, "Digitar números, letras e caracteresespeciais".PORTUGUÊSSolução de problemasReiniciar (Reboot) Sistema > Reinicio > P > "Reiniciar?" > PReinicio bruscamenteDesligue o cabo de alimentação > aguarde alguns segundos > reconecte.Não corte a energia durante uma atualização de firmware !Restaurar as configurações da fábrica Sistema > Reset > digite a senha do administrador > PTodas as configurações perder-se-ão !54
APPENDIXI.II.COPYRIGHT NOTICE AND WARRANTYDISCLAIMERDas Produkt enthält Software, die unter derGNU General Public License, Version 2, freigenutzt werden darf.This Product contains Software applicableto GNU General Public License, Version 2which can be used freely.Im Verhältnis zu den Lizenzgebern der Softwaregilt der folgende Haftungsausschluss:Towards the licensor of this Software the followingliability is disclaimed:This program is distributed in the hopethat it will be useful, but WITHOUT ANYWARRANTY; without even the impliedwarranty of MERCHANTABILITY or FIT-NESS FOR A PARTICULAR PURPOSE.See the GNU General Public License formore details.III.Der Lizenztext der GPL lautet wie folgt:The GNU General Public License is as follows:GNU GENERAL PUBLIC LICENSEVersion 2, June 1991Copyright (C) 1989, 1991Free Software Foundation, Inc.59 Temple Place, Suite 330Boston, MA 02111-1307, USAEveryone is permitted to copy and distributeverbatim copies of this license document, butchanging it is not allowed.PreambleThe licenses for most software are designed totake away your freedom to share and change it.By contrast, the GNU General Public License isintended to guarantee your freedom to share andchange free software--to make sure the softwareis free for all its users. This General Public Licenseapplies to most of the Free Software Foundation‘ssoftware and to any other program whose authorscommit to using it. (Some other Free SoftwareFoundation software is covered by the GNULibrary General Public License instead.) You canapply it to your programs, too.When we speak of free software, we are referringto freedom, not price. Our General PublicLicenses are designed to make sure that you havethe freedom to distribute copies of free software(and charge for this service if you wish), that youreceive source code or can get it if you want it, thatyou can change the software or use pieces of it innew free programs; and that you know you can dothese things.To protect your rights, we need to make restrictionsthat forbid anyone to deny you these rights or toask you to surrender the rights. These restrictionstranslate to certain responsibilities for you if youdistribute copies of the software, or if you modifyit. For example, if you distribute copies of sucha program, whether gratis or for a fee, you mustgive the recipients all the rights that you have. Youmust make sure that they, too, receive or can getthe source code. And you must show them theseterms so they know their rights.We protect your rights with two steps: (1)copyright the software, and (2) offer you thislicense which gives you legal permission to copy,distribute and/or modify the software.Also, for each author‘s protection and ours, wewant to make certain that everyone understandsthat there is no warranty for this free software.If the software is modified by someone else andpassed on, we want its recipients to know thatwhat they have is not the original, so that anyproblems introduced by others will not reflect onthe original authors‘ reputations.Finally, any free program is threatened constantlyby software patents. We wish to avoid thedanger that redistributors of a free program willindividually obtain patent licenses, in effect makingthe program proprietary. To prevent this, we havemade it clear that any patent must be licensed foreveryone‘s free use or not licensed at all.The precise terms and conditions for copying,distribution and modification follow.GNU GENERAL PUBLIC LICENSETERMS AND CONDITIONS FOR COPYING,DISTRIBUTION AND MODIFICATION0. This License applies to any program or otherwork which contains a notice placed by thecopyright holder saying it may be distributed55APP
APP56under the terms of this General PublicLicense. The „Program“, below, refers to anysuch program or work, and a „work basedon the Program“ means either the Programor any derivative work under copyright law:that is to say, a work containing the Programor a portion of it, either verbatim or withmodifications and/or translated into anotherlanguage. (Hereinafter, translation is includedwithout limitation in the term „modification“.)Each licensee is addressed as „you“.Activities other than copying, distribution andmodification are not covered by this License;they are outside its scope. The act of runningthe Program is not restricted, and the outputfrom the Program is covered only if its contentsconstitute a work based on the Program(independent of having been made by runningthe Program). Whether that is true depends onwhat the Program does.1.You may copy and distribute verbatim copies ofthe Program‘s source code as you receive it, inany medium, provided that you conspicuouslyand appropriately publish on each copy anappropriate copyright notice and disclaimer ofwarranty; keep intact all the notices that refer tothis License and to the absence of any warranty;and give any other recipients of the Program acopy of this License along with the Program.You may charge a fee for the physical act oftransferring a copy, and you may at your optionoffer warranty protection in exchange for a fee.2. You may modify your copy or copies of theProgram or any portion of it, thus forming awork based on the Program, and copy anddistribute such modifications or work underthe terms of Section 1 above, providedthat you also meet all of these conditions:a) You must cause the modified files to carryprominent notices stating that you changedthe files and the date of any change.b) You must cause any work that you distributeor publish, that in whole or in part containsor is derived from the Program or any partthereof, to be licensed as a whole at nocharge to all third parties under the terms ofthis License.c) If the modified program normally readscommands interactively when run, you mustAPPENDIXcause it, when started running for suchinteractive use in the most ordinary way, toprint or display an announcement includingan appropriate copyright notice and a noticethat there is no warranty (or else, sayingthat you provide a warranty) and that usersmay redistribute the program under theseconditions, and telling the user how to viewa copy of this License. (Exception: if theProgram itself is interactive but does notnormally print such an announcement, yourwork based on the Program is not requiredto print an announcement.)These requirements apply to the modifiedwork as a whole. If identifiable sections of thatwork are not derived from the Program, andcan be reasonably considered independentand separate works in themselves, thenthis License, and its terms, do not apply tothose sections when you distribute them asseparate works. But when you distribute thesame sections as part of a whole which is awork based on the Program, the distributionof the whole must be on the terms of thisLicense, whose permissions for other licenseesextend to the entire whole, and thus to eachand every part regardless of who wrote it.Thus, it is not the intent of this section to claimrights or contest your rights to work writtenentirely by you; rather, the intent is to exercisethe right to control the distribution of derivativeor collective works based on the Program.In addition, mere aggregation of another worknot based on the Program with the Program (orwith a work based on the Program) on a volumeof a storage or distribution medium does notbring the other work under the scope of thisLicense.3. You may copy and distribute the Program (ora work based on it, under Section 2) in objectcode or executable form under the terms ofSections 1 and 2 above provided that you alsodo one of the following:a) Accompany it with the complete correspondingmachine-readable source code, which mustbe distributed under the terms of Sections 1and 2 above on a medium customarily used forsoftware interchange; or,b) Accompany it with a written offer, valid forat least three years, to give any third party,for a charge no more than your cost of
APPENDIXphysically performing source distribution, acomplete machine-readable copy of thecorresponding source code, to be distributedunder the terms of Sections 1 and 2 aboveon a medium customarily used for softwareinterchange; or,c) Accompany it with the information youreceived as to the offer to distributecorresponding source code. (This alternativeis allowed only for noncommercial distributionand only if you received the program in objectcode or executable form with such an offer, inaccord with Subsection b above.)The source code for a work means the preferredform of the work for making modifications toit. For an executable work, complete sourcecode means all the source code for all modulesit contains, plus any associated interfacedefinition files, plus the scripts used to controlcompilation and installation of the executable.However, as a special exception, the sourcecode distributed need not include anything thatis normally distributed (in either source or binaryform) with the major components (compiler,kernel, and so on) of the operating systemon which the executable runs, unless thatcomponent itself accompanies the executable.If distribution of executable or object codeis made by offering access to copy from adesignated place, then offering equivalentaccess to copy the source code from the sameplace counts as distribution of the source code,even though third parties are not compelled tocopy the source along with the object code.4. You may not copy, modify, sublicense, ordistribute the Program except as expresslyprovided under this License. Any attemptotherwise to copy, modify, sublicense ordistribute the Program is void, and willautomatically terminate your rights under thisLicense. However, parties who have receivedcopies, or rights, from you under this Licensewill not have their licenses terminated so longas such parties remain in full compliance.5. You are not required to accept this License,since you have not signed it. However, nothingelse grants you permission to modify ordistribute the Program or its derivative works.These actions are prohibited by law if you donot accept this License. Therefore, by modifyingor distributing the Program (or any work basedon the Program), you indicate your acceptanceof this License to do so, and all its terms andconditions for copying, distributing or modifyingthe Program or works based on it.6. Each time you redistribute the Program (orany work based on the Program), the recipientautomatically receives a license from theoriginal licensor to copy, distribute or modify theProgram subject to these terms and conditions.You may not impose any further restrictions onthe recipients‘ exercise of the rights grantedherein. You are not responsible for enforcingcompliance by third parties to this License.7. If, as a consequence of a court judgment orallegation of patent infringement or for any otherreason (not limited to patent issues), conditionsare imposed on you (whether by court order,agreement or otherwise) that contradict theconditions of this License, they do not excuseyou from the conditions of this License. If youcannot distribute so as to satisfy simultaneouslyyour obligations under this License and any otherpertinent obligations, then as a consequenceyou may not distribute the Program at all. Forexample, if a patent license would not permitroyalty-free redistribution of the Program by allthose who receive copies directly or indirectlythrough you, then the only way you could satisfyboth it and this License would be to refrainentirely from distribution of the Program.If any portion of this section is held invalidor unenforceable under any particularcircumstance, the balance of the section isintended to apply and the section as a whole isintended to apply in other circumstances.It is not the purpose of this section to induce youto infringe any patents or other property rightclaims or to contest validity of any such claims;this section has the sole purpose of protectingthe integrity of the free software distributionsystem, which is implemented by public licensepractices. Many people have made generouscontributions to the wide range of softwaredistributed through that system in reliance onconsistent application of that system; it is up tothe author/donor to decide if he or she is willingto distribute software through any other systemand a licensee cannot impose that choice.This section is intended to make thoroughlyclear what is believed to be a consequence of57APP
APP58the rest of this License.8. If the distribution and/or use of the Program isrestricted in certain countries either by patentsor by copyrighted interfaces, the originalcopyright holder who places the Program underthis License may add an explicit geographicaldistribution limitation excluding those countries,so that distribution is permitted only in or amongcountries not thus excluded. In such case, thisLicense incorporates the limitation as if writtenin the body of this License.9. The Free Software Foundation may publishrevised and/or new versions of the GeneralPublic License from time to time. Suchnew versions will be similar in spirit to thepresent version, but may differ in detailto address new problems or concerns.Each version is given a distinguishing versionnumber. If the Program specifies a versionnumber of this License which applies to itand „any later version“, you have the option offollowing the terms and conditions either of thatversion or of any later version published by theFree Software Foundation. If the Program doesnot specify a version number of this License,you may choose any version ever published bythe Free Software Foundation.10. If you wish to incorporate parts of the Programinto other free programs whose distributionconditions are different, write to the authorto ask for permission. For software which iscopyrighted by the Free Software Foundation,write to the Free Software Foundation; wesometimes make exceptions for this. Ourdecision will be guided by the two goals ofpreserving the free status of all derivatives ofour free software and of promoting the sharingand reuse of software generally.NO WARRANTY11. BECAUSE THE PROGRAM IS LICENSEDFREE OF CHARGE, THERE IS NOWARRANTY FOR THE PROGRAM, TO THEEXTENT PERMITTED BY APPLICABLE LAW.EXCEPT WHEN OTHERWISE STATED INWRITING THE COPYRIGHT HOLDERSAND/OR OTHER PARTIES PROVIDE THEPROGRAM „AS IS“ WITHOUT WARRANTYOF ANY KIND, EITHER EXPRESSED ORIMPLIED, INCLUDING, BUT NOT LIMITEDTO, THE IMPLIED WARRANTIES OFMERCHANTABILITY AND FITNESS FOR AAPPENDIXPARTICULAR PURPOSE. THE ENTIRE RISKAS TO THE QUALITY AND PERFORMANCEOF THE PROGRAM IS WITH YOU. SHOULDTHE PROGRAM PROVE DEFECTIVE, YOUASSUME THE COST OF ALL NECESSARYSERVICING, REPAIR OR CORRECTION.12. IN NO EVENT UNLESS REQUIRED BYAPPLICABLE LAW OR AGREED TO INWRITING WILL ANY COPYRIGHT HOLDER,OR ANY OTHER PARTY WHO MAY MODIFYAND/OR REDISTRIBUTE THE PROGRAMAS PERMITTED ABOVE, BE LIABLE TOYOU FOR DAMAGES, INCLUDING ANYGENERAL, SPECIAL, INCIDENTAL ORCONSEQUENTIAL DAMAGES ARISINGOUT OF THE USE OR INABILITY TO USETHE PROGRAM (INCLUDING BUT NOTLIMITED TO LOSS OF DATA OR DATA BEINGRENDERED INACCURATE OR LOSSESSUSTAINED BY YOU OR THIRD PARTIESOR A FAILURE OF THE PROGRAM TOOPERATE WITH ANY OTHER PROGRAMS),EVEN IF SUCH HOLDER OR OTHER PARTYHAS BEEN ADVISED OF THE POSSIBILITYOF SUCH DAMAGES.END OF TERMS AND CONDITIONSHow to Apply These Termsto Your New ProgramsIf you develop a new program, and you want it tobe of the greatest possible use to the public, thebest way to achieve this is to make it free softwarewhich everyone can redistribute and change underthese terms.To do so, attach the following notices to theprogram. It is safest to attach them to the startof each source file to most effectively convey theexclusion of warranty; and each file should have atleast the „copyright“ line and a pointer to wherethe full notice is found.Copyright (C) This program is free software; you can
APPENDIXredistribute it and/or modify it under theterms of the GNU General Public Licenseas published by the Free Software Foundation;either version 2 of the License, or(at your option) any later version.This program is distributed in the hopethat it will be useful, but WITHOUT ANYWARRANTY; without even the impliedwarranty of MERCHANTABILITY or FIT-NESS FOR A PARTICULAR PURPOSE.See the GNU General Public License formore details.You should have received a copy of theGNU General Public License along withthis program; if not, write to the Free SoftwareFoundation, Inc., 59 Temple Place,Suite 330, Boston, MA 02111-1307USAIV.Den vollständigen korrespondierendenSourcecode der Software schickt Ihnen diesnom technology AG auf Nachfrage gerne aufeinem üblichen Datenträger gegen Erstattungder Herstellungskosten in Höhe von EUR 5,- zu.Der vollständige korrespondierende Sourcecodekann auch über unsere Website unter http://www.snom.com/gpl_.html?&L=0 herunter geladenwerden.If requested by you, the complete correspondingsource code of the Software can be sentby snom technology AG on a standard datastorage medium against the reimbursement ofthe manufacturing costs of EUR 5.- per unit.The complete corresponding source code of theSoftware can also be downloaded from our website http://www.snom.com/gpl_.html?&L=0.V..Weitere Informationen finden Sie auch unterhttp://www.snom.com.For further information see http://www.snom.com.59APP
snom technology AGCharlottenstr. 6810117 BerlinGermanyTel. +49 30 39 83 3-0Fax +49 30 39 83 31 11info@snom.com; sales@snom.comsnom technology, Inc.100 Cummings Center, Suite 125-GBeverly, MA 01915Tel. 978-998-7882Fax 978-998-7883infoUSA@snom.comsnom France SARL6 Parc des fontenelles78870 BaillyTel. +33 1 80 87 62 87Fax +33 1 80 87 62 88info@snom.comsales@snom.comsnom technology SRLVia A. Lusardi 1020122 MilanoTel +39 02 00611212Fax +39 02 93661864info@snom.comsales@snom.comYour specialist retailer - Ihr Fachhändler -Votre distributeur - Su distribuidor - Il tuo rivenditore:© 2010 snom technology AGv1.01


