
You also want an ePaper? Increase the reach of your titles
YUMPU automatically turns print PDFs into web optimized ePapers that Google loves.
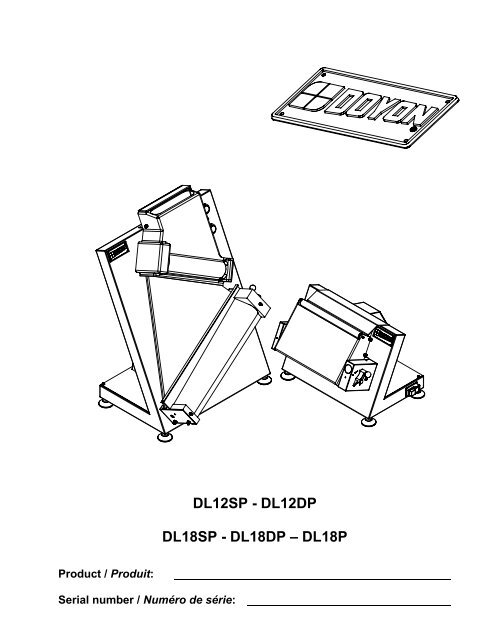
DL12SP - DL12DPDL18SP - DL18DP – DL18PProduct / Produit:Serial number / Numéro de série:
IMPORTANT SAFETY INSTRUCTIONSSAVE THESE INSTRUCTIONSDANGERTO REDUCE THE RISK OF FIRE OR ELECTRIC SHOCKCAREFULLY FOLLOW THESE INSTRUCTIONSTABLE OF CONTENTS(table des matières :page suivante)Description ___________________________________________________________________ A-1Safety instruction: Top roller cover _____________________________________________ A-2Caution ___________________________________________________________________ A-4Introduction________________________________________________________________ A-4Shipping __________________________________________________________________ A-4Installation warnings_________________________________________________________ A-6Important safeguards_________________________________________________________ A-6DL12SP & DL18SP Operation_________________________________________________ A-8DL12DP, DL18DP & DL18P Operation _________________________________________ A-8maintenance and cleaning_____________________________________________________ A-8Foot pedal (Optional) _______________________________________________________ A-10Component parts ________________________________________________________________B-1Iso view DL12SP & DL18SP ___________________________________________________B-2Iso view DL12DP & DL18DP __________________________________________________B-3Iso view DL18P _____________________________________________________________B-4DL12SP - DL18SP ___________________________________________________________B-6Roller DL12SP - Inferior roller DL12DP __________________________________________B-8DL18DP - DL12DP _________________________________________________________B-10Superior roller DL18DP - DL12DP _____________________________________________B-12Inferior roller DL18SP - DL18DP ______________________________________________B-14DL18P____________________________________________________________________B-16Warranty ________________________________________________________________________1DL [LIVRET].doc Rev. 04/2009
IMPORTANT INSTRUCTIONS DE SÉCURITÉCONSERVEZ CE MANUEL D’INSTRUCTIONSDANGERAFIN DE RÉDUIRE LES RISQUES D'INCENDIE OU D'ÉLECTROCUTIONSUIVRE CES INSTRUCTIONS AVEC SOINTABLE DES MATIÈRESDescription ____________________________________________________________________A-1Instruction de sécurité: Couvercle rouleaux supérieurs_______________________________A-3Attention ___________________________________________________________________A-5Introduction ________________________________________________________________A-5Expédition __________________________________________________________________A-5Avertissement lors de l'installation_______________________________________________A-7Importantes mesures de sécurité_________________________________________________A-7Opération de la DL12SP & DL18SP _____________________________________________A-9Opération de la DL12DP, DL18DP & DL18P______________________________________A-9Entretien et nettoyage _________________________________________________________A-9Pédale (optionel)____________________________________________________________A-11Pièces composantes _____________________________________________________________B-1Vue iso DL12SP & DL18SP ____________________________________________________B-2Vue iso DL12DP & DL18DP ___________________________________________________B-3Vue iso DL18P ______________________________________________________________B-4DL12SP - DL18SP ___________________________________________________________B-6Rouleau DL12SP - Rouleau inférieur DL12DP _____________________________________B-8DL18DP - DL12DP _________________________________________________________B-10Rouleau supérieur DL18DP - DL12DP __________________________________________B-12Rouleau inférieur DL18SP - DL18DP ___________________________________________B-14DL18P____________________________________________________________________B-16Garantie ________________________________________________________________________1DL [LIVRET].doc Rev. 04/2009
SECTION A:DESCRIPTION / DESCRIPTION
A-2SAFETY INSTRUCTION: TOP ROLLER COVERATTENTIONINSIDE THERE IS THE TOP ROLLER SAFETY COVERYOU MUST INSTALL IT ON THE MACHINE ASSHOWN ON THE PHOTOS.TOP ROLLER OF THE MACHINEPACKAGE WITH THE TOP COVEROpen the packageUnscrew the safety(top roller of machine)InstallScrew the safety(back of cover)I:\Travaux\MANUEL\VELMA\Laminoir DL\DL18S COUVERT-COVER-A.doc
INSTRUCTION DE SÉCURITÉ: COUVERCLE ROULEAUXSUPÉRIEURSRouleau supérieurATTENTIONÀ L’INTÉRIEUR DE LA BOÎTE, IL Y A UN COUVERCLE DESÉCURITÉ QUI DOIT ÊTRE INSTALLÉ SUR LES ROULEAUXSUPÉRIEURS AVANT L’UTILISATION DE L’APPAREIL.Suivre les instructions pour l’installation.L’emballage avec le couvercleA-3Ouvrir l’emballageEnlever la vis de sécurité sur le dessus del’appareilInstaller le couvercleInstaller la vis de sécuritéà l’arrière du couvercleI:\Travaux\MANUEL\VELMA\Laminoir DL\DL18S COUVERT-COVER-F.doc
A-4CAUTIONREAD ALL INSTRUCTIONSINTRODUCTIONThe manufacturer suggests to read this manual carefully.This equipment is manufactured with first quality material by experienced technicians. Properinstallation and maintenance will guarantee a reliable service for years to come.A nameplate specifies the model number, serial number, voltage, amperage, frequency andmanufacturing date.Drawings and replacement parts numbers are included in this manualATTENTIONDOYON is not responsible for damages to the property or the equipment causedby personnel who is not certified by known organisationsSHIPPINGFor your safety, this equipment has been verified by qualified technicians and carefully crated beforeshipment. The freight company assumes full responsibility concerning the delivery in good condition ofthe equipment in accepting to transport it.IMPORTANTRECEPTION OF THE MERCHANDISETake care to verify that the received equipment is not damaged before signing the delivery receipt. If adamage or a lost part is noticed, write it clearly on the receipt. If it is noticed after the carrier has left,contact immediately the freight company in order that they do their inspection.We do not assume the responsibility for damages or losses that may occur during transportation.IN GENERALTake off the packaging material with care. Take off all the material used for packing and accessories.
A-5ATTENTIONLISEZ TOUTES LES INSTRUCTIONSINTRODUCTIONLe fabricant suggère de lire attentivement ce manuel et de suivre avec soin les instructions fournies.Votre équipement est fabriqué avec des matériaux de première qualité par des techniciensd'expérience. Une utilisation normale et un entretien adéquat de l'équipement vous assurerontplusieurs années de bon service.Une plaque signalétique mentionne le numéro de modèle, le numéro de série, la tension, l'ampérage,la fréquence et la date de fabrication.Les dessins et les numéros de pièces de rechange sont inclus dans ce manuel.ATTENTIONÉquipement <strong>Doyon</strong> <strong>Inc</strong>. ne peut être tenu responsable pour les dommages causés àla propriété ou à l'équipement par du personnel non certifié par des organismesaccrédités.EXPÉDITIONPour votre protection, cet équipement a été vérifié et emballé avec précaution par des techniciensqualifiés avant son expédition. La compagnie de transport assume la pleine responsabilitéconcernant la livraison de cet équipement en bon état en acceptant de le transporter.IMPORTANTRÉCEPTION DE LA MARCHANDISEAvant de signer le reçu de livraison, prenez soin de vérifier dès la réception si l'équipement n'est pasendommagé. Si un dommage ou une perte est détecté, écrivez-le clairement sur le reçu de livraisonou votre bon de transport et faites signer le livreur. Si le dommage est remarqué après le départ dutransporteur, contactez immédiatement la compagnie de transport afin de leur permettre deconstater les dommages causés.Nous ne pouvons assumer la responsabilité pour les dommages ou les pertes qui pourraient survenirpendant le transport.GÉNÉRALITÉSOuvrir avec soin l'emballage de votre équipement. Enlever tous les matériaux utilisés pourl'envelopper ainsi que les accessoires.
A-6INSTALLATION WARNINGSThis equipment can be plugged on any network offering a protection of 15 amps.INSTALLATION AND SERVICEThe dough sheeter must be connected to the utility and electrically grounded in conformity to theeffective local regulations. If these are not established, the dough sheeter must be connectedaccording to the National Electrical Code (NFPA 70-XX). This equipment has a male plug thatmeets those requirements.IMPORTANT SAFEGUARDSRead all instructions.To protect against electrical shock, do not immerse cord, plugs, portable appliance in water orother liquids.Remove plug from the outlet when the appliance is not in use, before putting on or taking offparts, and before cleaning.Do not use outdoors.Do not let cord hang over edge of table or counter or touch hot surfaces.Do not operate any appliance with a damaged cord or plug or after the appliance malfunctionsor is dropped or damaged in any manner. Return appliance to the nearest authorized servicefacility for examination, repair or electrical or mechanical adjustment.Do not place on or near a hot gas or electric burner or in a heated oven.The use of accessory attachments not recommended by the appliance manufacturer may causeinjuries.Always check if the control switch is OFF before plugging cord into wall outlet. To disconnect,turn the control switch to OFF, then remove plug from wall outlet.Do not use appliance for other than intended use.Avoid contacting moving parts.Save these instructions.
A-7AVERTISSEMENT LORS DE L'INSTALLATIONCet équipement peut être branché sur tout réseau offrant une protection de 15 ampères.INSTALLATION ET SERVICECet appareil doit être branché et mis à la terre (grounded) conformément aux règlements effectifs devotre localité. Si aucune réglementation n'est établie, l’appareil doit être branché conformément auCode National de l'Électricité (NFPA 70-XX). Cet appareil est doté d’une prise 3 pattes qui répondà ces exigences.IMPORTANTES MESURES DE SÉCURITÉLisez toutes les instructions.Pour éviter les chocs électriques, ne plongez pas le cordon, la fiche ou l’appareil portatif dansl’eau ou tout autre liquide.Débranchez l’appareil de la prise de courant quand vous ne l’utilisez pas, avant d’enlever oud’installer des pièces et avant de le nettoyer.Ne faites pas fonctionner l’appareil si le cordon ou la fiche sont endommagés, si l’appareil nefonctionne pas correctement, s’il est tombé ou s’il a été endommagé. Confiez au service deréparation recommandé le plus proche tout examen, réparation ou réglage électrique oumécanique de l’appareil.L’utilisation d’accessoires non recommandés par le fabricant de l’appareil peut causer desblessures.N’utilisez pas l’appareil à l’extérieur.Ne laissez pas le cordon pendre par-dessus le bord d’une table ou d’un comptoir et assurezvousque le cordon n’est pas en contact avec des surfaces chaudes.Ne placez pas l’appareil près d’un brûleur à gaz allumé ou d’un élément électrique ou tensionou dans un four allumé.Le cas échéant, branchez toujours la fiche à l’appareil et assurez-vous que l’interrupteur decelui-ci est à la position ARRÊT (OFF) avant de brancher la fiche dans la prise. Pourdébrancher l’appareil, placez l’interrupteur à ARRÊT (OFF) puis retirez la fiche de la prisede courant.N’utilisez l’appareil que pour la fonction à laquelle il est destinée.Évitez de toucher les pièces mobiles.Conservez ces instructions.
A-8DL12SP & DL18SP OPERATION1 Press the green button to start the machine. (A pilot light will light up when the machine is on.)2 Adjust the opening of the roller to obtain the desired dough thickness.3 Put some flour in the chute and on the rollers to prevent the dough from sticking on the rollers.4 Flatten the dough ball with your hands before.5 Cover the dough with flour.6 Put the dough in the chute.7 When the dough comes out of the rollers, finish it manually at desired size, or do a second passin the roller to have a round shape if needed.8 To stop the machine, press the red button.DL12DP, DL18DP & DL18P OPERATION1 Press the green button to start the machine. (A pilot light will light up when the machine is on.)2 Adjust the opening of the roller to obtain the desired dough thickness.3 Put some flour in the chute and on the rollers to prevent the dough from sticking on the rollers.4 Flatten the dough ball with the hands before.5 Cover the dough with flour.6 Put the dough in the chute.7 When the dough comes out of the first set of rollers, guide the dough with your hand to thesecond set of rollers to obtain a round shape when the dough comes out of the second set ofrollers.8 When the dough comes out, finish it manually at desired size, if needed.9 To stop the machine press the red button.WARNINGNever remove the safety guard on the machine. Never try to push or remove the dough fromthe rollers with your hands. Always turn off the power on the machine before cleaning ortrying to take out some dough.MAINTENANCE AND CLEANINGRemove the plastic security cover on the rollers to clean the rollers.Clean the machine with a brush or a vacuum to take out the excess flour. DRY CLEAN ONLY
A-9OPÉRATION DE LA DL12SP & DL18SP1 Pour mettre l’appareil en marche, appuyer sur le bouton vert.(La lampe témoin verte s’illuminelorsque l’appareil est en marche).2 Ajustez l’ouverture des rouleaux à l’aide de la manivelle sur le côté de l’appareil selonl’épaisseur de pâte désiré.3 Introduire de la farine dans la chute et dans les rouleaux.4 Aplatir la boule de pâte à la main légèrement.5 Enfariner la pâte.6 Introduire la pâte dans les rouleaux.7 Terminer votre pâte à la main ou repassez une deuxième fois dans les rouleaux, si nécessaire.8 Pour arrêter l’appareil, appuyez sur le bouton rouge.OPÉRATION DE LA DL12DP, DL18DP & DL18P1 Pour mettre l’appareil en marche, appuyez sur le bouton vert. (La lampe témoin verte s’illuminelorsque l’appareil est en marche).2 Ajustez l’ouverture des rouleaux à l’aide de la manivelle sur le côté de l’appareil selonl’épaisseur de pâte désiré.3 Introduire de la farine dans la chute et dans les rouleaux.4 Aplatir la boule de pâte à la main légèrement.5 Enfariner la pâte.6 Introduire la pâte dans les rouleaux du haut.7 À l’aide de vos mains, guidez la pâte vers les rouleaux du bas.8 Terminez votre pâte à la main, si nécessaire.9 Appuyez sur le bouton rouge pour arrêter l’appareil.AVERTISSEMENTNe jamais enlever les couverts protecteurs sur le dessus de l’appareil. Ne jamais essayer d’enlever oude pousser la pâte avec les mains près des rouleaux. Toujours mettre l’appareil hors tension avant dele nettoyer ou d’enlever une pâte coincée.ENTRETIEN ET NETTOYAGENettoyer le laminoir à l’aide d’un balai ou d’une balayeuse afin d’éliminer le surplus de farine.Pour des taches plus coriaces, enlever les couverts de sécurité en plastique pour nettoyer lesrouleaux.NETTOYAGE À SEC SEULEMENT
A-10FOOT PEDAL (OPTIONAL)Part # PC100091The pedal connects by a special non-invertible tri-polar connector to theelectric/electronic circuit (low voltage) of the rolling machine.After connecting the pedal control to the rolling machine, it is alwaysnecessary to press the green start button to confirm the operation. Themachine is now ready and when the pedal is pressed one gives the startcommand to release the stop. The socket next to the machine has beenpositioned to protect it from blows; disconnection of the plug from thesocket during operation will cause the machine to stop.
A-11Pièce # PC100091PÉDALE (OPTIONEL)La pédale se branche avec un connecteur tripolaire spécial non-réversiblesur le circuit électrique / électronique (en basse tension) du laminoir. Il estnécessaire de toujours appuyer sur le bouton vert «start» pour confirmerl’opération après avoir branché la pédale au laminoir. À ce moment, lamachine est prête et en appuyant ou relâchant la pédale, la machinedémarre ou s’arrête. La prise de la machine a été placée de manière à êtreprotégée contre les chocs, pendant le fonctionnement, l’éventueldébranchement de la fiche provoque l’arrêt de la machine.
SECTION B:COMPONENT PARTS / PIÈCES COMPOSANTES
B-2B-2ISO VIEW DL12SP & DL18SPVUE ISO DL12SP & DL18SP
B-3ISO VIEW DL12DP & DL18DPVUE ISO DL12DP & DL18DPB-3
B-4B-4ISO VIEW DL18PVUE ISO DL18P
B-5
B-6DL12SP -- DL18SPDL12SP - DL18SP
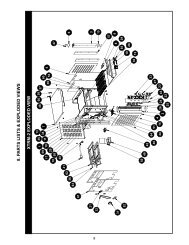
Item Part Number Description DL12S DL18SP1 PC100011-2 ROLLER ASSEMBLY - 11 PC100011-1 ROLLER ASSEMBLY 1 -2 PC100118 FRAME BODY 1 -2 PC100210 FRAME BODY - 13 PC100030 TOP MOTOR SUPPORT 1 14 PC100120-2 STAINLESS STEEL CHUTE 1 -4 PC100120-4 STAINLESS STEEL CHUTE - 15 PC100390 BACK LID 1 -5 PC100400 BACK LID - 16 PC100157 DRIVING BELT 1 17 PC100046 RUBBER LEGS 4 48 PC100045-A CAPACITOR 16 uF 250V 1 1OR PC100045 CAPACITOR 8 uF 400V 1 19 PC100073-N MOTOR 120V 60 HZ 1 1OR PC100073-M MOTOR 240V 50 HZ 1 110 MP100113-A 120V 60Hz POWER SWITCH 1 1OR MP100113 240V 50Hz POWER SWITCH 1 111 PC100310 CAUTION BEFORE CLEANING 1 112 PC100213-3 PLASTIC PROTECTOR 1 -12 PC100213 PLASTIC PROTECTOR - 113 PC100041 BOTTOM MOTOR SUPPORT 1 1Item Numéro Pièce Description DL12S DL18SP1 PC100011-1 ROULEAU ASSEMBLÉ 1 -1 PC100011-2 ROULEAU ASSEMBLE - 12 PC100118 STRUCTURE 1 -2 PC100210 STRUCTURE - 13 PC100030 SUPPORT MOTEUR DU HAUT 1 14 PC100120-2 CHUTE À PÂTE 1 -4 PC100120-4 CHUTE A PATE - 15 PC100390 PANNEAU ARRIÈRE 1 -5 PC100400 PANNEAU ARRIERE - 16 PC100157 COURROIE DU MOTEUR 1 17 PC100046 PATTE DE CAOUTCHOUC 4 48 PC100045-A CONDENSATEUR 16 uF 250V 1 1OU PC100045 CONDENSATEUR 8 uF 400V 1 19 PC100073-N MOTEUR 120V 60 HZ 1 1OU PC100073-M MOTEUR 240V 50 HZ - 110 MP100113-AINTERRUPTEUR PRINCIPALE 120V 160Hz1OU MP100113INTERRUPTEUR PRINCIPALE 240V 150Hz111 PC100310PRÉCAUTION AVANT LE1NETTOYAGE112 PC100213-3PROTECTEUR DES ROULEAUX DE 1PLASTIQUE-12 PC100213PROTECTEUR DES ROULEAUX DE -PLASTIQUE113 PC100041 SUPPORT MOTEUR DU BAS 1 1B-7
B-8ROLLER ROLLER DL12SP -- INFERIOR ROLLER DL12DP DL12DPROULEAU - INFÉRIEUR DL12DPROULEAU DL12SP - ROULEAU INFÉRIEUR DL12DP
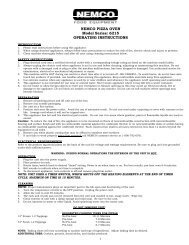
B-9Item Part Number Description Quantity1 PC100013 ROLLER HOLDER 12 PC100052-2 BACK ROLLER SCRAPER SPRING SX 1AND PC100052-1 FRONT ROLLER SCRAPER SPRING DX 13 PC100020-I ROLLER GEAR BOX 14 PC100024 ECCENTRIC 15 PC100024-1 FRONT ROLLER COUPLING 16 PC100018 BACK ROLLER INSIDE SHAFT 17 PC100019 FRONT ROLLER INSIDE SHAFT 18 PC100035 BACK ROLLER DL12S 19 PC100036 FRONT ROLLER DL12S 110 PC100026 FRONT ROLLER SCRAPER DL12S 111 PC100025 BACK ROLLER SCRAPER DL12S 112 PC100040 PULLEY 113 PC100022-1 ROLLER OPENING ADJUSTMENT LEVER 1Item Numéro Pièce Description Quantité1 PC100013 SUPPORT DES ROULEAUX 12 PC100052-2 RESSORT DU GRATTOIR ROULEAU ARRIÈRE 1ET PC100052-1 RESSORT DU GRATTOIR ROULEAU AVANT 13 PC100020-I ENGRENAGE DES ROULEAUX 14 PC100024 EXCENTRIQUE 15 PC100024-1 RACCORD DE L’ARBRE DU ROULEAU AVANT 16 PC100018 ARBRE DU ROULEAU ARRIÈRE 17 PC100019 ARBRE EXCENTRIQUE DU ROULEAU AVANT 18 PC100035 ROULEAU ARRIÈRE DL12S 19 PC100036 ROULEAU AVANT DL12S 110 PC100026 GRATTOIR ROULEAU AVANT DL12S 111 PC100025 GRATTOIR ROULEAU ARRIÈRE DL12S 112 PC100040 POULIE 113 PC100022-1LEVIER D’AJUSTEMENT D’OUVERTURE DES 1ROULEAUX
B-10DL18DP - DL12DPDL18DP - DL12DP
B-11ItemPart NumberNuméro Pièce1 MP1001122 PC100011-22 PC100011-1Description Description DL18S DL12DPCLEAR RUBBER POWERSWITCH COVERBOTTOM ROLLERASSEMBLYBOTTOM ROLLERASSEMBLYPROTECTEUR DE PLASTIQUE/ BOUTON2 2ROULEAU DU BAS ASSEMBLÉ 1 -ROULEAU DU BAS ASSEMBLE - 13 PC100012-2 TOP ROLLER ASSEMBLYROULEAU DU HAUTASSEMBLÉ1 -3 PC100012-1 TOP ROLLER ASSEMBLYROULEAU DU HAUTASSEMBLE- 14 PC100074 FRAME BODY STRUCTURE 1 -4 PC100006 FRAME BODY STRUCTURE - 15 PC100082 CENTER DOUGH SLIDER CHUTE À PÂTE DU CENTRE 1 -5 PC100001 CENTER DOUGH SLIDER CHUTE A PATE DU CENTRE - 16 PC100083-1 TOP DOUGH SLIDER CHUTE À PÂTE DU HAUT 1 -6 PC100002-1 TOP DOUGH SLIDER CHUTE A PATE DU HAUT - 17 PC100076-1 BACK LID PANNEAU ARRIÈRE 1 -7 PC100375 BACK LID PANNEAU ARRIERE - 18 PC100072BOTTOM ROLLER PLASTIC PROTECTEUR DE PLASTIQUECOVER/ ROUL. INF.1 -8 PC100043BOTTOM ROLLER PLASTIC PROTECTEUR DE PLASTIQUECOVER/ ROUL. INF.- 19 PC100071TOP ROLLER PLASTIC PROTECTEUR DE PLASTIQUECOVER/ ROUL. SUP.1 -9 PC100042TOP ROLLER PLASTIC PROTECTEUR DE PLASTIQUECOVER/ ROUL. SUP.- 110 PC100090 DRIVING BELTCOURROIED’ENTRAINEMENT1 -10 PC100370 DRIVING BELTCOURROIED’ENTRAINEMENT- 111 PC100030 TOP MOTOR SUPPORT SUPPORT MOTEUR DU HAUT 1 112 MP100111 GREEN START BUTTON BOUTON DÉPART VERT 1 113 MP100110 RED STOP BUTTON BOUTON D’ARRÊT ROUGE 1 114 PC100365FOOT PEDAL SWITCH PRISE ÉLECTRIQUE /OUTLETCOMMANDE AU PIED1 115 PC100046 RUBBER LEGS PATTE DE CAOUTCHOUC 4 116 PC100310CAUTION BEFORE PRÉCAUTION AVANT LECLEANINGNETTOYAGE2 117 PC100385 CONTROL BOARD 120V 60Hz CONTRÔLE 120 V 60Hz 1 1OR PC100380 CONTROL BOARD 240V 50Hz CONTRÔLE 240 V 50Hz 1 118 PC100073-N MOTOR 120V 60Hz MOTEUR 120 V 60Hz 1 1OR PC100073-M MOTOR 240V 50Hz MOTEUR 240 V 50Hz 1 119 PC100045-ACAPACITOR 16 µf 250V 120V CONDENSATEUR 16 µF 250V /MOTORMOTEUR 120 V1 1OR PC100045CAPACITOR 8 µf 400V for CONDENSATEUR 8 µF 400V /240V MOTORMOTEUR 240 V1 120 PC100079 BOTTOM MOTOR SUPPORT SUPPORT MOTEUR DU BAS 1 1
B-12SUPERIOR ROLLER DL18DP - DL12DP - DL12DPROULEAU DL18DP - DL12DPROULEAU SUPÉRIEUR DL18DP - DL12DP
B-13Item Part Number Description DL18S DL12DP1 PC100020-S DL18S SUPERIOR ROLLER GEAR BOX 1 12 PC100014 DL18S SUPERIOR ROLLER HOLDER 1 13 PC100024 ECCENTRIC 1 14 PC100024-1SUPERIOR ECCENTRIC SHAFT1COUPLING15 PC100022-1 ROLLER OPENING ADJUSTMENT LEVER 1 16 PC100040 PULLEY 1 17 PC100066SUPERIOR ROLLER INSIDE SHAFT 1DL18S-7 PC100031SUPERIOR ROLLER INSIDE SHAFT -DL12DP18 PC100064SUPERIOR ECCENTRIC INSIDE SHAFT 1DL18S-8 PC100032SUPERIOR ECCENTRIC INSIDE SHAFT -DL12DP19 PC100068 SUPERIOR FRONT ROLLER DL18S 1 -9 PC100067 SUPERIOR FRONT ROLLER DL12DP - 110 PC100067 SUPERIOR BACK ROLLER 1 -10 PC100033 SUPERIOR BACK ROLLER - 1Item Numéro Pièce Description DL18S DL12DP1 PC100020-SENGRENAGE ROULEAUX SUPÉRIEUR 1DL18S12 PC100014 SUPPORT ROULEAU SUPÉRIEUR DL18S 1 13 PC100024 EXCENTRIQUE 1 14 PC100024-1RACCORD DE L’ARBRE DU ROULEAU 1AVANT15 PC100022-1LEVIER D’AJUSTEMENT DES ROULEAUX 1SUPÉRIEUR DL18S16 PC100040 POULIE 1 17 PC100066 ARBRE DU ROULEAU SUPÉRIEUR DL18S 1 -7 PC100031ARBRE DU ROULEAU SUPERIEUR -DL12DP18 PC100064ARBRE EXCENTRIQUE DU ROULEAU 1SUPÉRIEUR DL18S-8 PC100032ARBRE EXCENTRIQUE DU ROULEAU -SUPERIEUR DL12DP19 PC100068 ROULEAU AVANT SUPÉRIEUR DL18S 1 -9 PC100034 ROULEAU AVANT SUPERIEUR DL12DP - 110 PC100067 ROULEAU ARRIÈRE SUPÉRIEUR DL18S 1 -10 PC100033 ROULEAU ARRIERE SUPERIEUR DL12DP - 1
B-14INFERIOR ROLLER DL18SP DL18SP - DL18DP - DL18DPROULEAU INFÉRIEUR DL18SP - DL18DP - DL18DP
B-15Item Part Number Description Quantity1 PC100013 INFERIOR ROLLER HOLDER 12 PC100052-2 INFERIOR BACK ROLLER SCRAPER SPRING 1AND PC100052-1 INFERIOR FRONT ROLLER SCRAPER SPRING 13 PC100020-I ROLLER GEAR BOX 14 PC100024 ECCENTRIC 15 PC100024-1 INFERIOR ECCENTRIC SHAFT COUPLING 16 PC100065 INFERIOR BACK ROLLER INSIDE SHAFT DL18S 17 PC100063 INFERIOR ECCENTRIC INSIDE SHAFT DL18S 18 PC100069 INFERIOR BACK ROLLER DL18S 19 PC100070 INFERIOR FRONT ROLLER DL18S 110 PC100081 INFERIOR FRONT ROLLER SCRAPER DL18S 111 PC100080 INFERIOR BACK ROLLER SCRAPER DL18S 112 PC100040 PULLEY 113 PC100022-1 ROLLER OPENING ADJUSTMENT LEVER 1Item Numéro Pièce Description Quantité1 PC100013 SUPPORT DES ROULEAUX 12 PC100052-2 RESSORT DU GRATTOIR ROULEAU ARRIÈRE 1AND PC100052-1 RESSORT DU GRATTOIR ROULEAU AVANT 13 PC100020-1 ENGRENAGE DES ROULEAUX 14 PC100024 EXCENTRIQUE 15 PC100024-1 RACCORD DE L’ARBRE DU ROULEAU AVANT 16 PC100065 ARBRE DU ROULEAU ARRIÈRE 17 PC100063 ARBRE EXCENTRIQUE DU ROULEAU AVANT 18 PC100069 ROULEAU ARRIÈRE DL12S 19 PC100070 ROULEAU AVANT DL12S 110 PC100081 GRATTOIR ROULEAU AVANT DL12S 111 PC100080 GRATTOIR ROULEAU ARRIÈRE DL12S 112 PC100040 POULIE 113 PC100022-1LEVIER D’AJUSTEMENT D’OUVERTURE DES 1ROULEAUX
B-16DL18PDL18P
Item Part Number Description Quantity1 MP100112 CLEAR RUBBER POWER SWITCH COVER 22 PC100103 PAD 23 PC100011-2 BOTTOM ROLLER ASSEMBLY 14 PC100101 FRAME BODY 15 PC100105 DOUGH SLIDER 16 PC100106-1 TOP DOUGH SLIDER 17 PC100405 BACK LID 18 PC100072 BOTTOM ROLLER PLASTIC COVER 19 PC100113 PLASTIC GUARD 110 PC100090 DRIVING BELT 111 PC100030 TOP MOTOR SUPPORT 112 MP100111 GREEN START BUTTON 113 MP100110 RED STOP BUTTON 114 PC100365 FOOT PEDAL SWITCH OUTLET 115 PC100046 RUBBER LEGS 416 PC100310 CAUTION BEFORE CLEANING17 PC100380 CONTROL BOARD 240V 50 HZ 117 PC100385 CONTROL BOARD 120V 60 HZ18 PC100045 CAPACITOR 8 µF 400V FOR 240V MOTOR 118 PC100045-A CAPACITOR 16 µF 250V19 PC100073-M MOTOR 240V 50 HZ 119 PC100073-N MOTOR 120V 60 HZ20 PC100012-4 ROLLER ASSEMBLY 121 PC100079 BOTTOM MOTOR SUPPORT 1Item Numéro Pièce Description Quantité1 MP100112PROTECTEUR DE PLASTIQUE POUR BOUTON2DÉPART/ARRÊT2 PC100103 TAMPON 23 PC100011-2 ROULEAU DU BAS ASSEMBLÉ 14 PC100101 STRUCTURE DE BASE 15 PC100105 CHÛTE À PÂTE 16 PC100106-1 CHÛTE À PÂTE DU HAUT 17 PC100405 PANNEAU ARRIÈRE 18 PC100072PROTECTEUR DE PLASTIQUE DES ROULEAUX1INFÉRIEURS9 PC100113 PROTECTEUR DE PLASTIQUE (ROULEAUX) 110 PC100090 COURROIE D'ENTRAÎNEMENT 111 PC100030 SUPPORT MOTEUR DU HAUT 112 MP100111 BOUTON DE DÉPART VERT 113 MP100110 BOUTON D’ARRÊT ROUGE 114 PC100365 PRISE ÉLECTRIQUE / COMMANDE AU PIED 115 PC100046 PATTE DE CAOUTCHOUC 416 PC100310 PRÉCAUTION AVANT LE NETTOYAGE17 PC100380 CONTRÔLE 240V 50 HZ 117 PC100385 CONTRÔLE 120V 60 HZ18 PC100045 CONDENSATEUR 8 µF 400V POUR MOTEUR 240V 118 PC100045-A CONDENSATEUR 16 µF 250V19 PC100073-M MOTEUR 240V 50 HZ 119 PC100073-N MOTEUR 120V 60 HZ20 PC100012-4 ROULEAU ASSEMBLÉ 121 PC100079 SUPPORT MOTEUR DU BAS 1B-17
WARRANTY / GARANTIE
LIMITED WARRANTY(Continental United States Of America And Canada Only)<strong>Doyon</strong> <strong>Equipment</strong> <strong>Inc</strong>. guarantees to the original purchaser only that its product arefree of defects in material and workmanship, under normal use.This warranty does not cover any light bulbs, thermostat calibration or defects due toor resulting from handling, abuse, misuse, nor shall it extend to any unit from whichthe serial number has been removed or altered, or modifications made byunauthorised service personnel or damage by flood, fire or other acts of God. Nor willthis warranty apply as regards to the immersion element damaged by hard water.The extent of the manufacturer’s obligation under this warranty shall be limited to thereplacement or repair of defective parts within the warranty period. The decision ofthe acceptance of the warranty will be made by <strong>Doyon</strong> <strong>Equipment</strong> servicedepartment, which decision will be final.The purchaser is responsible for having the equipment properly installed, operatedunder normal conditions with proper supervision and to perform periodic preventivemaintenance.If any parts are proven defective during the period of one year from date of purchase,<strong>Doyon</strong> <strong>Equipment</strong> <strong>Inc</strong>. hereby guarantees to replace, without charge, F.O.B. Linière,Quebec, Canada, such part or parts.<strong>Doyon</strong> <strong>Equipment</strong> <strong>Inc</strong> will pay the reasonable labour charges in connection with thereplacement parts occurring within one year from purchase date. Travel over 50miles, holiday or overtime charges are not covered. After one year from purchasedate, all labour and transportation charges in connection with replacement parts willbe the purchaser’s responsibility.<strong>Doyon</strong> <strong>Equipment</strong> <strong>Inc</strong>. does hereby exclude and shall not be liable to purchaser forany consequential or incidental damages including, but not limited to, damages toproperty, damages for loss of use, loss of time, loss of profits or income, resultingfrom any breach or warranty.In no case, shall this warranty apply outside Canada and continental United Statesunless the purchaser has a written agreement from <strong>Doyon</strong> <strong>Equipment</strong> <strong>Inc</strong>.
GARANTIE LIMITÉE(Pour le Canada et les États continentaux des États-Unis)Équipement <strong>Doyon</strong> <strong>Inc</strong>. garantit ses produits à l'acheteur original, contre tout défautde matériaux ou de fabrication, en autant qu'ils aient été utilisés de façon normale.Cette garantie ne s'applique cependant pas sur les ampoules, les calibrations detempérature, tout défaut dû ou résultant d'une mauvaise manipulation, d'un emploiabusif ou d'un mauvais usage. La garantie ne s'applique pas non plus sur toutéquipement dont le numéro de série aurait été enlevé ou altéré, tout produit modifiépar du personnel de service non autorisé, endommagé par une inondation, un feu outout autre acte de Dieu, ni sur les éléments immergés endommagés par l'eau dure.L'étendue des obligations du manufacturier, selon cette garantie, est le remplacementou la réparation des pièces défectueuses durant la période de garantie. L'acceptationde la garantie sera faite par le département de service d'Équipement <strong>Doyon</strong> <strong>Inc</strong>.Cette décision sera définitive.L'acheteur est responsable de faire installer son équipement adéquatement, del'opérer sous des conditions normales d'utilisation avec une bonne supervision, ainsique d'effectuer un entretien préventif périodique.Dans le cas où les pièces s'avéreraient défectueuses durant une période d'un an àpartir de la date d'achat, Équipement <strong>Doyon</strong> <strong>Inc</strong>. s'engage à les remplacer, sansfrais, F.O.B. Linière, Québec, Canada.Équipement <strong>Doyon</strong> <strong>Inc</strong>. couvrira les frais raisonnables de main-d'œuvre reliés auremplacement des pièces, pour une période d'un an à partir de la date d'achat.Toutefois, les frais encourus pour les déplacements au-delà de 50 milles, le tempssupplémentaire et les jours de congé ne sont pas couverts. Au-delà d'un an après ladate d'achat, tous frais de transport et de main-d'œuvre pour le remplacement despièces sont la responsabilité de l'acheteur.Équipement <strong>Doyon</strong> <strong>Inc</strong>. ne se tient pas responsable envers l'acheteur pour toutesconséquences ou dommages incluant, mais non limités à, dommages à la propriété,dommages pour perte d'usage, perte de temps, perte de profits ou de revenus,provenant de tout bris de garantie.En aucun cas, cette garantie ne s'applique à l'extérieur du continent des États-Unisd'Amérique ou du Canada, à moins que l'acheteur n'ait une entente écrite avecÉquipement <strong>Doyon</strong> <strong>Inc</strong>.
NOTES
NOTES
ÉQUIPEMENT DOYON INC.1255, rue PrincipaleLinière, Qc, Canada G0M 1J0Tel.: 1 (418) 685-3431Canada: 1 (800) 463-1636US: 1 (800) 463-4273FAX: 1 (418) 685-3948Internet: http://www.doyon.qc.cae-mail: doyon@doyon.qc.ca