PA1120DM - Monacor
PA1120DM - Monacor
PA1120DM - Monacor
- No tags were found...

Create successful ePaper yourself
Turn your PDF publications into a flip-book with our unique Google optimized e-Paper software.
DIGITAL-MESSAGE-EINSCHUBDIGITAL MESSAGE INSERTION®PA-1120DMBest.-Nr. 17.0830BEDIENUNGSANLEITUNGINSTRUCTION MANUALMODE D’EMPLOIISTRUZIONI PER L’USOMANUAL DE INSTRUCCIONES
DACHBevor Sie einschalten …Wir wünschen Ihnen viel Spaß mit Ihrem neuenGerät von MONACOR. Bitte lesen Sie diese Bedienungsanleitungvor dem Betrieb gründlichdurch. Nur so lernen Sie alle Funktionsmöglichkeitenkennen, vermeiden Fehlbedienungen undschützen sich und Ihr Gerät vor eventuellen Schädendurch unsachgemäßen Gebrauch. HebenSie die Anleitung für ein späteres Nachlesen auf.Der deutsche Text beginnt auf der Seite 4.GBBefore switching on …We wish you much pleasure with your newMONACOR unit. Please read these operatinginstructions carefully prior to operating the unit.Thus, you will get to know all functions of theunit, operating errors will be prevented, andyourself and the unit will be protected againstany damage caused by improper use. Pleasekeep the operating instructions for later use.The English text starts on page 7.FBCHAvant toute installation …Nous vous souhaitons beaucoup de plaisir à utilisercet appareil MONACOR. Lisez ce moded’emploi entièrement avant toute utilisation.Uniquement ainsi, vous pourrez apprendre l’ensembledes possibilités de fonctionnement del’appareil, éviter toute manipulation erronée etvous protéger, ainsi que l’appareil, de dommageséventuels engendrés par une utilisationinadaptée. Conservez la notice pour pouvoirvous y reporter ultérieurement.La version française se trouve page 10.IPrima di accendere …Vi auguriamo buon divertimento con il vostronuovo apparecchio di MONACOR. Leggeteattentamente le istruzioni prima di mettere infunzione l'apparecchio. Solo così potete conosceretutte le funzionalità, evitare comandisbagliati e proteggere voi stessi e l'apparecchioda eventuali danni in seguito ad un uso improprio.Conservate le istruzioni per poterle consultareanche in futuro.Il testo italiano inizia a pagina 13.EAntes de la utilización …Le deseamos una buena utilización para sunuevo aparato MONACOR. Por favor, lea estasinstrucciones de uso atentamente antes de hacerfuncionar el aparato. De esta manera conocerátodas las funciones de la unidad, se prevendránerrores de operación, usted y el aparato estaránprotegidos en contra de todo daño causado porun uso inadecuado. Por favor, guarde las instruccionespara una futura utilización.El texto en español empieza en la página 16.2www.monacor.com
®REC LEVELEXECPLAY/RECSTART/STOPM1 M2 M30 10H.P. MIC/LINE IN CLIP SIG DELREPEAT/STOP M1 M2 M30 10LEVEL1 2 3 4 5 6 7 8 9 10 11 12 13 14 ➀Anzahl der WiederholungenNumber of repeatsNombre de répétionsNumero delle ripetizioniZwischenpausenTime intervalsPausePause intermedieSW11 (M1)SW12 (M2)SW17 (M1)SW18 (M2)SW13 (M3)SW14 (M4)SW19 (M3)SW20 (M4)SW15 (M5)SW16 (M6)SW21 (M5) SW22 (M6)1234SEL 4CN4-1CN104CN07SEL 3123SEL 2123➁3
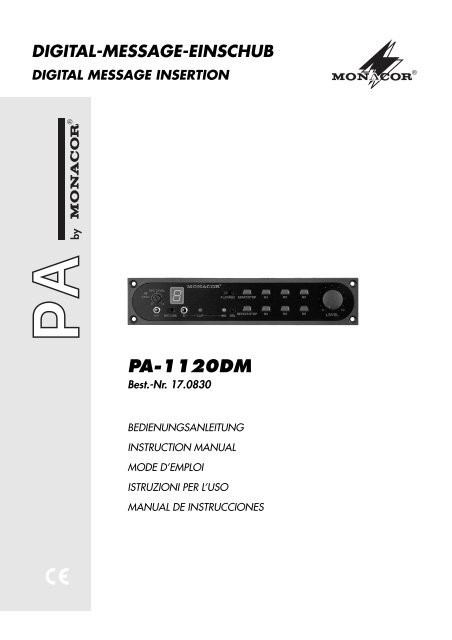
DACH4Bitte klappen Sie die Seite 3 heraus. Sie sehendann immer die beschriebenen Bedienelementeund Anschlüsse.1 Übersicht der Bedienelemente1 Anzeige EXEC leuchtet während der Aufnahmeund beim Abspielen einer Durchsage2 Regler REC LEVEL zum Einstellen der Aufnahmelautstärke3 Kopfhörerausgang H.P. (3,5-mm-Klinke)4 Umschalter MIC/LINE zum Einstellen der Eingangsempfindlichkeit(Mikrofon- oder Line-Pegel)5 Display für den gewählten Durchsagenspeicher(1 – 6)6 Eingang IN zur Aufnahme (3,5-mm-Klinke, asym.)7 Anzeige CLIP leuchtet bei übersteuertem Eingang8 Umschalter PLAY/REC zum Wählen zwischenWiedergabe und Aufnahme9 Anzeige SIG leuchtet bei vorhandenem Eingangssignal10 Taste DEL zum Löschen einer Durchsage oder desgesamten Durchsagenspeichers11 Taste START/STOP1. Tastendruck: Wiedergabe einer Durchsage2. Tastendruck: Stoppen einer Durchsage oderAufnahme12 Taste REPEAT/STOP für die Wiederholfunktion1. Tastendruck: Starten der Wiederholfunktion2. Tastendruck: Stoppen der Wiederholfunktion13 Tasten M 1 bis M 6 zum Anwählen eines Durchsagenspeichers14 Lautstärkeregler LEVEL (Mischregler)2 Hinweise für den sicheren GebrauchDer Einschub entspricht allen erforderlichen Richtliniender EU und ist deshalb mit gekennzeichnet.● Der Einschub darf nur von einer Fachwerkstatt eingebautwerden und ist nur zum Einbau in dieMONACOR-Geräte PA-1120, PA-1200, PA-1200EX,PA-1204EX, PA-1240, PA-5240, PA-5480, PA-6240,PA-6480 und PA-6600 geeignet.● Verwenden Sie den Einschub nur im Innenbereich.Schützen Sie ihn vor Tropf- und Spritzwasser, hoherLuftfeuchtigkeit und Hitze (zulässiger Einsatztemperaturbereich0 – 40 °C).● Nehmen Sie das Gerät mit dem eingebauten Einschubnicht in Betrieb bzw. ziehen Sie den Netzsteckersofort aus der Steckdose, wenn:1. sichtbare Schäden am Einschub, am Gerät oderan der Netzanschlussleitung vorhanden sind,2. nach einem Sturz oder Ähnlichem der Verdachtauf einen Defekt besteht,3. Funktionsstörungen auftreten.Geben Sie den Einschub oder das komplette Gerätin jedem Fall zur Reparatur in eine Fachwerkstatt.● Verwenden Sie für die Reinigung nur ein weiches,trockenes Tuch, auf keinen Fall Chemikalien oderWasser.● Wird der Einschub zweckentfremdet, nicht fachgerechteingebaut, falsch bedient oder nicht fachgerechtrepariert, kann keine Garantie für das Gerätund keine Haftung für daraus resultierende SachoderPersonenschäden übernommen werden.Soll der Einschub endgültig aus dem Betriebgenommen werden, übergeben Sie ihn zurumweltgerechten Entsorgung einem örtlichenRecyclingbetrieb.3 Einbau1) Vor dem Einbau des Einschubs den Netzsteckerdes Verstärkers bzw. des Einschubgrundgerätes(PA-1200EX, PA-1204EX) ziehen.2) Den Gehäusedeckel des Verstärkers bzw. des Einschubgrundgerätesabnehmen.3) Die Abdeckblende für den Einschubschacht auf derFrontseite des Verstärkers bzw. des Einschubgrundgerätsabschrauben. Die an der Abdeckblendefestgeklebte, dreipolige Leitung abnehmenund nach dem Einsetzen und Festschrauben desEinschubmoduls in das Stiftgehäuse CN07 stecken(siehe Abb. 2).4) Nur bei den Verstärkern PA-1120, PA-1240, PA-6240, PA-6480 und PA-6600: Vom AnschlussAS104 der Platine, die sich ganz links an der Rückseitedes Verstärkers befindet, geht eine zweipoligeLeitung mit einer schwarzen und braunen Ader ab.Das frei liegende Ende dieser Leitung in das StiftgehäuseCN104 des Einschubs stecken.5) Nur wenn der Einschub über separate Taster fernbedientwerden soll (siehe Kapitel 7):a) Dem Einschub liegt eine bedruckte Metallblendebei. Diese anstelle der Abdeckblende auf derRückseite des Verstärkers bzw. des Einschubgrundgerätsfestschrauben.b) Die große Steckbuchse des beiliegenden 10-poligenKabels in die neue Metallblende einschnappen.c) Den kleineren Stecker des 10-poligen Kabels indas Stiftgehäuse CN4-1 des Einschubs stecken.6) Bevor der Gehäusedeckel des Verstärkers bzw. desEinschubgrundgeräts wieder festgeschraubt wird,die im nächsten Kapitel beschriebenen Grundeinstellungendurchführen.4 Grundeinstellungen1) Der Einschub besitzt eine Speicherbatterie, damitdie Durchsagen auch nach dem Ausschalten gespeichertbleiben. Diese Speicherbatterie ist imAuslieferungszustand deaktiviert, um eine allmählicheEntladung bis zum Einbau zu verhindern. Umdie Speicherbatterie zu aktivieren, die BrückeSEL 2 von Pin 2 + 3 (Aus) auf Pin 1 + 2 (Ein) setzen– siehe Abb. 2.2) Die Anzahl der gewünschten Wiederholungen einerDurchsage und die gewünschte Länge der Zwischenpausenmit den DIP-Schaltern SW 11 bisSW 22 einstellen. Jedem Speicherplatz sind zweiDIP-Schalter zugewiesen:
Zuordnung der DIP-SchalterEinstellungSpeicherplatzM1 M2 M3 M4 M5 M6Wiederholung SW 11 SW 12 SW 13 SW 14 SW 15 SW 16Zwischenpause SW 17 SW 18 SW 19 SW 20 SW 21 SW 22Einstellung der WiederholungenAnzahl derBitnummerWiederholungen 1 2 3 4 5 6 7 80 ON X X X X X X X1 X ON X X X X X X2 X X ON X X X X X3 X X X ON X X X X4 X X X X ON X X X5 X X X X X ON X X6 X X X X X X ON Xunendlich X X X X X X XX = OFFEinstellung der ZwischenpausenX = OFF7 X X X X X X X4min X X X X X X ON8min X X X X X X Xnicht zulässig X X X X X X X3) Mit der Brücke SEL 3 den Ausgangspegel einstellen:Pin 1 + 2:keine Verstärkung des AusgangssignalsPin 2 + 3:Verstärkung des Ausgangssignals um 10 dB4) Mit der Brücke SEL 4 den Modus zum Starten einerDurchsage wählen:*entsprechend der Einstellungen unter Punkt 2)ONZwischenpauseBitnummer1s1ON2X3X4X5X6X7X8X2s X ON X X X X X X4s X X ON X X X X X8s X X X ON X X X X32 s X X X X ON X X X1min X X X X X ON X XBrücke auf Pin1+22+33+4WerkseinstellungStarten einer Durchsagedurch Betätigen einer der Tasten M 1 bisM6 (13) = einmalige Durchsagedurch Betätigen einer der Tasten M 1 bisM6 (13) = wiederholte Durchsage*XXONXzuerst eine der Tasten M 1 bis M 6 (13) drückenund dann die Taste START/STOP (11) bzw.REPEAT/STOP (12)5 Erste Inbetriebnahme des EinschubsBei der ersten Inbetriebnahme ist der kompletteDurchsagenspeicher mit Störgeräuschen belegt.Wichtig! Vor dem ersten Betrieb unbedingt denSpeicherinhalt löschen:1) Den Verstärker einschalten. Auf dem Display (5)erscheint die Ziffer „0“.2) Den Schalter PLAY/REC (8) auf REC stellen.3) Die Taste DEL (10) mit Hilfe eines kleinen Schraubendreherso. ä. betätigen. Der gesamte Durchsagenspeicherwird gelöscht.6 Bedienung6.1 Aufnehmen einer Durchsage1) Den Schalter PLAY/REC (8) auf REC stellen.2) Den Speicherplatz durch Drücken einer der TastenM1 bis M 6 (13) auswählen. Das Display (5) zeigtden entsprechenden Speicherplatz.3) Den Schalter MIC/LINE (4) entsprechend des verwendetenEingangssignals einstellen:für ein Mikrofon in die Position MIC,für ein Gerät mit Line-Pegel (z. B. Kassettenrecorder,CD-Spieler) in die Position LINE.4) Das Mikrofon bzw. das Gerät mit der Buchse IN (6)verbinden. Bei Bedarf den beiliegenden Adapterverwenden. Ist ein Eingangssignal vorhanden,leuchtet die Anzeige SIG (9).5) Mit dem Regler REC LEVEL (2) die Aufnahmelautstärkeso einstellen, dass die Anzeige CLIP (7)gerade nicht leuchtet.6) Die Aufnahme mit der Taste START/STOP (11)starten. Während der Aufnahme leuchtet dieAnzeige EXEC (1).7) Am Ende der Aufnahme durch ein erneutes Drückender Taste START/STOP (11) die Aufnahmebeenden. Die Anzeige EXEC (1) erlischt.8) Den Vorgang für bis zu sechs Durchsagen wiederholen.Hinweisea Die Speicherkapazität des gesamten Durchsagenspeichersbeträgt 4 Minuten und 28 Sekunden.Die Kapazität für jeden Speicherplatz wird automatischangepasst. Die Aufnahme stoppt automatisch,wenn der gesamte Speicher voll ist. Es lässt sichz. B. der gesamte Speicher auch für nur eine Durchsagemit einer Dauer von 4 Minuten und 28 Sekundennutzen.b Um eine vorhandene Durchsage durch eine neuezu ersetzen, muss der Speicherplatz vorher nichtgelöscht werden. Die alte Durchsage wird automatischüberschrieben.c Ist der Einschub in den Verstärker PA-1120, PA-1240,PA-6240, PA-6480 oder PA-6600 eingebaut, lässtsich z. B. über einen Alarmmeldekontakt automatischeine Durchsage des Speicherplatzes M 6 abrufen.In diesem Fall sollte dieser Speicherplatz füreine entsprechende Durchsage reserviert werden.DACH5
DACH6.2 Durchsagen abrufen1) Den Schalter PLAY/REC (8) auf PLAY stellen.2) Die Durchsage durch Drücken einer der Tasten M 1bis M 6 (13) auswählen. Das Display (5) zeigt denentsprechenden Speicherplatz an.3) Zum Abspielen der Durchsage die Taste START/STOP (11) drücken. Während des Abspielens derDurchsage leuchtet die Anzeige EXEC (1).4) Mit dem Regler LEVEL (14) die Lautstärke einstellen.5) Um die Durchsage vorzeitig zu beenden, die TasteSTART/STOP (11) erneut betätigen. Die AnzeigeEXEC (1) erlischt.Hinweis: Das Starten einer Durchsage kann auchdirekt durch Drücken einer der Tasten M 1 bis M 6 (13)erfolgen. Siehe hierzu im Kapitel 4 „Grundeinstellungen“unter Punkt 4).6.3 WiederholfunktionEine Durchsage kann auch entsprechend der im Kapitel4 unter Punkt 2) durchgeführten Einstellungenautomatisch wiederholt werden.1) Den Schalter PLAY/REC (8) auf PLAY stellen.2) Die Durchsage durch Drücken einer der Tasten M 1bis M 6 (13) auswählen. Das Display (5) zeigt denentsprechenden Speicherplatz an.3) Zum mehrfachen Abspielen der Durchsage dieTaste REPEAT/STOP (12) drücken. Während desAbspielens der Durchsage leuchtet die AnzeigeEXEC (1).4) Um die Durchsage vorzeitig zu beenden, die TasteREPEAT/STOP (12) erneut betätigen. Die AnzeigeEXEC (1) erlischt.Hinweis: Das Starten einer Durchsage mit Wiederholungkann auch direkt durch Drücken einer derTasten M 1 bis M 6 (13) erfolgen. Siehe hierzu im Kapitel4 „Grundeinstellungen“ unter Punkt 4).6.4 Löschen einer Durchsage1) Den Schalter PLAY/REC (8) auf REC stellen.2) Den Speicherplatz der zu löschenden Durchsagemit einer der Tasten M 1 bis M 6 (13) auswählen.Das Display (5) zeigt den entsprechenden Speicherplatzan.3) Die versenkte Taste DEL (10) mit Hilfe eines kleinenSchraubendrehers o. ä. betätigen. Die Durchsageist gelöscht.6.5 Löschen aller Durchsagen1) Den Verstärker aus- und wieder einschalten. DasDisplay (5) zeigt die Ziffer „0“.2) Den Schalter PLAY/REC (8) auf REC stellen.3) Die versenkte Taste DEL (10) mit Hilfe eines kleinenSchraubendrehers o. ä. betätigen. Der kompletteDurchsagenspeicher ist gelöscht.6.6 KopfhörerMit einem Kopfhörer kann während der Aufnahmeoder Wiedergabe die Durchsage kontrolliert werden.1) Den Kopfhörer mit der Buchse H.P. (3) verbinden.Eventuell den beiliegenden Adapter verwenden.2) Mit dem Lautstärkeregler LEVEL (14) die Lautstärkeeinstellen.Hinweis: Solange der Kopfhörer angeschlossen ist,kann die Durchsage nicht über die am Verstärker angeschlossenenLautsprecher gehört werden.7 Durchsagen ferngesteuert abrufen1. Ist der Einschub in einem Verstärker eingesetzt, andem sich das Kommandomikrofon PA-1120RC oderPA-6000RC anschließen lässt, können die Durchsagenauch ferngesteuert über das Kommandomikrofonabgerufen werden.2. Über separate Taster lassen sich Durchsagenebenfalls fernbedient abgerufen. Dazu den unterKapitel 3, Punkt 6) installierten Stecker entsprechendder Abb. 3 anschließen.M2 M3 M4 M5 M6 M1REPEAT/STOPSTART/STOP➂ Kontaktbelegung8 Technische DatenEingangMic: . . . . . . . . . . . . . . . -50 dB/600 Ω, asym.Line: . . . . . . . . . . . . . . . -10 dB/10kΩ, asym.AusgängeAudioausgang: . . . . . . . -10 dB, asym., mit SEL 3auf 0 dB einstellbarKopfhörer: . . . . . . . . . . 24 mW, ≥ 64 ΩFrequenzbereichMic: . . . . . . . . . . . . . . . 300 – 6400 HzLine: . . . . . . . . . . . . . . . 100 – 6400 HzAbtastrate: . . . . . . . . . . . . 16 kHzDurchsagenspeicher: . . . . 16 Mbit SRAMmax. Aufnahmezeit: . . . . . 4 min 28 smax. Speicherhaltezeitohne Stromversorgung: . . 60 TageStromversorgung: . . . . . . . 17 V über Verstärkeroder EinschubgrundgerätAbmessungen (B × H × T): 194 × 40 × 125 mmGewicht: . . . . . . . . . . . . . . 420 gÄnderungen vorbehalten.MASSEAKTIV6Diese Bedienungsanleitung ist urheberrechtlich für MONACOR ® INTERNATIONAL GmbH & Co. KG geschützt.Eine Reproduktion für eigene kommerzielle Zwecke – auch auszugsweise – ist untersagt.
Please unfold page 3. Then you can always see theoperating elements and connections described.1 Operating Elements1 LED EXEC lights while recording or replaying anannouncement2 Control REC LEVEL to adjust the recording volume3 Headphone output H.P. (3.5 mm jack)4 Selector switch MIC/LINE to adjust the input sensitivity(microphone level or line level)5 Display for the selected announcement memory(1 to 6)6 Input IN for recording (3.5 mm jack, unbal.)7 LED CLIP lights if the input is overloaded8 Selector switch PLAY/REC to select betweenreplaying and recording9 LED SIG lights if the input signal is available10 Button DEL to delete an announcement or theentire announcement memory11 Button START/STOP1 st pressing of button:to replay an announcement2 nd pressing of button:to stop an announcement or a recording12 Button REPEAT/STOP for the repeat function1 st pressing of button:to start the repeat function2 nd pressing of button:to stop the repeat function13 Buttons M 1 to M 6 to select an announcementmemory14 Volume control LEVEL (mixing control)2 Safety NotesThe insertion module corresponds to all required directivesof the EU and is therefore marked with .● This insertion must only be installed by authorized,skilled personnel and is only suitable for the installationinto the MONACOR units PA-1120, PA-1200,PA-1200EX, PA-1204EX, PA-1240, PA-5240, PA-5480, PA-6240, PA-6480 and PA-6600.● The insertion is suitable for indoor use only. Protectit against dripping water and splash water, high airhumidity, and heat (admissible ambient temperaturerange 0 – 40 °C).● Do not set the unit with the installed insertion intooperation and immediately disconnect the mainsplug from the mains socket if:1. there is visible damage to the insertion, unit, ormains cable,2. a defect might have occurred after a drop orsimilar accident,3. there are malfunctions.The insertion or the complete unit must in any casebe repaired by authorized, skilled personnel.● For cleaning only use a dry, soft cloth, by no meanschemicals or water.● No guarantee claims for the unit and no liability forany resulting personal damage or material damagewill be accepted if the insertion is used for other purposesthan originally intended, if it is not correctlyinstalled or operated or not repaired in an expertway.If the insertion is to be put out of operationdefinitively, take it to a local recycling plant fora disposal which is not harmful to the environment.3 Installation1) Prior to the installation of the insertion disconnectthe mains plug of the amplifier or basic insertion unit(PA-1200EX, PA-1204EX).2) Take off the housing cover of the amplifier or basicinsertion unit.3) Screw off the cover plate for the insertion compartmenton the front panel of the amplifier or the basicinsertion unit. Remove the three-pole line glued tothe cover plate and connect it to the pin housingCN07 after the insertion module has been insertedand tightened with screws (see fig. 2).4) Only for amplifiers PA-1120, PA-1240, PA-6240,PA-6480, and PA-6600: The PCB which is completelyat the left of the rear panel of the amplifierhas a connection AS104 with a two-pole line with ablack core and a brown core. Connect the bare endof this line to the pin housing CN104 of the insertion.5) Only for remote-controlling the insertion via separatebuttons for momentary action (see chapter 7):a) A printed metal plate is supplied with the insertion.Screw this metal plate instead of the coverplate tightly to the rear side of the amplifier orbasic insertion unit.b) Let the large plug-in jack of the supplied 10-polecable snap in the new metal plate.c) Connect the smaller plug of the 10-pole cable tothe pin socket CN4-1 of the insertion.6) Prior to tightening the housing cover of the amplifieror basic insertion unit with screws again, carry outthe basic settings described in the next chapter.4 Basic Settings1) The insertion has a storage battery so that theannouncements are kept stored even after switchingoff. This storage battery is deactivated when deliveredex factory to prevent a slow discharge untilthe unit will be installed. To activate the storage battery,place the jumper SEL 2 from pins 2 + 3 (Off) topins 1 + 2 (On) – see fig. 2.2) Set the number of desired repeats of an announcementand the desired length of the time intervalswith the DIP switches SW 11 to SW 22. Two DIPswitches are assigned to each memory location:GB7
GB8Assignment of the DIP switchesSettingMemory locationM1 M2 M3 M4 M5 M6Repeat SW 11 SW 12 SW 13 SW 14 SW 15 SW 16Time interval SW 17 SW 18 SW 19 SW 20 SW 21 SW 22Setting of the repeatsNumber ofBit nummerrepeats01ON2X3X4X5X6X7X8X1 X ON X X X X X X2 X X ON X X X X X3 X X X ON X X X X4 X X X X ON X X X5 X X X X X ON X XX = OFFX = OFF6 X X X X X X ON7 X X X X X X Xinfinite X X X X X X X3) Set the output level with the jumper SEL 3:pins 1 + 2:no amplification of the output signalpins 2 + 3:amplification of the output signal by 10 dB4) Select the mode for starting an announcement withjumper SEL 4:*according to the settings under item 2)XONXSetting of the time intervalsBit nummerTime interval1 2 3 4 5 6 7 81s ON X X X X X X X2s X ON X X X X X X4s X X ON X X X X X8s X X X ON X X X X32 s X X X X ON X X X1min X X X X X ON X X4min X X X X X X ON X8min X X X X X X Xnot admissible X X X X X X XJumper on Pin Starting of an announcement1+2press one of the buttons M 1 to M 6 (13) =single announcement2+33+4setting ex factorypress one of the buttons M 1 to M 6 (13) =repeated announcement*ONat first press one of the buttons M 1 to M 6 (13)and then button START/STOP (11) orREPEAT/STOP (12)X5 First Setting into Operation of theInsertionWhen setting into operation for the first time, the completeannouncement memory is occupied with interferingnoise.Important! Prior to the first operation delete in anycase the memory contents:1) Switch on the amplifier. The number “0” appears onthe display (5).2) Set the switch PLAY/REC (8) to REC.3) Activate the button DEL (10) by means of a smallscrew driver or similar tool. The entire announcementmemory is deleted.6 Operation6.1 Recording an announcement1) Set the switch PLAY/REC (8) to REC.2) Select the memory location by pressing one of thebuttons M 1 to M 6 (13). The display (5) shows thecorresponding memory location.3) Set the switch MIC/LINE (4) according to the inputsignal used:for a microphone to position MIC,for a unit with line level (e. g. cassette recorder,CD player) to position LINE.4) Connect the microphone or the unit to the jackIN (6). If required, use the supplied adapter. If aninput signal is available, the LED SIG (9) lights up.5) Adjust the recording volume with the control RECLEVEL (2) so that the LED CLIP (7) just does notlight up.6) Start the recording with the button START/STOP(11). While recording the LED EXEC (1) lights up.7) At the end of the recording stop the recording bypressing the button START/STOP (11) again. TheLED EXEC (1) extinguishes.8) Repeat the procedure for up to six announcements.Notesa The storage capacity of the entire announcementmemory is 4 minutes and 28 seconds. The capacityfor each memory location is automatically adapted.The recording stops automatically as soon as theentire memory is filled up. It is possible to use theentire memory e. g. even for only one announcementlasting 4 minutes and 28 seconds.b To replace an existing announcement by a newone, the memory location must not be deletedbefore. The previous announcement is automaticallyoverwritten.c If the insertion is installed into the amplifierPA-1120, PA-1240, PA-6240, PA-6480 or PA-6600, itis possible to call an announcement of the memorylocation M 6 automatically, e. g. via an alarm sensorcontact. In this case this memory location should bereserved for a corresponding announcement.
6.2 Calling the announcements1) Set the switch PLAY/REC (8) to PLAY.2) Select the announcement by pressing one of thebuttons M 1 to M 6 (13). The display (5) shows thecorresponding memory location.3) To replay the announcement, press the buttonSTART/STOP (11). While replaying the announcement,the indication EXEC (1) lights up.4) Adjust the volume with the control LEVEL (14).5) To finish the announcement before the end, pressbutton START/STOP (11) again. The indicationEXEC (1) extinguishes.Note: An announcement can also directly be started bypressing one of the buttons M 1 to M 6 (13). For thisrefer to chapter 4 “Basic Settings” under item 4).6.3 Repeat functionAn announcement can also be repeated automaticallyaccording to the settings carried out in chapter 4 underitem 2).1) Set the switch PLAY/REC (8) to PLAY.2) Select the announcement by pressing one of thebuttons M 1 to M 6 (13). The display (5) shows thecorresponding memory location.3) For multiple replaying of an announcement pressthe button REPEAT/STOP (12). While replaying theannouncement, the indication EXEC (1) lights up.4) To finish the announcement before the end, pressthe button REPEAT/STOP (12) again. The indicationEXEC (1) extinguishes.Note: An announcement with repeat can also directlybe started by pressing one of the buttons M 1 to M 6(13). For this refer to chapter 4 “Basic Settings” underitem 4).6.4 Deleting an announcement1) Set the switch PLAY/REC (8) to REC.2) Select the memory location of the announcement tobe deleted with one of the buttons M 1 to M 6 (13).The display (5) shows the corresponding memorylocation.3) Activate the recessed button DEL (10) by means ofa small screw driver or similar tool. The announcementis deleted.6.5 Deleting all announcements1) Switch the amplifier on and off again. The display(5) shows the number “0”.2) Set the switch PLAY/REC (8) to REC.3) Activate the recessed button DEL (10) by means ofa small screw driver or similar tool. The entire announcementmemory is deleted.6.6 HeadphonesThe announcement can be checked with headphoneswhile recording or replaying.1) Connect the headphones with the jack H.P. (3). Ifrequired, use the supplied adapter.2) Adjust the volume with the volume control LEVEL(14).Note: As long as the headphones are connected, theannouncement cannot be heard via the speakersconnected to the amplifier.7 Remote-controlled Calling of Announcements1. If the insertion has been installed into an amplifier,to which the zone paging microphone PA-1120RCor PA-6000RC can be connected, the announcementsmay also be called by remote control via thezone paging microphone.2. Via separate buttons for momentary action, theremote-controlled calling of announcements is alsopossible. For this connect the plug installed underchapter 3, item 6), according to fig. 3.M2 M3 M4 M5 M6 M1REPEAT/STOPSTART/STOP➂ Pin configurationGROUNDACTIVE8 SpecificationsInputMic: . . . . . . . . . . . . . . . -50 dB/600 Ω, unbal.Line: . . . . . . . . . . . . . . . -10 dB/10kΩ, unbal.Outputsaudio output: . . . . . . . . -10 dB, unbal., adjustableto 0 dB with SEL 3headphones: . . . . . . . . 24 mW, ≥ 64 ΩFrequency rangeMic: . . . . . . . . . . . . . . . 300 – 6400 HzLine: . . . . . . . . . . . . . . . 100 – 6400 HzSampling rate: . . . . . . . . . 16 kHzAnnouncement memory: . 16 Mbit SRAMMax. recording time: . . . . . 4 min 28 sMax. memory holding timew/o power supply: . . . . . . 60 daysPower supply: . . . . . . . . . . 17 V via amplifier or thebasic insertion unitDimensions, weight: . . . . . 194 × 40 × 125 mm, 420 gGBSubject to change.All rights reserved by MONACOR ® INTERNATIONAL GmbH & Co. KG. No part of this instruction manual maybe reproduced in any form or by any means for any commercial use.9
FBCHOuvrez le présent livret page 3 de manière à visualiserles éléments et branchements1 Eléments et branchements1 LED EXEC : brille pendant l’enregistrement et ladiffusion d’une annonce2 Potentiomètre de réglage REC LEVEL : réglage duvolume d’enregistrement3 Sortie casques H.P. (jack 3,5)4 Sélecteur MIC/LINE : réglage de la sensibilitéd’entrée (niveau micro ou niveau ligne)5 Affichage pour la mémoire sélectionnée (1 – 6)6 Entrée IN pour l’enregistrement (jack 3,5 asymétrique)7 LED CLIP : brille en cas de surcharge en entrée8 Sélecteur PLAY/REC pour sélectionner entre lectureet enregistrement9 LED SIG : brille en cas de présence d’un signald’entrée10 Touche DEL : pour effacer une annonce ou toute lamémoire des messages11 Touche START/STOP :1 pression : lecture d’un message2 pression : arrêt d’une annonce ou enregistrement12 Touche REPEAT/STOP pour la fonction répétition1 pression : démarrage de la fonction répétition2 pression : arrêt de la fonction répétition13 Touches M 1 à M 6 pour sélectionner une mémoire14 Réglage de volume LEVEL (mixeur)2 Conseils d’utilisationLe module insert répond à toutes les directives nécessairesde l’Union Européenne et porte donc le symbole.● Seul un personnel habilité peut effectuer l’installation; cet insert ne convient que pour être placédans les amplificateurs MONACOR PA-1120, PA-1200, PA-1200EX, PA-1204EX, PA-1240, PA-5240,PA-5480, PA-6240, PA-6480 et PA-6600.● Le module n’est conçu que pour une utilisation enintérieur. Protégez-le de tout type de projectionsd’eau, des éclaboussures, d’une humidité de l’airélevée et de la chaleur (plage de température defonctionnement autorisée : 0 – 40 °C).● Ne faites pas fonctionner l’appareil et débranchez-leimmédiatement dans les cas suivants :1. l’appareil ou le cordon secteur présente des dommages,2. après une chute ou un cas similaire vous avez undoute sur l’état du appareil,3. des défaillances apparaissent.Dans tous les cas, les dommages doivent êtreréparés par un technicien spécialisé.● Pour nettoyer l’appareil, utilisez un chiffon sec etdoux, en aucun cas de produits chimiques ou d’eau.● Nous déclinons toute responsabilité en cas de dommagesmatériels ou corporels consécutifs si lemodule est utilisé dans un but autre que celui pourlequel il a été conçu, s’il n’est pas correctementinstallé, utilisé ou n’est pas réparé par une personnehabilitée ; de même, la garantie deviendrait caduque.Lorsque le module est définitivement retiré duservice, vous devez le déposer dans uneusine de recyclage adaptée pour contribuer àson élimination non polluante.3 Installation1) Avant de placer l’insert, débranchez le cordon d’alimentationde l’amplificateur ou du support de base(PA-1200EX, PA-1204EX).2) Retirez le couvercle de l’amplificateur ou du supportde base.3) Dévissez la façade du compartiment du module surla face avant de l’amplificateur ou de l’appareil debase pour module. Retirez le câble trois pôles collésur la façade, puis une fois le module inséré etvissé, mettez le câble dans le boîtier de connexionCN07 (voir schéma 2).4) Uniquement sur les modèles PA-1120, PA-1240,PA-6240, PA-6480 et PA-6600 : la platine tout àgauche sur la face arrière de l’amplificateur possèdeune connexion AS104 avec un câble deuxpôles avec un conducteur noir et un conducteurmarron. Mettez l’extrémité libre de ce câble auboîtier de connexion CN104 du module.5) Uniquement pour la commande à distance par desclaviers séparés (voir chapitre 7) :a) L’insert est livré avec un cache métallique imprimé: Vissez-le à la place du cache sur la facearrière de l’amplificateur ou du support de base.b) Faites passer la grande fiche du câble 10 pôleslivré dans la plaque nouvelle.c) Connectez la petite fiche du câble 10 pôles à laborne CN4-1 de l’insert.6) Avant de revisser le couvercle de l’amplificateur oudu support de base, effectuez les réglages de basedécrits dans le paragraphe suivant.4 Réglages de base1) L’insert dispose d’une batterie à mémoire où lesannonces sont mémorisées après la déconnexiondu module. Cette batterie est désactivée à la sortiede l’usine, pour éviter toute décharge imprévue jusqu’auplacement définitif. Pour activer la batterie,déplacez les cavaliers SEL 2 des pins 2 + 3 (arrêt)sur les pins 1 + 2 (marche) – voir schema 2.2) Le nombre de répétitions souhaitées d’un messageet la longueur des pauses souhaitées se règle avecles interrupteurs DIP SW 11 à SW 22. A chaquemémoire sont attribués deux interrupteurs DIP :10
Agencement des interrupteurs DIPRéglageMémoireM1 M2 M3 M4 M5 M6Répétition SW 11 SW 12 SW 13 SW 14 SW 15 SW 16Pause SW 17 SW 18 SW 19 SW 20 SW 21 SW 22Réglage des répétitionsNombre deNuméro de bitpépétions 1 2 3 4 5 6 7 81s ON X X X X X X X2s X ON X X X X X X4s X X ON X X X X X8s X X X ON X X X X32 s X X X X ON X X X1min X X X X X ON X X4min X X X X X X ON X8min X X X X X X X ONinfini X X X X X X X XX = arrêtRéglage des pausesNuméro de bitPause1 2 3 4 5 6 7 81s ON X X X X X X X2s X ON X X X X X X4s X X ON X X X X X8s X X X ON X X X X32 s X X X X ON X X X1min X X X X X ON X X4min X X X X X X ON X8min X X X X X X X ONnon autorisé X X X X X X X XX = arrêt3) Avec le cavalier SEL 3, réglez le niveau de sortie :Pin 1 + 2 = aucune amplification du signal de sortiePin 2 + 3 = amplification du signal de sortie de 10 dB4) Avec le cavalier SEL 4, sélectionnez le mode dedémarrage d’une annonce :Cavalier sur pin1+22+33+4réglage d’usine*en fonction des réglages du point 2)Démarrage d’une annonceen activant une des touches M 1 à M 6 (13) :annonce uniqueen activant une des touches M 1 à M 6 (13) :annonce répétée*tout d’abord, enfoncez une des touches M 1 àM6 (13) puis la touche START/STOP (11) oula touche REPEAT/STOP (12)5 Première mise en serviceLors de la première mise en service, la mémoire est entotalité occupée par des bruits perturbateurs.Attention ! Vous devez impérativement effacer le contenude la mémoire avant toute utilisation :1) Allumez l’amplificateur ; le nombre “0” s’affiche (5).2) Mettez l’interrupteur PLAY/REC (8) sur REC.3) Actionnez la touche DEL (10) à l’aide d’un petit tournevis; la mémoire est entièrement effacée.6 Utilisation6.1 Enregistrement d’une annonce1) Mettez l’interrupteur PLAY/REC (8) sur REC.2) Enfoncez une des touches M 1 à M 6 (13) poursélectionner la position de la mémoire. L’affichage(5) indique la position correspondante.3) En fonction du signal d’entrée utilisé, réglez lesélecteur MIC/LINE (4) :pour un micro, sur la position MIC,pour un appareil à niveau Ligne (p. ex. magnétocassette,lecteur CD), sur la position LINE.4) Reliez le micro / l’appareil à la prise IN (6). Si besoin,utilisez l’adaptateur fourni. S’il y a un signald’entrée, la LED SIG (9) brille.5) Avec le réglage REC LEVEL (2), réglez le volumed’enregistrement de telle sorte que la LED CLIP (7)ne brille plus.6) Démarrez l’enregistrement avec la touche START/STOP (11). Pendant l’enregistrement, la LED EXEC(1) brille.7) A la fin de l’enregistrement, par une nouvelle pressionsur la touche START/STOP (11), terminez l’enregistrement.La LED EXEC (1) s’éteint.8) Vous pouvez répéter la démarche pour enregistrer6 annonces au plus.Conseilsa La capacité de la mémoire totale est de 4 minuteset 28 secondes. La capacité de chaque position demémoire s’adapte automatiquement. L’enregistrements’arrête automatiquement lorsque la mémoiretotale est pleine. Il est également possible d’utilisertoute la mémoire pour une annonce unique d’unedurée de 4 minutes et 28 secondes.b Pour remplacer une annonce donnée par unenouvelle, la position ne doit pas être auparavanteffacée. L’ancien message est automatiquementeffacé pendant le remplacement.c Si le module est placé dans l’amplificateur PA-1120,PA-1240, PA-6240, PA-6480 ou PA-6600, il est possibled’appeler automatiquement un message de laposition M 6 via par exemple un contact d’alarme.Dans ce cas, cette mémoire doit être réservée pourle message correspondant.FBCH11
FBCH6.2 Appel des messages1) Mettez le sélecteur PLAY/REC (8) sur PLAY.2) Enfoncez une des touches M 1 à M 6 (13) poursélectionner le message ; l’affichage (5) indique saposition.3) Pour lire le message, enfoncez la touche START/STOP (11) : pendant la lecture, la LED EXEC (1)brille.4) Avec le potentiomètre LEVEL (14), réglez le volume.5) Pour terminer une annonce avant son terme, enfoncezune nouvelle fois la touche START/STOP (11) ;la LED EXEC (1) ne brille plus.Remarque : le démarrage d’un message peut s’effectuerpar une pression sur une des touches M 1 àM6(13). Voir chapitre 4 “Réglages de base” point 4).6.3 RépétitionSelon les réglages effectués dans les étapes décritesau chapitre 4 point 2), un message peut être répétéautomatiquement.1) Mettez le sélecteur PLAY/REC (8) sur PLAY.2) Enfoncez une des touches M 1 à M 6 (13) poursélectionner le message ; l’affichage (5) indique saposition.3) Pour plusieurs lectures du message, enfoncez latouche REPEAT/STOP (12) ; pendant la lecture, laLED EXEC (1) brille.4) Pour terminer une annonce avant son terme, enfoncezune nouvelle fois la touche REPEAT/STOP (12) ; la LED EXEC (1) ne brille plus.Remarque : le démarrage d’un message avec répétitionpeut s’effectuer par une pression sur une destouches M 1 à M 6 (13). Voir chapitre 4 “Réglages debase” point 4).6.4 Effacement d’un message1) Mettez le sélecteur PLAY/REC (8) sur REC.2) Sélectionnez la position du message à effacer avecune des touches M 1 à M 6 (13), l’affichage (5) indiquela position correspondante.3) Activez la touche noyée DEL (10) à l’aide d’un petittournevis ou objet similaire, le message est effacé.6.5 Effacement de toutes les annonces1) Eteignez puis rallumez l’amplificateur, l’affichage(5) indique “0”.2) Mettez le sélecteur PLAY/REC (8) sur REC.3) Activez la touche noyée DEL (10) à l’aide d’un petittournevis ou objet similaire, l’ensemble des messagesest effacé.6.6 CasqueIl est possible de brancher un casque pour contrôlerl’enregistrement ou la lecture d’un message.1) Reliez le casque à la prise H.P. (3). Si besoin, utilisezl’adaptateur fourni.2) Réglez le volume avec le réglage LEVEL (14).Remarque : tant que le casque est branché, il n’est paspossible d’écouter le message via les haut-parleursreliés à l’amplificateur.7 Appel des messages à distance1. Si le module est placé dans un amplificateur,auquel on peut relier le microphone de commandePA-1120RC ou PA-6000RC, les annonces peuventêtre appelées, par une commande à distance, via lemicrophone de commande.2. Les messages peuvent être appelés à distance viades touches séparées. Reliez la prise installée auchapitre 3 point 6 (schéma 3).M2 M3 M4 M5 M6 M1REPEAT/STOPSTART/STOP➂ Configuration des pins8 Caractéristiques techniquesEntréesMic : . . . . . . . . . . . . . . . -50 dB/600 Ω,asymétriqueLigne : . . . . . . . . . . . . . -10 dB/10kΩ,asymétriqueSortiesSortie audio : . . . . . . . . -10 dB, asymétrique, avecSEL 3, réglable sur 0 dBCasque : . . . . . . . . . . . . 24 mW, ≥ 64 ΩBande passanteMic : . . . . . . . . . . . . . . . 300 – 6400 HzLigne : . . . . . . . . . . . . . 100 – 6400 HzTaux ff : . . . . . . . . . . . . . . . 16 kHzMémoire annonces : . . . . . 16 Mbit SRAMDuréeenregistrement max. : . . . . 4 min 28 sDurée de maintien de lamémoire sans alimentation : 60 joursAlimentation : . . . . . . . . . . 17 V par amplificateurou support de basePA-1200EX, PA-1204EXDimensions (L × H × P) : . 194 × 40 × 125 mmPoids : . . . . . . . . . . . . . . . 420 gTout droit de modification réservé.MASSEACTIF12Notice d’utilisation protégée par le copyright de MONACOR ® INTERNATIONAL GmbH & Co. KG. Toute reproductionmême partielle à des fins commerciales est interdite.
Vi preghiamo di aprire completamente la pagina 3.Così vedrete sempre gli elementi di comando e icollegamenti descritti.1 Elementi di comando1 Spia EXEC, rimane accesa durante la registrazionee la riproduzione di un messaggio2 Regolatore REC LEVEL per impostare il volumedella registrazione3 Uscita cuffia H.P. (jack 3,5 mm)4 Commutatore MIC/LINE per impostare la sensibilitàd’ingresso (livello microfono o line)5 Display per la memoria dei messaggi (1 – 6)6 Ingresso IN per la registrazione(jack 3,5 mm, asimm.)7 Spia CLIP, si accende se l’ingresso è sovrapilotato8 Commutatore PLAY/REC per selezionare la riproduzioneo la registrazione9 Spia SIG, si accende se è presente un segnaled’ingresso10 Tasto DEL per cancellare un messaggio o tutta lamemoria dei messaggi11 Tasto START/STOP1. pressione: riproduzione di un messaggio2. pressione: arresto di un messaggio o di unaregistrazione12 Tasto REPEAT/STOP per la funzione di ripetizione:1. pressione: inizio della funzione di ripetizione2. pressione: arresto della funzione di ripetizione13 Tasti M 1–M6 per selezionare una memoria dimessaggi14 Regolatore volume LEVEL (miscelatore)2 AvvertenzeIl modulo inserto è conforme a tutte le direttive richiestedell’UE e pertanto porta la sigla .● L’inserto dev’essere montato solo da un laboratoriospecializzato ed è previsto solo per il montaggionegli apparecchi MONACOR PA-1120, PA-1200,PA-1200EX, PA-1204EX, PA-1240, PA-5240, PA-5480, PA-6240, PA-6480 e PA-6600.● Usare l’inserto solo all’interno di locali. Proteggerlodall’acqua gocciolante e dagli spruzzi d’acqua, daalta umidità dell’aria e dal calore (temperatura d’impiegoammessa fra 0 e 40 °C).● Non mettere in funzione l’apparecchio con l’insertomontato e staccare subito la spina rete se:1. l’apparecchio, l’inserto o il cavo rete presentanodei danni visibili;2. dopo una caduta o dopo eventi simili sussiste ilsospetto di un difetto;3. l’apparecchio non funziona correttamente.Per la riparazione rivolgersi sempre ad una officinacompetente.● Per la pulizia usare solo un panno morbido, asciutto;non impiegare in nessun caso prodotti chimici oacqua.● Nel caso d’uso improprio, di montaggio sbagliato,d’impiego scorretto o di riparazione non a regolad’arte dell’inserto, non si assume nessuna responsabilitàper eventuali danni consequenziali a personeo a cose e non si assume nessuna garanziaper l’apparecchio.Se si desidera eliminare l’inserto definitivamente,consegnarlo per lo smaltimento adun’istituzione locale per il riciclaggio.3 Montaggio1) Prima di montare l’inserto staccare la spina direte dell’amplificatore o della base (PA-1200EX,PA-1204EX).2) Togliere il coperchio dell’amplificatore o della base.3) Svitare la mascherina per l’inserto sul lato anterioredell’amplificatore o dell’unità base d’inserimento.Togliere il cavetto a tre poli, incollato alla mascherinae montarlo, dopo aver inserito e avvitato ilmodulo d’inserimento, sul connettore maschioCN07 (vedi fig. 2).4) Solo per gli amplificatori PA-1120, PA-1240, PA-6240, PA-6480 e PA-6600: Dal contatto AS104della scheda che si trova tutto a sinistra sul retrodell’amplificatore, parte un cavetto a due poli conun conduttore nero e marrone. Inserire il terminalelibero di questo cavetto sul connettore maschioCN104 dell’inserto.5) Solo se l’inserto dev’essere telecomandato con deipulsanti separati (vedi capitolo 7):a) In dotazione con l’inserto si trova una mascherinametallica con sovrastampa. Avvitarla alposto della mascherina presente sul retrodell’amplificatore o della base.b) Fissare ad incastro il grande connettore femminadel cavo a 10 poli (in dotazione) nellanuova mascherina.c) Inserire il connettore piccolo del cavo a 10 polinella presa CN4-1 dell’inserto.6) Prima di rimontare il coperchio dell’amplificatore odella base, eseguire le impostazioni base descrittenel capitolo successivo.4 Impostazioni base1) L’inserto è equipaggiato con una batteria tamponeper tenere in memoria i messaggi anche dopo lospegnimento. Questa batteria è disattivata almomento della consegna per evitare che si scarichiprima del montaggio. Per attivarla spostare il jumperSEL 2 da pin 2 + 3 (off) a pin 1 + 2 (on) – vedi fig. 2.2) Con i dip-switch SW 11 – SW 22 impostare il numerodelle ripetizioni desiderate di un messaggio nonchéla durata delle pause intermedie. Ogni memoria hadue dip-switch:I13
I14Coordinamento dei dip-switchImpostazioneMemoriaM1 M2 M3 M4 M5 M6Ripetizione SW 11 SW 12 SW 13 SW 14 SW 15 SW 16Pausa intermedia SW 17 SW 18 SW 19 SW 20 SW 21 SW 22Impostazione delle ripetizioniNumero delleNumero bitripetizioni 1 2 3 4 5 6 7 80 ON X X X X X X X1 X ON X X X X X X2 X X ON X X X X X3 X X X ON X X X X4 X X X X ON X X X5 X X X X X ON X X6 X X X X X X ON X7 X X X X X X X ONinfinito X X X X X X X XX = OFFImpostazione delle pause intermediePausaNumero bitintermedio 1 2 3 4 5 6 7 81s ON X X X X X X X2s X ON X X X X X X4s X X ON X X X X X8s X X X ON X X X X32 s X X X X ON X X X1min X X X X X ON X X4min X X X X X X ON X8min X X X X X X X ONnon ammissibile X X X X X X X XX = OFF3) Con il jumper SEL 3 impostare il livello d’uscita:pin 1 + 2 = nessuna amplificazione del segnaled’uscitapin 2 + 3 = amplificazione del segnale d’uscita di10 dB4) Con il jumper SEL 4 selezionare il modo per avviareun messaggio:Jumper sul pin1+22+33+4defaultAvvio del messaggioazionando uno dei tasti M 1 – M 6 (13) =messaggio per una sola voltaazionando uno dei tasti M 1 – M 6 (13) =messaggio ripetuto*premere dapprima uno dei tasto M 1 – M 6 (13)e quindi il tasto START/STOP (11) oppureREPEAT/STOP (12)*a seconda delle impostazioni del punto 2)5 Prima messa in funzioneDurante la prima messa in funzione, l’intera memoriadei messaggi è occupato con dei rumori.Importante! Prima della prima messa in funzioneoccorre assolutamente cancellare il contenutodella memoria:1) Accendere l’amplificatore. Sul display (5) si vede lacifra “0”.2) Portare il commutatore PLAY/REC (8) su REC.3) Azionare il tasto DEL (10) con l’aiuto di un piccolocacciavite o un di simile strumento. Tutta la memoriadei messaggi è ora cancellata.6 Funzionamento6.1 Registrazione di un messaggio1) Portare il commutatore PLAY/REC (8) su REC.2) Selezionare la memoria premendo uno dei tastiM1–M6 (13). Il display (5) indica la memoria selezionata.3) Regolare il commutatore MIC/LINE (4) a secondadel segnale d’ingresso:per un microfono nella posizione MICper un apparecchio con livello line (p. es. registratorea cassette, lettore CD) nella posizione LINE4) Collegare il microfono o l’apparecchio con la presaIN (6). Se necessario utilizzare l’adattatore in dotazione.Se è presente un segnale d’ingresso, la spiaSIG (9) si accende.5) Con il regolatore REC LEVEL (2) impostare ilvolume della registrazione in modo tale che la spiaCLIP (7) per poco non si accende.6) Avviare la registrazione premendo il tasto START/STOP (11). Durante la registrazione, la spia EXEC(1) rimane accesa.7) Alla fine della registrazione premere di nuovo il tastoSTART/STOP (11). Si spegne la spia EXEC (1).8) La procedura può essere ripetuta per un massimodi sei messaggi.N.B.:a La capacità complessiva della memoria è di 4 minutie 28 secondi. La capacità di ogni singola memoriaviene adattata automaticamente. La registrazione siferma da sola quando tutta la memoria è esaurita. Èpossibile sfruttare l’intera memoria per un solo messaggiodella durata di 4 minuti e 28 secondi.b Per sostituire un messaggio con un altro non ènecessario cancellare prima la memoria. Con lanuova registrazione, la precedente viene automaticamentecancellata.c Se l’inserto è montato nell’amplificatore PA-1120,PA-1240, PA-6240, PA-6480 o PA-6600, è possibilechiamare un messaggio della memoria M 6, p. es.attraverso un contatto di allarme. In questo casoconviene riservare quella memoria per il relativomessaggio.
6.2 Chiamare un messaggio1) Portare il commutatore PLAY/REC (8) su PLAY.2) Selezionare il messaggio premendo uno dei tastiM1–M6 (13). Il display (5) indica la memoria selezionata.3) Per riprodurre il messaggio premere il tasto START/STOP (11). Durante la riproduzione, la spia EXEC(1) rimane accesa.4) Con il regolatore LEVEL (14) impostare il volume.5) Per interrompere il messaggio prematuramente premeredi nuovo il tasto START/STOP (11). La spiaEXEC (1) si spegne.N.B.: L’avvio di un messaggio può essere fatto anchepremendo direttamente uno dei tasti M 1–M6 (13).Vedi il capitolo 4 “Impostazioni base” nel punto 4).6.3 Funzione di ripetizioneUn messaggio può essere ripetuto secondo le impostazionidi cui nel capitolo 4, punto 2).1) Portare il commutatore PLAY/REC (8) su PLAY.2) Selezionare il messaggio premendo uno dei tastiM1–M6 (13). Il display (5) indica la memoria selezionata.3) Per la riproduzione ripetuta premere il tastoREPEAT/STOP (12). Durante la riproduzione, laspia EXEC (1) rimane accesa.4) Per interrompere il messaggio prematuramentepremere di nuovo il tasto REPEAT/STOP (12). Laspia EXEC (1) si spegne.N.B.: L’avvio di un messaggio con ripetizione puòessere fatto anche premendo direttamente uno deitasti M 1–M6 (13). Vedi il capitolo 4 “Impostazionibase” nel punto 4).6.4 Cancellare un messaggio1) Portare il commutatore PLAY/REC (8) su REC.2) Selezionare la memoria da cancellare premendouno dei tasti M 1–M6 (13). Il display (5) indica lamemoria selezionata.3) Premere il tasto incassato DEL (10) con l’aiuto di unpiccolo cacciavite o di un oggetto simile. Il messaggioè cancellato.6.5 Cancellare tutti i messaggi1) Spegnere e riaccendere l’amplificatore. Il display(5) indica “0”.2) Portare il commutatore PLAY/REC (8) su REC.3) Premere il tasto incassato DEL (10) con l’aiuto di unpiccolo cacciavite o di un oggetto simile. Tutta lamemoria è cancellata.6.6 CuffieIl messaggio può essere controllato durante la registrazionee la riproduzione per mezzo di una cuffia.1) Collegare la cuffia con la presa H.P. (3), utilizzandoeventualmente l’adattatore in dotazione.2) Impostare il volume con l’apposito regolatoreLEVEL (14).N.B.: Finché è collegata la cuffia, non è possibileascoltare il messaggio attraverso gli altoparlanti collegaticon l’amplificatore.7 Messaggi telecomandati1. Se l’inserto è montato in un amplificatore al quale sipuò collegare anche il microfono a zone PA-1120RCo PA-6000RC, gli avvisi possono essere chiamatianche con comando remoto attraverso il microfonoa zone.2. I messaggi telecomandati sono possibili anche tramitepulsanti separati. In questo caso collegare ilconnettore di cui al capitolo 3, punto 6) come illustratonella figura 3.M2 M3 M4 M5 M6➂ PedinaturaM1REPEAT/STOPSTART/STOP8 Dati tecniciIngressoMic: . . . . . . . . . . . . . . . . -50 dB/600 Ω, asimm.Line: . . . . . . . . . . . . . . . -10 dB/10 kΩ, asimm.UsciteUscita audio: . . . . . . . . -10 dB, asimm., conSEL 3 regolabile a 0 dBCuffia: . . . . . . . . . . . . . . 24 mW, ≥ 64 ΩBanda passanteMic: . . . . . . . . . . . . . . . . 300 – 6400 HzLine: . . . . . . . . . . . . . . . 100 – 6400 HzFrequenzadi scansionamento: . . . . . 16 kHzMemoria messaggi: . . . . . 16 Mbit SRAMDurata registrazione max.: 4 min 28 sTenuta max. della memoriasenza alimentazione: . . . . 60 gg.Alimentazione: . . . . . . . . . 17 V dall’amplificatore oapparecchio baseDimensioni (L × H × P): . . 194 × 40 × 125 mmPeso: . . . . . . . . . . . . . . . . 420 gCon riserva di modifiche tecniche.MASSAATTIVOILa MONACOR ® INTERNATIONAL GmbH & Co. KG si riserva ogni diritto di elaborazione in qualsiasi forma dellepresenti istruzioni per l’uso. La riproduzione – anche parziale – per propri scopi commerciali è vietata.15
EAbrir el presente manual en la página 3 para podervisualizar los elementos operativos y conexiones.1 Elementos y conexiones1 LED EXEC: se ilumina durante la grabación y ladifusión de un anuncio2 Potenciómetro de reglaje REC LEVEL: reglaje delvolumen de grabación3 Salida auriculares H.P. (jack 3,5)4 Selector MIC/LINE: reglaje de la sensibilidad deentrada (nivel micrófono o nivel línea)5 Visualización de la memoria seleccionada (1 a 6)6 Entrada IN para la grabación (jack 3,5 asimétrica)7 LED CLIP: parpadea en caso de sobrecarga enentrada8 Selector PLAY/REC para seleccionar entre lecturay grabación9 LED SIG: se ilumina en caso de presencia de unaseñal de entrada10 Tecla DEL: para borrar un anuncio o toda la memoriade anuncios11 Tecla START/STOP:1 pulsación: lectura de un anuncio2 pulsación: paro de un anuncio o grabación12 Tecla REPEAT/STOP para la función repetición1 pulsación: arranque de la función repetición2 pulsación: paro de la función repetición13 Teclas M 1 a M 6 para seleccionar una memoria deanuncios14 Reglaje del volumen LEVEL (mezclador)2 Consejos de utilizaciónEl módulo de inserción corresponde a todas las Directivasrequeridas por la UE y por ello está marcadacon .● Solamente personal habilitado puede efectuar lainstalación; este módulo solamente es válido paracolocarse en los aparatos MONACOR PA-1120, PA-1200, PA-1200EX, PA-1204EX, PA-1240, PA-5240,PA-5480, PA-6240, PA-6480 y PA-6600.● La inserción sólo está indicada para el uso en interior.Protéjala contra goteos y salpicaduras de agua,humedad elevada del aire, y del calor (gama de temperaturaambiente admisible 0 – 40 °C).● No hacer funcionar el aparato con el módulo colocadoy desconectarlo de inmediato de la red en lossiguientes casos:1. el aparato o el cable de red tiene algún daño,2. después de una caída o accidente parecido, elaparato pueda presentar algún daño,3. aparecen disfunciones.En todos los casos, el módulo o el aparato completodebe repararse por un técnico especializado.● Para limpiarlo, utilizar un paño seco y suave, enningún caso productos químicos o agua.● No se aceptará ninguna reclamación de garantíapara la unidad ni se asumirá ninguna responsabilidaden caso de daños personales o patrimonialesresultantes si la inserción se usa para fines distintosa los originalmente concebidos, si no se instala o seutiliza correctamente, o si no se repara de maneraexperta.Si la inserción debe retirarse definitivamentedel funcionamiento, llévela a un centro dereciclaje local para su disposición no perjudicialpara el medio ambiente.3 Instalación1) Antes de colocar el módulo, desconectar el cablede alimentación del amplificador o del aparato base(PA-1200EX, PA-1204EX).2) Retirar la cubierta del amplificador o del aparatobase.3) Desenrosque la cubierta para el compartimento deinserción situada en el panel frontal del amplificadoro del aparato base. Extraiga el cable de trespolos pegado a la cubierta y conéctelo a la carcasade pin CN07 una vez que el módulo se haya insertadoy reforzado con tornillos (ver figura 2).4) Sólo para amplificadores PA-1120, PA-1240, PA-6240, PA-6480 y PA-6600: El PCB que se encuentratotalmente colocado en la parte izquierda delpanel posterior del amplificador tiene una conexiónAS104 con un cable de 2 polos, negro y marrón.Conecte el extremo pelado de este cable a la carcasade pin CN104 del módulo.5) Solamente para el mando a distancia del módulopara teclados separados (ver cap. 7):a) El módulo se entrega con una tapa metálicaimprimida: Atornillarla en lugar de la placa en laparte trasera del amplificador o del aparatobase.b) Hacer pasar el conector grande del cable de 10polos entregado en la placa métalica nueva.c) Poner el conector del cable más pequeño 10polos al borne CN4-4 del módulo.6) Antes de atornillar la tapa del amplificador o delaparato base de nuevo, efectuar los reglajes debase descritos en el parágrafo siguiente.4 Reglajes de base1) El módulo dispone de una batería de memoria en laque los anuncios se memorizan después de la desconexión.Esta batería se desactiva a la entrega dela fábrica, para evitar cualquier descarga imprevistahasta la colocación definitiva. Para activar labatería de memoria, desplazar la grapa SEL 2 delpin 2 + 3 (paro) hacia el pin 1 + 2 (marcha), ver fig. 2.2) El número de repeticiones deseadas de un anuncioy la longitud deseada de los intervales se regulamediante los interruptores DIP SW 11 a SW 22. Acada posición de memoria se atribuyen dos interruptoresDIP:16
Atribución de los interruptores DIPReglajePosición de memoriaM1 M2 M3 M4 M5 M6Repetición SW 11 SW 12 SW 13 SW 14 SW 15 SW 16Interval SW 17 SW 18 SW 19 SW 20 SW 21 SW 22Reglaje de repeticionesNúmero deNuméro de bitrepeticiones 1 2 3 4 5 6 7 80 ON X X X X X X X1 X ON X X X X X X2 X X ON X X X X X3 X X X ON X X X X4 X X X X ON X X X5 X X X X X ON X X6 X X X X X X ON X7 X X X X X X X ONinfinito X X X X X X X XX = OFF (paro)Reglaje de intervalesNúmero de bitInterval1 2 3 4 5 6 7 81s ON X X X X X X X2s X ON X X X X X X4s X X ON X X X X X8s X X X ON X X X X32 s X X X X ON X X X1min X X X X X ON X X4min X X X X X X ON X8min X X X X X X X ONno autorizado X X X X X X X XX = OFF (paro)3) Mediante la grapa SEL 3, regular el nivel de salida:Pin 1 + 2:ninguna amplificación de la señal de salidaPin 2 + 3:amplificación de la señal de salida de 10 dB4) Mediante la grapa SEL 4, seleccionar el modo dearranque de un anuncio:Grapa en el pinArranque de un anuncio1+2activando una de las teclas M 1 a M 6 (13):anuncio único2+3activando una de las teclas M 1 a M 6 (13):anuncio repetito*3+4reglaje de fábrica*conforme a los reglajes del punto 2)primeramente, pulsar la tecla de la posición dememoria M 1 a M 6 (13) y después la teclaSTART/STOP (11) o REPEAT/STOP (12)5 Primera puesta en marcha del móduloDurante la primera puesta en servicio, la memoria deanuncios está en totalidad ocupada por ruidos perturbadores.¡Atención! Se debe de borrar imperativamente el contenidode la memoria antes su utilización:1) Conectar el amplificador; el número “0” se visualiza(5).2) Poner el interruptor PLAY/REC (8) en REC.3) Accionar la tecla DEL (10) con la ayuda de unpequeño destornillador o similar; la memoria deanuncios está completamente borrada.6 Utilización6.1 Grabación de un anuncio1) Poner el interruptor PLAY/REC (8) en REC.2) Pulsar una de las teclas M 1 a M 6 (13) para seleccionarla posición de memoria. La pantalla (5)visualiza la posición de memoria correspondiente.3) En función de la señal de entrada utilizada, regularel selector MIC/LINE (4):para un micrófono, en la posición MIC,para un aparato de nivel Línea (p. ej. lector CD,magnetófono a cassette), en posición LINE.4) Conectar el micrófono / el aparato a la toma IN (6).Si es necesario, utilizar el adapatador entregado; sitiene una señal de entrada, el LED SIG (9) se ilumina.5) Mediante el reglaje REC LEVEL (2), regular el volumende grabación de tal manera que el LED CLIP(7) no esté iluminado.6) Arrancar la grabación mediante la tecla START/STOP (11); durante la grabación, el LED EXEC (1)se ilumina.7) Al final de la grabación, mediante una nueva pulsaciónde la tecla START/STOP (11), terminar la grabación;se apaga EXEC (1).8) Se puede repetir el proceso para grabar hasta 6anuncios.Consejosa La capacidad de la memoria total es de 4 minutos y28 segundos. La capacidad de cada posición dememoria se adapta de manera automática. La grabaciónse para automáticamente cuando la memoriatotal está llena. Es también posible utilizar todala memoria solamente para un único anuncio deuna duración de 4 minutos y 28 segundos.b Para reemplazar un anuncio por otro de nuevo, laposición no debe ser anteriormente borrada. Elantiguo anuncio desaparecerá automáticamente.c Si el módulo está colocado en el amplificadorPA-1120, PA-1240, PA-6240, PA-6480 o PA-6600,es posible llamar automáticamente un anuncio dela posición M 6 vía por ejemplo un contacto dealarma. En este caso, esta posición de memoriadebe ser reservada para el anuncio correspondiente.E17
E6.2 Llamar anuncios1) Poner el selector PLAY/REC (8) en PLAY.2) Pulsar una de las teclas M 1 a M 6 (13) para seleccionarel anuncio; la pantalla (5) indica la posiciónde memoria correspondiente.3) Para leer el anuncio, pulsar la tecla START/STOP(11): durante la lectura, el LED EXEC (1) se ilumina.4) Mediante el potenciómetro LEVEL (14), regular elvolumen.5) Para terminar un anuncio antes del final, pulsar denuevo la tecla START/STOP (11); EXEC (1) seapaga.Remarca: El arranque de un anuncio puede efectuarsedirectamente mediante una pulsación de unade las teclas M 1 a M 6 (13). Ver cap. 4 “Reglajes debase”, punto 4.6.3 Función de repeticiónSegún los reglajes efectuados en las etapas descritasen cap. 4, punto 2, puede también repetirse un anuncioautomáticamente.1) Poner el selector PLAY/REC (8) en PLAY.2) Pulsar una de las teclas M 1 a M 6 (13) para seleccionarel anuncio; la pantalla (5) indica su posicióncorrespondiente.3) Para varios lectores de anuncio, pulsar la teclaREPEAT/STOP (12); durante la lectura, el LEDEXEC (1) se ilumina.4) Para terminar un anuncio antes del final, pulsarnuevamente la tecla REPEAT/STOP (11); EXEC(12) se apaga.Remarca: El arranque de un anuncio con repeticiónpuede efectuarse directamente mediante una pulsaciónde una de las teclas M 1 a M 6 (13). Ver cap. 4“Reglajes de base”, punto 4.6.4 Borrar un anuncio1) Poner el selector PLAY/REC (8) en PLAY.2) Seleccionar la posición de memoria de anuncios aborrar mediante una de las teclas M 1 a M 6 (13), lapantalla (5) indica la posición correspondiente.3) Activar la tecla DEL (10) inmersa con la ayuda deun pequeño destornillador o objeto similar, el anuncioestá borrado.6.5 Borrar todos los anuncios1) Apagar y después conectar de nuevo el amplificador,la pantalla (5) indica “0”.2) Poner el interruptor PLAY/REC (8) en REC.3) Activar la tecla DEL (10) inmersa mediante la ayudade un pequeño destornillador o objeto similar, elconjunto de los anuncios se borra.6.6 AuricularEs posible de conectar un auricular para controlar lagrabación o la lectura de un anuncio.1) Conectar el auricular a la toma H.P. (3). Si esnecesario, utilizar el adaptador entregado.2) Regular el volumen mediante el reglaje LEVEL (14).Remarca: mientras el auricular está conectado, no esposible oír el anuncio vía los altavoces conectados alamplificador.7 Llamar anuncios a distancia1. Si se ha instalado la inserción en un amplificador alque se puede conectar el micrófono de mesa confunción de control PA-1120RC o PA-6000RC, losanuncios también se pueden seleccionar mediantecontrol remoto a través del micrófono de mesa confunción de control.2. Los anuncios pueden también llamarse a distanciavía teclas separadas. Conectar la toma instaladaen el cap. 3, punto 6 según la esquema 3.M2 M3 M4 M5 M6 M1REPEAT/STOPSTART/STOP➂ Configuración de los pinesMASAACTIVO8 Características técnicasEntradaMic: . . . . . . . . . . . . . . . . -50 dB/600 Ω, asim.Line: . . . . . . . . . . . . . . . -10 dB/10kΩ, asim.Salidassalida audio: . . . . . . . . . -10 dB, asim., ajustable a0 dB con SEL 3auricular: . . . . . . . . . . . . 24 mW, ≥ 64 ΩRango de frecuenciaMic: . . . . . . . . . . . . . . . . 300 – 6400 HzLine: . . . . . . . . . . . . . . . 100 – 6400 HzTasa: . . . . . . . . . . . . . . . . . 16 kHzMemoria de anuncios: . . . . 16 Mbit SRAMDuración de grabación max.: 4 mn 28 sDuración de mantenimientomáx. de lamemoria sin alimentación: 60 díasAlimentación: . . . . . . . . . . 17 V con amplificador oPA-1200EX, PA-1204EXDimensiones, peso: . . . . . 194 × 40 × 125 mm, 420 gReservado el derecho a cualquier modificación.Manual de instrucciones protegido por el copyright de MONACOR ® INTERNATIONAL GmbH & Co. KG. Toda reproducciónmismo parcial para fines comerciales está prohibida.®Copyright © by MONACOR INTERNATIONAL GmbH & Co. KG, Bremen, Germany. All rights reserved.A-0511.99.02.08.2007