PA1120DM - Monacor
PA1120DM - Monacor
PA1120DM - Monacor
- No tags were found...

You also want an ePaper? Increase the reach of your titles
YUMPU automatically turns print PDFs into web optimized ePapers that Google loves.
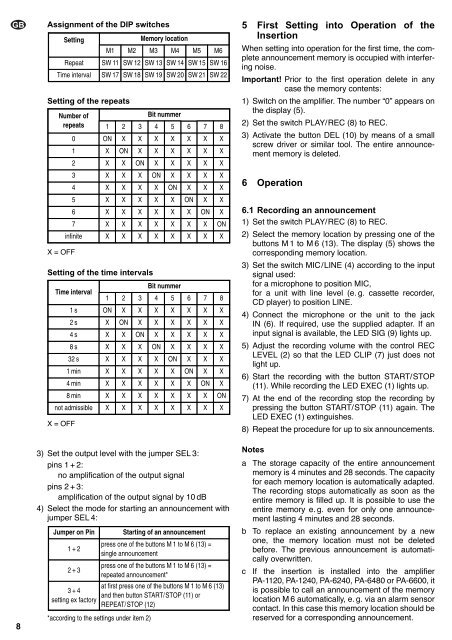
GB8Assignment of the DIP switchesSettingMemory locationM1 M2 M3 M4 M5 M6Repeat SW 11 SW 12 SW 13 SW 14 SW 15 SW 16Time interval SW 17 SW 18 SW 19 SW 20 SW 21 SW 22Setting of the repeatsNumber ofBit nummerrepeats01ON2X3X4X5X6X7X8X1 X ON X X X X X X2 X X ON X X X X X3 X X X ON X X X X4 X X X X ON X X X5 X X X X X ON X XX = OFFX = OFF6 X X X X X X ON7 X X X X X X Xinfinite X X X X X X X3) Set the output level with the jumper SEL 3:pins 1 + 2:no amplification of the output signalpins 2 + 3:amplification of the output signal by 10 dB4) Select the mode for starting an announcement withjumper SEL 4:*according to the settings under item 2)XONXSetting of the time intervalsBit nummerTime interval1 2 3 4 5 6 7 81s ON X X X X X X X2s X ON X X X X X X4s X X ON X X X X X8s X X X ON X X X X32 s X X X X ON X X X1min X X X X X ON X X4min X X X X X X ON X8min X X X X X X Xnot admissible X X X X X X XJumper on Pin Starting of an announcement1+2press one of the buttons M 1 to M 6 (13) =single announcement2+33+4setting ex factorypress one of the buttons M 1 to M 6 (13) =repeated announcement*ONat first press one of the buttons M 1 to M 6 (13)and then button START/STOP (11) orREPEAT/STOP (12)X5 First Setting into Operation of theInsertionWhen setting into operation for the first time, the completeannouncement memory is occupied with interferingnoise.Important! Prior to the first operation delete in anycase the memory contents:1) Switch on the amplifier. The number “0” appears onthe display (5).2) Set the switch PLAY/REC (8) to REC.3) Activate the button DEL (10) by means of a smallscrew driver or similar tool. The entire announcementmemory is deleted.6 Operation6.1 Recording an announcement1) Set the switch PLAY/REC (8) to REC.2) Select the memory location by pressing one of thebuttons M 1 to M 6 (13). The display (5) shows thecorresponding memory location.3) Set the switch MIC/LINE (4) according to the inputsignal used:for a microphone to position MIC,for a unit with line level (e. g. cassette recorder,CD player) to position LINE.4) Connect the microphone or the unit to the jackIN (6). If required, use the supplied adapter. If aninput signal is available, the LED SIG (9) lights up.5) Adjust the recording volume with the control RECLEVEL (2) so that the LED CLIP (7) just does notlight up.6) Start the recording with the button START/STOP(11). While recording the LED EXEC (1) lights up.7) At the end of the recording stop the recording bypressing the button START/STOP (11) again. TheLED EXEC (1) extinguishes.8) Repeat the procedure for up to six announcements.Notesa The storage capacity of the entire announcementmemory is 4 minutes and 28 seconds. The capacityfor each memory location is automatically adapted.The recording stops automatically as soon as theentire memory is filled up. It is possible to use theentire memory e. g. even for only one announcementlasting 4 minutes and 28 seconds.b To replace an existing announcement by a newone, the memory location must not be deletedbefore. The previous announcement is automaticallyoverwritten.c If the insertion is installed into the amplifierPA-1120, PA-1240, PA-6240, PA-6480 or PA-6600, itis possible to call an announcement of the memorylocation M 6 automatically, e. g. via an alarm sensorcontact. In this case this memory location should bereserved for a corresponding announcement.