pH METRO DIGITAL DIGITAL pH-METER pH- MÃTRE ... - Auxilab
pH METRO DIGITAL DIGITAL pH-METER pH- MÃTRE ... - Auxilab
pH METRO DIGITAL DIGITAL pH-METER pH- MÃTRE ... - Auxilab
- No tags were found...

You also want an ePaper? Increase the reach of your titles
YUMPU automatically turns print PDFs into web optimized ePapers that Google loves.
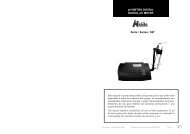
ENGLISHBeing:“S=100.0”; value of the slope in percent.“E0=0.0 mV”: value of electric potential at the isopotencial point system.Both values are defined after the calibration of equipment.Finally it comes into potential measurement mode and shows “0 mV” and the last programmedtemperature.The equipment is ready for use.Note: we recommend waiting 30 minutes. for stabilization of the <strong>pH</strong>-meter before proceedingto make measurements.System operates following this diagram:ENGLISHCalibration at a pointIt is used when it is not necessary to make precise measurements. Prepare the standard buffer solution <strong>pH</strong>=6.86 Select measurement mode of <strong>pH</strong> by botton <strong>pH</strong>/mV (2.1) Clean the electrode with distilled water and submerge in the solution Measure the temperature of the buffer solution with a thermometer using button“TEMP” (2.2) adjust the temperature on the screen with the temperature of the buffersolution (ej. 25ºC). Press button “STD” (2.4) (indicative “Std yes” on the screen) and after “ENTER” (2.5).The <strong>pH</strong>-meter detects automatically the present standard solution and it shows its <strong>pH</strong>value and selected temperature.OnScreen shows last programmed values of theslope and of E0If you used a different buffer solution, please adjust by button STD (▲/▼) (2.4), the <strong>pH</strong>value on the screen to the value of <strong>pH</strong> solution to the working temperature.TemperatureselectionButton TEMP. Button <strong>pH</strong>/mVMeasuringButton SLOPE. Button STD.CalibrationMeasurementnts <strong>pH</strong>/mVNote: to know this <strong>pH</strong>, look up Temperature-<strong>pH</strong> table that it is included in the back ofthe envelopes of the buffer.Press button “ENTER” (2.5); screen indicates “Std ok” and shows the slope value andpotential E0 are automatically recorded until next calibration. Finally it returns fo <strong>pH</strong>measurement mode.Wash the electrode with distilled water and dry it with filter paper or cellulose.6. CALIBRATIONNote: after calibration, the system records new reference data and automatically deletesthe previous calibration data, the equipment is tested for its use.The slope for the calibration at a point is considered by default 100.0%Calibration can be made by: Automatic detection of standar buffer solutions (4.00 <strong>pH</strong>, 6.86 <strong>pH</strong> y 9.18 <strong>pH</strong>) or manualadjustment with different buffer solutions.One or two points of calibration.Note: clean very well the electrode before its calibration because resulting measurements,based on the calibration of a dirty electrode will be wrong. Be sure the used buffersample for the standardization of the <strong>pH</strong>-meter is in good conditions.Calibration at two pointsGenerally it is used to calibrate the slope of the electrode Prepare standar buffer solutions <strong>pH</strong>=4.00 and <strong>pH</strong>=9.18. Proceed to make the calibration with the solution <strong>pH</strong>=4.00 following steps 2. to 5. of“Calibration at one point”. Press button “ENTER” (2.5); <strong>pH</strong>-meter returns to <strong>pH</strong> measurement mode. Wash the electrode with distilled water and dry it with filter paper or cellulose. Submerge the electrode in the solution <strong>pH</strong>=9.18.Measure the temperature of buffer solution with a thermometer using “TEMP” buttonVersion 3 August 09 Instruction manual 50903000 Page 23Page 24 Instruction manual 50903000 Version 3 August-09