pH METRO DIGITAL DIGITAL pH METER Serie / Series / 907 - Auxilab
pH METRO DIGITAL DIGITAL pH METER Serie / Series / 907 - Auxilab
pH METRO DIGITAL DIGITAL pH METER Serie / Series / 907 - Auxilab
- No tags were found...

You also want an ePaper? Increase the reach of your titles
YUMPU automatically turns print PDFs into web optimized ePapers that Google loves.
<strong>pH</strong> <strong>METRO</strong> <strong>DIGITAL</strong><strong>DIGITAL</strong> <strong>pH</strong> <strong>METER</strong><strong>Serie</strong> / <strong>Serie</strong>s / <strong>907</strong>Este manual es parte inseparable del aparato por lo que debe estardisponible a todos los usuarios del equipo. Le recomendamos leeratentamente el presente manual y seguir rigurosamente los procedimientosde uso para obtener las máximas prestaciones y unamayor duración del mismo.This manual should be available for all users of these equipments. To getthe best results and a higher duration of this equipment it is advisable toread carefully this manual and follow the processes of use.Revisión 1 de Octubre-2006 Manual de instrucciones 506<strong>907</strong>000 Pág. 1
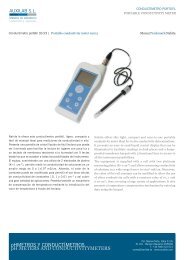
CASTELLANOGracias por haber adquirido este equipo. Deseamos sinceramente que disfrute del <strong>pH</strong>metrodigital Nahita <strong>907</strong>. Le recomendamos que cuide el equipo conforme a lo expuestoen este manual.Nahita desarrolla sus productos según las directrices del marcado CE y haciendo hincapiéen la ergonomía y seguridad del usuario.La calidad de los materiales empleados en la fabricación y el correcto proceder le permitirándisfrutar del equipo por muchos años.El uso incorrecto o indebido del equipo puede dar lugar a accidentes, descargas eléctricas,cortocircuitos, fuegos, lesiones, etc. Lea el punto de Mantenimiento, donde se recogenaspectos de seguridad.LEA DETALLADAMENTE ESTE MANUAL DE INSTRUCCIONES ANTES DEOPERAR CON ESTE EQUIPO CON EL FIN DE OBTENER LAS MÁXIMAS PRES-TACIONES Y UNA MAYOR DURACIÓN DEL MISMO.Tenga especialmente presente lo siguiente:• Este manual es parte inseparable del <strong>pH</strong>-metro digital Nahita <strong>907</strong>, por lo que debe estardisponible para todos los usuarios del equipo.• Debe manipularse siempre con cuidado evitando los movimientos bruscos, golpes, caídasde objetos pesados o punzantes; evitar el derrame de líquidos en su interior.• Nunca desmonte el equipo para repararlo usted mismo, además de perder la garantíapodría producir un funcionamiento deficiente de todo el equipo, así como daños a las personasque lo manipulan.• Para prevenir fuego o descargas eléctricas, evite los ambientes secos y polvorientos. Siesto ocurre, desenchufe inmediatamente el equipo de la toma de corriente.• Cualquier duda puede ser aclarada por su distribuidor (instalación, puesta en marcha,funcionamiento). Usted puede también mandarnos sus dudas o sugerencias a la siguientedirección de correo del Servicio Técnico Nahita (asistencia@auxilab.es) o bien llamandoal Tfno.: 807117040 (0,30 Euros/min).• Este equipo está amparado por la Ley de garantías y bienes de consumo (10/2003).• No se consideran en garantía las revisiones del equipo.• La manipulación del equipo por personal no autorizado provocará la pérdida total dela garantía.• Los fusibles o accesorios, así como la pérdida de los mismos, no están cubiertos pordicha garantía. Tampoco estarán cubiertos por el periodo de garantía las piezas en su desgastepor uso natural.• Asegúrese de guardar la factura de compra para tener derecho de reclamación o prestaciónde la garantía. En caso de enviar el equipo al Servicio Técnico adjuntar factura ocopia de la misma como documento de garantía.• Rellene y envíe la garantía antes de los 15 días después de la compra.• El fabricante se reserva los derechos a posibles modificaciones y mejoras sobre estemanual y equipo.Pág. 2 Manual de instrucciones 50<strong>907</strong>000 Revisión 1 de Octubre-06ANNEX I: CE CERTIFICATEAUXILAB S.L.CE DECLARATION OF CONFORMITY<strong>pH</strong> metro NAHITA <strong>907</strong> of <strong>Auxilab</strong>,S.L for the Directive of machines (89/392/CEEmodified) and the regulations adopted for its transpositionNAME OF THE MANUFACTURER / IMPORTER:AUXILAB, S.L.ADDRESS: Polígono Morea Norte, 831191 Beriáin (Navarra)WE STATE THAT:ph metro NAHITA <strong>907</strong>Model 50<strong>907</strong>000Are designed and manufactured according to:• Directive 89/392/CEE, including the modifications and the national regulationsthat transpose them.• Directive 73/23/CEE, modified over the electric security.• Directive 89/336/CEE, modified over the electromagnetic compatibility.• And that the following harmonized rules have applied (or part of them):UNE 292-1/-2/-2/A1,UNE-EN 1050, UNE-EN 614-1,UNE-EN 1037, UNE-EN1088, UNE-EN 547, UNE-EN 953, UNE-EN 294, UNE-EN 418, UNE-EN 894-1, UNE-EN 894-2, UNE-EN 954-1, UNE-EN 60204-1, UNE 61010-1/A2, UNE-EN61010-2-051.BERIAIN 26th October 2006Signed by: ALFONSO AINCIBURU SANZDIRECTOR/MANAGERPolígono Morea Norte, 8 31191 Beriain (Navarra) - Spain. Tel. 948 310 513 Fax 948 312 071Internet: www.auxilab.es · Email: correo@auxilab.esVersion 1 February-07 Instruction manual 5024000X Page 23ENGLISH
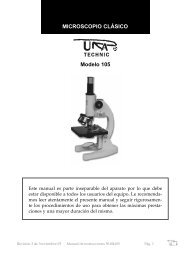
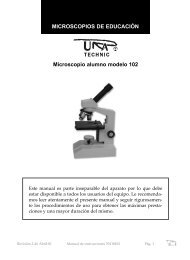
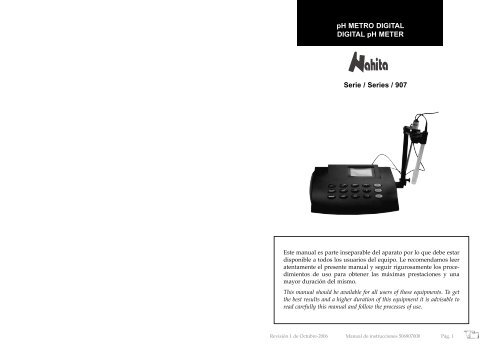
ENGLISH• Avoid submerging the electrode for a long period of time in distilled water, proteic solutionsor fluorhydric acid.• Avoid the contact of the electrode with silica organic oil.• If slope (k) decreases with use, submerge the bulb in a 4% fluorhydric acid solution for3-5 seconds, rinse with abundant distilled water and then immerse the bulb in a 0.1 mol/Lchlorhydric acid solution.• Always use original components and supplies. Other devices can be similar but theycan damage the equipment.• The <strong>pH</strong>-meter is supplied with an adapter. It has to be plugged to an earth connectionand the socket should be handy and ready to unplug the equipment in case of emergency.• Never try to repair the <strong>pH</strong>-meter by yourself, since you will lose the warranty and mayprovoke damages to the general operating system or the electrical installation, as well asinjuries to the people that usually handle the <strong>pH</strong>-meter (burns, hurts…) or damages innearby equipments.• In the event of breakdown please contact your distributor to overhaul through NAHI-TA Technical Assistance Department.Cleaning• Never use scourers or substances that can grate for cleaning metallic parts such as stainlesssteel, aluminium, coatings, etc. as they damage the <strong>pH</strong>-meter and produce an earlyageing of the equipment.• Use a fluff-free cloth dampened with soaped water that does not contain abrasives.• If the electrode is inactive due to the dirtiness of the bulb, the slope value (k) will decreaseand measurements will not be correct. If this occurs, please clean the electrode withdifferent solutions according to the contamination.NOTE: Tetrachloromethane and trichloroethylene should not be used as detergentssince they dissolve the polycarbonate resins that make up the electrode structure.ATTENTION!! IF EQUIPMENTS ARE NOT PROPERLY CLEAN ANDDISINFECTED THEY WOULD NOT BE ALLOWED TO REPAIR BY OURTECHNICAL SERVICE.INSTRUCTIONS ON ENVIRONMENT PROTECTIONAt the end of its life cycle, please, do not dispose of this equipment bythrowing it in the usual garbage; hand it over a collection point for the recyclingof electrical and electronic appliances. It does not contain dangerousor toxic products for humans but a non adequate disposal would damagethe environment.The materials are recyclable as mentioned in its marking. By recycling material or byother forms of re-utilization of old appliances, you are making an important contributionto protect our environment.Please inquire at the community administration for the authorized disposal location.Page 22 Instruction manual 506<strong>907</strong>000 Version 1 October-06¡ATENCIÓN! NO SE ADMITIRÁ NINGÚN APARATO PARA REPARARQUE NO ESTÉ DEBIDAMENTE LIMPIO Y DESINFECTADO.INDICE DE IDIOMASCastellanoInglésINDICE DE CONTENIDOS1 APLICACIONES DEL INSTRUMENTO2 DESCRIPCIÓN3 ESPECIFICACIONES TÉCNICAS4 INSTALACIÓN / PUESTA EN MARCHA5 MANTENIMIENTO Y LIMPIEZAANEXO I: CERTIFICADO CERevisión 1 de Octubre-06 Manual de instrucciones 506<strong>907</strong>000 Pág. 32-1213-231. APLICACIONES DEL INSTRUMENTO<strong>pH</strong>-metro digital de sobremesa basado en tecnología con microprocesador y concebidopara realizar mediciones de <strong>pH</strong>, potencial eléctrico (mV) y temperatura. De fácil y sencillomanejo, este aparato constituye, sin duda, un instrumento ideal para su uso en laboratoriosde control de calidad.2. DESCRIPCIÓN1.1 Display de cristal líquido (LCD)1.2 ENTER botón para confirmar las diferentes funciones1.3 CANCEL botón para salir de la función seleccionada1.4 ON/OFF botón de encendido/apagado1.5 <strong>pH</strong> botón para seleccionar función <strong>pH</strong>1.6 mV botón para seleccionar función potencial milivoltios1.7 CAL botón para entrar en el modo calibración1.8 SAVE botón para seleccionar la función guardar datos1.9 ISO botón de selección del punto isopotencial, según pureza del agua1.10 Botones para seleccionar diferentes parámetros1.11 DEL función borrar datos1.12 HOLD botón fuera de uso1.13 View botón para seleccionar la función visualización de datos memorizados1.14 Porta soportes1.15 Soporte para electrodos1.16 Electrodo1.17 Sonda de temperatura CASTELLANO33451011
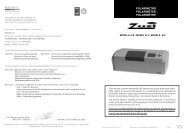
<strong>pH</strong>PRINT1PRINT2mVSAVEDELCALISOENTERCANCEL1.11.17CASTELLANOENGLISH• To get out of this function press CANCEL button (1.3) and he equipment will be readyto perform a new measurement.1.5 1.6 1.71.141.151.16NOTE: If you are not using the <strong>pH</strong>-meter for a long period of time please make sure itis disconnected from the net and protected from dust (this way you will avoid accidentsand will extend its working-life).1.91.8HOLD VIEW ON/OFF1.11 1.12 1.131.102.1 Conector de alimentación2.2 Conector BNC para electrodo demedida2.3 Conector toma de referencia2.4 Conector tierra2.5 Conector sonda de temperatura2.6 Interface RS2323. ESPECIFICAIONES TÉCNICAS1.21.31.42.1 2.2 2.3 2.4 2.52.6Security• The <strong>pH</strong>-meter must be used by previously qualified staff that knows how the equipmentworks thanks to the user manual.• Put the <strong>pH</strong>-meter on top of a horizontal, plane and stable table making a free space atleast at 30 cm per side.• Do not put the <strong>pH</strong>-meter near any warm supply (burners, blowlamps…), nor expose itdirectly to the sun, etc. Avoid vibrations, dust and dry environments.• When you are not using the <strong>pH</strong>-meter for a long period of time please make sure it isunplugged in order to avoid possible accidents.• It is essential to have the equipment switched off and unplugged from the net beforecleaning, checking components or replacing any piece (e.g. replacement of a fuse).• Never try to repair the <strong>pH</strong>-meter by yourself, since you will lose the warranty and mayprovoke damages to the general operating system or the electrical installation, as well asinjuries to the people that usually handle the equipment (burns, hurts…).• Try not to spill any liquid on the control panel, though it is properly insulated. In caseyou have any doubts do please immediately unplug the equipment (see Maintenance).• Made under the European regulations for electrical security, electromagnetic compatibilityand security on machines.Rango <strong>pH</strong>0.00-14.00 <strong>pH</strong>Rango mV -1999.9-1999.9Rango Temperatura 0.0-100.0 ºCResolución <strong>pH</strong> 0.01Resolución mV 1Precisión <strong>pH</strong> ± 0.01Precisión mV ± 1Rango CAT 0.0-100.0 ºCImpedancia de entrada 1012 OhmCalibración <strong>pH</strong>1 ó 2 puntosAlimentaciónAdaptador externo DC 9V5. MAINTENANCE AND CLEANINGTo get the best results and a higher duration of the <strong>pH</strong>-meter it is essential to follow theprocesses of use.Note: All the processes of use mentioned below will not have any value unless you keepa continued and careful maintenance.• Please follow the processes of use of this manual.• This manual should be available for all users of this equipment.•After each use, rinse carefully the electrode with distilled water; a lack of cleaning willcause a bad working order of the equipment.• Always put the electrode into the cap which contains KCl (3 mol/L) to keep the bulbwet; do not submerge the electrode in distilled water. Dust and water vapour accumulationwill reduce the life-span of the electrode. If environment is very wet dry the electrodewith a cellulose cloth.Pág. 4 Manual de instrucciones 50<strong>907</strong>000 Revisión 1 de Octubre-06Version 1 October-06 Instruction manual 506<strong>907</strong>000 Page 21
ENGLISHIsopotential point selectionNahita digital <strong>pH</strong>-meter is provided with isopotential point selection function, accordingto the features of the solution to be analyzed:- Solutions prepared with normal water, select <strong>pH</strong> 7.00 isopotential point.- Solutions prepared with pure and ultrapure water, select <strong>pH</strong> 12.00 isopotentialpoint.- Solutions prepared with ammonia water, select <strong>pH</strong> 12.00 isopotential point.Press ISO button (1.9), with buttons (1.10) select the adequate isopotential pointaccording to previously described, and press ENTER button (1.2) to save changes. To goto <strong>pH</strong> measuring function, press <strong>pH</strong> button (1.5); at the left lower part of the display it isshown the selected isopotential point.<strong>pH</strong> measurementNOTE: Before starting measurements, make sure that the equipment is calibrated.• Turn the <strong>pH</strong>-meter on by pressing ON/OFF button (1.4). The equipment starts automaticallyin <strong>pH</strong> measuring mode.• Rinse the electrode with distilled water and dry it with filter or cellulose paper.• Immerse the electrode and the temperature probe 4 cm (approx.) in the solution to beanalyzed. Stir gently the sample with the electrode and wait until measurement stabilizes.<strong>pH</strong> value is shown at the middle of the display and the temperature value is shown below.At the left lower part of the display the curve slope and the isopotential point will appear.• To visualize electrical potential value in mV, press mV button (1.6); to go back to <strong>pH</strong>mode, press <strong>pH</strong> button (1.5).NOTA: If several measurements are taken successively in different samples, it is recommendedto clean thoroughly the electrode with distilled water to avoid cross contamination.Data savingOnce determined the <strong>pH</strong> or electrical potential (mV), press SAVE button (1.8) and theequipment will save temperature and <strong>pH</strong> or mV measured values.Nahita <strong>pH</strong>-meter is equipped with memory to save a maximum of 50 measurementsnumerated according to the order in which they are saved.Data deleting• To delete all saved data press DEL button (1.11). All <strong>pH</strong> data saved. Delete now? will bevisualized on display, then press ENTER button (1.2) and all saved data will be deleted.• To delete a unique datum, press VIEW button (1.13), select the datum to be deleted withbuttons (1.10) and the press DEL button (1.11). Delete selected? will be visualizedon display, press ENTER button (1.2) and the selected datum will be deleted. Page 20 Instruction manual 506<strong>907</strong>000 Version 1 October-064. INSTALACIÓN Y PUESTA EN MARCHAInspección preliminar• Desembale el <strong>pH</strong>-metro, retire el plástico que lo envuelve y quite la protección depoliespán en que viene encajado. Retire todas las protecciones y, sin conectar el <strong>pH</strong>-metroa la red eléctrica, asegúrese de que no presenta ningún daño debido al transporte. De serasí, comuníquelo inmediatamente a su transportista o suministrador para que puedahacer las debidas reclamaciones en el plazo establecido.• Guarde el embalaje, ya que siempre se deben realizar las devoluciones en su embalajeoriginal con todos los accesorios suministrados.• Compruebe los accesorios que usted debe recibir junto al equipo:- Soporte para electrodos- Electrodo combinado- Sonda de temperatura- Solución buffer <strong>pH</strong> 4.00, 6.86, 9.18- Cubierta protectora- Adaptador corriente DC 9V- Cables para conectar a ordenador o impresora- Manual de uso- Certificado de garantíaSolo aceptamos devoluciones de equipos en los 15 días posteriores al envío y siempreque vengan completos en su embalaje original.InstalaciónAntes de comenzar a utilizar el <strong>pH</strong>-metro, es conveniente familiarizarse con sus componentesy fundamentos básicos, así como con las funciones de sus controles.LEA DETALLADAMENTE ESTE MANUAL DE INSTRUCCIONES ANTES DEOPERAR CON ESTE EQUIPO CON EL FIN DE OBTENER LAS MÁXIMAS PRES-TACIONES Y UNA MAYOR DURACIÓN DEL MISMO.• Coloque el <strong>pH</strong>-metro sobre una mesa horizontal, plana y estable, creando un espaciolibre de al menos 30 cm por cada lado. No coloque el equipo en zonas próximas a fuentesde calor (mecheros, sopletes...), ni lo exponga directamente a la luz del sol, etc.• Evite la presencia en el lugar de trabajo de productos inflamables o tóxicos.- Coloque el soporte para electrodos (1.15) en el porta soportes (1.14) que presenta el equipo.- El <strong>pH</strong>-metro se suministra junto con un adaptador de corriente. Inserte el cableen el conector de alimentación del <strong>pH</strong>-metro y conéctelo a la base de corriente220V 50Hz ± 10% que esta provista de toma de tierra.Revisión 1 de Octubre-06 Manual de instrucciones 506<strong>907</strong>000 Pág. 5CASTELLANO
CASTELLANONi el fabricante ni el distribuidor asumirán responsabilidad alguna por los dañosocasionados al equipo, instalaciones o lesiones sufridas a personas debido a la inobservanciadel correcto procedimiento de conexión eléctrica. La tensión debe ser de 220V50Hz ± 10%.- Conexión del electrodoConecte el electrodo (1.16) en el conector BCN situado en la parte posterior delaparato (2.2).Nota: el Ph-metro <strong>907</strong> de Nahita puede ser utilizado con otros electrodos de <strong>pH</strong> disponiblesen el mercado siempre y cuando dispongan de conector BNC.- Conexión sonda de temperaturaConecte la sonda de temperatura (1.17) en el conector hembra correspondiente(2.5).- Encienda el <strong>pH</strong>-metro presionandCalibración del <strong>pH</strong>-metroEl <strong>pH</strong>-metro Nahita <strong>907</strong> puede ser calibrado en 1 ó 2 puntos de forma manual o automática.Preparación de los patronesEl <strong>pH</strong>-metro incluye las siguientes soluciones patrón que se suministran en sobres individuales:<strong>pH</strong> 4.00 (25 ºC), <strong>pH</strong> 6.86 (25 ºC), <strong>pH</strong> 9.18 (25 ºC).Vierta el contenido de uno de los sobres en un vaso limpio y añada unos 100 mL de aguadestilada. Disuelva bien y si lo ve necesario, añada un poco más de agua. Una vez disueltotodo el contenido del sobre, vierta la solución obtenida a un matraz aforado de 250 mLy proceda al enrase con agua destilada.Calibración automáticaSeleccione el modo calibración automática. Para ello, presione el botón CAL (1.7) y ayudándosede (1.10) seleccione el modo calibración automática (AUTO). Presione ENTER(1.2) y en pantalla visualizará los valores de <strong>pH</strong> y temperatura, y el comando STD 1.A. Calibración en 1 puntoUn punto de calibración significa que el equipo es calibrado con una sola disoluciónpatrón. Le recomendamos que emplee la solución patrón de <strong>pH</strong> 6.86 (25 ºC).Proceda de la siguiente manera:- Limpie el electrodo con agua destilada y séquelo. Sumérjalo unos 4 cm junto ala sonda de temperatura en la solución patrón, girándolo suavemente. La sonda de temperaturadebe estar próxima al electrodo.- Pulse el botón CAL (1.7). En pantalla visualizaremos STD1 y el valor de la temperatura.- Cuando aparezca en pantalla el valor del <strong>pH</strong> de forma estable, presione ENTER(1.2). En pantalla se visualizará el valor del <strong>pH</strong> y de la pendiente de la curva (K) y "STD1FINISHED!". La calibración en 1 punto habrá finalizado.Pág. 6 Manual de instrucciones 50<strong>907</strong>000 Revisión 1 de Octubre-06ENGLISHManual calibrationManual calibration mode will be necessary in case of using standard solutions differentthan those supplied with the equipment. To enter this function, press CAL button (1.7)and with buttons (1.10), select the manual calibration mode (MANUAL). Press ENTERbutton (1.2) and you will visualize on display the <strong>pH</strong> and temperature values, and theSTD1 command.A. Calibration at 1 pointProceed as the following:- Rinse the electrode with distilled water and dry it. Immerse the electrode andthe temperature probe 4 cm (approx.) in the standard solution and shake gently. The temperatureprobe must be next to the electrode.- Press CAL button (1.7). STD1 and the temperature value will be visualized ondisplay.- When the <strong>pH</strong> value on display is stable, press ENTER button (1.2). With buttons(1.10) adjust the <strong>pH</strong> value to that of the standard solution used and press ENTER button(1.2) again. The <strong>pH</strong> value, curve slope (K) and "STD1 FINISHED!" will be visualizedon display. The calibration at one point is finished.- To go to <strong>pH</strong> measuring function, press <strong>pH</strong> button (1.5).B. Calibration at 2 pointsProceed as the following:- Rinse the electrode with distilled water and dry it. Immerse the electrode andthe temperature probe 4 cm (approx.) in the standard solution A while turning gently. Thetemperature probe must be next to the electrode.- Press CAL button (1.7). STD1 and the temperature value will be visualized ondisplay.- When the <strong>pH</strong> value on display is stable, press ENTER button (1.2). With buttons(1.10) adjust the <strong>pH</strong> value to that of the standard solution A used, and press ENTERbutton (1.2) again. The <strong>pH</strong> value, curve slope (K) and "STD1 FINISHED!" will be visualizedon display.- Take the electrode and the temperature probe out of solution A, rinse with distilledwater and dry. Immerse the electrode in the standard solution B, together with thetemperature probe.- Press again CAL button (1.7). STD2 and the temperature value will be visualizedon display.- When the <strong>pH</strong> value on display is stable, press ENTER button (1.2). With buttons(1.10) adjust the <strong>pH</strong> value to that of the standard solution B used, and press ENTERbutton (1.2) again. The <strong>pH</strong> value, curve slope (K) and "STD2 FINISHED!" will be visualizedon display. The calibration at two points is finished.- To go to <strong>pH</strong> measuring function, press <strong>pH</strong> button (1.5).Version 1 October-06 Instruction manual 506<strong>907</strong>000 Page 19
ENGLISH- Press CAL button (1.7). STD1 and the temperature value will be visualized ondisplay.- When the <strong>pH</strong> value on display is stable, press ENTER button (1.2). The <strong>pH</strong>value, curve slope (K) and "STD1 FINISHED!" will be visualized on display. The calibrationat one point is finished.- To go to <strong>pH</strong> measuring function, press <strong>pH</strong> button (1.5).NOTE: During calibration, <strong>pH</strong>, mV CAL and ISO buttons are effective; if pressing anyof them, calibration will not be correct.NOTE: For calibration at 1 point, we do recommend to use the <strong>pH</strong> 4.00 (25 ºC) standardsolution when working within an acid range and the <strong>pH</strong> 9.18 (25 ºC) standard solutionwhen working within a basic range.B. Calibration at 2 pointsCalibration at 2 points means that the equipment is calibrated with two standard solutions.We recommend to use the <strong>pH</strong> 6.86 (25ºC) standard solution as the first calibrationpoint and the <strong>pH</strong> 4.00 (25 ºC), acid, or the <strong>pH</strong> 9.18 (25 ºC), basic, standard solutions as thesecond calibration point.Proceed as the following:- Rinse the electrode with distilled water and dry it. Immerse the electrode andthe temperature probe 4 cm (approx.) in the standard solution A while turning gently. Thetemperature probe must be next to the electrode.- Press CAL button (1.7). STD1 and the temperature value will be visualized ondisplay.- When the <strong>pH</strong> value on display is stable, press ENTER button (1.2). The <strong>pH</strong>value, curve slope (K) and "STD1 FINISHED!" will be visualized on display.- Take the electrode and the temperature probe out of solution A, rinse with distilledwater and dry. Immerse the electrode in the standard solution B, together with thetemperature probe.- Press again CAL button (1.7). STD2 and the temperature value will be visualizedon display.- When the <strong>pH</strong> value on display is stable, press ENTER button (1.2). The <strong>pH</strong>value, curve slope (K) and "STD2 FINISHED!" will be visualized on display. The calibrationat two points is finished.- To go to <strong>pH</strong> measuring function, press <strong>pH</strong> button (1.5).NOTE: During calibration, <strong>pH</strong>, mV CAL and ISO buttons are effective; if pressing anyof them, calibration will not be correct.NOTE: CALIBRATION IS SAVED EVEN IF THE EQUIPMENT IS TURNED OFF.CASTELLANO- Para volver a la función de medición de <strong>pH</strong> pulse el botón <strong>pH</strong> (1.5).NOTA: Durante la calibración, los botones de <strong>pH</strong>, mV, CAL e ISO son efectivos; si presionaalguno de ellos la calibración no será correcta.NOTA: Si realiza la calibración en un solo punto, le recomendamos utilizar la soluciónpatrón <strong>pH</strong> 4.00 (25 ºC) si va a trabajar en un rango ácido y la solución patrón <strong>pH</strong> 9.18 (25ºC) si va a trabajar en un rango básico.B. Calibración en 2 puntosLa calibración en dos puntos significa que el equipo es calibrado con dos solucionespatrón. Le recomendamos que emplee la solución patrón de <strong>pH</strong> 6.86 (25ºC) como primerpunto de calibración, y la solución patrón de <strong>pH</strong> 4.00 (25 ºC), ácido, o <strong>pH</strong> 9.18 (25 ºC), básico,como segundo punto de calibración.Proceda de la siguiente manera:- Limpie el electrodo con agua destilada y séquelo. Sumérjalo unos 4 cm junto ala sonda de temperatura en la solución patrón A, girándolo suavemente. La sonda de temperaturadebe estar próxima al electrodo.- Pulse el botón CAL (1.7). En pantalla visualizaremos STD1 y el valor de la temperatura.- Cuando aparezca en pantalla el valor del <strong>pH</strong> de forma estable, presione ENTER(1.2). En pantalla se visualizará el valor del <strong>pH</strong> y de la pendiente de la curva (K) y "STD1FINISHED!".- Saque el electrodo de la solución A, lávelo con agua destilada y séquelo.Introdúzcalo en la solución patrón B junto con la sonda de temperatura.- Pulse de nuevo el botón CAL (1.7), en el <strong>pH</strong>-metro visualizaremos STD2 y elvalor de la temperatura.- Cuando aparezca en pantalla el valor del <strong>pH</strong> de forma estable, presione ENTER(1.2). En pantalla se visualizará el valor del <strong>pH</strong> y de la pendiente de la curva (K) y "STD2FINISHED!". La calibración en 2 puntos habrá finalizado.- Para volver a la función de medición de <strong>pH</strong> pulse el botón <strong>pH</strong> (1.5).NOTA: Durante la calibración los botones de <strong>pH</strong>, mV, CAL e ISO son efectivos; si presionaalguno de ellos la calibración no será correcta.NOTA: LA CALIBRACIÓN SE GUARDA AUNQUE APAGUEMOS EL EQUIPOCalibración manualEl modo manual de calibración será necesario en caso de utilizar soluciones patrón distintasa las suministradas con el equipo. Para acceder a esta función, presione el botónCAL (1.7) y ayudándose de (1.10), seleccione el modo calibración manual (MANUAL).Presione ENTER (1.2) y en pantalla visualizará los valores de <strong>pH</strong> y temperatura, y elcomando STD 1. Page 18 Instruction manual 506<strong>907</strong>000 Version 1 October-06Revisión 1 de Octubre-06 Manual de instrucciones 506<strong>907</strong>000 Pág. 7
CASTELLANOA. Calibración en 1 puntoProceda de la siguiente manera:- Limpie el electrodo con agua destilada y séquelo. Sumérjalo unos 4 cm junto ala sonda de temperatura en la solución patrón, girándolo suavemente. La sonda de temperaturadebe estar próxima al electrodo.- Pulse el botón CAL (1.7). En el <strong>pH</strong>-metro visualizaremos STD1 y el valor de latemperatura.- Cuando aparezca en pantalla el valor del <strong>pH</strong> de forma estable, presione ENTER(1.2). Con los botones (1.10) ajuste el valor de <strong>pH</strong> al de la solución patrón utilizada ypresione de nuevo ENTER (1.2). En pantalla se visualizará el valor del <strong>pH</strong> y de la pendientede la curva (K) y "STD1 FINISHED!". La calibración en 1 punto habrá finalizado.- Para volver a la función de medición de <strong>pH</strong> pulse el botón <strong>pH</strong> (1.5). B. Calibración en 2 puntosProceda de la siguiente manera:- Limpie el electrodo con agua destilada y séquelo. Sumérjalo unos 4 cm junto ala sonda de temperatura en la solución patrón A, girándolo suavemente. La sonda de temperaturadebe estar próxima al electrodo.- Pulse el botón CAL (1.7). En el <strong>pH</strong>-metro visualizaremos STD1 y el valor de latemperatura.- Cuando aparezca en pantalla el valor del <strong>pH</strong> de forma estable, presione ENTER(1.2). Con los botones (1.10) ajuste el valor de <strong>pH</strong> al de la solución patrón A utilizaday presione de nuevo ENTER (1.2). En pantalla se visualizará el valor del <strong>pH</strong> y de la pendientede la curva (K) y "STD1 FINISHED!".- Saque el electrodo de la solución A, lávelo con agua destilada y séquelo.Introdúzcalo en la solución patrón B junto con la sonda de temperatura.- Pulse de nuevo el botón CAL (1.7), en el <strong>pH</strong>-metro visualizaremos STD2 y elvalor de la temperatura.- Cuando aparezca en pantalla el valor del <strong>pH</strong> de forma estable, presione ENTER(1.2). Con los botones (1.10) ajuste el valor de <strong>pH</strong> al de la solución patrón B utilizaday presione de nuevo ENTER (1.2). En pantalla se visualizará el valor del <strong>pH</strong> y de la pendientede la curva (K) y "STD2 FINISHED!".La calibración en 2 puntos habrá finalizado.- Para volver a la función de medición de <strong>pH</strong> pulse el botón <strong>pH</strong> (1.5). Selección del punto isopotencial• El <strong>pH</strong>-metro Nahita dispone de selección del punto isopotencial, según las característicasde la disolución que se va a analizar:• Soluciones preparadas con agua normal, seleccione el punto isopotencial <strong>pH</strong> 7.00.• Soluciones preparadas con agua pura y ultrapura, seleccione el punto isopotencial <strong>pH</strong>12.00.• Soluciones preparadas con agua amonio, seleccione el punto isopotencial <strong>pH</strong> 17.00.wire and to the other end to the <strong>pH</strong>-meter connector.ENGLISHNeither the manufacturer nor the distributor will assume any responsibility for thedamages produced to the equipment during its installation or damages to people sufferedby the improper use of the electric connection. The tension should be 220V 50Hz± 10%.• Electrode connectionPlease connect the electrode (1.16) to the connector situated at the back part of theequipment (2.2).Note: Nahita <strong>pH</strong>-meter <strong>907</strong> can be also used with other <strong>pH</strong> electrodes available on themarket provided they present a BNC connector.• Temperature probe connectionPlease connect the temperature probe (1.17) to the corresponding socket connector atthe back part of the equipment (2.5).• Turn the <strong>pH</strong>-meter on by pressing the ON/OFF button (1.4); the equipment automaticallyenters in <strong>pH</strong> measuring function.<strong>pH</strong>-meter calibrationNahita <strong>pH</strong>-meter <strong>907</strong> can be automatically or manually calibrated at 1 or 2 points.Standards preparationThe <strong>pH</strong>-meter includes the following standard solutions that are supplied individuallypackaged: <strong>pH</strong> 4.00 (25 ºC), <strong>pH</strong> 6.86 (25 ºC), <strong>pH</strong> 9.18 (25 ºC).Empty the contents of one of the packages into a clean beaker and add 100 mL of distilledwater. Dissolve well the powder and if necessary, add a little more water. Once thepackaged content is dissolved, pour the obtained solution into a 250 mL volumetric flaskand fill it with distilled water until it reaches the volume mark.Automatic calibrationSelect automatic calibration mode. For this, press CAL button (1.7) and with buttons(1.10) select the automatic calibration mode (AUTO). Press ENTER (1.2) and you willvisualize on display the <strong>pH</strong> and temperature values, and the STD1 command.A. Calibration at 1 pointOne point calibration means that the equipment is calibrated with a unique standardsolution. We recommend using the <strong>pH</strong> 6.86 (25 ºC) standard solution.Proceed as the following:- Rinse the electrode with distilled water and dry it. Immerse the electrode andthe temperature probe 4 cm (approx.) in the standard solution while turning gently. Thetemperature probe must be next to the electrode. Pág. 8 Manual de instrucciones 50<strong>907</strong>000 Revisión 1 de Octubre-06Version 1 October-06 Instruction manual 506<strong>907</strong>000 Page 17
4. INSTALLATION / SETTIGN UPPreliminary inspectionUnwrap the <strong>pH</strong>-meter, take off the involving plastic and take off the polispan protectionin which it comes fitted. Take off all protections and without connecting the <strong>pH</strong>-meterto the power supply, make sure that the equipment does not present any damage becauseof the shipment. In case it presents any damage, tell it immediately to your transportagent or dealer so that they can make the claims in the correct time limit.Please keep the original wrapping; you will always need it for returns enclosed with allthe accessories supplied.Please check that all the accessories are enclosed with the equipment:- Electrode support- Combined electrode-Temperatura probe- Buffer solutions <strong>pH</strong> 4.00, 6.86, 9.18- Dustjacket- DC adapter, 9 V- Wires to connect to PC or printer- Instructions manual- Warranty certificateWe will only accept any equipment return within 15 days after delivery and providedit comes in its original wrapping.InstallationBefore using the <strong>pH</strong>-meter, it is convenient for you to familiarize with its componentsand basic essentials, as well as with its control functions.PLEASE READ THOROUGHLY THE INSTRUCTIONS BEFORE CONNECTINGAND OPERATING WITH THIS EQUIPMENT WITH THE AIM OF ACHIEVINGTHE HIGHEST FEATURES AND THE MAXIMUM DURABILITY OF THE INS-TRUMENT.Please put the <strong>pH</strong>-meter on top of a horizontal, plane and stable table making a freespace at least at 30 cm per side. Do not put the <strong>pH</strong>-meter near any warm supply (burners,blowlamps…), nor expose it directly to the sun, etc.During operation, dangerous material such as flammable or infectious liquids must beout of the working area.• Place the electrode support (1.15) on the electrode support holder (1.14) of the equipment.• The <strong>pH</strong>-meter is supplied together with a current adapter. Please insert the wire thatfeeds the AC electric current in the base of current 220V 50Hz ±10% provided with earthPage 16 Instruction manual 506<strong>907</strong>000 Version 1 October-06ENGLISHCASTELLANO• Pulse el botón ISO (1.9), seleccione con (1.10) el punto isopotencial adecuado segúnlo expuesto anteriormente y presione ENTER (1.2) para guardar los cambios realizados.Para volver a la función de medición de <strong>pH</strong> pulse el botón <strong>pH</strong> (1.5); en la parte inferiorizquierda de la pantalla podrá comprobar el valor del punto isopotencial al que está trabajando.Medición del <strong>pH</strong>NOTA: Antes de comenzar las mediciones asegúrese de que el equipo está calibrado.• Encienda el <strong>pH</strong>-metro pulsado el botón ON/OFF (1.4). El medidor entra automáticamentepor defecto en modo de medición de <strong>pH</strong>.• Lave con agua destilada el electrodo y séquelo con papel de filtro o celulosa.• Sumerja el electrodo junto con la sonda de temperatura unos 4 cm en la muestra a analizar.Remueva ligeramente con el electrodo la muestra y espere a que la medición se estabilice.El <strong>pH</strong> se muestra en el centro de la pantalla, debajo veremos la temperatura, y enla parte inferior izquierda la pendiente de la curva y el punto isopotencial al cual se estatrabajando.• También puede visualizar la lectura de potencial en mV (milivoltios) pulsando el botónmV (1.6); para volver al modo <strong>pH</strong> pulse el botón <strong>pH</strong> (1.5).NOTA: Si se toman muchas mediciones sucesivamente en muestras diferentes, se recomiendalimpiar el electrodo minuciosamente con agua destilada para evitar la contaminacióncruzada.Guardar datos• Una vez determinados el <strong>pH</strong> o el potencial (mV), presione el botón SAVE (1.8) y el equipoguardará los valores de temperatura y <strong>pH</strong> o mV medidos.• El <strong>pH</strong>-metro Nahita tiene capacidad en su memoria para almacenar hasta un máximode 50 medidas, numeradas según el orden en que han sido guardadas.Borrar datos• Si desea borrar todos los datos memorizados pulse el botón DEL (1.11). En pantallavisualizará all <strong>pH</strong> datum saved. Delate now?, pulse el botón ENTER (1.2) y todos los datosalmacenados serán borrados.• Si desea borrar un dato concreto, pulse el botón VIEW (1.13) y seleccione el dato quedesea borrar ayudándose de los botones (1.10), pulse el botón DEL (1.11). En pantallavisualizará Delete selected?, pulse ENTER (1.2) y el dato seleccionado será borrado.• Para salir de esta función pulse el botón CANCEL (1.3) y el equipo quedará listo pararealizar una nueva medición.NOTA: Cuando no vaya a hacer uso del <strong>pH</strong>-metro durante largos períodos de tiempo,Revisión 1 de Octubre-06 Manual de instrucciones 506<strong>907</strong>000 Pág. 9
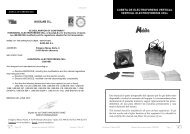
<strong>pH</strong>PRINT1PRINT2mVSAVEDELCALISOENTERCANCELCASTELLANOasegúrese de que esté desconectado de la red y protéjalo del polvo (evitando así posiblesaccidentes y prolongando la vida útil del equipo).Seguridad• El <strong>pH</strong>-metro debe ser utilizado por personal cualificado previamente, que conozca elequipo y su manejo mediante el manual de uso.• Coloque el <strong>pH</strong>-metro sobre una mesa horizontal, plana y estable, creando un espaciolibre de al menos 30 cm por cada lado.• No coloque el <strong>pH</strong>-metro en zonas próximas a fuentes de calor (mecheros, sopletes...), niexponga el equipo directamente a la luz del sol. Evite las vibraciones, el polvo y ambientesmuy secos.• Cuando no vaya a hacer uso del equipo por largos períodos de tiempo, asegúrese deque esté desconectado de la red para evitar posibles accidentes.• Para cualquier manipulación de limpieza, verificación de los componentes o sustituciónde cualquier componente (ej: sustitución de fusible) es imprescindible apagar el equipo ydesconectarlo de la toma de corriente.• No intente repararlo usted mismo; además de perder la garantía puede causar daños enel funcionamiento general del equipo, así como lesiones a personas (quemaduras, heridas...)y daños a la instalación eléctrica.• Procure que no entre agua en el cuadro de controles, aunque éste se encuentre debidamenteaislado. Si por cualquier causa sospecha que ha entrado agua o cualquier líquidodesconecte el equipo inmediatamente (ver Mantenimiento).• Fabricado según las directivas europeas de seguridad eléctrica, compatibilidad electromagnéticay seguridad en maquinas.1.91.81.5 1.6 1.71.1HOLD VIEW ON/OFF1.11 1.12 1.131.141.172.1 Power connector2.2 BNC Electrode connector2.3 Reference connector2.4 Earth connector2.5 Temperature probe connector2.6 RS232 interface1.101.151.161.21.31.42.1 2.2 2.3 2.4 2.5ENGLISH2.63. TECHNICAL SPECIFICATIONS5. MANTENIMIENTO Y LIMPIEZAPara un adecuado funcionamiento del <strong>pH</strong>-metro es necesario seguir algunas recomendaciones.Nota: Todas las normas de utilización citadas anteriormente carecerán de valor si nose realiza una continua labor de mantenimiento.• Siga las instrucciones y advertencias relativas a este manual.• Tenga este manual siempre a mano para que cualquier persona pueda consultarlo.• Después de su uso deberá lavar el electrodo con agua destilada y secarlo; una falta delimpieza ocasionará un mal funcionamiento del equipo.• Ponga el capuchón al electrodo, el cual contiene KCl (3 mol/L) para mantener el bulbohúmedo; no sumerja el electrodo en agua destilada. La acumulación de polvo y vapor deagua reduce la vida útil del electrodo. Si el ambiente fuera muy húmedo seque el electrodocon un paño de celulosa.• Evite sumergir durante mucho tiempo el electrodo en agua destilada, solución proteicao ácido fluorhídrico.<strong>pH</strong> range0.00-14.00 <strong>pH</strong>mV range -1999.9-1999.9Temperatura range 0.0-100.0 ºC<strong>pH</strong> resolution 0.01mV resolution 1<strong>pH</strong> precision ± 0.01mV precision ± 1ATC range 0.0-100.0 ºCInput impedance1012 Ohm<strong>pH</strong> calibration1 or 2 pointsPowerDC adapter, 9 VPág. 10 Manual de instrucciones 50<strong>907</strong>000 Revisión 1 de Octubre-06Version 1 October-06 Instruction manual 506<strong>907</strong>000 Page 15
ATTENTION!! IF EQUIPMENTS ARE NOT PROPERLY CLEAN ANDDISINFECTED THEY WOULD NOT BE ALLOWED TO REPAIR BY OURTECHNICAL SERVICE.INDEX OF LANGUAGESSpanishEnglishINDEX OF CONTENTS1 USES OF THE INSTRUMENT2 DESCRIPTION3 TECHNICAL SPECIFICATIONS4 INSTALLATION / SETTING UP5 MAINTENANCE AND CLEANINGANNEX I: CE CERTIFICATE1. USES OF THE INSTRUMENTPage 14 Instruction manual 506<strong>907</strong>000 Version 1 October-062-1213-23This board digital <strong>pH</strong>-meter is based on microprocessor technology and conceived tocarry out <strong>pH</strong>, electrical potential (mV) and temperature measurements. Easy and simpleto operate, this equipment is, undoubtedly, an ideal instrument to use in quality controllaboratories.2. DESCRIPTION1.1 Liquid crystal display (LCD)1.2 ENTER button, to confirm the different functions1.3 CANCEL button, to get out of the selected function1.4 ON/OFF button, to turn the equipment on/off1.5 <strong>pH</strong> button, to select <strong>pH</strong> function1.6 mV button, to select electrical potential function1.7 CAL button, to enter calibration mode1.8 SAVE button, to select data saving function1.9 ISO button, to select isopotential point function according to water purity1.10 buttons, to select different parameters1.11 DEL button, to select data deleting function1.12 HOLD button, out of use1.13 VIEW button, to select saved data visualization function1.14 Electrode support holder1.15 Electrode support1.16 Electrode1.17 Temperature probe ENGLISH141415162123CASTELLANO• Evite el contacto del electrodo con aceite orgánico de sílice.• Si disminuye la pendiente K a lo largo del uso, sumerja el bulbo en una solución al 4%de ácido fluorhídrico durante 3-5 segundos, lave con abundante agua destilada y sumerjael bulbo en una solución de ácido clorhídrico 0.1 mol/L.• Utilice siempre componentes y repuestos originales. Puede ser que otros dispositivossean parecidos, pero su empleo puede dañar el equipo.• El <strong>pH</strong>-metro dispone de un adaptador, éste debe conectarse a una toma de corriente queesté conectada a tierra, debiendo quedar a mano para poder desconectarlo en caso deemergencia.• No intente repararlo usted mismo; además de perder la garantía puede causar daños enel funcionamiento general del <strong>pH</strong>-metro, así como lesiones a personas (quemaduras, heridas...)y daños a la instalación eléctrica, o equipos eléctricos cercanos.• En caso de avería diríjase a su proveedor para la reparación través del Servicio Técnicode Nahita.Limpieza• Para la limpieza de las partes metálicas, acero inoxidable, aluminio, pinturas, etc nuncautilice estropajos o productos que puedan rayar, ya que deterioran el <strong>pH</strong>-metro, limitandola vida útil del equipo.• Para la limpieza del equipo recomendamos se utilice un trapo libre de pelusa humedecidocon agua jabonosa que no contenga productos abrasivos.• Si el electrodo esta inactivado debido a la suciedad del bulbo, la K bajará y el valormedido no será correcto. Si esto ocurre, por favor limpie el electrodo con varias solucionesde acuerdo a la contaminación.NOTA: El tetracloro metano y tricloroetileno no pueden ser empleados como detergentesya que disuelven las resinas de policarbonato con las que está fabricada la estructuradel electrodo.¡ATENCIÓN! NO SE ADMITIRÁ NINGÚN APARATO PARA REPARARQUE NO ESTÉ DEBIDAMENTE LIMPIO Y DESINFECTADO.INSTRUCCIONES SOBRE PROTECCIÓN DEL MEDIO AMBIEN-TENo se deshaga de este <strong>pH</strong> Metro tirándolo a la basura ordinaria cuandohaya terminado su ciclo de vida; llévelo a un punto de recogida para elreciclaje de aparatos eléctricos y electrónicos. No contiene elementos peligrosos, tóxicospara el humano pero una eliminación no adecuada, perjudicaría al medio ambiente.Los materiales son reciclables tal como se indica en la marcación. Al reciclar materialesu otras formas de reutilización de aparatos antiguos, esta Ud. haciendo una contribuciónimportante a la protección del medio ambiente.Por favor, póngase en contacto con la administración de su comunidad para que le asesorensobre los puntos de recogida.Revisión 1 de Octubre-06 Manual de instrucciones 506<strong>907</strong>000 Pág. 11
ANEXO I: CERTIFICADO CEAUXILAB S.L.DECLARACIÓN CE DE CONFORMIDAD<strong>pH</strong>-metro NAHITA <strong>907</strong> de <strong>Auxilab</strong>,S.L a la Directivade Máquinas (89/392/CEE modificada) y a las reglamentacionesadoptadas para su transposiciónNOMBRE DEL FABRICANTE / IMPORTADOR:AUXILAB, S.L.DIRECCIÓN: Polígono Morea Norte, 831191 Beriáin (Navarra)DECLARAMOS QUE:Están diseñados y fabricados de acuerdo a:<strong>pH</strong> metro NAHITA <strong>907</strong>Directiva 89/392/CEE, incluidas las modificaciones de la misma, y las reglamentaciones nacionales que la trasponen.Directiva 73/23/CEE, modificada sobre seguridad eléctrica.Directiva 89/336/CEE, modificada sobre compatibilidad electromagnética.Y que se han aplicado las siguientes normas armonizadas (o parte de ellas):•••UNE 292-1/-2/-2/A1,UNE-EN 1050, UNE-EN 614-1,UNE-EN 1037, UNE-EN1088, UNE-EN 547, UNE-EN 953, UNE-EN 294, UNE-EN 418, UNE-EN 894-1, UNE-EN 894-2, UNE-EN 954-1, UNE-EN 60204-1, UNE 61010-1/A2, UNE-EN61010-2-051.BERIAIN a 21 de OCTUBRE 2006Fdo: ALFONSO AINCIBURU SANZDIRECTOR/GERENTECASTELLANOPolígono Morea Norte, 8 31191 Beriain (Navarra) - Spain. Tel. 948 310 513 Fax 948 312 071Internet: www.auxilab.es · Email: correo@auxilab.esPág. 12 Manual de instrucciones 50<strong>907</strong>000 Revisión 1 de Octubre-06ENGLISHThank you for choosing this equipment. We sincerely wish that you enjoy your Nahitadigital <strong>pH</strong>-meter <strong>907</strong>. We highly recommend looking after this equipment according towhat is stated in this manual.Nahita develops its products according to the CE marking regulations as well as emphasizingthe ergonomics and security for its user.The correct using of the equipment and its good quality will permit you to enjoy thisequipment for years.The improper use of the equipment can cause accidents and electric discharges, circuitbreakers, fires, damages, etc. Please read the point of Maintenance, where we expose thesecurity notes.TO GET THE BEST RESULTS AND A HIGHER DURATION OF THE EQUIP-MENT IT IS ADVISABLE TO READ THOROUGHLY THIS MANUAL BEFOREOPERATING WITH THE EQUIPMENT.Please bear in mind the following:• This manual is inseparable from the Nahita digital <strong>pH</strong>-meter <strong>907</strong>, so it should be availablefor all the users of this equipment.• You should carefully handle the equipment avoiding sudden movements, knocks, freefall of heavy / sharp objects on it. Avoid spilling liquids inside the equipment.• Never dismantle the different pieces of the equipment to repair it yourself, since it couldproduce a defective use of the whole equipment and a loss of the product warranty, aswell as injuries on people that handle the <strong>pH</strong>-meter.• To prevent fire or electric discharges avoid dry or dusty environments. In case it mayhappen unplug the equipment immediately.• If you have any doubt about setting up, installation or functioning do not hesitate incontacting your wholesaler. You can also tell us any doubts or suggestions you have bycontacting Nahita Technical Assistance Department by email to asistencia@auxilab.es orby telephone: +34 807 117 040 (0,30 Euros/min).• This equipment is protected under the Warranties and consumer goods regulation(10/2003).• Overhaul is not covered by the equipment warranty.• Operations made by non-qualified staff will automatically produce a loss of thewarranty.• Neither fuses nor accessories (including their loss), are covered by the product'swarranty. The warranty neither covers piece's deterioration due to the course of time.• Please make sure you keep the invoice, either for having the right to claim or asking forwarranty coverage. In case you have to send the equipment to Nahita Technical AssistanceDepartment you should enclose the original invoice or a copy as guarantee.• Please do not forget filling the warranty certificate and send it before 15 days after thedate of purchase.• Manufacturer reserves the right to modify or improve the manual or equipment.Version 1 October-06 Instruction manual 506<strong>907</strong>000 Page 13