slug mold instructions - Lee Precision,Inc.
slug mold instructions - Lee Precision,Inc.
slug mold instructions - Lee Precision,Inc.
- No tags were found...

You also want an ePaper? Increase the reach of your titles
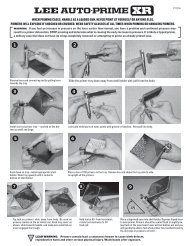
YUMPU automatically turns print PDFs into web optimized ePapers that Google loves.
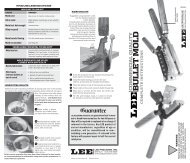
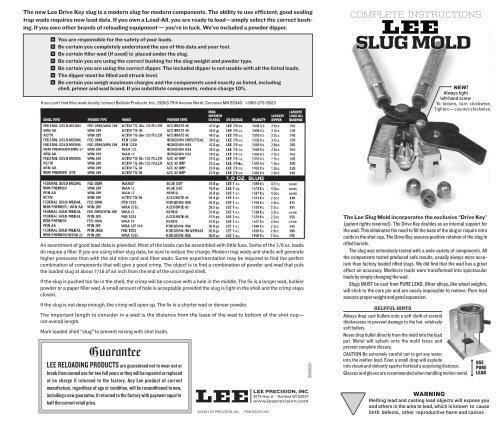
Promptly andproperly disposethe dross oroxides skimmedoff the moltenmetal.THE MELTERThe <strong>Lee</strong> Pro Pot IV (pictured) is the best method of melting your metal. Heatcontrol is simple and the bottom pour spout is convenient and efficient forpouring.REDUCING EXPOSURELead contamination in the air, in dust, and on your skin is invisible. Keepchildren and pregnant women away during use and until clean up is complete.Risk can be reduced, but not eliminated with strong ventilation, washinghands immediately after use of these products before eating or smoking;and careful cleaning of surfaces and floors with disposable wipes afterlead dust has had a chance to settle. Use a lead-specific cleaning agent withedta, or a high-phosphate detergent (like those for electric dishwashers)and bag wipes for disposal.IMPORTANTTO PREVENT DAMAGE TO YOUR MOLD ORPOOR QUALITY BULLETS, FOLLOW THESEINSTRUCTIONS EXACTLY.[1] REMOVE ALL TRACES of oil. Wash <strong>mold</strong> blockin white gas, lacquer thinner or strong detergent and water.[2] HOLD THE FLAME from a match in contact withthe bullet cavity so it deposits a thin film of carbon in thecavity. This is important to eliminate the wrinkles.[³] PREHEAT MOLD. Dip corner of <strong>mold</strong> into moltenmetal and hold there for 30 seconds. If the lead solidifieson the <strong>mold</strong> block, it’s an indication the <strong>mold</strong> is not hotenough.WEAR SAFETYGLASSESIMPORTANT[4]USE PURE LEADLUBRICATE<strong>mold</strong> usingbeeswax orPermatex® antiseizelubricantor equivalent.DO NOT USE<strong>Lee</strong> Liquid Aloxas it will bakeon the <strong>mold</strong> surface,preventing proper closure. Do not use paraffin waxas it does not provide adequate high temperature lube andtends to migrate to the cavities, causing wrinkled bullets.Lightly touch the preheated <strong>mold</strong> alignment pinsand the sprue pivot point screw. It will instantly wickinto the sprue plate pivot area and allow gall free operationof the sprue plate. As soon as you feel the sprueplate bind touch the now hot sprue pivot point withlube. WARNING Do not start casting bullets until your<strong>mold</strong> has been lubricated.LUBE CORE PIN[₆] JUST BEFORE complete solidification of themetal in the sprue plate, strike the sprue plate with awood dowel to cut the sprue. Move plate 90º to clearthe base of the bullet.[7] OPEN HANDLES and tap handle hinge boltto shake bullet onto soft cloth. If <strong>mold</strong> doesn’t openeasily, gently tap the aluminum block near the bottomwhile applying light pressure to open the blocks.TAKE CARE OF YOUR MOLDYour bullet <strong>mold</strong> is a precision-made tool. To preserve this built-in accuracy,it’s necessary to lubricate it properly. Beeswax or Permatex® anti-seizelubricant, or equivalent must be applied to the mid-alignment pins andsprue pivot point screws. Lack of lubrication will cause the sprue plate togall and blocks to mismatch. Damage could be irreparable. When storing forlong periods, lightly oil steel parts to prevent rust.PREPARING YOUR METALUSE PURE LEAD. Wear safety glasses and gloves. After the metal has melted,it will have a grey scum on the top. Flux the metal. Do this by placing asmall piece (size of a pea ) of beeswax or paraffin into the molten metal andstir with ladle until there is nothing but dark grey powder floating on themetal. This should be removed with small ladle. Always flux the metal afteradding to the pot, or if it needs it.The smoke caused by fluxing your metal can be ignited with a match. Thiswill keep your work area smoke-free.IF THE SLUG STICKS TO THE CORE PINLook for nicks or burrs along the edge of the slot in the core pin. Lightlysanding with 150 grit (or finer) to dull the edge will help.CAUTION Your bullet <strong>mold</strong> will be damaged and your bulletswill be of poor quality unless lubricated as in step #4.Use strong ventilationHELPFUL HINTSNever drop bullets directly from the <strong>mold</strong> into thelead pot. Metal will splash onto the <strong>mold</strong> faces and preventcomplete closure.Be extremely careful not to get any water into themolten lead. Even a small drop will explode into steam andviolently spatter hot lead a surprising distance.Glasses and gloves are mandatory when handlingmolten metal.Loads should not exceed 34000 PSI with plain basebullets. This means most pistol loads can be loaded withoutgas checks. Bullets for modern cartridges will bestated size to plus .003 Most bullets from <strong>Lee</strong> <strong>mold</strong>s can beused as cast. Sizing should not be considered as an absolutenecessity. However, all cast bullets must be lubricated.When using a hard alloy like linotype multiply thelisted bullet weight by .93 to obtain your approximatebullet weight.TROUBLESHOOTINGMold not filling outTakes long formetal to solidify[5] FILL MOLTEN METAL into <strong>mold</strong> block throughsprue plate. Some bullet shapes tend to trap air at thenose. This can be eliminated by pouring the metal on thesprue plate chamfer instead of directly into the hole. Thiscauses a swirling action that better fills the <strong>mold</strong>.PROBLEM REASON REMEDYMold does not line upor closes with difficultyMold does notrelease bulletMold coldDip corner of <strong>mold</strong> in molten metal for 30 secondsOil in <strong>mold</strong>Wash blocks in solvent, white gas, lacquer thinner, etc.Metal not hot enough<strong>Inc</strong>rease heatMetal needs fluxingFlux the metal as per <strong>instructions</strong>Mold not smoked See Step #2Mold too hotNeeds lubricationBurr at part lineLUBE SCREWTouch <strong>mold</strong> to moistened cloth or sponge. Caution: Don’t get waterin the block or lead as it turns into steam instantly and the metalspatters with explosive force.Lubricate your <strong>mold</strong> as in Step #4 above.Don’t get any in the cavityWARNING Do not strike core pin holder. Ifbullets do not drop free with a light tap onhinge bolt, heat corner of <strong>mold</strong> in molten metalRemove burr by scraping very lightly with a sharp knifeinside the cavity