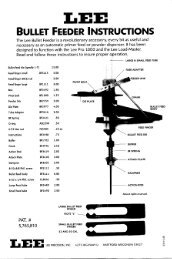
LEE LOAD-MASTER - Lee Precision,Inc.
LEE LOAD-MASTER - Lee Precision,Inc.
LEE LOAD-MASTER - Lee Precision,Inc.

Create successful ePaper yourself
Turn your PDF publications into a flip-book with our unique Google optimized e-Paper software.
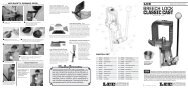
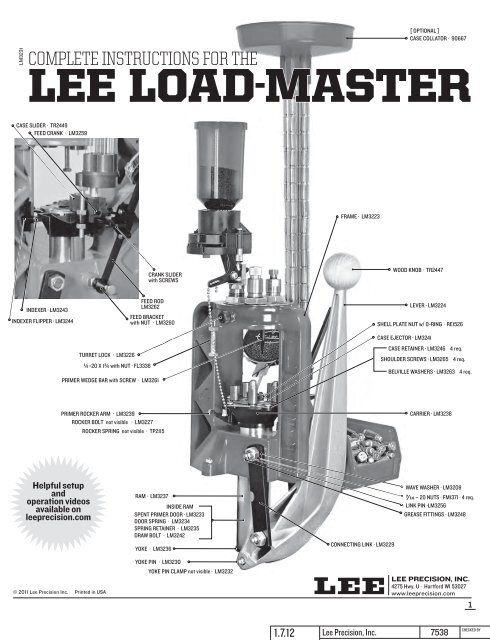
LM3231<br />
[ OPTIONAL ]<br />
CASE COLLATOR · 90667<br />
COMPLETE INSTRUCTIONS FOR THE<br />
<strong>LEE</strong> <strong>LOAD</strong>-<strong>MASTER</strong><br />
CASE SLIDER · TR2449<br />
FEED CRANK · LM3259<br />
INDEXER · LM3243<br />
INDEXER FLIPPER · LM3244<br />
Helpful setup<br />
and<br />
operation videos<br />
available on<br />
leeprecision.com<br />
CRANK SLIDER<br />
with SCREWS<br />
PRIMER ROCKER ARM · LM3239<br />
ROCKER BOLT not visible · LM3227<br />
ROCKER SPRING not visible · TP2115<br />
© 2011 <strong>Lee</strong> <strong>Precision</strong> <strong>Inc</strong>. Printed in USA<br />
TURRET LOCK · LM3226<br />
N–20 X 1O with NUT · FL3336<br />
FEED ROD<br />
LM3262<br />
FEED BRACKET<br />
with NUT · LM3260<br />
PRIMER WEDGE BAR with SCREW · LM3261<br />
RAM · LM3237<br />
INSIDE RAM<br />
SPENT PRIMER DOOR · LM3233<br />
DOOR SPRING · LM3234<br />
SPRING RETAINER · LM3235<br />
DRAW BOLT · LM3242<br />
YOKE · LM3236<br />
YOKE PIN · LM323O<br />
YOKE PIN CLAMP not visible · LM3232<br />
FRAME · LM3223<br />
CONNECTING LINK · LM3229<br />
WOOD KNOB · TR2447<br />
LEVER · LM3224<br />
SHELL PLATE NUT w/ O-RING · RE1526<br />
CASE EJECTOR · LM3241<br />
CASE RETAINER · LM3246 4 req.<br />
SHOULDER SCREWS · LM3265 4 req.<br />
BELVILLE WASHERS · LM3263 4 req.<br />
CARRIER · LM3238<br />
WAVE WASHER · LM3208<br />
G\af – 20 NUTS · FM1371 · 4 req.<br />
LINK PIN ·LM3256<br />
GREASE FITTINGS · LM3248<br />
<strong>LEE</strong> PRECISION, INC.<br />
4275 Hwy. U · Hartford WI 53027<br />
www.leeprecision.com<br />
1.7.12 <strong>Lee</strong> <strong>Precision</strong>, <strong>Inc</strong>. 7538<br />
1<br />
CHECKED BY
2<br />
The <strong>Lee</strong> Load-Master is the finest reloading machine<br />
ever built. To maximize its usefulness,<br />
the instructions should be read and fully understood.<br />
CAUTION<br />
Ammunition reloading can be dangerous if done<br />
im properly and should not be attempted by persons<br />
not willing and able to read and fol l ow instructions<br />
exactly. Children should not be permitted to reload<br />
ammunition without strict parental supervision.<br />
Always wear safety glasses when reloading and<br />
shooting. Ammunition loaded with these tools and<br />
data should only be used in modern guns in good<br />
condition. We do not accept responsibility for<br />
ammunition loaded with these tools or data as we<br />
have no control over the manufacture and storage of<br />
components or the loading procedure and techniques.<br />
Primers and gun powders, like gasoline and matches,<br />
can be dangerous if improperly handled or misused.<br />
Failure to follow these instructions may result in<br />
serious injury or death.<br />
IMPORTANT<br />
YOU MUST DO THESE BEFORE YOU CAN RE<strong>LOAD</strong><br />
1 Bolt to a sturdy bench<br />
2 Install case inserter<br />
3 Adjust the dies<br />
4 Adjust case retainers VERY IMPORTANT<br />
5 Fill primer feeder with correct primers [ See CAUTION, p. 4 ]<br />
6 Adjust primer seating depth<br />
7 Attach powder measure and adjust for proper charge<br />
8 Fill the powder measure with the correct powder<br />
ALWAYS WEAR SAFETY GLASSES WHEN RE<strong>LOAD</strong>ING OR SHOOTING<br />
WARNING The greatest danger in reloading is<br />
the double charge. Should you be interrupted while<br />
reloading, or should anything go wrong, take every<br />
possible precaution in making sure no round has<br />
received a double charge.<br />
Only CCI or REMINGTON brand primers are safe to use<br />
with this tool, unless you have the optional Explosion<br />
Deflector.<br />
CAUTION The reloading of rifle ammunition<br />
requires extra care. Because of the extremely high<br />
pressures of most rifle ammunition, you must be sure<br />
your cases are in good condition. Inspect them before<br />
each reloading for damage and wear. Cases must be<br />
trimmed. An excessively long case will pinch the bullet<br />
in the end of the rifle chamber and cause dangerously<br />
high pressure that could damage your gun and cause<br />
personal injury.
Mounting Your Press<br />
Attach your press to a sturdy workbench<br />
with ¼” bolts. Three are required.<br />
Mounting distance is the same as the <strong>Lee</strong><br />
Pro 1000 and Turret Press. Screws are not<br />
recommended. Be sure that the mounting<br />
pads are fully flush with the front edge of<br />
your workbench. This insures su�cient<br />
clearance for the ram.<br />
It is suggested that ample room be available<br />
to the left of the press. This will be<br />
your work area and a handy place for your<br />
bullets. Only a small area need be kept<br />
available to the right of the press for empty<br />
cases and loaded rounds.<br />
Case Catcher<br />
As the shell plate is rotated, at the bottom<br />
of the stroke, the loaded round is<br />
ejected down the chute to the right. The<br />
The loaded round catcher is held by a special<br />
bracket which must be attached to<br />
your bench with the screws provided. The<br />
left end of the bracket should be parallel<br />
with the Load-Master right mounting lug.<br />
Case Inserter<br />
Cases are slid close to the shell plate<br />
on the downstroke of the ram and pushed<br />
into the shell plate as the ram starts upward.<br />
This unique action is achieved with<br />
a crank connected to an angled slide with<br />
the crank slider. The feed bracket can be<br />
easily adjusted in or out as required to<br />
fully insert the case. Once set, usually no<br />
further adjustment is needed unless you<br />
change from a very large case to an extremely<br />
small case.<br />
The following is best performed without<br />
primers and the turret not installed.<br />
Insert the round end of the ¼ square<br />
shaft into the feed bracket, making sure<br />
that it is turned with a flat side square to<br />
the press. The crank wire should enter the<br />
end hole of the case slider. Tighten the set<br />
screw. Tighten the top screw of the crank<br />
slider; use bottom screw to adjust force of<br />
shell insertion.<br />
Cycle press to assure free motion. At the<br />
upper most ram travel, place a case in front<br />
of the shell slider, cycle lever, again place<br />
case in front of slider, cycle lever. If the<br />
case collides with the case in shell plate,<br />
remove feed rod and unscrew feed bracket<br />
one or more full turns. When tightening<br />
feed bracket, be sure to allow E/af” clearance<br />
between carrier tongue and square<br />
rod—about the thickness of a pencil.<br />
Tighten top screw. Adjust shell insertion<br />
pressure with bottom screw.<br />
Do not install 4-tube case feeder until<br />
press is set up and tested.<br />
Installing the <strong>Lee</strong> Auto-Disk<br />
Powder Measure<br />
The <strong>Lee</strong> Deluxe Auto-Disk Powder Measure<br />
is an improved version with positive<br />
pull back.<br />
The bottom end of the chain should pass<br />
through the hole in the carrier. Attach the<br />
brass pendant to the chain so the mea-<br />
sure is fully retracted when the ram is in<br />
the extreme down position. Some chain<br />
should dangle below the pendant as the<br />
weight helps the chain slide through the<br />
carrier hole on each cycle. Fine adjustment<br />
is easiest done where the chain attaches<br />
to the powder measure. The chain passes<br />
through two holes in the lever and it will<br />
never move, yet it is easily adjusted. Store<br />
the connecting link on the end of the chain.<br />
It will be available should you need it for a<br />
repair.<br />
Installing the <strong>Lee</strong><br />
Perfect Powder Measure<br />
The Perfect Powder Measure has been<br />
attached to the universal charging die and<br />
the proper drop tube is installed. The rest<br />
of the set of drop tubes are packed with<br />
your press so you may load other calibers.<br />
With a case in the shell plate in station<br />
#3, screw the Universal Charging Die and<br />
Perfect Powder Measure assembly into<br />
the turret until it moves the powder drum<br />
to the full dump position (crank down).<br />
See details on the Universal Charging Die<br />
instructions. The carrier has an extension<br />
with a hole for the chain to pass through.<br />
Helpful setup and operation videos available on leeprecision.com<br />
3
Now lower the ram and attach the pendant<br />
to the bead chain with just enough<br />
tension to rotate the drum to the fill position<br />
(crank up).<br />
It is always important to check the setting<br />
of any adjustable powder measure.<br />
Normally this is done with a powder scale.<br />
If you do not yet have a scale, limit your<br />
loading to the charges on the back side<br />
of the die instructions. A powder dipper is<br />
provided so you can check the charge from<br />
your perfect powder measure to double<br />
check your setting. The measure, when<br />
properly adjusted, will dispense a charge<br />
that just fills the dipper. Be sure it is the<br />
correct dipper as listed on the <strong>Lee</strong> load<br />
data supplied with the dies.<br />
Preliminary Testing<br />
When you operate the lever you must<br />
make complete strokes, stop to stop. Failure<br />
to complete the up stroke (lever down) can<br />
cause index flipper to put in a “half-cocked”<br />
position at mid-stroke and cause press to<br />
bind. Continued pressure may damage the<br />
ejector pawl. If for whatever reason you short<br />
stroke the press, pay attention to the indexer<br />
as it pulls out of the carrier at mid-stroke. If<br />
you feel it bind — STOP — and pull the indexer<br />
out manually to the edge of the frame<br />
before completing the down stroke.<br />
ROTATION<br />
CAM<br />
Cycle the lever up and down a few times<br />
to get the feel of your machine. As the<br />
ram starts up the case slider<br />
should move in and then retract.<br />
The indexer rod flipper<br />
will be turned slightly to the left<br />
at mid-stroke and back again at<br />
the very top of the stroke. [FIG. 1]<br />
About halfway down, the indexer<br />
will be pulled toward you<br />
by a raised rib and moved to the<br />
right by the sloping projection<br />
on the frame. [FIGURES 2 AND 3]<br />
4<br />
FIGURE 1<br />
Near the bottom of the stroke the lever will<br />
push against the indexer and smoothly rotate<br />
the shell plate exactly 72.°<br />
Always move the ram fully to the stops<br />
at both ends of the stroke. Be gentle at the<br />
stops. Repeatedly slamming the lever hard<br />
against the stops will break something. You<br />
have full control of the speed of ram travel<br />
and index. While you can go as fast as you<br />
like and the machine will not malfunction,<br />
going too fast will cause the powder to fling<br />
out of your cases while indexing and not<br />
permit you to feel when things go wrong.<br />
For this reason, we strongly suggest a slow<br />
to moderate lever speed. Highest production<br />
is achieved with fast lever travel during<br />
the mid stroke and learn to slow your<br />
travel at both ends of the stroke. Remember<br />
that large charges of rifle powder need<br />
time to flow, so you must pause su�ciently<br />
for all of the powder to enter the case.<br />
One Last Step! Very Important!<br />
At 4 of the 5 loading stations the cases<br />
are held in the shell plate with case retainers.<br />
The retainers are made to swing out<br />
so you can easily remove a case from any<br />
position. They must be set so that they hold<br />
the case fully into the shell plate. If you<br />
push them in too far the case will correctly<br />
position them as it passes.<br />
Place a single case in the shell holder<br />
and set the case retainers against the case<br />
rim in all four stations. The case retainers<br />
precisely position the case so that it will be<br />
centered to enter the dies and most important<br />
to center over the new primer<br />
in the second station.<br />
Only CCI or Remington brand primers are safe<br />
to use with this tool unless you have the optional<br />
explosion deflector. Other brands, especially<br />
Federal primers, explode with such force that<br />
serious injury can occur with their use.<br />
Primer Explosion Deflector 90363<br />
Must be used with all brands of primers<br />
other than CCI or Remington.<br />
FIGURE 2<br />
KICK-OVER<br />
RAMP<br />
FIGURE 3<br />
Filling the Primer Feeder<br />
Dump only one box of primers into the<br />
tray. Only Remington or CCI brand primers<br />
are safe to use unless you have installed<br />
the optional explosion deflector. Do not<br />
use Federal or any brand of primers other<br />
than CCI or Remington without the explosion<br />
deflector in place.<br />
Gently shake the tray side to side and all<br />
of the primers will automatically turn right<br />
side up. Replace the cover. Now while holding<br />
the primers back with a pencil point or<br />
paper clip, attach the tray to the trough. Tap<br />
the side of the tray several times to fill the<br />
trough. The trough will remain filled while<br />
using due to the agitator bumps on the<br />
frame. A primer won’t feed unless a case is<br />
present to push the primer lever back.<br />
New<br />
Some .45 brass has been<br />
discovered with small<br />
primers. Please sort your<br />
brass accordingly.<br />
Set Primer Depth Adjustment<br />
The N–20 screw that bears against<br />
the priming rocker arm may require some<br />
fine adjusting to seat primers to your liking.<br />
Make very small adjustments and test<br />
after each. There is su�cient spring in the<br />
linkage to accommodate slight di�erences<br />
in cases.<br />
Helpful setup and operation videos available on leeprecision.com
Operation<br />
Always move the lever fully to the positive<br />
stops at both end of lever travel.<br />
Be gentle when you come to the stops<br />
to avoid damage. Cases are not perfect<br />
and rims may be damaged. It is important<br />
to always watch to see that the case fully<br />
enters the shell plate.<br />
Always keep the primer trough full with<br />
CCI or Remington brand primers. No other<br />
brand is safe to use without the optional<br />
explosion deflector.<br />
After the fourth stroke of the lever the<br />
sized, primed and charged case should be<br />
in a position to start the bullet into the case<br />
mouth or rest it on the case mouth if you<br />
are loading rifle cases.<br />
That’s all there is to it. The <strong>Lee</strong> Load-<br />
Master is the nicest press you’ll ever use.<br />
WARNING<br />
The greatest danger in reloading is the double<br />
charge. Should you be interrupted while reloading<br />
or should anything go wrong, go way<br />
out of your way to be positive that no round has<br />
received a double charge.<br />
Cases can be easily removed from every<br />
station by swinging out the case retainer.<br />
Case Feeder<br />
The <strong>Lee</strong> 4 Tube Magazine Case Feeder<br />
and collator are highly desirable options<br />
for pistol cases. Attach the cylinder and<br />
plate as shown. This assembly should be<br />
slightly more than one case length above<br />
the carrier tongue. A close adjustment of<br />
the height will keep cases from tipping.<br />
However, it should not be so close that<br />
slight case length variances will cause<br />
binding. Tighten the lock nuts. Use two G/af<br />
wrenches to prevent breaking the bracket.<br />
No case feeder is available for most<br />
rifle cases. Rifle cases should be dropped<br />
in front of the case slider at the top of the<br />
stroke. It will be automatically inserted into<br />
the shell plate after the index is completed.<br />
Keep Your Press Clean<br />
It is especially important to frequently<br />
clean out the openings in the shell plate<br />
which hold the shell. Dirt or gunpowder will<br />
keep the case from fully entering the shell<br />
plate. This will cause feeding, priming and<br />
alignment problems.<br />
Frequently check the primers to be sure<br />
they are seated properly. If dirt falls on the<br />
priming punch, it will deface the primer.<br />
Unless it is extreme, it will cause no harm.<br />
To remove the dirt, depress the primer<br />
rocker arm to raise the punch and wipe it<br />
clean with your finger.<br />
Empty The Spent Primers<br />
Primers are 100% captured inside the<br />
ram. To empty, simply slide the cover back<br />
while holding a container under the ram.<br />
Be sure to close the cover, or it will get<br />
bent the next time the ram is raised.<br />
Lubrication<br />
The press has been lubricated at the<br />
factory. After several thousand rounds<br />
of loading, or if the press has set idle for<br />
a long time it should be relubricated. Use<br />
any automotive type grease in the 3 fittings<br />
at the ends of the pins. Grease guns are<br />
available in automotive departments of all<br />
chain stores for less than ten dollars. Place<br />
a small dab of grease on the primer rocker<br />
arm where it contacts the bolt head. The<br />
ram should be oiled before every use and it<br />
will last forever.<br />
Automotive engine oil is the best. Any<br />
kind of oil is better than none. DO NOT USE<br />
WD-40 or dry lubricants. These do not offer<br />
su�cient protection.<br />
A very tiny amount of grease in the center<br />
hole of the shell plate and the square<br />
indexer rod will greatly extend the life of<br />
the carrier and make it work smooth as<br />
silk.<br />
Changing The Turret<br />
Changing calibers is quick and easy because<br />
of the removable turret. It is precisely<br />
aligned with the knurled lock screw on<br />
the left. Loosen the screw so the turret can<br />
be rotated about W” and lifted out. When<br />
replacing, make certain the lock screw engages<br />
the groove in the turret.<br />
Changing Calibers<br />
The fastest way to change dies is to have<br />
them installed in their own turret. It then<br />
becomes very fast and easy to replace the<br />
entire turret.<br />
If the shell head is of a di�erent size it is<br />
also necessary to replace the shell plate.<br />
The shell plates for the Load-Master are<br />
the easiest of all to change.<br />
While the shell plate is o�, you can<br />
change the primer feeder if another size is<br />
needed. Remember to change to the proper<br />
type of primers — rifle, pistol, regular or<br />
magnum.<br />
Changing The Priming Tool<br />
Remove the knurled nut, case ejector,<br />
indexer rod and shell plate. Swing the case<br />
retainer out of the way. Insert the primer<br />
punch into the hexagon-shaped hole in the<br />
right rear of the carrier. Be sure the tiny<br />
Helpful setup and operation videos available on leeprecision.com<br />
5
spring is installed into the hole at the rear<br />
of the primer punch. Now slip the primer<br />
trough over the punch. Push down on<br />
the left end of the priming rocker arm to<br />
be sure everything is working freely. The<br />
primer punch will be seen moving up as<br />
you push down on the priming rocker arm.<br />
Changing The Shell Plate<br />
Remove knurled nut case ejector and indexer.<br />
Select proper shell plate from chart<br />
on the last page. Replace shell plate on<br />
carrier you will have to work it under the<br />
primer lever.<br />
Place case ejector directly on top of the<br />
shell plate making sure square on top of<br />
center post is engaged and case ejector<br />
pointer is towards the chute on the right.<br />
Secure case ejector and shell plate with<br />
knurled nut. Be sure “O” ring and groove is<br />
toward shell plate. Install indexer with longer<br />
portion of flipper pointing upward and<br />
beveled side of indexer to your right.<br />
Wedge locking of the shell plate is adjusted<br />
by screwing the flipper out for a<br />
tighter lock, screw in for a looser lock.<br />
Smoothest operation is attained with the<br />
wedge lock slightly loose.<br />
6<br />
NOTE BEVEL<br />
Changing Dies<br />
Specific die installation instructions are not included in this manual.<br />
Always follow the instructions included with the dies.<br />
WHEN INSTALLING DIES<br />
• Follow instructions supplied with dies.<br />
• Always install decapping die in station #1.<br />
• Carbide pistol dies should be installed so they just touch the shell plate.<br />
• Dies for rifle bottle neck case must be screwed in until they touch<br />
the shell plate plus N turn.<br />
• Do not use rifle dies that require end of sizing die be kept away from shell plate.<br />
They have dangerous capability of producing ammunition with excessive headspace.<br />
Station 3<br />
This is the powder charging station.<br />
It is strongly recommended that an<br />
automatic powder measure be used<br />
at this station.<br />
3<br />
Specific Station Requirements<br />
Station 2<br />
This station may not be used to add powder or deprime.<br />
A pistol expanding die can be used at this station if it does not<br />
deprime or add to the powder.<br />
HINT A carbide sizing die with the decapper removed can be<br />
placed at this station. This will provide excellent alignment of the<br />
case for priming and will alert you if the case retainer moves out of<br />
position. Be sure to install a <strong>Lee</strong> Universal Decapping Die in station<br />
#1 or use a larger caliber die to deprime.<br />
2<br />
4 5<br />
1Station<br />
1<br />
This is the only station<br />
for depriming.<br />
Station 5<br />
This station is used for a separate crimp die.<br />
The optional <strong>Lee</strong> Carbide Factory Crimp Die<br />
both crimps and sizes any case that exceeds<br />
SAAMI specifications.<br />
Station 4<br />
This is typically used to seat the bullet.<br />
On pistol cases where the mouth has been flared, the bullet can be started into the case mouth by hand or<br />
can be automatically placed with the optional <strong>Lee</strong> Bullet Feeder.<br />
The die should be adjusted to seat the bullet at the proper depth. Proper depth is achieved when:<br />
a] Cartridge overall length is short enough to function through your gun’s action.<br />
b] The bullet’s crimp groove is almost entirely inside the case mouth.<br />
NOTE This is not important if a <strong>Lee</strong> Factory Crimp Die is to be used at the next station.<br />
c] The bullet is not seated deeper than recommended by the charge table.<br />
Helpful setup and operation videos available on leeprecision.com
Alignment of the Carrier to the Turret<br />
This is an adjustment that need never be done unless<br />
you disassemble the carrier from the ram.<br />
The draw bolt head, at the bottom of the ram,<br />
MUST be loosened so the carrier can be rotated on<br />
the end of the ram. With the index flipper in the “in<br />
position” and the carrier at the pull out rib position,<br />
swing the carrier clockwise (viewed from top) until<br />
center hub of index flipper contacts the pull-out rib.<br />
[FIGURE 4]. Tighten draw bolt securely — 11.6 ft./lbs.<br />
Troubleshooting<br />
Problem Possible Cause Remedy<br />
Primers not fully seated Lever not lowered to full down stop Actuate lever to FULL DOWN position<br />
Remove<br />
powder<br />
or debris<br />
from<br />
shelf<br />
Die set too deeply to press Adjust dies to insure carrier can travel to<br />
FULL UP position<br />
Primer rocker arm bolt<br />
not properly adjusted<br />
See adjustment procedure in this manual<br />
Tipped primer Case retainer out of adjustment See adjustment procedure in this manual<br />
Cases not aligned well due to<br />
out of tolerance or damaged rim<br />
Install sizing die without decapper in priming<br />
station for better alignment.<br />
See Changing Dies, Station #2.<br />
Dirt or gun powder in shell holder grooves Scrape shell holder grooves with paper clip. Use<br />
compressed air to remove debris.<br />
Tumbling media on primer post<br />
or in primer feed<br />
FIGURE 4<br />
PULL-OUT RIB<br />
INDEX FLIPPER<br />
Primer does not feed onto primer punch Oil in trough Clean oil from trough<br />
Remove and clean primer feed. Do not process<br />
cases with tumbling media lodged in primer<br />
flash hole.<br />
Primer trough not full Keep primer trough full<br />
Shell plate fails to index Damaged case ejector pawl Straighten pawl to prevent excessive<br />
clockwise movement of shell plate<br />
Carrier out of adjustment See adjustment procedure<br />
in this manual<br />
Indexer improperly installed See adjustment procedure<br />
in this manual<br />
DRAW BOLT<br />
7
Accessories Part No.<br />
Large Primer Feeder.........................................90077<br />
Small Primer Feeder.........................................90075<br />
Shell Plate, specify caliber................................<br />
Large Case Feeder . . . . . . . . . . . . . . . . . . . . . . . . . . . . . . . . . . . . . . . . . . .90658<br />
Small Case Feeder ...........................................90659<br />
This has a small slider and an extension for short cases<br />
Rifle Case Feeder ............................................90663<br />
This has a reducer bushing to better fit 223 and 30 M1 cases.<br />
30 M1 Carbine and other small and short calibers. Rifle cases<br />
are best loaded by placing the case in front of the case slider<br />
after inspection and lubrication<br />
Primer Explosion Deflector................................90363<br />
Must be used with all brands of primers other<br />
than CCI or Remington<br />
5 Hole Turret...................................................90079<br />
Bin and Bracket ..............................................90687<br />
with mounting bracket & screws<br />
Case Collator ..................................................90667<br />
fills all four feeder tubes in 10 seconds<br />
Custom Made Shell Plates<br />
6 weeks delivery<br />
Available in over 125 Calibers<br />
All of the combinations listed should work<br />
quite well. Because of the assorted shapes of<br />
cartridges, some may require slight modifications<br />
to the equipment for best results. It simply isn’t<br />
possible to make, say, a single case inserter,<br />
to work perfectly with every size and shape<br />
of cartridge. The factory can usually make<br />
custom modifications at reasonable costs.<br />
Please contact us for your special needs.<br />
<strong>Lee</strong> Bullet Feeder<br />
Fits directly into the Load-<br />
Master. Automatically feeds<br />
bullets into the mouth of the<br />
seating die. Aligns bullets<br />
more accurately than possible<br />
by hand. <strong>Inc</strong>reases the<br />
cyclic rate 50 to 100%.<br />
8<br />
<strong>Lee</strong> Guarantee<br />
<strong>LEE</strong> RE<strong>LOAD</strong>ING PRODUCTS<br />
ARE GUARANTEED not to wear<br />
out or break from normal use for two full<br />
years, or they will be repaired or<br />
replaced at no charge if returned to the<br />
factory. Any <strong>Lee</strong> product of current<br />
manufacture, regardless of age or<br />
condition, will be reconditioned to new,<br />
including a new guarantee, if returned to<br />
the factory with payment equal to half<br />
the current retail price. 1<br />
List of Sizes<br />
CARTRIDGE SHELL PRIMER CASE<br />
PISTOL PLATE SIZE FEEDER<br />
22 Rem Jet 1S S 90658<br />
256 Win. Mag 1S S 90658<br />
30 Luger 19S S 90659<br />
30 Mauser 19S S 90659<br />
32 ACP* 7 S 90659<br />
32 Short Colt 4A S 90659<br />
32 Long Colt 4A S 90659<br />
32 S&W 4A S 90659<br />
32 S&W Long 4A S 90659 w/Large Slider<br />
32 H&R Mag 4A S 90659 w/Large Slider<br />
32 Colt N.P. 4A S 90659 w/Large Slider<br />
380 Auto 4S S 90659<br />
9mm Luger 19S S 90659<br />
38 S&W 1S S 90658<br />
38 Colt N.P. 1S S 90658<br />
38 Super Auto 19S S 90658<br />
38 ACP 19S S 90658<br />
38 Short Colt 1S S 90658<br />
38 Long Colt 1S S 90658<br />
38 Special 1S S 90658<br />
357 Magnum 1S S 90658<br />
40 S&W 19S S 90658 w/Small Slider<br />
10mm Auto 19L L 90658<br />
41 Long Colt 1S L 90658<br />
41 Action EXP 19L S None<br />
41 Magnum 9L L 90658<br />
44 S&W SPL 11L L 90658<br />
44 S&W Russian 11L L 90658<br />
44 Magnum 11L L 90658<br />
44 Auto Mag 2L L 90658<br />
45 Auto 2L L 90658<br />
45 Colt 11L L 90658<br />
455 Webley 5L L 90658<br />
PPC 12L S 90658<br />
CARTRIDGE SHELL PRIMER CASE<br />
RIFLE PLATE SIZE FEEDER<br />
17 REM 4S S 90663<br />
22 Hornet 20 S 90663<br />
22K Hornet 7 S 90663<br />
22 Savage 3L L<br />
22 BR 2L S<br />
218 BEE 6S S<br />
219 Zipper 3L L<br />
220 Swift 10L L<br />
221 Fireball 4S S 90663<br />
222 REM 4S S 90663<br />
222 REM Magnum 4S S 90663<br />
223 (5.56mm) 4S S 90663<br />
224 Clark (22/257) 2L S<br />
225 WIN 10L L<br />
22/250 2L L<br />
240 Weatherby 2L L<br />
243 WIN 2L L<br />
6mm REM 2L L<br />
244 REM 2L L<br />
6mm/284 2L L<br />
6mm/06 2L L<br />
6x47 (6mm/222M) 4S S<br />
25/284 2L L<br />
25/06 2L L<br />
25/20 WIN 6S S<br />
250 Savage 2L L<br />
25/35 3L L<br />
257 Roberts 2L L<br />
257 Weatherby 5L L<br />
6.5mm06 2L L<br />
6.5mmx57 2L L<br />
CARTRIDGE SHELL PRIMER CASE<br />
RIFLE PLATE SIZE FEEDER<br />
6.5x55 Mauser 3L L<br />
6.5 JAP 10L L<br />
6.5 REM Magnum 5L L<br />
6.5 Carcano 2L L<br />
264 WIN Magnum 5L L<br />
270 WIN 2L L<br />
270 Weatherby 5L L<br />
7mm/08 2L L<br />
280 REM 2L L<br />
7x57mm Mauser 2L L<br />
7x61 Sharpe & Hart 5L L<br />
7mm REM Magnum 5L L<br />
7mm Weatherby 5L L<br />
284 Winchester 2L L<br />
7.5mm Schmidt-Rubin 3L L<br />
30M1 Carbine 7 S 90663<br />
7.62x53 ARG Mauser 3L L<br />
7.62mmx39 12L L 90658<br />
30 Herrett 3L L<br />
30/30 WIN (30 W.C.F.) 3L L<br />
300 Savage 2L L<br />
308 WIN (7.62 NATO) 2L L<br />
30/06 Springfield 2L L<br />
300 H&H 5L L<br />
300 Weatherby 5L L<br />
300 WIN Magnum 5L L<br />
308 Norma Magnum 5L L<br />
7.7 JAP 2L L<br />
32 WIN S.L. 3L L<br />
32 WIN SPL. 3L L<br />
32/20 (32 W.C.F.) 6S S<br />
8x57 Mauser 2L L<br />
8mm/06 2L L<br />
8mm MAN SCHOE. 2L L<br />
8mm REM Magnum 5L L<br />
33 WIN 8L L<br />
338 WIN Magnum 5L L<br />
340 Weatherby 5L L<br />
348 WIN 8L L<br />
35 REM 2L L<br />
35 WIN 5L L<br />
35 Whelan 2L L<br />
350 REM Magnum 5L L<br />
358 WIN 2L L<br />
358 Norma MAG 5L L<br />
375 WIN 3L L<br />
375 H&H 5L L<br />
375 Weatherby 5L L<br />
38/40 WIN 14L L<br />
38/55 WIN 3L L<br />
40/82 WIN 8L L<br />
408 WIN 3L L<br />
44/40 14L L<br />
444 Marlin 11L L<br />
45/70 GOVT 8L L<br />
458 WIN Magnum 5L L<br />
Most of the above sizes can be made up at the factory if the dies are listed in<br />
our catalog. Not all dies listed above are available.<br />
Most pistol calibers come with the Pro Auto-Disk powder measure and<br />
a case feeder. Carbide dies when available.<br />
Most rifle calibers come with the Perfect Powder Measure and Universal<br />
Charging Die. No case feeder.<br />
*7 may not work with all cases<br />
4275 Highway U<br />
Hartford Wisconsin 53027<br />
www.leeprecision.com