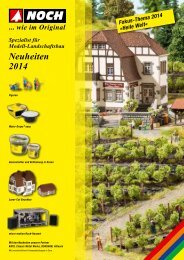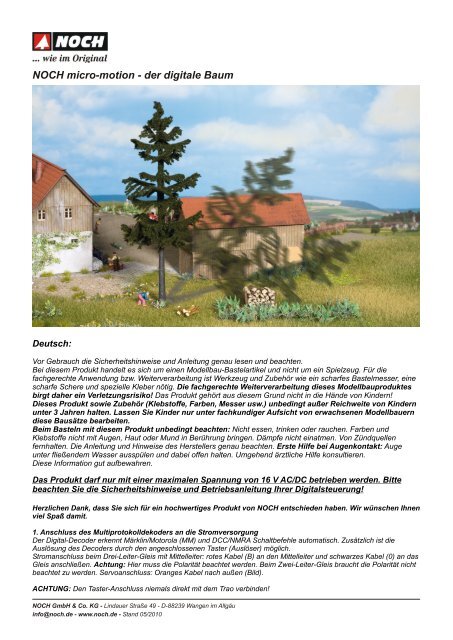
NOCH micro-motion - der digitale Baum
NOCH micro-motion - der digitale Baum
NOCH micro-motion - der digitale Baum

Create successful ePaper yourself
Turn your PDF publications into a flip-book with our unique Google optimized e-Paper software.
<strong>NOCH</strong> <strong>micro</strong>-<strong>motion</strong> - <strong>der</strong> <strong>digitale</strong> <strong>Baum</strong><br />
Deutsch:<br />
Vor Gebrauch die Sicherheitshinweise und Anleitung genau lesen und beachten.<br />
Bei diesem Produkt handelt es sich um einen Modellbau-Bastelartikel und nicht um ein Spielzeug. Für die<br />
fachgerechte Anwendung bzw. Weiterverarbeitung ist Werkzeug und Zubehör wie ein scharfes Bastelmesser, eine<br />
scharfe Schere und spezielle Kleber nötig. Die fachgerechte Weiterverarbeitung dieses Modellbauproduktes<br />
birgt daher ein Verletzungsrisiko! Das Produkt gehört aus diesem Grund nicht in die Hände von Kin<strong>der</strong>n!<br />
Dieses Produkt sowie Zubehör (Klebstoffe, Farben, Messer usw.) unbedingt außer Reichweite von Kin<strong>der</strong>n<br />
unter 3 Jahren halten. Lassen Sie Kin<strong>der</strong> nur unter fachkundiger Aufsicht von erwachsenen Modellbauern<br />
diese Bausätze bearbeiten.<br />
Beim Basteln mit diesem Produkt unbedingt beachten: Nicht essen, trinken o<strong>der</strong> rauchen. Farben und<br />
Klebstoffe nicht mit Augen, Haut o<strong>der</strong> Mund in Berührung bringen. Dämpfe nicht einatmen. Von Zündquellen<br />
fernhalten. Die Anleitung und Hinweise des Herstellers genau beachten. Erste Hilfe bei Augenkontakt: Auge<br />
unter fließendem Wasser ausspülen und dabei offen halten. Umgehend ärztliche Hilfe konsultieren.<br />
Diese Information gut aufbewahren.<br />
Das Produkt darf nur mit einer maximalen Spannung von 16 V AC/DC betrieben werden. Bitte<br />
beachten Sie die Sicherheitshinweise und Betriebsanleitung Ihrer Digitalsteuerung!<br />
Herzlichen Dank, dass Sie sich für ein hochwertiges Produkt von <strong>NOCH</strong> entschieden haben. Wir wünschen Ihnen<br />
viel Spaß damit.<br />
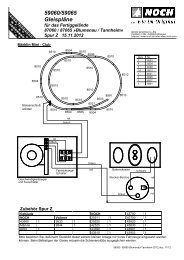
1. Anschluss des Multiprotokolldeko<strong>der</strong>s an die Stromversorgung<br />
Der Digital-Deco<strong>der</strong> erkennt Märklin/Motorola (MM) und DCC/NMRA Schaltbefehle automatisch. Zusätzlich ist die<br />
Auslösung des Deco<strong>der</strong>s durch den angeschlossenen Taster (Auslöser) möglich.<br />
Stromanschluss beim Drei-Leiter-Gleis mit Mittelleiter: rotes Kabel (B) an den Mittelleiter und schwarzes Kabel (0) an das<br />
Gleis anschließen. Achtung: Hier muss die Polarität beachtet werden. Beim Zwei-Leiter-Gleis braucht die Polarität nicht<br />
beachtet zu werden. Servoanschluss: Oranges Kabel nach außen (Bild).<br />
ACHTUNG: Den Taster-Anschluss niemals direkt mit dem Trao verbinden!<br />
<strong>NOCH</strong> GmbH & Co. KG - Lindauer Straße 49 - D-88239 Wangen im Allgäu<br />
info@noch.de - www.noch.de - Stand 05/2010
Angeschlossener<br />
Taster<br />
(Auslöser)<br />
Programmier-<br />
Taster auf Deco<strong>der</strong><br />
orange<br />
<strong>NOCH</strong> GmbH & Co. KG - Lindauer Straße 49 - D-88239 Wangen im Allgäu<br />
info@noch.de - www.noch.de<br />
ACHTUNG:<br />
Den Taster<br />
niemals mit Trafo<br />
direkt verbinden!<br />
Zur Programmierung ist die Taste auf dem Deco<strong>der</strong> (Bild)<br />
zu drücken bevor <strong>der</strong> Deco<strong>der</strong> mit Strom versorgt wird.<br />
Das nachstehend beschriebene Verfahren ist genau<br />
einzuhalten.<br />
2. Programmierung einer "Digitalzentrale" auf eine<br />
Weichen- o<strong>der</strong> Signaladresse<br />
Der Anschluss des Deko<strong>der</strong>s erfolgt an das Hauptgleis,<br />
nicht an das Programmiergleis. Wichtig: Während <strong>der</strong><br />
Programmierung darf auf <strong>der</strong> Digitalzentrale keine Lok mit<br />
<strong>der</strong> Adresse 66 im Märklin/Motorola-Format und keine Lok<br />
mit <strong>der</strong> Adresse 66 im DCC/NMRA-Format aktiv sein. Bitte<br />
überprüfen Sie dies vor <strong>der</strong> weiteren Programmierung.<br />
Führen Sie jetyt einen Neustart <strong>der</strong> Digitalzentrale durch,<br />
ohne jedoch Ihren bisherigen Datenbestand zu löschen<br />
(ACHTUNG: Hiermit ist kein totaler Reset des Systems<br />
gemeint! Bitte schauen Sie in das Handbuch Ihrer<br />
Digitalzentrale!).<br />
Schalten Sie die Spannung am Gleis aus („STOP“ Taste drücken). Den Taster am Deco<strong>der</strong> gedrückt halten (Bild),<br />
während Sie den Strom am Gleis wie<strong>der</strong> einschalten. Die rote LED des Deco<strong>der</strong>s leuchtet jetzt. Der Deco<strong>der</strong> kann<br />
ausschließlich auf eine Adressgruppe von vier aufeinan<strong>der</strong> folgenden Adressen programmiert werden (Beispiel: 1 - 4,<br />
5 - 8, 9 - 12 usw.). Der Deco<strong>der</strong> erkennt automatisch, ob es sich um eine Märklin/Motorola o<strong>der</strong> um eine DCC Adresse<br />
handelt. Richten Sie jetzt den <strong>Baum</strong> als Funktionsartikel ein.<br />
Wichtig: Jeweils die erste Adresse einer Vierer-Adressgruppe schaltet die Funktion. Senden Sie einen Schaltbefehl<br />
woraufhin die rote LED erlischt (in unserem Beispiel: 1,5,9, usw). Je nach eingesetzter Digitalzentrale ist als höchste<br />
Adresse im Märklin/Motorola Format die Adresse 317 und im DCC Format die Adresse 2045 auswählbar. Nicht alle<br />
Digitalzentralen senden den ganzen Adressbereich.<br />
Der Deco<strong>der</strong> prüft während des Einlesens <strong>der</strong> Adresse die Schaltbefehle. Es kann vorkommen, dass Sie den<br />
Schaltbefehl mehrfach senden müssen. Insbeson<strong>der</strong>e dann, wenn während des Einlesens mehrere Loks in den<br />
unterschiedlichsten Digitalformaten aktiv sind. Sobald die rote LED ausgeht, ist <strong>der</strong> Deco<strong>der</strong> programmiert. Bei einigen<br />
Multiprotokoll-Zentralen ist es erfor<strong>der</strong>lich das Digitalformat des gespeicherten Magnetartikels zu än<strong>der</strong>n. Rufen Sie dazu<br />
den Magnetartikel auf und wechseln Sie das Datenformat (Märklin/Motorola DCC/NMRA).<br />
3. Märklin Mobile Station 60652 (feste Lok-Adresse):<br />
1. Richten Sie eine Lok mit <strong>der</strong> Adresse 66 ein.<br />
2. Rotes Kabel am Mittelleiter und schwarzes Kabel am Gleis anschließen. Wichtig: Dabei Polarität beachten.<br />
3. „STOP“ auf <strong>der</strong> Mobile Station drücken (Strom AUS). Nun die Taste auf dem Deco<strong>der</strong> gedrückt halten (Bild 2) und<br />
STOP auf <strong>der</strong> Mobile Station erneut drücken (Strom EIN).<br />
4. Rote LED geht an und aus.<br />
Der Deco<strong>der</strong> ist nun auf die Lok-Adresse 66 programmiert. Die Taste „Beleuchtung“ schaltet die Funktion (<strong>Baum</strong> fällt /<br />
wie<strong>der</strong> aufstellen).<br />
4. ROCO Lokmaus 2 (feste Lok-Adresse):<br />
1. Richten Sie eine Lok mit <strong>der</strong> Adresse 66 ein.<br />
2. Schwarzes Kabel am Gleis anschließen.<br />
3. Adresse senden: Dazu Taste F1 mehrfach drücken.<br />
4. Taste auf dem Deco<strong>der</strong> gedrückt halten (Bild) und rotes Kabel mit Gleis verbinden (Strom EIN).<br />
5. Rote LED geht an und aus.
Der Deco<strong>der</strong> ist nun auf die Lok-Adresse 66 programmiert. Die Taste F1 schaltet die Funktion (<strong>Baum</strong> fällt / wie<strong>der</strong> aufstellen).<br />
Anmerkung: Damit die Adresse gesendet wird, ist das Verfahren genau einzuhalten. Bitte nicht die „STOP“ Taste<br />
benutzen.<br />
5. Deco<strong>der</strong>-Adresse vergessen und Deco<strong>der</strong> RESET<br />
Haben Sie einmal die Adresse des Deco<strong>der</strong>s vergessen, können Sie das vorstehend beschriebene Verfahren<br />
wie<strong>der</strong>holen. Haben Sie eine Digitaladresse im Deco<strong>der</strong> gespeichert und wollen den <strong>Baum</strong> dann wie<strong>der</strong> analog direkt an<br />
einem Modelleisenbahn-Transformator betreiben, müssen Sie die Digitaladresse löschen. Schalten Sie dazu den Strom<br />
aus und schließen Sie den Taster zur analogen Auslösung an. Halten Sie den externen Taster zur Auslösung und den<br />
Taster auf dem Deco<strong>der</strong> gedrückt. Dann schalten Sie den Strom ein. Jetzt hat <strong>der</strong> Deco<strong>der</strong> seine Digitaladresse<br />
vergessen und Sie können den Deco<strong>der</strong> mit dem externen Taster auslösen.<br />
6. Analoger Betrieb<br />
Das auslösen über den angeschlossenen Taster ist je<strong>der</strong>zeit möglich. Sie können auch ein vorhandenes Stellpult<br />
verwenden. ACHTUNG: Das Stellpult darf keine Verbindung zum Bahnstrom o<strong>der</strong> zum Transformator haben.<br />
7. Problembehandlung Was tue ich, wenn <strong>der</strong> Funktionsartikel nicht funktioniert?<br />
Sollte die Programmierung beim ersten Mal nicht funktionieren:<br />
1. Anleitung genau lesen / Deco<strong>der</strong>-Programmierung wie<strong>der</strong>holen. 3 Sekunden warten vor neuem Einlesen<br />
2. Tasten auf <strong>der</strong> Digitalzentrale länger und langsamer drücken / Tasten mehrfach drücken.<br />
3. Datenformat des eingerichteten Magnetartikels wechseln (Märklin/Motorola DCC/NMRA).<br />
English:<br />
Safety Precautions: Read and follow these safety precautions and instructions carefully before use.<br />
This product is a model building item and not a toy. For appropriate application and use, tools like a sharp cutter, a sharp<br />
pair of scissors and special glue are necessary. Therefore, appropriate work with this model building product does pose<br />
risk of injury! For that reason this product is not for children! Keep this product as well as all accessories (glue, paints,<br />
cutter etc.) out of reach of children un<strong>der</strong> 3 years of age! Let children build this kit only if supervised by a competent adult<br />
modeller. For the use of paints and glues please follow these safety precautions carefully: Do not eat, drink or smoke.<br />
Avoid any contact with eyes, skin or mouth. Do not breathe any vapours. Keep away from ignition sources. Follow the<br />
instructions and safety precautions of the manufacturer carefully. First aid for contact with eyes: Flush the eye with clean<br />
water holding the eyelid open. Immediately consult medical advice. Keep these instructions safe.<br />
This product is allowed to be operated with a maximal voltage of 16 V AC/DC. Please carefully read and follow<br />
the safety precautions and instructions before using your command unit!<br />
Congratulations on the purchase of a high-quality <strong>NOCH</strong> product. We wish you a lot of fun with our digital<br />
tree.<br />
Before installing the tree in the model landscape, please verify the correct function of this product.<br />
1. How to connect the multi-protocol digital deco<strong>der</strong> to the current supply<br />
The digital deco<strong>der</strong> automatically recognizes the Märklin/Motorola (MM) format and DCC/NMRA format switching<br />
commands for locomotives. Additionally the deco<strong>der</strong> can be released by a pushbutton. Electrical connection for a thirdrail-track<br />
with center rail: Connect the red cable (B) to the center rail and the black cable (0) to the track. Attention: Pay<br />
attention to the polarity! Using a double-rail-track you do not have to pay attention to the polarity. Connection of the servo<br />
motor: orange cable to the outer part (see picture). Attention: Do not connect the manual release pushbutton directly to<br />
the transformer! For programming press the pushbutton on the deco<strong>der</strong> before connecting the deco<strong>der</strong> to the current<br />
supply. Please strictly adhere to the following procedure:<br />
2. How to programm a turnout or signal address on the digital station<br />
The deco<strong>der</strong> has to be connected to the main track, not to the programming track. Important: While programming<br />
please make sure that neither a locomotive with address 66 in the Märklin data format nor a locomotive with address 66<br />
in the DCC/NMRA format are activated on the command unit. Please check this before you continue to programm. In<br />
addition we recommend making a restart of the command unit without deleting the existing database (ATTENTION: Do<br />
not make a complete reset of the system! Please follow the instruction manual of your command unit!). Switch off the<br />
power on the track (press button “STOP”). Keep the pushbutton on the deco<strong>der</strong> (see picture) pressed when you switch<br />
on the power on the track again. The red LED of the deco<strong>der</strong> flashes now. The deco<strong>der</strong> can only be programmed with an<br />
address group of 4 successive addresses (Example: 1 4, 5 8, 9 12, etc.). The deco<strong>der</strong> automatically recognizes<br />
whether it is a Märklin/Motorola or a DCC address. Now enter the address for the digital tree as a magnetic item.
Important: The first address of the group of 4 successive addresses always controls the function. Send a switching<br />
command and the red LED will go out (in our example: 1, 5, 9, etc.). Depending on the used command unit the highest<br />
address which can be chosen in the Märklin/Motorola format is address 317 and address 2045 in the DCC format. Not all<br />
command units send the complete address range. The deco<strong>der</strong> checks the switching commands while importing the<br />
address. It may happen that you have to send the switching command several times, especially if various locomotives are<br />
activated in different digital formats while importing. As soon as the red LED goes out, the programming of the deco<strong>der</strong> is<br />
finished. To release the deco<strong>der</strong> it is necessary to change the digital format of the memorized magnetic item (digital tree)<br />
on some multi-protocol command units. For this purpose call up the magnetic item and change the data format<br />
(Märklin/Motorola DCC/NMRA).<br />
3. Märklin Mobile Station 60652 (firm locomotive address):<br />
1. Install a locomotive with address 66.<br />
2. Connect the red cable to the center track and the black cable to the track. Important: Pay attention to the polarity!<br />
3. Press “STOP” on the mobile station (power OFF). Now keep the pushbutton pressed on the deco<strong>der</strong> and press again<br />
STOP on the mobile station (power ON).<br />
4. Red LED goes on and out.<br />
The deco<strong>der</strong> is now programmed with the locomotive address 66. The button “illumination” releases the function (tree<br />
falls down and is stood up again).<br />
4. ROCO Lokmaus 2 (firm locomotive address):<br />
1. Install a locomotive with address 66.<br />
2. Connect the black cable to the track.<br />
3. Send address: For this purpose press button F1 several times.<br />
4. Keep the button pressed on the deco<strong>der</strong> and connect the red cable to the track (power ON).<br />
5. Red LED goes on and out.<br />
The deco<strong>der</strong> is now programmed with the locomotive address 66. The button F1 releases the function (tree falls down<br />
and is stood up again). Note: Please strictly adhere to this procedure to ensure that the address will be sent. Do not use<br />
the button “STOP”.<br />
5. You do not remember your deco<strong>der</strong> address and have to make a deco<strong>der</strong> RESET<br />
In case you do not remember your deco<strong>der</strong> address, you can repeat the procedure previously described. If you have<br />
memorized a digital address in your deco<strong>der</strong> but if you want to analogically operate the tree directly with a model railroad<br />
transformer, you have to cancel the digital address. For that purpose switch off the current and connect the pushbutton<br />
for the analogue release. Keep the manual release pushbutton as well as the button on the deco<strong>der</strong> pressed and then<br />
switch on the current. Now the digital address of the deco<strong>der</strong> is deleted and you can release the deco<strong>der</strong> with the manual<br />
release pushbutton.<br />
6. Analog Operation<br />
The release is possible any time with the enclosed pushbutton, however you can also use a control box. ATTENTION:<br />
Make sure that the control box does not have any connection the the traction current or to the transformer.<br />
7. Problem Handling What can I do when the digital tree does not work?<br />
In case the programming does not properly work at first time:<br />
1. Carefully read the instructions and repeat the deco<strong>der</strong> programming. Please wait 3 seconds before you start<br />
programming again.<br />
2. Press the buttons on the command unit longer and more slowly / press the buttons several times.<br />
3.Change the data format of the memorized magnetic item (Märklin/Motorola DCC/NMRA)<br />
Français<br />
Avant d'utiliser ce produit, veuillez lire et suivre attentivement les consignes de sécurité et le mode d'emploi. Cet article est un<br />
produit de bricolage pour modélisme et n'est pas un jouet. Pour le montage, des outils tels une lame aiguisée, des ciseaux<br />
aiguisés ainsi qu'une colle spéciale sont nécessaires. De ce fait, un risque de blessure est possible! Pour cette raison, tenir<br />
ce produit hors de portée des enfants! Tenir absolument ce produit et les accessoires (colle, peintures, lames etc.) hors<br />
de portée des enfants de moins de 3 ans! Ne pas laisser les enfants assembler ces kits sans surveillance d'un adulte<br />
compétent. Pour l'utilisation des colles et des peintures, veuillez suivre les précautions suivantes: Ne pas manger, boire<br />
ou fumer lors de la manipulation. Eviter tout contact avec les yeux, la peau et la bouche. Ne pas inhaler les vapeurs. Tenir à<br />
l'écart des sources inflammables. Veuillez suivre attentivement le mode d'emploi et les indications du fabricant. Premiers<br />
secours en cas de contact avec les yeux: Rincer immédiatement et abondamment à l'eau en les maintenant ouverts et<br />
consulter un ophtalmologiste.<br />
<strong>NOCH</strong> GmbH & Co. KG - Lindauer Straße 49 - D-88239 Wangen im Allgäu<br />
info@noch.de - www.noch.de
<strong>NOCH</strong> <strong>micro</strong>-<strong>motion</strong> “Arbre digital” Mode d'emploi<br />
La mise en route de ce produit doit s'opérer uniquement avec une tension au maximum de 16 V en courant<br />
alternatif ou direct. Veuillez lire attentivement le mode d'emploi de votre commande <strong>digitale</strong> !<br />
Nous vous remercions d'avoir acheté un produit <strong>NOCH</strong> de haute qualité et vous souhaitons beaucoup de plaisir<br />
lors de son utilisation.<br />
Avant installation de l'arbre digital sur le réseau, bien vérifier sa fonction correcte.<br />
1. Raccordement du décodeur multiprotocole à l'alimentation en courant<br />
Le décodeur numérique accepte automatiquement des formats Märklin/Motorola (MM) ainsi que DCC/NMRA. De plus, le<br />
décodeur peut être commandé par un bouton. Branchement d'un système à 3 rails en courant alternatif : raccor<strong>der</strong> le fil<br />
rouge (B) au conducteur neutre et le fil noir au rail. Attention : bien respecter la polarité. En utilisant un système à 2 rails,<br />
il ne faut pas respecter la polarité. Branchement du servo : fil orange à l'extérieur (voir photo). ATTENTION : Ne jamais<br />
brancher le bouton d'actionnement de l'arbre directement au transformateur! Pour la programmation, appuyer sur la<br />
touche du décodeur avant de raccor<strong>der</strong> le décodeur à l'alimentation en courant. Veuillez respecter scrupuleusement cette<br />
procédé.<br />
2. Programmation d'une adresse d'aiguillage ou de signal<br />
Le raccordement du décodeur se fait à la voie principale et non pas à la voie de programmation. Important : Veillez à ce<br />
qu'aucune locomotive avec l'adresse 66 sous format Märklin/Motorola ou DCC/NMRA soit active sur la centrale<br />
numérique pendant la programmation. Vérifiez bien ceci avant chaque programmation. D'autre part, il convient<br />
d'effectuer un nouveau démarrage de la centrale numérique sans effacer les données déjà entrées. (Attention : Il ne<br />
s'agit pas d'un reset total ! Veuillez lire les instructions de votre centrale numérique !)<br />
Mettez le rail hors tension (appuyez sur la touche « STOP »). Maintenez la touche du décodeur enfoncée (voir photo)<br />
durant la nouvelle mise sous tension du rail. A présent, la LED rouge s'illumine. Le décodeur permet uniquement de<br />
programmer un seul domaine de valeurs de 4 adresses consécutives (ex : 1 4, 5 8, 9 12 etc.). Le décodeur sait<br />
automatiquement s'il s'agit d'une adresse sous format Märklin/Motorola ou du DCC. Ensuite entrez l'adresse de l'arbre<br />
digital. Important : Seule la première adresse de chaque plage de valeurs peut activer la fonction. Passez un ordre de<br />
commande et la LED rouge va s'éteindre (ex. : 1,5,9 etc). En fonction de la centrale numérique utilisée, la valeur la plus<br />
haute à choisir est l'adresse 317 sous format Märklin/Motorola et 2045 sous format DCC. Toutes les centrales<br />
numériques ne permettent pas d'envoyer le domaine entier d'adresses. En lisant les données de la configuration, le<br />
décodeur contrôle les ordres de commande. Il peut arriver qu'il faille passer l'ordre de commande plusieurs fois,<br />
particulièrement si plusieurs locomotives sont activées sous les différents formats numériques pendant l'enregistrement.<br />
Dès que la LED rouge s'éteint le décodeur est programmé. Pour certaines centrales multiprotocoles il faut changer le<br />
format numérique de l'article magnétique enregistré afin de comman<strong>der</strong> le décodeur. Pour cela activez cet article<br />
magnétique et changez le format (Märklin/Motorola DCC/NMRA).<br />
.<br />
3. Märklin Mobile Station 60652 (adresse de locomotive fixe)<br />
1. Entrez l'adresse 66 pour la locomotive<br />
2. Raccordez le fil rouge au conducteur neutre et le fil noir au rail. Important : faites attention à la polarité.<br />
3. Appuyer sur la touche « STOP » de la centrale « Mobile Station » (hors tension). En maintenant la touche enfoncée<br />
sur le décodeur, appuyez simultanément sur le bouton « STOP » de la centrale « Mobile Station » (sous tension).<br />
4. La LED rouge clignote<br />
Le décodeur est maintenant programmé à l'adresse 66. La touche « éclairage » active la fonction (l'arbre tombe/se<br />
redresse)<br />
4. ROCO Lokmaus 2 (adresse de locomotive fixe)<br />
1. Entrez l'adresse 66 pour la locomotive<br />
2. Raccordez le fil noir au rail,<br />
3. Envoyez l'adresse : appuyer la touche F1 plusieurs fois.<br />
4. Maintenez la touche enfoncée sur le décodeur et liez le fil rouge avec le rail (sous tension)<br />
5. La LED rouge clignote<br />
Le décodeur est maintenant programmé à l'adresse 66. La touche « éclairage » active la fonction (l'arbre tombe/se<br />
redresse). Remarque: Pour s'assurer que l'adresse est envoyée, il faut bien respecter ce procédé. Ne pas utiliser la<br />
touche «STOP».<br />
5. En cas d'oubli de l'adresse du décodeur et reset du décodeur<br />
Si vous avez oublié l'adresse de votre décodeur, il convient de répéter le procédé comme décrit. Si vous avez enregistré<br />
une adresse numérique dans le décodeur alors que vous désirez comman<strong>der</strong> l'arbre de manière conventionnelle avec un<br />
transformateur, il faut effacer l'adresse numérique. Mettez hors tension et branchez le bouton externe pour<br />
l'actionnement manuel. Maintenez enfoncée simultanément la touche externe ainsi que la touche sur le décodeur.<br />
Maintenant mettez sous tension. Le décodeur a oublié son adresse numérique et vous pouvez opérer le décodeur avec<br />
le bouton externe.
6. Opération conventionnelle<br />
L'opération par le bouton externe est toujours possible. Vous pouvez également utiliser un pupitre de commande.<br />
Attention : Veillez à ce que le pupitre de commande ne soit pas connecté à la voie ou au transformateur.<br />
7. Traitement des problèmes Que faire si le produit ne fonctionne pas ?<br />
Si la programmation ne fonctionne pas la première fois :<br />
1. Lire attentivement le mode d'emploi / répéter le mode de programmation du décodeur. Après 3 secondes démarrer à<br />
nouveau la configuration<br />
2. Appuyer plus longuement et plus lentement les touches sur la centrale numérique / appuyer plusieurs fois sur les<br />
touches.<br />
3. Changer le format de données de l'article magnétique installé (Märklin/Motorola DCC/NMRA)<br />
Español<br />
Antes de utilizar este producto, leer atentamente las instrucciones de seguridad y el modo de empleo. Este producto es<br />
un artículo de bricolaje para modelismo y no un juguete. Para la utilización o elaboración posterior correcta se necesitan<br />
herramientas y accesorios como un cuchillo afilado, tijeras puntiagudas y pegamento especial. El tratamiento correcto<br />
de este producto posee riesgos escondidos de lesión. ¡Por eso mantener este producto fuera del alcance de los<br />
niños! ¡En ningún momento dejar el producto así como los accesorios (pegamento, colores, cuchillos, etc.) al<br />
alcance de niños menores<br />
de 3 años! La utilización de este producto por niños deberá realizarse solo bajo<br />
vigilancia de un adulto modelista.<br />
Durante el bricolaje con este producto aten<strong>der</strong> en todo caso las indicaciones siguientes: no comer, beber ni<br />
fumar. Evitar el contacto de colores o pegamento con la piel, boca y los ojos. Evitar la inhalación de vapores. No exponer<br />
a fuentes de calor. Seguir exactamente las instrucciones e indicaciones del fabricante. En caso de contacto con los ojos<br />
lavar con abundante agua manteniendo los párpados abiertos y buscar atención medica inmediatamente.<br />
Antes de montar el árbol en el paisaje es imprescindible de poner la función del árbol en prueba.<br />
Instrucciónes de manejo <strong>NOCH</strong> <strong>micro</strong> <strong>motion</strong> „árbol digital“<br />
La tensión máxima de funcionamiento para el producto es de 16 V CA/CC. Por favor sigue las instrucciones de<br />
seguridad y de manejo de su panel de control digital.<br />
Muchas gracias por haber elegido este producto de alta calidad de <strong>NOCH</strong>. ¡Le deseamos que disfrute del árbol<br />
digital!<br />
1. Conectar el decodificador digital de protocolo multiple a la corriente<br />
El decodificador digital reconoce automaticamente las señales (ordenes) para locomotoras e árticulos magneticos que<br />
recibe de los sistemas Märklin/Motorla (MM) o estándar DCC/NMRA. Adicionalmente se puede también activar el<br />
decodificador manualmente mediante el botón pulsador. Para conectar un sistema de tres carriles con conductor neutro<br />
a la corriente se debe: conectar el cable rojo (B) al conductor neutro y el cable negro (0) a la vía. Atención: Respeten la<br />
polaridad al conectar. Para sistemas de dos carriles no hay que respetar la polaridad. Para conectar el servomando:<br />
cable de color naranja hacia afuera (véase imagen). ¡Atención: Nunca conectar el pulsador con el transformador en<br />
directo! Para programar el decodificador pulsar la tecla del decodificador antes de encen<strong>der</strong> el suministro de tensión.<br />
Seguir el procedimiento siguiente exactamente como se le describe.<br />
2. Programación de una central digital para una dirección de aguja o señal.<br />
Conectar el decodificador solamente a la vía principal y nunca a la vía de programación. Importante: Durante el proceso<br />
de programación no se debe de tener activado en la central digital una locomotora con dirección 66 en formato<br />
Märklin/Motorla asi como DCC/NMRA. Compruebe esto por favor antes de continuar con la programación. Reanudar<br />
ahora el sistema sin borrar los datos existentes. (¡Atención: aqui no se habla de un reset total del sistema!) Sigue las<br />
instrucciones de su central digital para la reanudación. Apagar la tension de la via (pulsando la tecla “STOP”). Mantener<br />
pulsado el pulsador del decodificador (véase imagen) y encen<strong>der</strong> al mismo tiempo la tensión de la vía. La LED roja del<br />
decodificador se iluminará ahora. El decodificador se puede programar solamente a un grupo de cuatro direcciones<br />
seguidas (p.e. 1-4, 5-8, 8-12 etc.) El decodificador reconoce automáticamente si se trata de una dirección<br />
Märklin/Motorola o DCC estándar. Memorize ahora la dirección del árbol á traves de un árticulo magnetico.<br />
Importante: Siempre es la primera dirección del grupo de los cuatro que regula la función. Mandar ahora una orden de<br />
mando con lo cual se apaga la LED roja (en nuestro ejemplo es la 1, 5, 9, etc.) Depende de la central digital que se<br />
utiliza se tiene un valor de dirección maximo de 317 para el sistema Märklin/Motorola y un valor máximo de 2045 para el<br />
sistema DCC. No todas centrales <strong>digitale</strong>s mandan el sector completo de direcciones. El decodificador comprueba la<br />
orden de mando durante el proceso de memorización de la dirección. Puede occurir que tenga que mandar la orden de<br />
mando varias vezes. Sobre todo si están activadas varias locomotoras de diferentes formatos <strong>digitale</strong>s durante el<br />
proceso de acopio de la dirección. En cuanto se apaga la LED roja el decodificador está programado.<br />
<strong>NOCH</strong> GmbH & Co. KG - Lindauer Straße 49 - D-88239 Wangen im Allgäu<br />
info@noch.de - www.noch.de
En algunas centrales <strong>digitale</strong>s de multiprotocolo es necesario de cambiar el formato digital del articulo magnetico<br />
memorizado. Activar para ello el articulo magnetico y cambiar el formato de datos (Märklin/Motorola DCC/NMRA).<br />
3. Märklin Mobile Station 60652 (dirección de locomotora fija):<br />
1. Programar una locomotora a la dirección 66<br />
2. Conectar el cable rojo al conductor neutro y el cable negro a la vía. Importante: Tenga en cuenta la polaridad.<br />
3. Presionar la tecla „STOP“ en la Mobile Station (La corriente esta en OFF). Mantenga ahora pulsado el pulsador del<br />
decodificador y pulsar de nuevo le tecla STOP en la Mobile Station (corriente está en ON).<br />
4. La LED roja se ilumina y se apaga en continuación. El decodificador esta ahora programado a la dirección 66. La tecla<br />
“iluminación“ pone la función en marcha. (El árbol se tumba y se repone.)<br />
4. ROCO Lokmaus 2 (dirección de locomotora fija):<br />
1. Programar una locomotora a la dirección 66<br />
2. Conectar el cable negro a la vía.<br />
3. Mandar ahora la dirección: Pulsar la tecla F1 varias veces.<br />
4. Mantenga pulsado el pulsador del decodificador y conecte el cable rojo con la vía (corriente esta en ON)<br />
5. La LED roja se ilumina y se apaga en continuación.<br />
El decodificador está ahora memorizado a la dirección 66 de la locomotora. La tecla F1 pone la función en marcha. (El<br />
árbol se tumba y se repone)<br />
Indicación: Para asegurar que la dirección se memorize, es imprescindible de seguir exactamente dichas instrucciones.<br />
Por favor no pulse la tecla “STOP”.<br />
5.Olvido de la dirección del decodificador y RESET del decodificador<br />
Si se ha olvidado la dirección del decodificador, simplemente repetir el procedimiento anterior. Si se ha memorizado una<br />
dirección digital en el decodificador y se quiere conectarlo posteriormente de manera convencional a un transformador<br />
se tiene que borrar primero la dirección digital. Apague para ello la corriente y conecte el pulsador para la activación<br />
manual. Pulsar el pulsador externo y el pulsador del decodificador al mismo tiempo. Poner la corriente en marcha. El<br />
decodificador ha borrado ahora la dirección digital y desde luego se puede activar el decodificador manualmente<br />
mediante el pulsador externo.<br />
6. Activación manual del árbol<br />
Siempre se tiene la posibilidad de activar manualmente el movimiento del árbol con el botón pulsador adjunto. Se puede<br />
usar para ello también un pupitre de mando. . Atencíon: El pupitre de mando no debe ser conectado a la vía o al<br />
transformador.<br />
7. Tratamiento de problemas ¿Que puedo hacer sí el producto no funciona?<br />
Si la programación no funciona por primera vez:<br />
1. Leer atentamente las instrucciones de manejo / Repetir la programación del decodificador. Esperar tres segundos<br />
antes de introducir los datos de nuevo.<br />
2. Púlsar las teclas de la central digital más lento y con más tiempo. / Pulsar las teclas varias veces.<br />
3. Cambiar el formato memorizado del árticulo magnetico (Märklin/Motorola DCC/NMRA).<br />
Ne<strong>der</strong>lands<br />
Voor gebruik de veiligheidswaarschuwingen en instructies goed lezen en in acht nemen. Dit product is een modelbouwknutsel-artikel<br />
en geen speelgoed. Voor de juiste toepassing en verwerking is gereedschap en toebehoren zoals een<br />
scherp mes, een scherpe schaar en speciale lijm nodig. Vakkundige verwerking van dit modelbouwproduct vormt<br />
kans op letsel! Daarom buiten bereik van kin<strong>der</strong>en houden! Dit product en toebehoren (lijm, verf, messen enz.)<br />
absoluut buiten bereik van kin<strong>der</strong>en on<strong>der</strong> de 3 jaar houden! Laat kin<strong>der</strong>en alleen on<strong>der</strong> vakkundige begeleiding<br />
van een volwassen modelbouwer deze bouwset bewerken. Let bij het in elkaar zetten van dit product absoluut<br />
op: niet eten, drinken of roken. Verf en lijm niet in aanraking brengen met ogen, huid of mond. Niet inademen. Verwij<strong>der</strong>d<br />
houden van ontstekingsbronnen. De handleiding en instructies van de fabrikant nauwkeurig opvolgen. Eerste hulp bij<br />
oogcontact: ogen open houden en met stromend water uitspoelen en. Direct een arts raadplegen. Voor het inbouwen<br />
in het landschap eerst de werking controleren.<br />
Het product mag alleen met een maximale spanning van 16V AC/DC worden gebruikt. Let op de veiligheidseisen<br />
en de handleiding van uw <strong>digitale</strong> besturing!<br />
Hartelijk dank, dat u voor een hoogwaardig product van <strong>NOCH</strong> hebt gekozen. Wij wensen u daarmee veel plezier.<br />
1. Aansluiten van de multiprotocoldeoc<strong>der</strong> op de voeding.<br />
De <strong>digitale</strong> deco<strong>der</strong> herkent volautomatisch Märklin/Motorola (MM) en DCC/NMRA schakelopdrachten voor locs en<br />
magneetartikelen. Als extra kan de deco<strong>der</strong> worden geschakeld door een drukknop.
Stroomaansluiting bij drie-gelei<strong>der</strong> met middengelei<strong>der</strong>: rode draad (B) op de middengelei<strong>der</strong> en zwarte draad (0) op de<br />
spoorstaaf aansluiten. Let op: Hier moet op de polariteit gelet worden. Bij twee-gelei<strong>der</strong> rails hoeft men niet op de<br />
polariteit te letten. Servo aansluiting: oranje draad naar buiten (foto).<br />
LET OP: De drukknopaansluitingen nooit direct met de trafo verbinden!<br />
Voor het programmeren moet eerst de drukknop op de deco<strong>der</strong> worden ingedrukt, voor de deco<strong>der</strong> van stroom wordt<br />
voorzien. De hieron<strong>der</strong> beschreven procedure moet precies worden opgevolgd.<br />
2. Programmeren van een „<strong>digitale</strong> centrale“ op een wissel- of seinadres<br />
De deco<strong>der</strong> wordt aangesloten op het hoofdspoor en niet op het programmeerspoor. Belangrijk: Tijdens het<br />
programmeren mag er op de <strong>digitale</strong> unit geen loc actief zijn met het adres 66 in Märklin-Motorola-format en geen loc met<br />
adres 66 in DCC/NMRA-format. Controleer dit voor u ver<strong>der</strong> gaat met programmeren. Ver<strong>der</strong> moet u de <strong>digitale</strong> centrale<br />
opnieuw starten, zon<strong>der</strong> de reeds aanwezige databestanden te wissen (LET OP: hier is geen totale reset van het<br />
systeem bedoeld! Kijk in het handboek van uw <strong>digitale</strong> centrale!).<br />
Schakel de railspanning uit („STOP“-toets indrukken). De drukknop op de deco<strong>der</strong> ingedrukt houden (foto), tijdens het<br />
weer inschakelen van de stroom op de rails. De rode LED van de deco<strong>der</strong> licht op. De deco<strong>der</strong> kan uitsluitend worden<br />
geprogrammeerd op een adresgroep van vier opeenvolgende adressen (voorbeeld: 1-4, 5-8, 9-12, enz.). De deco<strong>der</strong><br />
herkent automatisch of het om een Märklin/Motorola of een DCC adres gaat. Maak nu een magneetartikel aan.<br />
Belangrijk: Het eerste adres van een adresgroep van vier schakelt steeds de functie. Stuur nu een schakelopdracht<br />
waarna de rode LED dooft (in ons voorbeeld: 1,5,9, enz.). Afhankelijk van het gebruik van de <strong>digitale</strong> centrale is het<br />
hoogst te kiezen adres bij Märklin/Motorola format het adres 317 en bij DCC format het adres 2045. Niet alle centrale<br />
zenden het hele adresbereik.<br />
De deco<strong>der</strong> controleert tijdens het inlezen van het adres de schakelopdrachten. Het kan voorkomen dat en<br />
schakelopdracht meer<strong>der</strong>e malen gezonden moet worden. Zeker wanneer tijdens het inlezen meer<strong>der</strong>e locs in de<br />
verschillende digitaalformats actief zijn. Zodra de rode LED uit gaat is de deco<strong>der</strong> geprogrammeerd. Bij sommige<br />
multiprotocol centrales is het noodzakelijk het digitaalformat van het opgeslagen magneetartikel voor de werking van de<br />
deco<strong>der</strong> te veran<strong>der</strong>en. Roep daarvoor het magneetartikel op en veran<strong>der</strong> het dataformat (Märklin/Motorola <br />
DCC/NMRA).<br />
3. Märklin Mobile Station 60652 (vast locadres):<br />
1. Maak een loc met het adres 66.<br />
2. Rode draad op de middengelei<strong>der</strong> en zwarte draad op de railstaaf aansluiten. Belangrijk: Let op de polariteit.<br />
3. „STOP“ op het Mobile Station indrukken (stroom uit). Nu de drukknop op de deco<strong>der</strong> ingedrukt houden (foto 2) en<br />
STOP op het Mobile Station opnieuw indrukken (stroom aan).<br />
4. Rode LED gaat aan en uit.<br />
De deco<strong>der</strong> is nu op het locadres 66 geprogrammeerd. De drukknop „Verlichting“ schakelt de functie (boom valt/ weer<br />
oprichten).<br />
4. ROCO Lokmaus 2 (vast locadres):<br />
1. Maak een loc met het adres 66.<br />
2. Zwarte draad op de rails aansluiten.<br />
3. Adres zenden: daarvoor toets F1 meer<strong>der</strong>e malen indrukken.<br />
4. Drukknop op de deco<strong>der</strong> ingedrukt houden (foto 2) en de rode draad met de rails verbinden (stroom aan).<br />
5. Rode LED gaat aan en uit.<br />
De deco<strong>der</strong> is nu op het locadres 66 geprogrammeerd. De toets F1 schakelt de functie (boom valt/ weer oprichten).<br />
Opmerking: om het adres te zenden, moet het proces nauwkeurig worden opgevolgd. De „STOP“-toets niet gebruiken.<br />
5. Deco<strong>der</strong>adres vergeten en deco<strong>der</strong> RESET<br />
Mocht u het deco<strong>der</strong>adres een keer vergeten zijn, dan kunt u de hiervoor beschreven procedure herhalen. Heeft u een<br />
digitaaladres in de deco<strong>der</strong> opgeslagen en wilt u de boom analoog daarna weer gaan gebruiken, direct op een<br />
modelspoortrafo, dan moet u het digitaaladres wissen. Schakel daartoe de stroom uit en sluit de drukknop voor de<br />
analoge besturing aan. Houd de externe drukknop voor het schakelen en de drukknop op de deco<strong>der</strong> ingedrukt. Schakel<br />
dan de stroom aan. Nu heeft de deco<strong>der</strong> het digitaaldadres gewist en kunt u de deco<strong>der</strong> met de externe drukknop in<br />
werking stellen.<br />
6.Analoog gebruik<br />
Het schakelen via de bijgevoegde drukknop is altijd mogelijk. U kunt ook een schakelblok gebruiken. LET OP: het<br />
schakelblok mag geen verbinding hebben met de modelspoorstroom of met de trafo.<br />
7. Problemen oplossen Wat doe ik, wanneer het artikel niet werkt?<br />
Werkt het programmeren niet bij de eerste keer:<br />
1. Handleiding nauwkeurig lezen / deco<strong>der</strong> programmering herhalen. 3 seconden wachten voor het opnieuw inlezen.<br />
2. Toetsen op de <strong>digitale</strong> centrale langer en langzamer indrukken / toetsen meer<strong>der</strong>e malen indrukken.<br />
3. Dataformat van het ingestelde magneetartikel veran<strong>der</strong>en (Märklin/Motorola DCC/NMRA).<br />
<strong>NOCH</strong> GmbH & Co. KG - Lindauer Straße 49 - D-88239 Wangen im Allgäu<br />
info@noch.de - www.noch.de