

Sony SU-WL450 - SU-WL450 Informations d'installation du support de fixation murale Slovénien
Sony SU-WL450 - SU-WL450 Informations d'installation du support de fixation murale Slovénien
Sony SU-WL450 - SU-WL450 Informations d'installation du support de fixation murale Slovénien

You also want an ePaper? Increase the reach of your titles
YUMPU automatically turns print PDFs into web optimized ePapers that Google loves.
3 Bundle the AC Adapter using<br />
the cable hol<strong>de</strong>rs (supplied<br />
with the TV). Make sure that the<br />
label is facing outwards when<br />
bundling AC adapter.<br />
For KDL-48W60B/48W58B/48R48B/<br />
40W60B/40R48B/40R45B<br />
For KDL-32R43B/32R41B<br />
Installing the TV on the wall<br />
1 Connect the necessary cable(s)<br />
to the TV.<br />
Make sure to connect the cables before<br />
installing the TV on the wall. You will be<br />
unable to connect the cables when the TV<br />
is installed.<br />
Refer to the Reference Gui<strong>de</strong> supplied with<br />
your TV.<br />
Note<br />
ˎˎSubcontract the cable routing in the wall to a licensed<br />
contractor.<br />
ˎˎBundle the connecting cables to prevent stepping on<br />
them before wall mounting.<br />
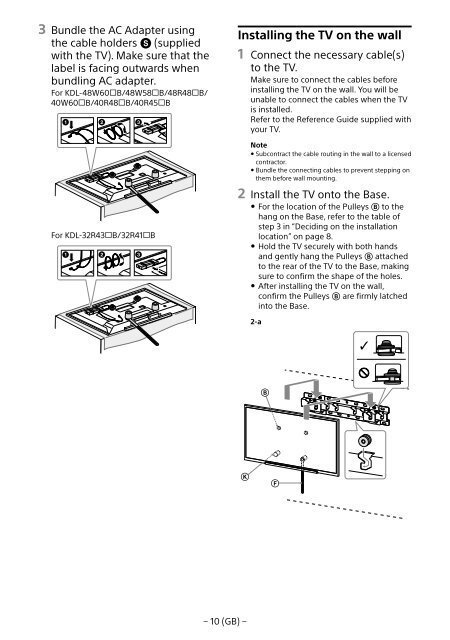
2 Install the TV onto the Base.<br />
ˎˎFor the location of the Pulleys to the<br />
hang on the Base, refer to the table of<br />
step 3 in “Deciding on the installation<br />
location” on page 8.<br />
ˎˎHold the TV securely with both hands<br />
and gently hang the Pulleys attached<br />
to the rear of the TV to the Base, making<br />
sure to confirm the shape of the holes.<br />
ˎˎAfter installing the TV on the wall,<br />
confirm the Pulleys are firmly latched<br />
into the Base.<br />
2-a<br />
<br />
<br />
<br />
− 10 (GB) −


