
You also want an ePaper? Increase the reach of your titles
YUMPU automatically turns print PDFs into web optimized ePapers that Google loves.
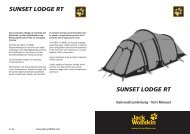
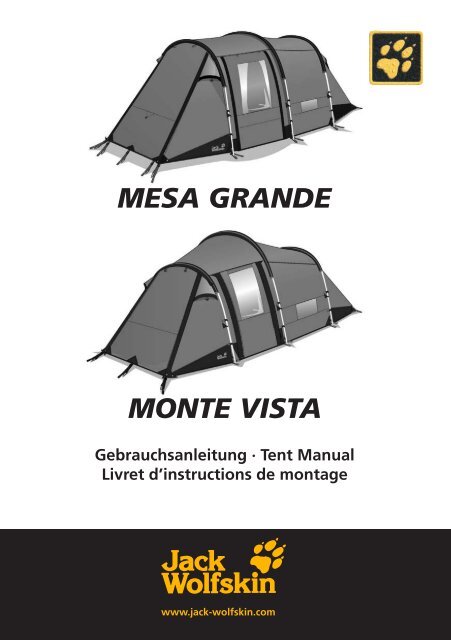
mesa grande<br />
monte Vista<br />
Gebrauchsanleitung · Tent Manual<br />
Livret d’instructions de montage
mesa grande /<br />
monte Vista<br />
MESA GRANDE MONTE VISTA<br />
ZeLtPaCKsaCKinHaLt<br />
· 1 Innenzelt/Außenzelt-<br />
Kombination/Bodenschutzwanne<br />
· 21 Heringe, Reparaturmaterialien<br />
& Nahtabdichter im Heringspack -<br />
beutel<br />
· 1 Stangenpackbeutel mit:<br />
3 vorgebogene Stahlstangen<br />
1 Reparaturhülse<br />
Contents oF tent PaCK saCK<br />
· 1 inner tent/ flysheet combination/<br />
additional groundsheet tarp<br />
· 21 pegs, repair materials & seam<br />
sealant in peg bag<br />
· 1 pole bag containing:<br />
3 pre-bent steel poles<br />
1 pole repair sleeve<br />
ContenU dU saC de tente<br />
· 1 tente intérieure/ensemble double<br />
toit bâche de sol supplémentaire<br />
· 21 piquets, matériel de<br />
réparation & mastic d’étanchéité<br />
dans le sac de piquets<br />
· 1 sac d’armatures<br />
· 3 Armatures en acier<br />
· 1 douille de réparation<br />
JACK WOLFSKIN entwickelt seine Produkte ständig weiter. Wir behalten uns vor, einzelne Komponenten zu verändern.<br />
Abbildungen der Aufbauanleitung können vom aktuellen Produkt abweichen.<br />
At JACK WOLFSKIN we are continually improving and upgrading our products. We therefore reserve the right to make<br />
changes to individual components. Diagrams used for the pitching instructions may differ slightly from the actual product.<br />
JACK WOLFSKIN développe et améliore ses produits en permanence. De ce fait nous nous réservons la possibilité de modifier<br />
certains composants. Les illustrations du mode de montage peuvent différer légèrement de celles du produit actuel.<br />
2
BeLÜFtUng<br />
Ihr Zelt ist mit ausreichenden Belüftungsmöglichkeiten<br />
ausgestattet. Sorgen Sie immer für<br />
eine gute Luftzirkulation um die Gefahr der<br />
Kondenswasserbildung zu vermindern. Dennoch<br />
ist Kondenswasserbildung unvermeidbar.<br />
Verwechseln Sie Kondenswasser bitte nicht mit<br />
eindringender Feuchtigkeit.<br />
PFLege<br />
Reinigen Sie Ihr Zelt in aufgebautem Zustand<br />
ausschließlich mit Wasser und wenig Seife. Befreien<br />
Sie vor allem die Reißverschlüsse regelmäßig<br />
von Schmutz und Sand. Auf keinen Fall<br />
in die Waschmaschine oder Reinigung geben,<br />
da hier die Beschichtung irreversibel zerstört<br />
werden kann. Geeignete Silikonschmiermittel<br />
schützen Stangen vor Korrosion und Reißverschlüsse<br />
vor dem Einfrieren.<br />
FeUer<br />
Offenes Feuer und Flammen sind eine Gefahr<br />
für Zeltgewebe. Vermeiden Sie offenes Feuer<br />
in unmittelbarer Nähe des Zeltes.<br />
VentiLaton<br />
Your tent is equipped with sufficient ventilation<br />
options. Try to ensure that there is always<br />
a good flow of air through the tent to reduce<br />
the risk of condensation build-up. However,<br />
condensation cannot completely be avoided.<br />
Please do not confuse condensation with<br />
actual water penetration through the fabric of<br />
the tent.<br />
Care and maintenanCe<br />
Clean your tent when pitched, using only a little<br />
soap and water. Zips in particular should be<br />
cleaned regularly to remove dirt and grit. On<br />
no account should the tent be machine washed<br />
or dry cleaned, since this could cause irreversible<br />
damage to the protective coating on the<br />
tent fabric. Suitable silicone-based lubricants<br />
protect poles from corrosion and prevent zips<br />
freezing.<br />
Fire PreVention<br />
Open fires and flames are a hazard for tent<br />
materials. Avoid naked flames in the immediate<br />
vicinity of the tent.<br />
VentiLation<br />
Votre tente est suffisamment équipée<br />
d’options pour une bonne ventilation. Assurezvous<br />
de toujours avoir une bonne circulation<br />
d’air dans la tente pour réduire la condensation.<br />
Malgré tout il est impossible de prévenir<br />
totalement la formation d’eau de condensation.<br />
Ne confondez pas cependant eau de<br />
condensation et pénétration d’eau au travers<br />
de la toile de tente.<br />
entretien<br />
Nettoyez votre tente montée, uniquement<br />
à l’eau un peu savonneuse. Les fermetures à<br />
glissière doivent être nettoyées régulièrement<br />
pour les débarrasser de la saleté et du sable.<br />
Ne surtout pas laver la tente à la machine, ne<br />
pas faire à nettoyer à sec, ces types de nettoyage<br />
causeraient une altération irréversible de<br />
l’enduit protecteur de la toile. Des lubrifiants<br />
appropriés à base de silicone, protègent les<br />
arceaux de la corrosion et les fermetures à<br />
glissière du gel.<br />
FeU<br />
Le feu confiné et toute flamme en général<br />
représentent un risque pour la toile. Évitez<br />
d’approcher toute flamme nue de la toile.<br />
3
PHase 1<br />
Beim ersten Aufbau: Sie sollten Ihr<br />
neues Zelt erst einmal probeweise<br />
aufbauen, und sich vor Antritt der<br />
ersten Reise mit allen Aufbauschritten<br />
vertraut machen.<br />
Wählen Sie zunächst einen geeigneten<br />
Standort für Ihr Zelt aus (1) und entfernen<br />
Sie dort alle spitzen Gegenstände,<br />
die den Zeltboden beschädigen könnten.<br />
Breiten Sie Ihr Zelt flach auf dem<br />
Boden aus und fügen Sie die Segmente<br />
der Stahlstangen sorgfältig zusammen,<br />
so dass diese fest ineinander sitzen (2).<br />
Achten Sie darauf, dass während des<br />
Aufbaus alle Reißverschlüsse geschlossen<br />
sind.<br />
4<br />
Pitching your tent for the first time:<br />
We recommend you to do a dry run<br />
pitching your new tent, in order to<br />
become familiar with all the pitching<br />
instructions before your first trip.<br />
Choose a suitable pitching site (1),<br />
removing all sharp objects which may<br />
damage the groundsheet. Spread out<br />
the tent on the ground and carefully<br />
connect all pole sections, ensuring a<br />
tight fit (2).<br />
Ensure that all zips are closed when<br />
pitching the tent.
Le premier montage de votre tente:<br />
Afin de vous familiariser avec les<br />
instruc-tions de montage nous vous<br />
conseillons de faire un essai de montage<br />
de votre tente neuve avant de<br />
partir en voyage.<br />
Choisissez d’abord un emplacement<br />
approprié pour dresser votre tente<br />
(1), en prenant soin d’enlever tous les<br />
objets pointus pouvant endommager<br />
le tapis de sol de la tente. Étalez votre<br />
tente à plat sur le sol et assemblez<br />
soigneuse-ment tous les arceaux, de<br />
manière à ce qu’ils soient bien emboîtés<br />
les uns dans les autres (2). Assurez à<br />
ce que toutes les fermetures à glissière<br />
soient bien fermées pendant le montage<br />
de la tente.<br />
5
PHase 2<br />
Führen Sie die Stangen nun vorsichtig<br />
in die entsprechenden außen liegenden<br />
Stangenkanäle ein (1). Wenden<br />
Sie keine Gewalt an. Wenn Sie auf<br />
Widerstand stoßen während Sie die<br />
Stangen einführen oder spannen,<br />
machen Sie das Problem ausfindig und<br />
beheben Sie es. Setzen Sie die Stangen<br />
unter Spannung, indem Sie die Stangenenden<br />
in die RING & PIN – Vorrichtung<br />
am verstellbaren Bodengurtband<br />
einstecken (2). Spannen Sie nun das<br />
Gurtband für eine straffe Stangenfixierung<br />
(3). Befestigen Sie nun final die<br />
Kunststoff-Clips an den Stangen (4).<br />
6<br />
Carefully insert the poles into their<br />
respective external pole channels (1).<br />
Do not use force. If resistance is met<br />
when the poles are inserted or tensioned,<br />
check and remedy the problem.<br />
Tension the poles by inserting the<br />
RING & PIN pole pins into the open<br />
ends of the pole channels (2) and<br />
tightening the guying tape at ground<br />
level (3).<br />
Fix the plastic clips to the bare pole<br />
parts (4).
Introduisez les arceaux d’armature<br />
dans leurs fourreaux extérieures correspon-dants<br />
avec précaution (1). Ne<br />
forcez pas. Si vous vous heurtez à de la<br />
résistance pendant que vous introduisez<br />
les arceaux ou que vous les tendez,<br />
cherchez-en la cause et éliminez-la.<br />
Tendez les arceaux, afin de mettre les<br />
extrémités des mâts dans le mécanisme<br />
„RING & PIN“ aux sangles de bande<br />
du sol (2). Tendez ensuite la sangle de<br />
bande pour obtenir une bonne fixation<br />
des armatures (3). Enfin, fixez les<br />
clips en plastique aux armatures (4).<br />
7
PHase 3<br />
Stellen Sie sicher, dass alle Reißverschlüsse<br />
geschlossen sind und fixieren<br />
Sie Ihr Zelt am Fußende (1).<br />
Nehmen Sie dann die beiden vorderen<br />
Apsidenbefestigungen in die Hand<br />
und ziehen Sie das Zelt nach vorne hin<br />
wie eine Ziehharmonika auseinander.<br />
Richten Sie das Zelt gerade aus und<br />
spannen Sie die vordere und hintere<br />
Apsis an den Abspannpunkten mit<br />
Heringen.<br />
Achten Sie darauf, dass die Bodenspannbänder<br />
des Außenzeltes gleichmäßig<br />
gespannt sind und das Zelt in<br />
einer Linie steht (2).<br />
8<br />
45°<br />
Making sure all zips are closed, anchor<br />
your tent at the rear end (1).<br />
Next, take hold of the two front<br />
porch anchor points and pull the tent<br />
forward, opening it up like a concertina.<br />
Straighten the tent and peg out the<br />
front and rear porches. Make sure<br />
that the flysheet guying tapes at<br />
ground level are equally tensioned<br />
and that the tent is positioned in a<br />
straight line (2).
Après que vous vous êtes assuré que<br />
toutes les fermetures à glissière soient<br />
fermées,fixez l’arrière de votre tente<br />
avec un piquet. Puis saisissez les deux<br />
boucles de tension de l’abside d’entrée<br />
et déployez votre tente en la tirant<br />
vers l’avant comme un accordéon. Tendez<br />
la tente jusqu’à ce qu’elle soit bien<br />
droite en fixant les piquets de l’abside<br />
frontal et arrière (1).<br />
Assurez-vous que les fixations des<br />
hau-bans du double toit au niveau du<br />
sol soient tendues de manière égale et<br />
que le positionnement de la tente soit<br />
en ligne droite (2).<br />
9
PHase 4<br />
Bodenplane<br />
Fixieren und straffen Sie die vorderen<br />
Schlaufen der Bodenplane an den<br />
Heringen der vorderen Überzeltschlaufen.<br />
10<br />
Groundsheet tarp<br />
Attach the front loops of the groundsheet<br />
tarp to the pegs anchoring the<br />
front loops of the flysheet and tension<br />
them to pull the groundsheet flat.
Bâche de sol<br />
Utilisez les piquets pour fixer et tendre<br />
les tirants avant de la bâche de sol aux<br />
tirants de la tente extérieure.<br />
11
PHase 5<br />
Fixieren und straffen Sie nachfolgend<br />
alle übrigen Befestigungsschlaufen (1).<br />
Spannen Sie Ihr Zelt anschließend mit<br />
Hilfe der dafür vorgesehenen Abspannleinen<br />
und der restlichen Heringe<br />
sturmstabil aus (2).<br />
Bei Nässe kann sich das Zeltmaterial<br />
dehnen. Es muss dann etwas nachgespannt<br />
werden (1).<br />
12<br />
Continue to tension the tent by pegging<br />
out the remaining anchor points<br />
(1).<br />
Peg out the remaining guy lines to<br />
make the tent wind stable (2).<br />
When wet, the polyester flysheet<br />
material may stretch slightly. Re-guy<br />
where necessary .
Fixez et tendez ensuite tous les tirants<br />
de fixation restants. (1).<br />
Tendez ensuite votre tente à l’aide<br />
des haubans et piquets prévus à cet<br />
effet, de manière à ce qu’elle résiste<br />
aux intempéries (2).<br />
Par temps humide il est possible que<br />
le tissu se dilate. Il faudra alors retendre<br />
la tente.<br />
45°<br />
13
inFo<br />
reParatUren<br />
Reparaturmaterialien<br />
für<br />
kleine Reparaturenunterwegs<br />
liegen<br />
bei. Produktionsfehler werden im Rahmen der<br />
Garantieleistungen repariert. Andere Reparaturen<br />
führen wir gegen eine Gebühr gerne<br />
aus. Schicken Sie das gereinigte Zelt mit klarer<br />
Reparaturkennzeichnung/-anweisung und Ihrem<br />
Kaufbeleg über Ihren Fachhändler ein.<br />
LagerUng<br />
Bevor Sie Ihr Zelt längere Zeit lagern, muss es<br />
vollkommen durchgetrocknet sein, sonst besteht<br />
Gefahr von Schimmel- und Stockfleckenbildung.<br />
UV straHLUng<br />
Ultraviolette (UV) Strahlung zerstört mit der Zeit<br />
alle modernen Zeltmaterialien. Das spezielle<br />
Polyester-Zeltmaterial erhöht die Lebensdauer<br />
gegenüber herkömmlichen Nylon-Zeltmaterialien,<br />
kann aber auch auf Dauer der Natur nicht trotzen.<br />
Bitte vermeiden Sie deshalb dauerhafte intensive<br />
Sonneneinwirkung. <strong>Jack</strong> <strong>Wolfskin</strong> übernimmt<br />
keine Garantie für Schäden durch UV Strahlung.<br />
rePairs<br />
Repair materials for minor repairs during usage<br />
are provided. Production faults will be repaired<br />
under the terms of our guarantee. Our service<br />
department will be pleased to perform other<br />
repairs for a small charge. Please send in your<br />
cleaned tent via your nearest dealer, enclosing<br />
clear repair instructions and proof of purchase.<br />
storage<br />
Allow your tent to dry thoroughly while still<br />
assembled before storing it for any longer<br />
period. This will prevent mildew and damp<br />
stains forming.<br />
UV LigHt<br />
Ultraviolet (UV) radiation reduces the tearstrength<br />
of all tent materials in the course of<br />
time. The special polyester tent material increases<br />
the service life in comparison with conventional<br />
nylon materials. Tent materials, however,<br />
cannot permanently defy the effects of nature.<br />
Therefore, please avoid subjecting the tent to<br />
intensive sunlight for extended periods of time.<br />
JACK WOLFSKIN will not assume any liability for<br />
damage caused by ultraviolet light.<br />
14<br />
rÉParations<br />
Le matériel pour les petites réparations en cours<br />
de voyage est fourni avec la tente. Tout défaut<br />
de fabrication est couvert par la garantie. Nous<br />
effectuons volontiers les autres réparations<br />
contre paiement à un tarif raisonnable. Veuillez<br />
nous envoyer la tente nettoyée, en joignant<br />
le ticket de caisse, par l’intermédiaire de votre<br />
magasin spécialisé le plus proche, avec de claires<br />
instructions de réparation.<br />
stoCKage<br />
Avant d’être stockée pendant une durée prolongée,<br />
la tente doit être entièrement sèche, afin<br />
de prévenir la formation de moisissures et de<br />
tâches d‘humidité.<br />
raYonnement ULtraVioLet<br />
Avec le temps, les rayons ultraviolets réduisent la<br />
résistance de toutes les toiles de tente. La toile<br />
spéciale en polyester accroît la longévité de la<br />
tente par rapport à celles en Nylon traditionnelles,<br />
mais à la longue, elle ne peut résister de<br />
manière permanente aux effets de la nature.<br />
De ce fait nous vous prions donc d’éviter toute<br />
exposition intensive de longue durée au soleil.<br />
JACK WOLSKIN n’assume aucune garantie pour<br />
les dommages causés par les rayons ultraviolets.
Weitere tiPPs<br />
Ihr MESA GRANDE / MONTE VISTA hat unterschiedlich<br />
lange Stahlstangen. MONTE VISTA:<br />
Die lange Stange kommt in die Mitte, die beiden<br />
kürzeren Stangen bilden die Zeltfront und<br />
das Fußende. MESA GRANDE: Die beiden langen<br />
Stangen bildenden Zelteingangsbereich – die<br />
kurze das Fußende. Farbliche Markierungen<br />
helfen beim Einfädeln in die richtigen Stangenkanäle.<br />
Überprüfen Sie die verstellbaren Gurtbänder<br />
an den Ring & Pin Stangenfixierungen:<br />
Nur die stramme Grundspannung der Stangen<br />
ist die Vorraussetzung für besten Stand und<br />
Sturmstabilität Ihres Zeltes. Ihr Zelt ist zusätzlich<br />
mit einer kompletten, herausnehmbaren Bodenplane<br />
ausgestattet. Achten Sie beim Aufbau<br />
peinlich darauf, dass die Bodenplane nicht unter<br />
dem Überzelt hervorsteht, damit kein Wasser<br />
ins Zeltinnere dringen kann.<br />
naHtdiCHter<br />
Die wichtigsten Nähte sind mit einer speziellen<br />
Nahtbandversiegelung versehen. Es empfiehlt<br />
sich Nahtstellen, in die Bänder oder Gummilitzen<br />
mit eingefasst sind und die so die Bandabklebung<br />
unterbrechen, von innen und außen<br />
zusätzlich mit beiliegendem PU Nahtdichter<br />
abzudichten. Eine Garantie für die Verklebung<br />
ist ausgeschlossen.<br />
FUrtHer tiPs<br />
Your MESA GRANDE/ MONTE VISTA has steel<br />
poles of different lengths. On the MONTE<br />
VISTA the long pole goes in the middle. On the<br />
MESA GRANDE the two long poles form the<br />
entrance area. Colour coded marks help in locating<br />
the correct pole channel. Check to ensure<br />
that the poles are positioned and tensioned<br />
correctly. This is the prerequisite for a secure,<br />
wind stable pitch. Your tent is equipped with<br />
an additional removable groundsheet tarp.<br />
When pitching the tent, ensure that the<br />
groundsheet tarp does not protrude from<br />
beneath the flysheet to prevent water penetrating<br />
through into the inside of the tent.<br />
seam seaLant<br />
The important seams are specially tape sealed.<br />
However we do recommend additional sealing<br />
with the PU seam sealant provided, particularly<br />
at those points of the seam where tapes or<br />
rubber tensioning loops are integrated into<br />
seam and thus interrupt the continuity of the<br />
tape seal. We offer no guarantee on the seam<br />
taping of the seams.<br />
aUtres ConseiLs<br />
Votre MESA GRANDE / MONTE VISTA a des<br />
armatures en acier de différentes longueurs.<br />
MONTE VISTA: Le long mât est pour le centre,<br />
les deux mâts plus courts constituent le devant<br />
et le fond de la tente.<br />
MESA GRANDE: Les deux longs mâts constituent<br />
l’entrée de la tente – le court constitue le fond<br />
de la tente. Le marquage en couleur aide à<br />
passer les mâts dans les glissières prévues.<br />
Vérifiez les sangles de la bande réglable du système<br />
de fixation d‘armatures „Ring & Pin“. Seule<br />
une forte tension de base des arceaux peut<br />
garantir une bonne stabilité et une meilleure<br />
résistance aux intempéries de votre tente.<br />
CoLLe imPermeaBiLisante<br />
Les coutures importantes ont été recouvertes<br />
d’une bande scellée spéciale. Nous vous<br />
recommandons toutefois de traiter, à l’intérieur<br />
comme à l’extérieur, avec la colle imperméabilisante<br />
PU fournie avec la tente, les endroits où<br />
des bandes et des cordons en caoutchouc sont<br />
insérés dans la couture et interrompent donc la<br />
continuité de collage des bandes. Le collage des<br />
bandes scellées n’est pas couvert par la garantie.<br />
15
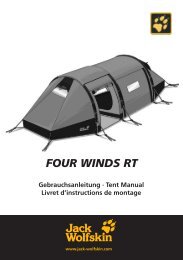
mesa grande /<br />
monte Vista<br />
Diese großzügigen 3-Bogen-Tunnelzelte mit<br />
2 getrennten Schlafkabinen bieten Platz für<br />
die ganze Familie.<br />
Variabel: Bei ausgehängter kleiner Schlafkabine<br />
entsteht eine aufstellbare Riesenapsis.<br />
Das vorgebogene Stahlgestänge optimiert<br />
die Kopffreiheit im Innenraum und sorgt<br />
für die Gesamtstabilität des Großraumzeltes.<br />
Die großen Lüfter sorgen für optimales<br />
Innenraumklima. Herausnehmbare<br />
Bodenschutzwanne, abdeckbare Fenster,<br />
Netztaschen und Wäscheleinenschlaufen in<br />
den Innenräumen, stabile Alunägel und der<br />
geräumige Kompressionspacksack bieten<br />
zusätzlichen Nutzen und Komfort.<br />
Ample 3 hoop tunnel tents with room to<br />
stand and featuring two separate sleeping<br />
areas.<br />
The configuration can be varied by dispensing<br />
with the smaller sleeping cabin to<br />
create a huge porch area. A special pole<br />
configuration optimizes the headroom in<br />
the inner tent and improves the overall<br />
stability of the construction.<br />
Ventilation ducts provide a pleasant interior<br />
climate. Useful additional features include<br />
curtained windows, a removable groundsheet,<br />
mesh pockets and drying line loops<br />
inside, aluminium pegs and a roomy compression<br />
packsack.<br />
08/11<br />
Cette grande - 3 arceaux- tente-tunnel<br />
avec ses 2 chambrées séparées offre un<br />
espace pour toute la famille.<br />
Variable: En détachant la petite chambre<br />
se forme une très grande pièce .Les arceaux<br />
spéciaux optimisent la hauteur intérieure<br />
et accroissent la stabilité de la tente.<br />
Les grands dispositifs d’aération offrent<br />
une température agréable à l’intérieur. La<br />
bâche de sol supplémentaire pouvant être<br />
retirée, les fenêtres obstruées, les poches<br />
intérieures et les tirants pour une corde à<br />
ligne ainsi que les arceaux en aluminium et<br />
le sac de compression, offrent un confort<br />
et une fonctionnalité supplémentaire.