

Sony HDR-PJ650E - HDR-PJ650E Consignes d’utilisation Anglais
Sony HDR-PJ650E - HDR-PJ650E Consignes d’utilisation Anglais
Sony HDR-PJ650E - HDR-PJ650E Consignes d’utilisation Anglais

Create successful ePaper yourself
Turn your PDF publications into a flip-book with our unique Google optimized e-Paper software.
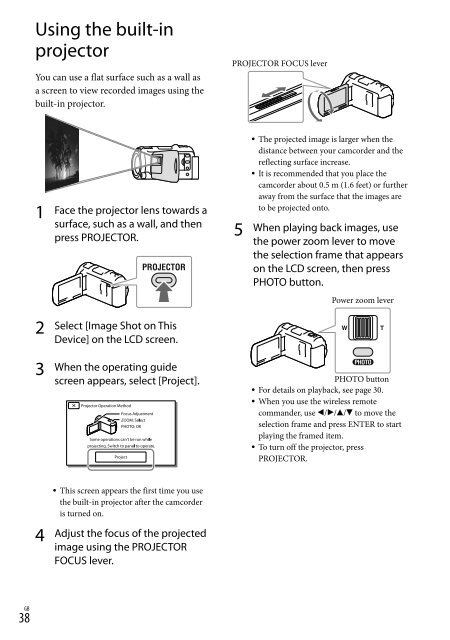
Using the built-in<br />
projector<br />
1<br />
2<br />
3<br />
<br />
4<br />
38 GB<br />
You can use a flat surface such as a wall as<br />
a screen to view recorded images using the<br />
built-in projector.<br />
Face the projector lens towards a<br />
surface, such as a wall, and then<br />
press PROJECTOR.<br />
Select [Image Shot on This<br />
Device] on the LCD screen.<br />
When the operating guide<br />
screen appears, select [Project].<br />
This screen appears the first time you use<br />
the built-in projector after the camcorder<br />
is turned on.<br />
Adjust the focus of the projected<br />
image using the PROJECTOR<br />
FOCUS lever.<br />
PROJECTOR FOCUS lever<br />
5<br />
<br />
<br />
The projected image is larger when the<br />
distance between your camcorder and the<br />
reflecting surface increase.<br />
It is recommended that you place the<br />
camcorder about 0.5 m (1.6 feet) or further<br />
away from the surface that the images are<br />
to be projected onto.<br />
When playing back images, use<br />
the power zoom lever to move<br />
the selection frame that appears<br />
on the LCD screen, then press<br />
PHOTO button.<br />
Power zoom lever<br />
PHOTO button<br />
For details on playback, see page 30.<br />
When you use the wireless remote<br />
commander, use /// to move the<br />
selection frame and press ENTER to start<br />
playing the framed item.<br />
To turn off the projector, press<br />
PROJECTOR.


