

Sony STR-D550Z - STR-D550Z Consignes d’utilisation Français
Sony STR-D550Z - STR-D550Z Consignes d’utilisation Français
Sony STR-D550Z - STR-D550Z Consignes d’utilisation Français

Create successful ePaper yourself
Turn your PDF publications into a flip-book with our unique Google optimized e-Paper software.
Getting Started<br />
Hookups<br />
CD player<br />
Tape deck<br />
DAT/MD<br />
Turntable<br />
6 EN<br />
The arrow ç indicates signal flow.<br />
L<br />
R<br />
L<br />
R<br />
Receiver<br />
• If your turntable has an earth lead<br />
To prevent hum, connect the earth lead to the y ground<br />
terminal on the receiver.<br />
CONTROL A1 Hookups (USA and Canadian<br />
<strong>STR</strong>-DE705 only)<br />
• If you have a CONTROL A1 compatible <strong>Sony</strong> CD player<br />
or tape deck<br />
Use a CONTROL A1 cord (not supplied) to connect the<br />
S-LINK CTRL A1 jack on the CD player or tape deck to the<br />
S-LINK CTRL A1 jack on the receiver. Refer the separate<br />
manual “CONTROL-A1 Control System” and the<br />
Operating Instructions supplied with your CD player or<br />
tape deck for details.<br />
• If you have a <strong>Sony</strong> CD changer with a COMMAND<br />
MODE selector<br />
If the CD changer’s COMMAND MODE selector can be<br />
switched between CD 1, CD 2, and CD 3, be sure to set the<br />
command mode to “CD 1” and connect the changer to the<br />
CD terminals on the receiver.<br />
However, if you have a <strong>Sony</strong> CD changer with VIDEO<br />
OUT terminals, set the command mode to “CD 2” and<br />
connect the changer to the VIDEO 2 terminals on the<br />
receiver.<br />
Where do I go next?<br />
L<br />
R<br />
IN<br />
CD<br />
Receiver<br />
REC OUT<br />
IN<br />
TAPE MONITOR<br />
Receiver<br />
REC OUT<br />
DAT/MD<br />
L<br />
R<br />
IN<br />
Receiver<br />
IN<br />
PHONO<br />
CD player<br />
OUTPUT<br />
Go on to the next section to connect the speakers.<br />
LINE<br />
L<br />
R<br />
Tape deck<br />
OUTPUT<br />
LINE<br />
INPUT<br />
LINE<br />
DAT/MD<br />
OUTPUT<br />
LINE<br />
OUTPUT<br />
LINE<br />
INPUT<br />
LINE<br />
Turntable<br />
L<br />
R<br />
L<br />
R<br />
L<br />
R<br />
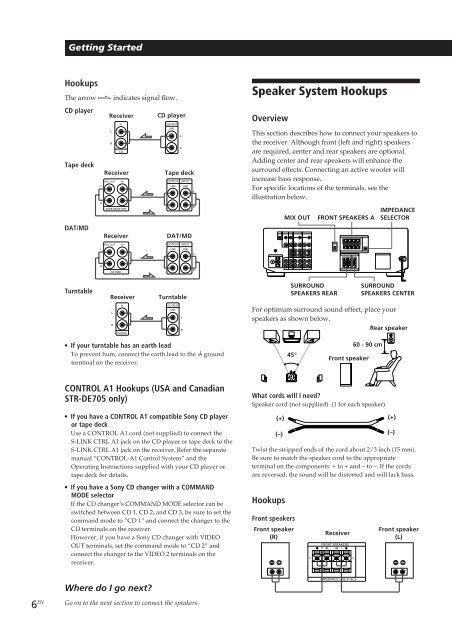
Speaker System Hookups<br />
Overview<br />
This section describes how to connect your speakers to<br />
the receiver. Although front (left and right) speakers<br />
are required, center and rear speakers are optional.<br />
Adding center and rear speakers will enhance the<br />
surround effects. Connecting an active woofer will<br />
increase bass response.<br />
For specific locations of the terminals, see the<br />
illustration below.<br />
(+)<br />
(–)<br />
45°<br />
Front speaker<br />
(R)<br />
MIX OUT<br />
SURROUND<br />
SPEAKERS REAR<br />
A<br />
FRONT SPEAKERS A<br />
Receiver<br />
60 - 90 cm<br />
Front speaker<br />
FRONT SPEAKERS<br />
R<br />
L<br />
IMPEDANCE<br />
SELECTOR<br />
SURROUND<br />
SPEAKERS CENTER<br />
For optimum surround sound effect, place your<br />
speakers as shown below.<br />
What cords will I need?<br />
Speaker cord (not supplied) (1 for each speaker)<br />
Rear speaker<br />
Twist the stripped ends of the cord about 2/3 inch (15 mm).<br />
Be sure to match the speaker cord to the appropriate<br />
terminal on the components: + to + and – to –. If the cords<br />
are reversed, the sound will be distorted and will lack bass.<br />
Hookups<br />
Front speakers<br />
(+)<br />
(–)<br />
Front speaker<br />
(L)<br />
} ] } ]<br />
IMPEDANCE USE 4-16 Ω<br />
A


