Prism Projector User's Guide - Artograph
Prism Projector User's Guide - Artograph
Prism Projector User's Guide - Artograph

Create successful ePaper yourself
Turn your PDF publications into a flip-book with our unique Google optimized e-Paper software.
3. General<br />
Focusing &<br />
Enlarging<br />
The size and clarity<br />
of your projected<br />
image is determined<br />
by the distance of the<br />
projector from the<br />
projection surface and<br />
the focusing of the<br />
lens. The farther the<br />
projector is from the<br />
work surface, the larger<br />
your image will be. As you change distance, you<br />
will have to slide the lens in or out slowly within the<br />
lens barrel to focus the projected image. The <strong>Prism</strong><br />
both enlarges and reduces with one reversible<br />
lens. The projection range of this lens is 80% (4/5 x)<br />
reduction (20% less than the size of your original), up<br />
to 20 times enlargement. Please Note: A gap exists<br />
in the projection range that cannot be achieved due<br />
to the reversing of the lens –170% to 250%. You will<br />
have to adjust the size of your original to achieve a<br />
size in this range.<br />
Distance Chart<br />
(approximate) – Measured from label above lens to<br />
projection surface.<br />
Range .8 1x 5x 10x 20x<br />
Distance 24” 23” 47” 89” 14’<br />
(61cm) (58m) (1.2m) (2.3m) (4.3m)<br />
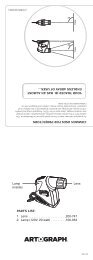
Lens in reduction<br />
position<br />
Lens in enlargement<br />
position<br />
4. Copy Area<br />
The copy area is 7” x 7”. This indicates the<br />
maximum size of copy the lens can see. This copy<br />
size, however, varies with the desired projection<br />
size. With greater enlargement, the lens sees less<br />
of the copy area.<br />
5. Photograph Projection<br />
(Use Caution!)<br />
Photographs are commonly used in projectors;<br />
however, a few precautions must be taken:<br />
1. Work from a copy of any valuable or important<br />
photographs. Never use an original if it cannot<br />
be replaced. Photographs were not intended to<br />
handle the intense light and heat created by a<br />
projector. Though this projector is fan-cooled and<br />
ventilated to keep the copy cooler, it does get hot<br />
and photographs may be adversely affected by<br />
the heat and light.<br />
2. Never project old photographs as they are<br />
particularly sensitive to heat and light and they will<br />
be damaged. Again, have a copy made.<br />
3. To prevent photographs from curling, mount<br />
them to a stiff backing material or put them in a<br />
picture mat.<br />
4. When projecting, make sure that the fan is<br />
operating and that the cooling vents have not<br />
been obstructed. When fi nished tracing the<br />
projected photo, turn the projector off and<br />
remove photo.<br />
Tips & Techniques<br />
Oversized Copy/Books<br />
If your original is larger than what will fi t onto the<br />
copy area, or if you are working from a picture in a<br />
book, simply remove the lid from the projector by<br />
pulling up the cover carefully and removing the two<br />
pivot pins. Place the copy or book on top of the<br />
projector. The lens will still only see a 7” x 7” portion<br />
of this copy, but placing it on top will allow you to<br />
move it around and project it in sections. Once you<br />
have drawn a section, move the copy and realign the<br />
projected image to the stopping point of the traced<br />
area. Resume tracing and repeat as many times as<br />
necessary. The other alternative to oversized copy<br />
is to reduce the original on a copier, so that it fi ts<br />
within the 7” x 7” copy area. Another way to make<br />
use of oversized copy that is not manageable on<br />
top of the projector is to place the copy face-up on<br />
your tabletop, remove the projector lid and place the<br />
projector upside down and on top of the copy. This<br />
way the copy will remain rigid and your projected<br />
image is more likely to line up properly.<br />
Small 3-D Objects<br />
Small 3-D objects can be projected by removing<br />
the projector lid and placing the object on top of<br />
the projector copy area. To ensure maximum image<br />
clarity, place a box over the top of the object to<br />
eliminate ambient light (light escaping from the top<br />
of the projector). To project 3-D objects which are<br />
larger than the 7” x 7” copy area, take a photograph<br />
of the object and project the print.<br />
CAUTION: Do not mount aerosol cans or<br />
pressurized objects onto the projector. The hot<br />
surface may cause them to burst.<br />
Measurements of Projections<br />
To determine a particular scale of a projected<br />
image, mount a 6” ruler next to the copy or draw<br />
1” grid lines onto the copyboard itself. If specifi c<br />
enlargements are frequently used from common<br />
originals, mark the fl oor with tape. Position the<br />
tape at desired distances and mark the image size<br />
3