HeadLine Bedienungsanleitung
HeadLine Bedienungsanleitung
HeadLine Bedienungsanleitung

Create successful ePaper yourself
Turn your PDF publications into a flip-book with our unique Google optimized e-Paper software.
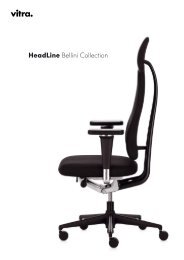
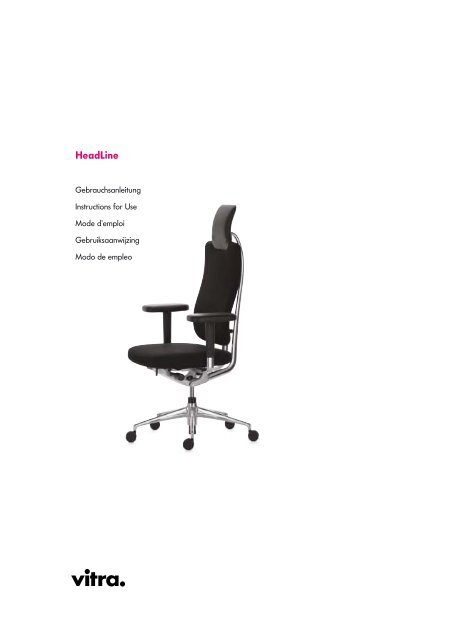
<strong>HeadLine</strong><br />
Gebrauchsanleitung<br />
Instructions for Use<br />
Mode d’emploi<br />
Gebruiksaanwijzing<br />
Modo de empleo
Mario und Claudio Bellini<br />
Mario Bellini, geboren 1935, und sein Sohn Claudio,<br />
geboren 1965, arbeiten gemeinsam in ihrem Studio in<br />
Mailand an Design- und Architekturprojekten.<br />
Mario and Claudio Bellini<br />
Mario Bellini (70) and his son Claudio (40) share a studio<br />
in Milan, working together on design and architectural<br />
projects.<br />
Mario et Claudio Bellini<br />
Dans leur studio à Milan, Mario Bellini, né en 1935, et son<br />
fils Claudio, né en 1965, travaillent à des projets de design<br />
et d’architecture communs.<br />
Mario en Claudio Bellini<br />
Mario Bellini, geboren in 1935, en zijn zoon Claudio, geboren<br />
in 1965, werken in hun studio in Milaan samen aan<br />
design- en architectuurprojecten.<br />
Mario y Claudio Bellini<br />
Mario Bellini nació en 1935 y su hijo Claudio en 1965,<br />
trabajan juntos en su estudio de Milán en proyectos<br />
arquitectónicos y de diseño.<br />
<strong>HeadLine</strong> |
Regulierung der Sitzhöhe<br />
Drücken Sie die Taste vorne rechts unter der Sitzfläche nach oben<br />
und bringen Sie den Sitz durch Be- und Entlasten in die gewünschte<br />
Höhe. Sie ist richtig, wenn Ober- und Unterschenkel einen Winkel<br />
von 90 bilden und Ihre Füsse flach auf dem Boden stehen.<br />
Adjusting the seat height<br />
Locate the button underneath and to the front right of the seat<br />
surface; push it upwards and adjust the seat to the desired height<br />
by applying or releasing pressure. The seat is correctly adjusted<br />
when the upper and lower leg form an angle of 90 and the feet<br />
are placed flat on the ground.<br />
Réglage de la hauteur de l’assise<br />
Tirez le levier situé à droite, sous l’avant de l'assise. La pression de<br />
votre corps sur l'assise vous permet d'en régler la hauteur. Celle-ci<br />
est correcte lorsque les articulations du genou forment un angle<br />
droit et que vos pieds reposent à plat sur le sol.<br />
Regeling van de zithoogte<br />
Druk de knop rechtsvoor onder de zitting naar boven en breng<br />
de zitting op de gewenste hoogte door deze in meerdere of mindere<br />
mate te belasten. De zithoogte is correct als de boven- en<br />
onderbenen een hoek van 90 met elkaar maken en de voeten<br />
plat op de grond staan.<br />
Regulación de la altura de asiento<br />
Presione la palanca que hay debajo del asiento, en el lado derecho,<br />
y regule la altura del asiento a su gusto aumentando o disminuyendo<br />
la presión del mismo. Alcanzará la altura correcta<br />
cuando los muslos y las piernas formen un ángulo de 90 y los<br />
pies descansen horizontalmente sobre el suelo.<br />
<strong>HeadLine</strong> |
Verstellung der Sitztiefe<br />
Drücken Sie den Bedienknopf unter dem Sitz rechts vor der Armlehne<br />
ein und schieben Sie die Sitzfläche vor oder zurück. Wichtig<br />
ist, dass Sie in jeder Position Kontakt zur Rückenlehne halten und<br />
genügend Abstand zwischen Sitzvorderkante und Unterschenkel<br />
besteht.<br />
Altering the seat depth<br />
Locate the knob underneath the seat and to the right in front of<br />
the armrest; push it in and slide the seat surface forwards or backwards.<br />
Whatever position you adopt, it is important that your<br />
back remains in contact with the backrest and that there is adequate<br />
space between the front edge of the seat and your lower leg.<br />
Réglage de la profondeur de l’assise<br />
Appuyez sur le bouton de réglage situé sous l’assise, à droite,<br />
devant l’accoudoir, et déplacez l'assise vers l'avant ou l'arrière. Il<br />
est important que votre dos reste en contact avec le dossier dans<br />
toute position et que le bas des jambes et l'arête avant de l'assise<br />
soient suffisamment espacés.<br />
Instelling van de zitdiepte<br />
Druk de bedieningsknop onder de zitting rechts voor de armlegger<br />
in en schuif de zitting naar voren of naar achteren. Belangrijk<br />
is dat u in elke zithouding contact houdt met de rugleuning en er<br />
voldoende ruimte is tussen de voorkant van de zitting en de<br />
onderbenen.<br />
Regulación de la profundidad del asiento<br />
Pulse el botón situado debajo del reposabrazos, en el lado derecho,<br />
y desplace la superficie del asiento hace delante o hacia<br />
atrás. Es importante que, en todo momento, mantenga contacto<br />
con el respaldo y que la distancia entre el borde delantero del<br />
asiento y el muslo sea la suficiente.<br />
<strong>HeadLine</strong> |
Regulierung der Stützkraft der Rückenlehne<br />
Ziehen Sie das Handrad unter der Sitzfläche links nach aussen und<br />
drehen Sie es, bis die gewünschte Stützkraft der Rückenlehne<br />
erreicht ist (nach vorne stärker, nach hinten schwächer). Die Rückenlehne<br />
soll so an Ihr Gewicht angepasst werden, dass sie in jeder<br />
Sitzposition stützt und gleichzeitig dynamisches Sitzen ermöglicht.<br />
Setting the backrest tension<br />
Locate the hand wheel to the left underneath the seat surface;<br />
pull it outwards and turn it until the backrest provides you with the<br />
desired degree of support (forwards for greater support, backwards<br />
for less support). The backrest should be adjusted to your<br />
weight so as to support you in any sitting position while allowing<br />
for movement.<br />
Réglage de la résistance du dossier<br />
Tirez vers l’extérieur le bouton de réglage se trouvant à gauche,<br />
sous l’assise, et tournez-le jusqu'à atteindre la résistance souhaitée<br />
(en avant pour augmenter la résistance, en arrière pour la diminuer).<br />
Adaptez le dossier à votre poids de manière à ce qu’il vous<br />
offre le soutien nécessaire dans toute position et autorise toutefois<br />
une position assise dynamique.<br />
Regeling van de tegendruk van de rugleuning<br />
Trek het handwiel links onder de zitting naar buiten en draai het<br />
totdat de gewenste tegendruk van de rugleuning is bereikt (naar<br />
voren meer tegendruk, naar achteren minder tegendruk). De<br />
rugleuning moet zo aan uw gewicht worden aangepast dat hij u<br />
in elke zithouding steun geeft en tegelijkertijd dynamisch zitten<br />
mogelijk maakt.<br />
Regulación de la fuerza de apoyo del respaldo<br />
Tire hacia fuera de la ruedecilla que se encuentra en el lado<br />
izquierdo, debajo del asiento, y gírela hasta que el respaldo<br />
alcance la fuerza deseada (hacia delante más fuerza, hacia atrás<br />
más suavidad). El respaldo debe ajustarse de tal modo a su peso,<br />
que podrá ofrecer un buen apoyo en cualquier posición y adoptar<br />
una postura dinámica.<br />
<strong>HeadLine</strong> |
Arretierung der Rückenlehne<br />
Durch Umlegen des Kipphebels unter der Sitzfläche vorne können<br />
Sie die Rückenlehne in der aufrechten Sitzposition arretieren. Durch<br />
Umlegen in die entgegengesetzte Richtung lösen Sie die Arretierung<br />
und geben die Rückenlehne und damit die Synchronmechanik<br />
wieder frei für dynamisches Sitzen.<br />
Locking the backrest<br />
You can use the change lever, located underneath the front of the<br />
seat surface, to lock the backrest in the upright position. Switching<br />
the change lever over in the opposite direction unlocks the backrest<br />
and releases the synchronised mechanism to allow you free<br />
movement while sitting.<br />
Blocage du dossier<br />
En renversant le levier situé sous la partie avant de l’assise, vous<br />
pouvez bloquer le dossier en position droite. Lorsque vous rabattez<br />
le levier dans la direction opposée, le dossier est débloqué et<br />
le mécanisme synchrone permet une assise dynamique.<br />
Vergrendeling van de rugleuning<br />
Door de tuimelhendel voor onder de zitting om te zetten kunt u<br />
de rugleuning in de zithouding rechtop vergrendelen. Met de tuimelhendel<br />
in de andere stand wordt de vergrendeling opgeheven<br />
en geeft u de rugleuning en daarmee ook het synchroonmechanisme<br />
weer vrij voor dynamisch zitten.<br />
Bloqueo del respaldo<br />
Moviendo la palanca que hay en la parte delantera, bajo el<br />
asiento se puede bloquear o desbloquear el respaldo en posición<br />
erguida. Moviéndola hacia el lado contrario hará que se suelte el<br />
bloqueo, y el respaldo y el mecanismo sincronizado quedarán<br />
libres de nuevo para el funcionamiento dinámico.<br />
<strong>HeadLine</strong> |
Höhenverstellung der Lumbalstütze<br />
Bringen Sie die Lumbalstütze mit dem Schieber an der Rückseite<br />
der Lehne in die gewünschte Höhe. Die Lumbalstütze soll so eingestellt<br />
sein, dass sie den Lordosenbereich optimal stützt und ein Kippen<br />
des Beckens nach hinten verhindert.<br />
Height adjustment of the lumbar support<br />
Use the slide at the rear of the backrest to move the lumbar<br />
support to the desired height. The lumbar support should be<br />
adjusted to provide optimum support to the lumbar region and<br />
to prevent the pelvis slumping to the rear.<br />
Réglage de la hauteur du support lombaire<br />
Un coulisseau situé à l’arrière du dossier permet d’amener le support<br />
lombaire dans la position souhaitée. Il doit être réglé de<br />
manière à soutenir la courbure naturelle de la région lombaire et<br />
à éviter le basculement du bassin en arrière.<br />
Hoogteverstelling van de lendensteun<br />
Breng de lendensteun met de schuifregelaar aan de achterzijde<br />
van de rugleuning op de gewenste hoogte. De lendensteun moet<br />
zo zijn ingesteld dat hij optimale ondersteuning biedt aan de lendenen<br />
en kantelen van het bekken naar achteren voorkomt.<br />
Regulación de la altura del soporte lumbar<br />
Utilice el botón que hay en la parte posterior del respaldo para<br />
desplazar el apoyo lumbar hasta la altura deseada. El apoyo<br />
lumbar deberá ajustarse de tal modo que se ajuste a la forma<br />
natural de la espalda e impida la inclinación de la pelvis hacia<br />
atrás.<br />
<strong>HeadLine</strong> |
Höheneinstellung der Armlehnen (alle Armlehnen)<br />
Drücken Sie den Knopf an der Aussenseite der Armauflage und<br />
schieben Sie die Armlehne in die gewünschte Höhe. Ober- und<br />
Unterarm sollten dabei einen rechten Winkel bilden, um die Schultermuskulatur<br />
optimal zu entlasten.<br />
Setting the height of the armrests (all armrests)<br />
Press the button located on the outer side of the armrest and slide<br />
the armrest to the desired height. The upper and lower arm<br />
should now form a right angle, reducing to a minimum any stress<br />
on the shoulder muscles.<br />
Réglage de la hauteur des accoudoirs (tous types d’accoudoirs)<br />
Appuyez sur le bouton situé sur la face extérieure de la surface<br />
d’appui et déplacez l'accoudoir à la hauteur souhaitée. Les articulations<br />
du coude doivent former un angle droit pour que les muscles<br />
des épaules soient détendus.<br />
Hoogte-instelling van de armleggers (alle armleggers)<br />
Druk op de knop aan de buitenkant van de armsupport en schuif<br />
de armlegger tot de gewenste hoogte. De boven- en de<br />
onderarm moeten daarbij een rechte hoek vormen, zodat de<br />
spieren in de schouders optimaal worden ontlast.<br />
Ajuste de la altura de los reposabrazos (todos los reposabrazos)<br />
Pulse el botón situado en la parte exterior del reposabrazos y<br />
colóquelo a la altura deseada. El brazo y el antebrazo deberán<br />
formar un ángulo recto para proporcionar un descanso óptimo a<br />
la musculatura escapular.<br />
<strong>HeadLine</strong> |
Breiteneinstellung der Armlehne (alle Armlehnen)<br />
Die Breite der Armlehnen können Sie über die Einstellschraube an<br />
der Unterseite der Armlehnenträger verstellen. Lösen Sie hierfür<br />
die Schraube und schieben Sie die Armlehne auf der Schiene in die<br />
gewünschte Position, ziehen Sie dann die Schraube wieder an.<br />
Adjusting the width of the armrest (all armrests)<br />
You can adjust the width of the armrests by means of the adjusting<br />
screw on the underside of the armrest supports. To do this,<br />
slacken the screw and slide the armrest along the rail to the<br />
desired position; then tighten up the screw again.<br />
Réglage de l’écartement des accoudoirs (tous types d’accoudoirs)<br />
L’écartement des accoudoirs peut être adapté par l’intermédiaire<br />
de la vis de réglage située sur le dessous du support de l’accoudoir.<br />
A cet effet, desserrer la vis, décaler les accoudoirs sur le rail<br />
jusqu’à atteindre la position souhaitée et resserrer la vis.<br />
Breedte-instelling van de armleggers (alle armleggers)<br />
De breedte van de armleggers kunt u met de instelschroef aan de<br />
onderkant van de drager van de armlegger verstellen. Draai<br />
hiertoe de schroef los en schuif de armlegger over de rail in de<br />
gewenste stand; draai vervolgens de schroef weer vast.<br />
Regulación de la anchura del reposabrazos (todos los reposabrazos)<br />
Puede ajustar el ancho de los reposabrazos mediante el tornillo<br />
de ajuste que hay en la parte inferior del soporte del reposabrazos.<br />
Para ello, afloje el tornillo y mueva el reposabrazos por la<br />
guía hasta que alcance la posición deseada; finalmente apriete el<br />
tornillo de nuevo.<br />
<strong>HeadLine</strong> |
3D-Einstellung der Armlehnenauflage (3D-Armlehne)<br />
Breite, Tiefe und Winkel (360 ) der Armlehnenauflage können Sie<br />
bei dieser Version zusätzlich verstellen. Hierfür drücken Sie den<br />
schmalen Knopf an der Innenseite unter der Armauflage und<br />
bewegen die Auflage in die gewünschte Position. Durch das Loslassen<br />
des Knopfes wird sie arretiert.<br />
3-D adjustment of the armrest pad (3-D armrest)<br />
You can also adjust the width, depth and angle (360 ) of the armrest<br />
pad on this model. To do this, press the slimline button on the<br />
inner side of the armrest and turn the pad to the desired position.<br />
Releasing the button will lock the pad into position.<br />
Réglage tridimensionnel de la surface d’appui (accoudoirs<br />
tridimensionnels)<br />
Sur cette variante, vous pouvez en outre régler l’écartement, la<br />
profondeur et l’angle (360 ) de la surface d’appui. A cet effet,<br />
appuyez sur le petit bouton situé sur la face intérieure, sous la<br />
surface d’appui, et amenez celle-ci dans la position souhaitée.<br />
Pour bloquer la surface d’appui dans cette position, lâchez le<br />
bouton.<br />
3D-instelling van de armsupports (3D-armleggers)<br />
Breedte, diepte en hoek (360 ) van de armsupports kunt u bij<br />
deze versie afzonderlijk instellen. Druk hiertoe op de smalle knop<br />
aan de binnenkant onder de armsupport en breng de armsupport<br />
in de gewenste positie. Door de knop los te laten wordt de<br />
armsupport vergrendeld.<br />
Ajuste 3D de la superficie de apoyo del reposabrazos<br />
(reposabrazos 3D)<br />
Además, en esta versión podrá regular la anchura, la profundidad<br />
y el ángulo (360 ) de la superficie de apoyo del reposabrazos.<br />
Para ello, presione el pequeño botón que encontrará bajo el<br />
reposabrazos, en la parte interior, y mueva la superficie de<br />
apoyo a la posición deseada. Si bloquea el botón se quedará fijo<br />
en esa posición.<br />
<strong>HeadLine</strong> | 10
Sie haben sich für ein Vitra-Qualitätsprodukt entschieden. Wir wünschen<br />
Ihnen viel Freude damit.<br />
<strong>HeadLine</strong> ist ein innovativer Bürodrehstuhl. Er entspricht der EN 1335,<br />
erfüllt die Anforderungen der EU-Richtlinien für Bildschirmarbeitsplätze<br />
und trägt das Siegel „Ergonomie geprüft”.<br />
Anwendung<br />
Die Gebrauchsanleitung enthält alle Informationen, wie Sie<br />
<strong>HeadLine</strong> richtig einstellen und wie Sie alle Vorteile, die der Stuhl<br />
bietet, nutzen können.<br />
You have chosen a quality Vitra product. We hope you will enjoy<br />
using it.<br />
<strong>HeadLine</strong> is an innovative office swivel chair. It conforms to<br />
EN1335, satisfies the requirements of the EU directives for computer<br />
workstations and carries the "ergonomically tested" seal of<br />
approval.<br />
Practical use<br />
The instructions for use contain all the information needed to adjust<br />
your Headline chair correctly and to exploit all of its advantages.<br />
Vous avez choisi un produit de qualité Vitra. Nous espérons qu’il<br />
vous apportera entière satisfaction.<br />
<strong>HeadLine</strong> est un siège de bureau innovant. Il répond aux exigences<br />
de la norme EN 1335 et des directives européennes relatives aux<br />
postes de travail informatisés et porte le label « Ergonomie contrôlée<br />
».<br />
Emploi<br />
Le mode d’emploi vous fournit toutes les informations dont vous<br />
avez besoin pour adapter le siège <strong>HeadLine</strong> à vos besoins et profiter<br />
de tous les avantages qu’il offre.<br />
U hebt besloten tot de aankoop van een kwaliteitsproduct van<br />
Vitra. Wij wensen u veel gebruiksplezier. <strong>HeadLine</strong> is een innovatieve<br />
bureaustoel. De stoel is in overeenstemming met de Europese<br />
norm EN 1335, voldoet aan de eisen van de EU-richtlijnen voor<br />
beeldschermwerkplekken en draagt het Duitse ergonomiekeurmerk<br />
"Ergonomie geprüft".<br />
Toepassing<br />
In de gebruiksaanwijzing vindt u alle informatie over de juiste<br />
instelling van <strong>HeadLine</strong> en kunt u lezen hoe u van alle voordelen<br />
van de stoel kunt genieten.<br />
Acaba de adquirir un producto de calidad Vitra. Deseamos que<br />
lo disfrute. <strong>HeadLine</strong> es un innovador sillón giratorio de oficina.<br />
Cumple la norma EN 1335, las exigencias de la directiva de la<br />
UE en materia de puestos de trabajo con ordenador, y cuenta,<br />
además, con el sello de ergonomía probada.<br />
Uso<br />
Las instrucciones de uso contienen toda la información para realizar<br />
adecuadamente los ajustes de <strong>HeadLine</strong> y poder aprovechar<br />
todas las ventajas que ofrece este sillón.<br />
<strong>HeadLine</strong> | 11
Benutzerhinweise<br />
Rollen. Alle <strong>HeadLine</strong> Bürodrehstühle sind serienmässig mit harten<br />
Rollen für weiche Böden ausgestattet (Rolle einfarbig). Bei harten<br />
Fussbodenbelägen müssen weiche Rollen eingesetzt werden (Rolle<br />
zweifarbig).<br />
Pflegehinweise. Bitte reinigen Sie den Stoffbezug nur mit milden,<br />
neutralen Reinigungsmitteln in einem feuchten Lappen (nur wenig<br />
Flüssigkeit) oder saugen Sie die Bezüge einfach ab. Bei Lederbezug<br />
beachten Sie bitte beiliegende Pflegeanleitung. Der Stoffbezug der<br />
Kopfstütze kann abgenommen und gewaschen werden.<br />
Garantie und Service. Bezugsmaterialien und Rollen: sechs Monate.<br />
Alle anderen Materialien: zwei Jahre. Weitere Hinweise in unseren<br />
Notes<br />
Rollers. All <strong>HeadLine</strong> office swivel chairs are fitted as standard with<br />
solid rollers (in one colour) for soft floors. Soft rollers (in two<br />
colours) must be used on hard floor coverings.<br />
Care. Only clean the fabric chair cover with mild, neutral cleaning<br />
agents on a damp cloth (small amount of liquid only) or simply use<br />
a vacuum cleaner. Follow the enclosed care instructions for leather<br />
covers. The headrest fabric cover can be removed and washed.<br />
Warranties and servicing. Cover materials and rollers: six<br />
months. All other materials: two years. Additional information can<br />
be found in our general terms and conditions of sale. Armrests,<br />
upholstery and rollers can be replaced without the need for<br />
Remarques<br />
Roulettes. Tous les sièges de bureau <strong>HeadLine</strong> sont équipés en<br />
série de roulettes dures pour les sols souples (roulettes unicolores).<br />
Pour les sols durs, utilisez des roulettes souples (bicolores).<br />
Entretien. Pour le nettoyage des revêtements tissu, utilisez uniquement<br />
des produits doux et neutres sur un chiffon humide (peu de<br />
liquide) ou nettoyez les revêtements à l’aspirateur. Pour les revêtements<br />
en cuir, lisez les conseils d'entretien du cuir ci-joints. Le revêtement<br />
en tissu de l’appuie-tête peut être déhoussé et lavé.<br />
Garantie et service. Matériaux de revêtements et roulettes : six<br />
mois. Autres matériaux : deux ans. Pour plus de détails, consultez<br />
nos conditions générales de vente. Les accoudoirs, rembourrages et<br />
Benutzerhinweise<br />
Rollen. Alle <strong>HeadLine</strong> Bürodrehstühle sind serienmässig mit harten<br />
allgemeinen Verkaufsbedingungen. Armlehnen, Polster und Rollen<br />
sind ohne Spezialwerkzeug austauschbar bzw. vor Ort nachrüstbar.<br />
Achtung! Arbeiten an Gasfedern bzw. deren Austausch dürfen<br />
nur durch eingewiesenes Fachpersonal durchgeführt werden.<br />
Bitte beachten Sie, dass Ihr <strong>HeadLine</strong> nur für die bestimmungsgemässe<br />
Verwendung als Bürodrehstuhl unter Beachtung der allgemeinen<br />
Sorgfaltspflicht benutzt werden darf.<br />
Bei anderweitigem Einsatz besteht ein erhöhtes Unfallrisiko (z.B. durch<br />
Verwendung als Aufstiegshilfe oder Sitzen auf den Armlehnen).<br />
Benutzerhinweise<br />
specialist tools and can be fitted on site after delivery.<br />
Caution! Replacing or carrying out any other work on gasoperated<br />
springs must only be undertaken by trained technicians.<br />
Please note that your <strong>HeadLine</strong> must only be used for its intended<br />
purpose as an office swivel chair and in compliance with your<br />
general obligation to take due care and attention. Other types of<br />
use (e.g. as a step stool or sitting on the armrests) will increase the<br />
risk of an accident.<br />
roulettes peuvent être échangés ou ajoutés ultérieurement sur<br />
place sans outils spéciaux.<br />
Attention ! Le remplacement ou les réparations de la cartouche<br />
à gaz ne doivent être effectués que par du personnel<br />
qualifié.<br />
Réservez votre siège <strong>HeadLine</strong> à une utilisation appropriée en y<br />
apportant le soin nécessaire. Une utilisation inappropriée peut être<br />
cause d’accidents (par exemple si vous utilisez le fauteuil en tant<br />
qu’escabeau ou que vous vous asseyez sur les accoudoirs).<br />
Benutzerhinweise<br />
<strong>HeadLine</strong> | 1
Aanwijzingen voor de gebruiker<br />
Zwenkwielen. Alle <strong>HeadLine</strong>-bureaustoelen zijn standaard uitgerust<br />
met harde zwenkwielen voor zachte vloeren (wiel in één kleur).<br />
Bij harde vloeren dienen zachte zwenkwielen te worden geplaatst<br />
(wiel in twee kleuren).<br />
Onderhoud. Reinig de stoffen bekleding alleen maar met een<br />
mild, neutraal reinigingsmiddel op een vochtige doek (gebruik hierbij<br />
niet te veel water) of reinig de bekleding eenvoudig met de stofzuiger.<br />
Neem bij lederen bekleding de bijgevoegde onderhoudshandleiding<br />
in acht. De stoffen bekleding van de hoofdsteun kan<br />
worden afgenomen en gewassen.<br />
Garantie en service. Bekledingsmaterialen en zwenkwielen: zes<br />
maanden. Alle andere materialen: twee jaar. Overige aanwijzingen<br />
vindt u in onze algemene verkoopvoorwaarden. Armleggers, kus<br />
Advertencias para el usuario<br />
Ruedas. Todos los sillones giratorios de oficina <strong>HeadLine</strong> están<br />
equipados de serie con ruedas duras para suelos blandos (ruedas<br />
de un color). Si va a usarlo en suelos duros, deberá utilizar ruedas<br />
blandas (ruedas de dos colores).<br />
Pautas de conservación. Como norma general, limpie la tapicería<br />
aplicando únicamente productos de limpieza suaves y neutros con<br />
una bayeta ligeramente humedecida, o utilice un aspirador. Si la<br />
tapicería es de cuero, lea atentamente las instrucciones de conservación<br />
que se adjuntan. El tejido del reposacabezas es desenfundable<br />
y lavable.<br />
Garantía y asistencia técnica. Materiales de tapizado y ruedas:<br />
seis meses de garantía. Todos los demás materiales: dos años de<br />
garantía. Encontrará notas adicionales en el documento de condi<br />
sens en zwenkwielen kunnen zonder speciaal gereedschap te allen<br />
tijde worden vervangen of in een later stadium bij de klant worden<br />
geplaatst.<br />
Let op! Werkzaamheden aan gasveren (inclusief vervanging<br />
van de gasveer) mogen slechts door deskundigen worden<br />
verricht.<br />
Houd er rekening mee dat uw <strong>HeadLine</strong> slechts voor het beoogde<br />
gebruik als bureaudraaistoel met inachtneming van de algemeen<br />
geldende zorgvuldigheidsplicht mag worden ingezet. Bij ander dan<br />
het beoogde gebruik bestaat een verhoogd ongevalsrisico (bijvoorbeeld<br />
bij gebruik als klimhulp of zitten op de armleggers).<br />
Benutzerhinweise<br />
ciones generales de venta. Los reposabrazos, el acolchado y las<br />
ruedas son fácilmente intercambiables y pueden montarse a<br />
posteriori.<br />
Advertencia: La manipulación de la suspensión elástica por<br />
gas o la sustitución de la misma sólo debe llevarla a cabo<br />
personal cualificado.<br />
Por favor, tenga en cuenta que <strong>HeadLine</strong> sólo podrá utilizarse<br />
conforme a lo descrito y como sillón giratorio de oficina teniendo<br />
en consideración las normas generales de seguridad. Si lo utiliza<br />
de modo diferente, el riesgo de accidente es elevado (por ejemplo,<br />
si se sienta sobre los reposabrazos).<br />
Benutzerhinweise<br />
Rollen. Alle <strong>HeadLine</strong> Bürodrehstühle sind serienmässig mit harten<br />
Rollen für weiche Böden ausgestattet (Rolle einfarbig). Bei harten<br />
Fussbodenbelägen müssen weiche Rollen eingesetzt werden (Rolle<br />
zweifarbig).<br />
Pflegehinweise. Bitte reinigen Sie den Stoffbezug nur mit milden,<br />
neutralen Reinigungsmitteln in einem feuchten Lappen (nur wenig<br />
Flüssigkeit) oder saugen Sie die Bezüge einfach ab. Bei Lederbezug<br />
beachten Sie bitte beiliegende Pflegeanleitung.Der Stoffbezug der<br />
<strong>HeadLine</strong> | 1
www.vitra.com<br />
email: info@vitra.com<br />
Vitra International AG<br />
Klünenfeldstrasse 22<br />
CH-4127 Birsfelden<br />
Tel. +41 (0)61 377 00 00<br />
Fax +41 (0)61 377 15 10<br />
Vitra Ges.m.b.H.<br />
Pfeilgasse 35<br />
A-1080 Wien<br />
Tel. +43 (0)1 405 75 14<br />
Fax +43 (0)1 405 75 14 11<br />
NV Vitra Belgium SA<br />
Woluwelaan, 137<br />
B-1831 Diegem<br />
Tel. +32 (0)2 725 84 00<br />
e-mail: info@vitra.be<br />
Vitra AG<br />
Klünenfeldstrasse 22<br />
CH-4127 Birsfelden<br />
Tel. +41 (0)61 377 15 19<br />
Fax +41 (0)61 377 15 10<br />
Showroom<br />
Pelikanstrasse 10<br />
CH-8001 Zürich<br />
Tel. +41 (0)44 277 77 00<br />
Fax +41 (0)44 277 77 09<br />
Vitra koncept, s.r.o.<br />
Komunardu 32<br />
CZ-170 00 Praha 7<br />
Tel. +420 266 712 755<br />
Fax +420 266 712 754<br />
Vitra GmbH<br />
Charles-Eames-Strasse 2<br />
D-79576 Weil am Rhein<br />
Tel. 00 800 22 55 84 87<br />
Fax +49 (0) 76 21 702 32 42<br />
Vitra Hispania S.A.<br />
Calle Marqués de Villamejor, 5<br />
E-28006 Madrid<br />
Tel. +34 91 426 45 60<br />
Fax +34 91 578 32 17<br />
Showroom<br />
Plaza Comercial 5<br />
E-08003 Barcelona<br />
Tel. +34 93 268 72 19<br />
Fax +34 93 268 81 39<br />
Avda. Almirante Reis 114-4 G<br />
P-1150-023 Lisboa<br />
Tel. +351 21 816 2028<br />
Fax +351 21 816 2982<br />
Vitra<br />
40, rue Violet<br />
F-75015 Paris<br />
Tel. +33 (0)1 56 77 07 77<br />
Fax +33 (0)1 45 75 50 56<br />
Vitra Ltd.<br />
30 Clerkenwell Road<br />
London EC1M 5PG-GB<br />
Tel. +44 (0)20 7608 6200<br />
e-mail: info_uk@vitra.com<br />
Vitra International AG<br />
Magyarországi Kereskedelmi<br />
Képviselet<br />
Graphisoft Park, GE épület<br />
Záhony u. 7.<br />
HU-1031 Budapest<br />
Tel. +36 1 430 0476<br />
Fax +36 1 430 0477<br />
Vitra (Nederland) B.V.<br />
De Oude Molen 2<br />
NL-1184 VW Ouderkerk<br />
aan de Amstel<br />
Tel. +31 (0)20 517 44 44<br />
e-mail: info@vitra.nl<br />
Vitra Scandinavia AS<br />
Stortingsgaten 30<br />
N-0161 Oslo<br />
Tel. +47 23 11 58 70<br />
Fax +47 23 11 58 79<br />
Vitra International AG<br />
Spól´ka Akcyjna<br />
Przedstawicielstwo w Polsce<br />
Ul. Burakowska 5/7<br />
PL-01-066 Warszawa<br />
Tel. +48 22 887 10 64<br />
Fax +48 22 887 10 65<br />
Vitra Furniture (Shanghai) Co., Ltd.<br />
338 Nanjing West Road<br />
Tian An Center<br />
Room 803-804<br />
PRC-Shanghai 200003<br />
Tel. +86 21 6359 6870<br />
Fax +86 21 6359 6872<br />
Vitra Furniture Pte. Ltd.<br />
8, Shenton Way<br />
# 19-05, Temasek Tower<br />
Singapore 068811<br />
Tel. +65 6536 2189<br />
Fax +65 6535 5447<br />
Vitra Inc.<br />
29 Ninth Avenue<br />
New York, NY 10014-USA<br />
Tel. +1 212 463 5700<br />
Fax +1 212 929 6424<br />
557 Pacific Avenue<br />
San Francisco, CA 94133-USA<br />
Tel. +1 415 296 0711<br />
Fax +1 415 296 0709<br />
<strong>HeadLine</strong> | 1