Pharo® Dampfgenerator - Hansgrohe
Pharo® Dampfgenerator - Hansgrohe
Pharo® Dampfgenerator - Hansgrohe

Create successful ePaper yourself
Turn your PDF publications into a flip-book with our unique Google optimized e-Paper software.
Pharo<br />
<strong>Pharo®</strong> <strong>Dampfgenerator</strong><br />
® Module ®<br />
Pharo ® Dampfmodul DL 40 29612XXX<br />
Pharo ® Dampfmodul DL 40 29613XXX<br />
Montageanleitung<br />
Installation Instructions<br />
Istruzioni di montaggio<br />
Instractions de montage<br />
Instrucciones de montaje<br />
Montage instructies<br />
Návod k montáži<br />
Instrukcja montażu<br />
Ðóêîâîäñòâî ïî ìîíòàæó
INhaLtsverzeIchNIs<br />
Inhalt<br />
Masse 4<br />
Bestandteile 5<br />
Serviceteile DG 3,0 kW 6<br />
Serviceteile DG 4,5 kW 8<br />
Technische Daten DG 3,0 kW 10<br />
Technische Daten DG 4,5 kW 12<br />
Vorwort<br />
In der Anleitung Verwendete<br />
14<br />
Symbole 15<br />
Sicherheitsvorschriften 16<br />
Benötigtes Werkzeug 18<br />
Montage Eckschrank 20<br />
Funktionsprüfung 28<br />
Steuerung K IV Steam Plus 30<br />
Bedienung 38<br />
Entkalken 42<br />
2<br />
coNteNts<br />
contents<br />
Dimensions 4<br />
Components 5<br />
Spare parts DG 3,0 kW 6<br />
Spare parts DG 4,5 kW 8<br />
Technical Data DG 3,0 kW 10<br />
Technical Data DG 4,5 kW 12<br />
Foreword 14<br />
Symbols Used in the Instructions 15<br />
Safety Precautions 16<br />
Required Tools 18<br />
Corner Cabinet Installation 20<br />
Functional Check 28<br />
K IV Steam Plus Control 30<br />
Operation 38<br />
Decalcifying 42<br />
INDIce<br />
Indice<br />
Ingombri 4<br />
Componenti 5<br />
Parti di ricambio DG 3,0 kW 6<br />
Parti di ricambio DG 4,5 kW 8<br />
Dati tecnici DG 3,0 kW 10<br />
Dati tecnici DG 3,0 kW 12<br />
Introduzione 14<br />
Simboli utilizzati nel manuale 15<br />
Prescrizioni di sicurezza 16<br />
Utensili richiesti 18<br />
Montaggio dell' armadietto angolare 20<br />
Controllo del funzionamento 28<br />
Controllo K IV Steam Plus 30<br />
Uso 38<br />
Per togliere il calcare 42
3<br />
Deutsch<br />
english<br />
Italiano
Masse DIMeNsIoNs INgoMbrI<br />
4
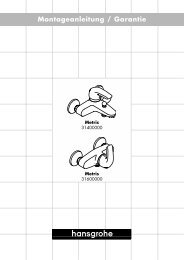
estaNDteILe<br />
Karton 1<br />
a Eckschrank mit Dampftechnik inklusive<br />
Aromadispenser/inklusive<br />
automatischer Duftstoffdosierung<br />
b Eckabdeckung<br />
Karton 2 (in Karton 1)<br />
c Revisionsscheibe<br />
Karton 3 (in Karton 1)<br />
Befestigungsteile<br />
Deckel und Sieb für Aromadispenser<br />
Steuerung K IV Steam Plus<br />
Blende für Steuerung<br />
Trafo<br />
Stromversorgungskabel<br />
b<br />
a<br />
coMPoNeNts<br />
carton 1<br />
a Corner cabinet with steam system<br />
including aroma dispenser/including<br />
automatically essential oils addition<br />
a Corner cover<br />
carton 2 (in carton 1)<br />
b Service window<br />
carton 3 (in carton 1)<br />
mounting parts<br />
cover and sieve for aroma dispenser<br />
K IV Steam Plus control<br />
cover for control<br />
transformer<br />
power supply cable<br />
c<br />
coMPoNeNtI<br />
Imballo 1<br />
a armadietto angolare con tecnologia<br />
del vapore incluso Aromadispenser/<br />
compreso dosaggio automatico delle<br />
essenze aromatiche<br />
b Copertura angolare<br />
Imballo 2 (nell'imballo 1)<br />
c pannello d'ispezione<br />
Imballo 3 (nell'imballo 1)<br />
elementi di montaggio<br />
Coperchio e filtro per Aromadispenser<br />
scatola di comandoK IV STEAM PLUS<br />
Pannello per unità di comando<br />
transformatore<br />
Cavo d’alimentazione elettrica<br />
Deutsch<br />
english<br />
Italiano
servIceteILe MIt Dg 3 KW<br />
Pos. Bezeichnung<br />
Description<br />
Descrizione<br />
Nr./Nr./No. VE<br />
1<br />
2<br />
3<br />
4<br />
5<br />
6<br />
7<br />
8<br />
9<br />
10<br />
11<br />
12<br />
13<br />
14<br />
15<br />
16<br />
17<br />
18<br />
19<br />
20<br />
21<br />
22<br />
23<br />
24<br />
6<br />
--<br />
--<br />
xxx<br />
000<br />
090<br />
320<br />
410<br />
420<br />
Trafo<br />
Duftbefülleinheit kpl.<br />
Deckel<br />
Sieb<br />
Duftbegrenzer<br />
Duftbehälter<br />
Magnetventil<br />
Levelsensor<br />
<strong>Dampfgenerator</strong> kpl.<br />
Heizspirale<br />
Dampfaustrittsdüse<br />
Schrauben Set<br />
Schaltkasten<br />
Glasplatte<br />
Befestigungssatz<br />
Steuerung K IV STEAM PLUS<br />
Absperrventil<br />
Temperaturfühler<br />
Eckabdeckung<br />
Frontblende<br />
Rosette<br />
Duftstoffbehälter<br />
Magnetventil<br />
Deckel (für flüssig Duftstoff)<br />
Anschlussleitung 230 V<br />
Lichtanschlusskabel (12 V)<br />
oberflächen<br />
chrom<br />
chrom/gold<br />
weiß (alpin)<br />
pergamon<br />
platin<br />
colors<br />
chromeplated<br />
chromeplated/goldplated<br />
white (alpin)<br />
pergamon<br />
platin<br />
sPare Parts Dg 3 KW<br />
transformer<br />
fragrance device complete<br />
cover<br />
sieve<br />
fragrance adjusting<br />
fragrance reservoir<br />
solenoid valve<br />
level sensor<br />
steam generator cpl.<br />
heating element<br />
steam inlet<br />
screw set<br />
switching Box<br />
glass plate<br />
mounting kit<br />
control K IV STEAM PLUS<br />
isolating valve<br />
temperature sensor<br />
corner cover<br />
cover<br />
escutcheon<br />
tank for 'aromatics'<br />
solenoid valve<br />
cover (for fluid scent)<br />
power supply cable 230 V<br />
lighting cable (12 V)<br />
couleures<br />
cromato<br />
cromato/oro<br />
bianco (alpino)<br />
pergamon<br />
platino<br />
4 0<br />
460<br />
800<br />
810<br />
880<br />
PartI DI rIcaMbIo Dg 3 KW<br />
transformatore<br />
97068000<br />
unità riempimento di sostanze aromatiche 97079000<br />
coperchio<br />
97080000<br />
filtro<br />
97081000<br />
limitatore sostanza aromatica 97082000<br />
recipiente per sostanza aromatica 97083000<br />
valvola elettromagnetica 97084000<br />
sensore livello<br />
97085000<br />
generatore di vapore<br />
97086000<br />
spirale di riscaldamento 97087000<br />
ugello di fuoriuscita vapore 97458000<br />
set di viti<br />
21880xxx<br />
cassetta di contenimento 97088000<br />
lastra di vetro<br />
21881000<br />
set di fissaggio<br />
97543000<br />
scatola di comandoK IV STEAM PLUS 97920000<br />
valvola d'arresto<br />
97103000<br />
termosensore<br />
97922000<br />
Copertura angolare<br />
97544980<br />
cappuccio<br />
96643xxx<br />
copertura<br />
97541000<br />
contenitore essenza aromatica 97484000<br />
valvola magnetica<br />
96646000<br />
coperchio<br />
98602000<br />
cavo di allacciamento 230 V<br />
cavo di allacciamento per<br />
l‘illuminazione (12 V)<br />
weiß<br />
grau<br />
steel<br />
satinox<br />
edelmatt<br />
white<br />
grey<br />
steel<br />
satinox<br />
satin chrome<br />
97542000<br />
97540000<br />
bianco<br />
grigio<br />
acciaio<br />
satinox<br />
satincromo<br />
1<br />
1<br />
1<br />
1<br />
1<br />
1<br />
1<br />
1<br />
1<br />
1<br />
1<br />
4<br />
1<br />
1<br />
1<br />
1<br />
1<br />
1<br />
1<br />
1<br />
1<br />
1<br />
1<br />
1<br />
1
19<br />
18<br />
22<br />
23<br />
24<br />
4<br />
21<br />
16<br />
20<br />
13<br />
11<br />
3<br />
4<br />
6<br />
2<br />
12<br />
1<br />
14<br />
8<br />
10<br />
1<br />
1<br />
9<br />
Deutsch<br />
english<br />
Italiano
servIceteILe MIt Dg 4, KW<br />
Pos. Bezeichnung<br />
Description<br />
Descrizione<br />
Nr./Nr./No. VE<br />
1<br />
2<br />
3<br />
4<br />
5<br />
6<br />
7<br />
8<br />
9<br />
10<br />
11<br />
12<br />
13<br />
14<br />
15<br />
16<br />
17<br />
18<br />
19<br />
20<br />
21<br />
22<br />
23<br />
24<br />
25<br />
8<br />
--<br />
--<br />
xxx<br />
000<br />
090<br />
320<br />
410<br />
420<br />
Trafo<br />
Duftbefülleinheit kpl.<br />
Deckel<br />
Sieb<br />
Duftbegrenzer<br />
Duftbehälter<br />
Magnetventil<br />
Levelsensor<br />
<strong>Dampfgenerator</strong> kpl.<br />
Heizspirale 4,5 KW<br />
Dampfaustrittsdüse<br />
Schrauben Set<br />
Dampfmodul<br />
Glasplatte<br />
Befestigungssatz<br />
Steuerung K IV STEAM PLUS<br />
Absperrventil<br />
Temperaturfühler<br />
Eckabdeckung<br />
Frontblende<br />
Rosette<br />
Duftstoffbehälter<br />
Magnetventil<br />
Relaismodul 400 V<br />
Deckel für flüssig Duftstoff<br />
Anschlussleitung 400 V<br />
Lichtanschlusskabel (12 V)<br />
oberflächen<br />
chrom<br />
chrom/gold<br />
weiß (alpin)<br />
pergamon<br />
platin<br />
colors<br />
chromeplated<br />
chromeplated/goldplated<br />
white (alpin)<br />
pergamon<br />
platin<br />
sPare Parts Dg 4, KW<br />
transformer<br />
fragrance device complete<br />
cover<br />
sieve<br />
fragrance adjusting<br />
fragrance reservoir<br />
solenoid valve<br />
level sensor<br />
steam generator cpl.<br />
heating element<br />
steam inlet<br />
screw set<br />
switching Box<br />
glass plate<br />
mounting kit<br />
control K IV STEAM PLUS<br />
isolating valve<br />
temperature sensor<br />
corner cover<br />
cover<br />
escutcheon<br />
tank for 'aromatics'<br />
solenoid valve<br />
Relaismodul 400V<br />
cover for fluid scent<br />
power supply cable 230 V<br />
lighting cable (12 V)<br />
couleures<br />
cromato<br />
cromato/oro<br />
bianco (alpino)<br />
pergamon<br />
platino<br />
4 0<br />
460<br />
800<br />
810<br />
880<br />
PartI DI rIcaMbIo Dg 4, KW<br />
transformatore<br />
97068000<br />
unità riempimento di sostanze aromatiche 97079000<br />
coperchio<br />
97080000<br />
filtro<br />
97081000<br />
limitatore sostanza aromatica 97082000<br />
recipiente per sostanza aromatica 97083000<br />
valvola elettromagnetica 97084000<br />
sensore livello<br />
97085000<br />
generatore di vapore<br />
97831000<br />
spirale di riscaldamento 97828000<br />
ugello di fuoriuscita vapore 97458000<br />
set di viti<br />
21880xxx<br />
cassetta di contenimento 97088000<br />
lastra di vetro<br />
21881000<br />
set di fissaggio<br />
97543000<br />
scatola di comandoK IV STEAM PLUS 97920000<br />
valvola d'arresto<br />
97103000<br />
termosensore<br />
97922000<br />
Copertura angolare<br />
97544980<br />
cappuccio<br />
96643xxx<br />
copertura<br />
97541000<br />
contenitore essenza aromatica 97484000<br />
valvola magnetica<br />
96646000<br />
cassetta di contenimento 400 V 97830000<br />
coperchio<br />
98602000<br />
cavo di allacciamento 400 V<br />
cavo di allacciamento per<br />
l‘illuminazione (12 V)<br />
weiß<br />
grau<br />
steel<br />
satinox<br />
edelmatt<br />
white<br />
grey<br />
steel<br />
satinox<br />
satin chrome<br />
97829000<br />
97540000<br />
bianco<br />
grigio<br />
acciaio<br />
satinox<br />
satincromo<br />
1<br />
1<br />
1<br />
1<br />
1<br />
1<br />
1<br />
1<br />
1<br />
1<br />
1<br />
4<br />
1<br />
1<br />
1<br />
1<br />
1<br />
1<br />
1<br />
1<br />
1<br />
1<br />
1<br />
1<br />
1
19<br />
18<br />
22<br />
23<br />
2<br />
4<br />
21<br />
16<br />
20<br />
24<br />
13<br />
11<br />
3<br />
4<br />
6<br />
2<br />
12<br />
1<br />
14<br />
8<br />
10<br />
1<br />
1<br />
9<br />
9<br />
Deutsch<br />
english<br />
Italiano
techNIsche DateN Dg 3 KW<br />
Mindestfließdruck: 2 bar<br />
Betriebsdruck: max. 10 bar<br />
Empfohlener Betriebsdruck: 2 – 5 bar<br />
Prüfdruck: 16 bar<br />
Heißwassertemperatur: max. 70 °C<br />
Empfohlene Heißwassertemp.: 60 °C<br />
Durchflussleistung bei 3 bar:<br />
Dampferzeuger:<br />
4,1 l/h (Dampfbetrieb)<br />
Dampferzeuger:<br />
7,7 l/h (Dampfbetrieb + Drainage)<br />
Ab 14 °d (2,5 mmol/l) Ihres Wassers ist<br />
zum Schutz des <strong>Dampfgenerator</strong>s eine<br />
Wasserenthärtungsanlage in die Wasserzufuhr<br />
einzubauen.<br />
Das Dampfmodul ist geeignet um einen<br />
geschlossenen raum von ca. 2, m 3 ausreichend<br />
zu bedampfen!<br />
Die Module bestehen aus folgenden<br />
Werkstoffen:<br />
- Eckschrank mit Dampftechnik aus<br />
Acryl<br />
Legende<br />
a Leerrohr 1 mit Innen-Ø 25 mm für<br />
Stromversorgung:<br />
Das mitgelieferte Stromversorgungskabel<br />
mit Anschlussdose und Kupplungsstecker<br />
für den Anschluß am <strong>Dampfgenerator</strong><br />
ermöglicht die Installation der Stromversorgung<br />
bis zu maximal ca. 6 m entfernt<br />
vom Eckschrankmodul. Die Anschlussdose<br />
muss jederzeit zugänglich und im<br />
Trockenbereich (Schutzzone 3) installiert<br />
werden.<br />
Anschlussdose mit Elektroanschluss<br />
230V/N/PE/50Hz für das Stromversorgungskabel<br />
vorsehen.<br />
Die Absicherung muss über eine Fehlerstrom-Schutzeinrichtung<br />
(RCD) mit<br />
einem Bemessungsdifferenzstrom ≤<br />
30 mA. erfolgen.<br />
b Leerrohr 2 mit Innen-Ø 25 mm für Trafokabel:<br />
Der mitgelieferte Trafo (Abmessung:<br />
120x80x80mm) muss im Trockenbereich<br />
(Schutzzone 3) installiert werden. Das<br />
Trafokabel ermöglicht die Installation<br />
des Trafos bis zu max. ca. 6 m entfernt<br />
vom Eckschrankmodul. Der Trafo muss<br />
jederzeit zugänglich sein. Ein beschädigter<br />
Anschluss kann nicht ersetzt<br />
werden. Der Trafo darf dann nicht mehr<br />
betrieben werden.<br />
Der Trafo wird an eine Steckdose<br />
230V/50Hz angeschlossen und muss über<br />
eine Fehlerstrom-Schutzeinrichtung (RCD)<br />
mit einem Bemessungsdifferenzstrom<br />
von ≤ 30 mA abgesichert werden.<br />
c Leerrohr 3 mit Innen-Ø 25 mm für Steuerleitung<br />
(12V~/40W) zum ansteuern<br />
einer externen Beleuchtung (Beleuchtung<br />
nicht im Lieferumfang)<br />
Das mitgelieferte Verlängerungskabel<br />
ermöglicht den Anschluss bis zu max.<br />
ca. 4 m entfernt vom Modul.<br />
10<br />
techNIcaL Data Dg 3 KW<br />
Minimum flow pressure: 2 bar<br />
Operating pressure: max. 10 bar<br />
Recommended operating pressure:<br />
2 – 5 bar<br />
Test pressure: 16 bar<br />
Hot water temperature: max. 70° C<br />
Recommended hot water temp.: 60° C<br />
Flow capacity at 3 bar<br />
Steam generator:<br />
4.1 l/h (steam operation)<br />
Steam generator:<br />
7.7 l/h (steam operation+ drain)<br />
Install water softening equipment in<br />
the water inlet to protect the steam<br />
generator as from water hardness level<br />
14°d (2,5 mmol/l) (German Standard).<br />
the steam module is suitably to steam a<br />
closed room of approx. 2. m 3 !<br />
The modules consist of the following<br />
materials:<br />
- corner cabinet with steam system<br />
made of acrylic material<br />
Legend<br />
a Wiring conduit 1 with internal diameter<br />
of 25 mm for power supply:<br />
The Steam generator is supplied with a<br />
cable lead allowing for the mains connection<br />
to be made approx 6m from<br />
the corner of the cabin.<br />
The connection must be accessible at<br />
all times and must be installed in the<br />
dry area (protection zone 3).<br />
Plan socket with power supply connection<br />
230V/N/PE/50Hz<br />
The connection must be fused via a<br />
2-pole RCCB with a residual current of<br />
≤ 30 mA.<br />
b Wiring conduit 2 with internal diameter<br />
of 25 mm for transformer cable:<br />
The transformer (dimension:<br />
120x80x80mm) must be installed in<br />
the dry area (protection zone 3). The<br />
transformer cable allows the connection<br />
to be installed max. approx. 6 m from<br />
corner cabinet. The transformer must<br />
be accessible at all times. A damaged<br />
connection cable cannot be replaced,<br />
and the transformer must not be operated<br />
in this case.<br />
The transformer must be connected<br />
to a power outlet (230V/50Hz). The<br />
connection must be fused via a 2-pole<br />
RCCB with a residual current of ≤ 30<br />
mA.<br />
c Wiring conduit 3 with internal diameter<br />
of 25 mm for control cable (12V~/40W)<br />
for external lighting (the lighting isn't a<br />
component of the delivery):<br />
The enclosed extension cord allows<br />
the connection max. approx. 4 m from<br />
corner cabinet.<br />
D tWW = hot water DN15 ½“<br />
e Plan waterdrainage (Ø 50 mm) under<br />
steam nozzle of the corner cabinet.<br />
DatI tecNIcI Dg 3 KW<br />
Pressione minima: 2 bar<br />
Pressione di servizio: max. 10 bar<br />
Pressione di servizio consigliata: 2 – 5 bar<br />
Pressione di prova: 16 bar<br />
Temperatura acqua calda: max. 70° C<br />
Temp. acqua calda consigliata: 60° C<br />
Portata con 3 bar<br />
Generatore di vapore:<br />
4,1 l/h (esercizio con vapore)<br />
Generatore di vapore:<br />
7,7 l/h (esercizio con vapore + drenaggio)<br />
A partire da 14°d (2,5 mmol/l) dell'acqua,<br />
a protezione del generatore di vapore è<br />
indispensabile montare un impianto<br />
per la addolcificazione dell'acqua<br />
nell'alimentazione dell'acqua.<br />
Il modulo vapore è adatto per produrre<br />
vapore sufficiente per un locale chiuso di<br />
ca. 2, m 3 !<br />
I moduli sono costruiti con i seguenti<br />
materiali:<br />
- parete angolare con tecnologia del<br />
vapore in materiale acrilico<br />
Legenda<br />
a Tubo vuoto di posa 1 con Ø interno 25<br />
mm per l‘alimentazione elettrica:<br />
Il cavo d’alimentazione di corrente elettrica<br />
in dotazione con spina di connettore<br />
per l’allacciamento di rete al generatore<br />
di vapore permette l’installazione dell’alimentazione<br />
elettrica fino ad una<br />
distanza massima di ca. 6m dal modulo<br />
armadietto angolare. L’installazione del<br />
collegamento deve essere eseguita in<br />
modo da essere accessibile in qualsiasi<br />
momento ed in zona asciutta (zona di<br />
protezione 3).<br />
Prevedere una scatola di collegamento<br />
con il collegamento elettrico 230V/N/<br />
PE/50Hz per il cavo d’alimentazione di<br />
corrente elettrica.<br />
La protezione deve essere eseguita<br />
attraverso un interruttore automatico a<br />
corrente residua (RCD) con una taratura<br />
della corrente differenziale pari a ≤ 30<br />
mA.<br />
b Tubo vuoto di posa 2 con Ø interno 25<br />
mm per cavo del trasformatore:<br />
Il trasformatore in dotazione (Dimensione:<br />
120x80x80mm) deve essere installato in<br />
zona asciutta (zona di protezione 3). Il cavo<br />
del trasformatore consente di installare il<br />
trasformatore fino ad una distanza massima<br />
di ca. 6m dal modulo armadietto angolare.<br />
Il trasformatore deve essere accessibile<br />
in qualsiasi momento. Non è possibile<br />
sostituire un collegamento danneggiato.<br />
In tal caso non è più permesso utilizzare<br />
il trasformatore.<br />
Il trasformatore viene collegato ad una<br />
presa di alimentazione 230V/50Hz e deve<br />
essere protetto attraverso un interruttore<br />
automatico a corrente residua (RCD) con<br />
una taratura della corrente differenziale<br />
pari a ≤ 30 mA.
D tWW - Trinkwasser warm DN15 ½“<br />
e Wasserablauf (Ø 50 mm) unterhalb der<br />
Dampfaustrittsdüse vorsehen.<br />
Anschluss für Wasserzulauf und der<br />
Wasserablauf sind nach den derzeit gültigen<br />
DIN 1988/EN 1717 / DIN 1986/EN<br />
12056 und den örtlichen Vorschriften zu<br />
installieren (Anschlußmuffe DN15 ½“,<br />
bündig Fliesen).<br />
Die Leerrohre und Anschlüsse können<br />
wahlweise links oder rechts vorgesehen<br />
werden.<br />
Befestigungspunkte F für das Dampfmodul<br />
bei der Rohinstallation berücksichtigen.<br />
einbau auf die Fliesen!<br />
Connections for water inlet and drain<br />
have to be installed according to the<br />
currently valid DIN 1988/EN 1717 / DIN<br />
1986/EN 12056 as well as local regulations<br />
(connection sleeve DN15 ½“, flush<br />
with tiles).<br />
Wiring conduit and water connection<br />
optionally on the left or right side.<br />
Taking care to the fastening points F<br />
for the steam module at the raw installation.<br />
Installation of modules on the tiles!<br />
c Tubo vuoto di posa 3 con Ø interno<br />
25 mm per filo pilota (12V~/40W) per<br />
il controllo di un‘illuminazione esterna<br />
(illuminazione non compresa nel Kit di<br />
fornitura).<br />
Il cavo di prolunga fornito in dotazione<br />
consente il collegamento fino ad una<br />
distanza massima di ca. 4m dal modulo.<br />
D TWW - acqua potabile calda DN15 ½“<br />
e Predisporre lo scarico a pavimento (Ø<br />
50mm) in corrispondenza del diffusore<br />
vapore.<br />
I collegamenti per l'acqua di mandata e<br />
la tubazione dell‘acqua di uscita devono<br />
essere installati secondo le vigenti norme<br />
DIN 1988/EN 1717 / DIN 1986/ EN<br />
12056 ed in conformità con le vigenti<br />
normative locali (manicotto di collegamento<br />
DN15 ½“, a filo con piastrelle).<br />
Il tubo vuoto di posa ed i raccordi di collegamento,<br />
possono essere predisposti<br />
a scelta sia a destra che a sinistra.<br />
Durante l’installazione dei tubi, tenere in<br />
considerazione i punti di fissaggio F per<br />
il modulo vapore.<br />
Installazione sulle piastrelle!<br />
11<br />
Deutsch<br />
english<br />
Italiano
techNIsche DateN Dg 4, KW<br />
Mindestfließdruck: 2 bar<br />
Betriebsdruck: max. 10 bar<br />
Empfohlener Betriebsdruck: 2 – 5 bar<br />
Prüfdruck: 16 bar<br />
Heißwassertemperatur: max. 70 °C<br />
Empfohlene Heißwassertemp.: 60 °C<br />
Durchflussleistung bei 3 bar:<br />
Dampferzeuger:<br />
9,1 l/min (Dampfbetrieb)<br />
Dampferzeuger:<br />
13 l/min (Dampfbetrieb + Drainage)<br />
Ab 14 °d (2,5 mmol/l) Ihres Wassers ist<br />
zum Schutz des <strong>Dampfgenerator</strong>s eine<br />
Wasserenthärtungsanlage in die Wasserzufuhr<br />
einzubauen.<br />
Das Dampfmodul ist geeignet um einen<br />
geschlossenen Raum von ca. 4 m3 ausreichend<br />
zu bedampfen!<br />
Die Module bestehen aus folgenden<br />
Werkstoffen:<br />
- Eckschrank mit Dampftechnik aus<br />
Acryl<br />
Legende<br />
a Leerrohr 1 mit Innen-Ø 25 mm für<br />
Stromversorgung:<br />
Das mitgelieferte Stromversorgungskabel<br />
mit Anschlussdose und Kupplungsstecker<br />
für den Anschluß am <strong>Dampfgenerator</strong><br />
ermöglicht die Installation der Stromversorgung<br />
bis zu maximal ca. 6 m<br />
entfernt vom Eckschrankmodul. Die<br />
Anschlussdose muss jederzeit zugänglich<br />
und im Trockenbereich (Schutzzone 3)<br />
installiert werden.<br />
Anschlussdose mit Elektroanschluss<br />
400V/L1/L2/N/PE/50Hz für das Stromversorgungskabel<br />
vorsehen.<br />
Die Absicherung muss über eine Fehlerstrom-Schutzeinrichtung<br />
(RCD) mit<br />
einem Bemessungsdifferenz-strom ≤<br />
30 mA. erfolgen.<br />
b Leerrohr 2 mit Innen-Ø 25 mm für Trafokabel:<br />
Der mitgelieferte Trafo (Abmessung:<br />
120x80x80mm) muss im Trockenbereich<br />
(Schutzzone 3) installiert werden. Das<br />
Trafokabel ermöglicht die Installation<br />
des Trafos bis zu max. ca. 6 m entfernt<br />
vom Eckschrankmodul. Der Trafo muss<br />
jederzeit zugänglich sein. Ein beschädigter<br />
Anschluss kann nicht ersetzt<br />
werden. Der Trafo darf dann nicht mehr<br />
betrieben werden.<br />
Der Trafo wird an eine Steckdose<br />
230V/50Hz angeschlossen und muss über<br />
eine Fehlerstrom-Schutzeinrichtung (RCD)<br />
mit einem Bemessungsdifferenzstrom<br />
von ≤ 30 mA abgesichert werden.<br />
c Leerrohr 3 mit Innen-Ø 25 mm für Steuerleitung<br />
(12V~/40W) zum ansteuern<br />
einer externen Beleuchtung (Beleuchtung<br />
nicht im Lieferumfang)<br />
Das mitgelieferte Verlängerungskabel<br />
ermöglicht den Anschluss bis zu max.<br />
ca. 4 m entfernt vom Modul..<br />
12<br />
techNIcaL Data Dg 4, KW<br />
Minimum flow pressure: 2 bar<br />
Operating pressure: max. 10 bar<br />
Recommended operating pressure:<br />
2 – 5 bar<br />
Test pressure: 16 bar<br />
Hot water temperature: max. 70° C<br />
Recommended hot water temp.: 60° C<br />
Flow capacity at 3 bar<br />
Steam generator:<br />
9,7 l/h (steam operation)<br />
Steam generator:<br />
13 l/h (steam operation+ drain)<br />
Install water softening equipment in the<br />
water inlet to protect the steam generator<br />
as from water hardness level 14°d<br />
(2,5 mmol/l) (German Standard).<br />
The steam module is suitably to steam a<br />
closed room of approx. 4 m3!<br />
The modules consist of the following<br />
materials:<br />
- corner cabinet with steam system<br />
made of acrylic material<br />
Legend<br />
a Wiring conduit 1 with internal diameter<br />
of 25 mm for power supply:<br />
The Steam generator is supplied with<br />
a cable lead allowing for the mains<br />
connection to be made approx 6m from<br />
the corner of the cabin.<br />
The connection must be accessible at<br />
all times and must be installed in the<br />
dry area (protection zone 3).<br />
Plan socket with power supply connection<br />
400V/L1/L2/N/PE/50Hz<br />
The connection must be fused via a<br />
2-pole RCCB with a residual current of<br />
≤ 30 mA.<br />
b Wiring conduit 2 with internal diameter<br />
of 25 mm for transformer cable:<br />
The transformer (dimension:<br />
120x80x80mm) must be installed in<br />
the dry area (protection zone 3). The<br />
transformer cable allows the connection<br />
to be installed max. approx. 6 m from<br />
corner cabinet. The transformer must<br />
be accessible at all times. A damaged<br />
connection cable cannot be replaced,<br />
and the transformer must not be operated<br />
in this case.<br />
The transformer must be connected<br />
to a power outlet (230V/50Hz). The<br />
connection must be fused via a 2-pole<br />
RCCB with a residual current of ≤ 30<br />
mA.<br />
c Wiring conduit 3 with internal diameter<br />
of 25 mm for control cable (12V~/40W)<br />
for external lighting (the lighting isn't a<br />
component of the delivery):<br />
The enclosed extension cord allows<br />
the connection max. approx. 4 m from<br />
corner cabinet.<br />
D TWW = hot water DN15 ½“<br />
e Plan waterdrainage (Ø 50 mm) under<br />
steam nozzle of the corner cabinet.<br />
DatI tecNIcI Dg 4, KW<br />
Pressione minima: 2 bar<br />
Pressione di servizio: max. 10 bar<br />
Pressione di servizio consigliata: 2 – 5 bar<br />
Pressione di prova: 16 bar<br />
Temperatura acqua calda: max. 70° C<br />
Temp. acqua calda consigliata: 60° C<br />
Portata con 3 bar<br />
Generatore di vapore:<br />
9,7 l/h (esercizio con vapore)<br />
Generatore di vapore:<br />
13 l/h (esercizio con vapore + drenaggio)<br />
A partire da 14°d (2,5 mmol/l) dell'acqua,<br />
a protezione del generatore di vapore è<br />
indispensabile montare un impianto<br />
per la addolcificazione dell'acqua<br />
nell'alimentazione dell'acqua.<br />
Il modulo vapore è adatto per produrre<br />
vapore sufficiente per un locale chiuso<br />
di ca. 4 m3!<br />
I moduli sono costruiti con i seguenti<br />
materiali:<br />
- parete angolare con tecnologia del<br />
vapore in materiale acrilico<br />
Legenda<br />
a Tubo vuoto di posa 1 con Ø interno 25<br />
mm per l‘alimentazione elettrica:<br />
Il cavo d’alimentazione di corrente elettrica<br />
in dotazione con spina di connettore<br />
per l’allacciamento di rete al generatore<br />
di vapore permette l’installazione<br />
dell’alimentazione elettrica fino ad una<br />
distanza massima di ca. 6m dal modulo<br />
armadietto angolare. L’installazione del<br />
collegamento deve essere eseguita in<br />
modo da essere accessibile in qualsiasi<br />
momento ed in zona asciutta (zona di<br />
protezione 3).<br />
Prevedere una scatola di collegamento<br />
con il collegamento elettrico 400V/L1/<br />
L2/N/PE/50Hz per il cavo d’alimentazione<br />
di corrente elettrica.<br />
La protezione deve essere eseguita<br />
attraverso un interruttore automatico a<br />
corrente residua (RCD) con una taratura<br />
della corrente differenziale pari a ≤ 30<br />
mA.<br />
b Tubo vuoto di posa 2 con Ø interno 25<br />
mm per cavo del trasformatore:<br />
Il trasformatore in dotazione (Dimensione:<br />
120x80x80mm) deve essere installato<br />
in zona asciutta (zona di protezione 3).<br />
Il cavo del trasformatore consente di<br />
installare il trasformatore fino ad una<br />
distanza massima di ca. 6m dal modulo<br />
armadietto angolare. Il trasformatore<br />
deve essere accessibile in qualsiasi<br />
momento. Non è possibile sostituire<br />
un collegamento danneggiato. In tal<br />
caso non è più permesso utilizzare il<br />
trasformatore.<br />
Il trasformatore viene collegato ad una<br />
presa di alimentazione 230V/50Hz e deve<br />
essere protetto attraverso un interruttore<br />
automatico a corrente residua (RCD) con<br />
una taratura della corrente differenziale<br />
pari a ≤ 30 mA.<br />
c Tubo vuoto di posa 3 con Ø interno 25 mm
D TWW - Trinkwasser warm DN15 ½“<br />
e Wasserablauf (Ø 50 mm) unterhalb der<br />
Dampfaustrittsdüse vorsehen.<br />
Anschluss für Wasserzulauf und der<br />
Wasserablauf sind nach den derzeit<br />
gültigen DIN 1988/EN 1717 / DIN 1986/<br />
EN 12056 und den örtlichen Vorschriften<br />
zu installieren (Anschlußmuffe DN15 ½“,<br />
bündig Fliesen).<br />
Die Leerrohre und Anschlüsse können<br />
wahlweise links oder rechts vorgesehen<br />
werden.<br />
Befestigungspunkte F für das Dampfmodul<br />
bei der Rohinstallation berücksichtigen.<br />
einbau auf die Fliesen!<br />
Connections for water inlet and drain<br />
have to be installed according to the<br />
currently valid DIN 1988/EN 1717 / DIN<br />
1986/EN 12056 as well as local regulations<br />
(connection sleeve DN15 ½“, flush<br />
with tiles).<br />
Wiring conduit and water connection<br />
optionally on the left or right side.<br />
Taking care to the fastening points F<br />
for the steam module at the raw installation.<br />
Installation of modules on the tiles!<br />
per filo pilota (12V~/40W) per il controllo<br />
di un‘illuminazione esterna (illuminazione<br />
non compresa nel Kit di fornitura).<br />
Il cavo di prolunga fornito in dotazione<br />
consente il collegamento fino ad una<br />
distanza massima di ca. 4m dal modulo.<br />
D TWW - acqua potabile calda DN15 ½“<br />
e Predisporre lo scarico a pavimento (Ø<br />
50mm) in corrispondenza del diffusore<br />
vapore.<br />
I collegamenti per l'acqua di mandata e<br />
la tubazione dell‘acqua di uscita devono<br />
essere installati secondo le vigenti norme<br />
DIN 1988/EN 1717 / DIN 1986/ EN<br />
12056 ed in conformità con le vigenti<br />
normative locali (manicotto di collegamento<br />
DN15 ½“, a filo con piastrelle).<br />
Il tubo vuoto di posa ed i raccordi di collegamento,<br />
possono essere predisposti<br />
a scelta sia a destra che a sinistra.<br />
Durante l’installazione dei tubi, tenere in<br />
considerazione i punti di fissaggio F per<br />
il modulo vapore.<br />
Installazione sulle piastrelle!<br />
13<br />
Deutsch<br />
english<br />
Italiano
vorWort<br />
Die vorliegende Anleitung ist für den<br />
Installateur gedacht, sie beschreibt die für<br />
einen korrekten Einbau anzuwendenden<br />
Systeme und Methoden.<br />
Die Module entsprechen den Richtlinien<br />
und weissen daher keine Gefahren für<br />
den Benutzer auf, falls sie nach den vom<br />
Hersteller gelieferten Anweisungen eingebaut,<br />
benutzt und gepflegt wird und unter<br />
der Bedingung, dass die elektrischen und<br />
mechanischen Teile voll leistungstüchtig<br />
gehalten werden.<br />
Aus diesem Grund sind die in der<br />
vorliegenden Anleitung verzeichneten<br />
Anweisungen genauestens zu befolgen.<br />
Die Module sind in Konformität mit den<br />
Niederspannungsrichtlinien 73/23/EWG,<br />
93/68/EWG und der Norm CEI 64-8 (IEC<br />
60364) hergestellt.<br />
Die Schutzart ist IPX5, die Nennspannung<br />
beträgt für DG 29612XXX 230V,<br />
die Nennleistung ist 3,5 kW, und für DG<br />
29613XXX beträgt die Nennspannung<br />
400V die Nennleistung dort ist 4,5 KW.<br />
Die von der Europarichtlinie für elektromagnetische<br />
Verträglichkeit auferlegten<br />
Sicherheitsanforderungen (Richtlinien<br />
89/336/EWG, 92/31/EWG, 93/68/EWG)<br />
und die Konformität mit der letzteren<br />
wird durch die Anwendung folgender<br />
europäischer Normen gewährleistet:<br />
EN 55014-1<br />
EN 55014-2<br />
EN 61000-3-2<br />
EN 61000-3-3<br />
EN 61000-4-2<br />
EN 61000-4-3<br />
EN 61000-4-4<br />
EN 61000-4-5<br />
EN 61000-4-11<br />
14<br />
ForeWorD<br />
These instructions are intended for the<br />
installer, they describe the systems and<br />
methods to be used for correct installation.<br />
The Modules comply with the regulations<br />
and therefore presents no hazards for the<br />
user, providing it is installed, used and<br />
serviced according to the instructions<br />
provided by the manufacturer and with<br />
the condition that the electrical and<br />
mechanical parts are maintained fully<br />
operational.<br />
For this reason the instructions contained<br />
here are to be followed exactly.<br />
The Modules are manufactured in conformity<br />
with the low voltage directives<br />
73/23/EEC, 93/68/EEC and the CEI 64-8<br />
(IEC 60364) standard.<br />
The protection type is IPX5, the rated<br />
voltage for DG (29612XXX) is 230 V,the<br />
rated power is 3,0 kW, the rated voltage<br />
for DG (29613XXX) 400V the rated power<br />
is 4,5 kW.<br />
The safety requirements imposed by the<br />
European directive for electromagnetic<br />
compatibility (directives 89/336/EEC,<br />
92/31/EEC, 93/68/EEC) and the conformity<br />
with the last are ensured by the<br />
application of the following European<br />
standards:<br />
EN 55014-1<br />
EN 55014-2<br />
EN 61000-3-2<br />
EN 61000-3-3<br />
EN 61000-4-2<br />
EN 61000-4-3<br />
EN 61000-4-4<br />
EN 61000-4-5<br />
EN 61000-4-11<br />
INtroDuzIoNe<br />
Il seguente manuale è destinato agli<br />
installatori, descrive sistemi e metodi<br />
da adottare per eseguire una corretta<br />
installazione del prodotto.<br />
I moduli rispondendo alle direttive non<br />
rappresenta pericoli per l’operatore se,<br />
installata, usata, mantenuta secondo le<br />
istruzioni fornite dal costruttore e a condizione<br />
che le parti elettriche e quelle<br />
meccaniche siano tenute in perfetta<br />
efficienza.<br />
Per questa ragione occorre attenersi<br />
scrupolosamente alle istruzioni indicate<br />
in questo manuale.<br />
I moduli sono stati costruiti in conformità<br />
con le direttive relative alla bassa tensione<br />
73/23/CEE, 93/68/CEE ed alla norma CEI<br />
64-8 (IEC 60364).<br />
Il tipo di protezione è IPX5, la tensione<br />
nominale è 230 V (29612XXX), la potenza<br />
nominale è 3,0 kW.<br />
La tensione nominale e 400V (29613XXX),<br />
la potenza nominale e 4,5 kW<br />
Il rispetto delle disposizioni di sicurezza<br />
emesse dalla direttiva europea relativa<br />
alla tollerabilità elettromagnetica (direttive<br />
89/336/CEE, 92/31 /CEE, 93/68/CEE)<br />
e la conformità con quest'ultima viene<br />
garantita attraverso l'applicazione delle<br />
seguenti norme europee:<br />
EN 55014-1<br />
EN 55014-2<br />
EN 61000-3-2<br />
EN 61000-3-3<br />
EN 61000-4-2<br />
EN 61000-4-3<br />
EN 61000-4-4<br />
EN 61000-4-5<br />
EN 61000-4-11
IN Der aNLeItuNg<br />
verWeNDete syMboLe<br />
In der vorliegenden Einbauanleitung<br />
und an einigen Stellen auf dem Produkt<br />
selbst befinden sich Symbole, die hier<br />
unten beschrieben werden.<br />
ÜbLIche syMboLe uND Ihre beschreIbuNg.<br />
achtuNg stroMschLaggeFahr<br />
Meldet dem betreffenden Personal,<br />
dass der beschriebene Vorgang, falls<br />
nicht unter Einhaltung der Sicherheitsvorschriften<br />
ausgeführt, das Risiko eines<br />
elektrischen Schlags birgt.<br />
achtuNg aLLgeMeINe geFahr<br />
Meldet dem betreffenden Personal,<br />
dass der beschriebene Vorgang, falls<br />
nicht unter Einhaltung der Sicherheitsvorschriften<br />
ausgeführt, das Risiko von<br />
Körperverletzungen birgt.<br />
aNMerKuNg<br />
Weist das betreffende Personal auf Informationen<br />
hin, deren Nichtbeachtung zu<br />
leichten Personen- oder Produktschäden<br />
führen kann.<br />
hINWeIs<br />
Weist das betreffende Personal auf Informationen<br />
hin, deren Inhalt wichtig ist<br />
und berücksichtigt werden soll.<br />
hyDrauLIscher INstaLLateur<br />
Fachtechniker, der imstande ist, das<br />
Produkt unter normalen Bedingungen<br />
einzubauen und Eingriffe wie Einstellungen,<br />
Wartungs- und notwendige Reparaturarbeiten<br />
an mechanischen Teilen<br />
auszuführen. Er ist nicht befähigt, Eingriffe<br />
an elektrischen Anlagen auszuführen,<br />
wenn diese unter Spannung stehen.<br />
eLeKtrIscher INstaLLateur<br />
Fachtechniker, der imstande ist, das<br />
Produkt unter normalen Bedingungen<br />
einzubauen. Er ist für alle Eingriffe elektrischer<br />
Art wie Einstellungen, Wartung<br />
und Reparaturen zuständig. Er ist imstande,<br />
unter Spannung in Schaltschränken<br />
oder elektrischen Dosen zu arbeiten.<br />
syMboLs useD IN the INstructIoNs<br />
The symbols described below appear<br />
in these Installation Instructions and in<br />
some locations on the product itself.<br />
syMboLs useD aND theIr DescrIPtIoN.<br />
atteNtIoN rIsK oF eLectrIc<br />
shocK<br />
Informs the personnel concerned that<br />
the process described, unless performed<br />
in compliance with the safety rules,<br />
bears the risk of electric shock.<br />
atteNtIoN geNeraL hazarD<br />
Informs the personnel concerned that<br />
the process described, unless performed<br />
in compliance with the safety rules,<br />
bears the risk of injury.<br />
coMMeNt<br />
Informs the personnel concerned of<br />
information which, if not observed, can<br />
cause minor injuries or damage.<br />
Note<br />
Informs the personnel concerned of<br />
information with important contents to<br />
be observed.<br />
INstaLLer<br />
Specialist technician capable of installing<br />
the product under normal conditions<br />
and performing settings, maintenance<br />
and necessary repair work on<br />
mechanical parts. He is not authorised<br />
to make interventions on live electrical<br />
equipment.<br />
eLectrIcIaN<br />
Specialist technician capable of installing<br />
the product under normal conditions. He<br />
is responsible for all electrical work, such<br />
as setting, maintenance and repairs. He<br />
is capable of working in energized control<br />
cabinets or on electrical sockets.<br />
sIMboLI utILIzzatI NeL MaNuaLe<br />
Nel presente manuale di istruzioni di montaggio,<br />
si trovano dei simboli, alcuni dei quali si<br />
trovano applicati in alcuni punti del prodotto<br />
stesso. In questa parte della documentazione<br />
si procede alla descrizione del significato di<br />
questi simboli.<br />
sIMboLI correNtI e DescrIzIoNe DeL<br />
Loro sIgNIFIcato.<br />
atteNzIoNe PerIcoLo DI scossa<br />
FoLgorazIoNe<br />
Segnala al personale interessato che<br />
l'operazione descritta può comportare il rischio<br />
di una scossa elettrica se non eseguita<br />
nel pieno rispetto delle norme di sicurezza.<br />
atteNzIoNe PerIcoLo geNeraLe<br />
Segnala al personale interessato che<br />
l'operazione descritta può comportare il<br />
rischio di seri incidenti se non eseguita nel<br />
pieno rispetto delle norme di sicurezza.<br />
avverteNza<br />
Richiama l'attenzione del personale interessato<br />
su informazioni che in caso di inosservanza<br />
possono comportare leggeri danni a<br />
persone o al prodotto.<br />
Nota beNe<br />
Segnala al personale interessato informazioni<br />
con un contenuto importante che deve<br />
essere tenuto in considerazione.<br />
INstaLLatore IDrauLIco<br />
Tecnico specializzato in grado di installare il<br />
prodotto in normali situazioni ed ad eseguire<br />
interventi di registrazione, di manutenzione e<br />
di necessari lavori di riparazione su parti meccaniche.<br />
Egli non è autorizzato ad eseguire<br />
interventi su impianti elettrici che si trovino<br />
sotto tensione.<br />
INstaLLatore eLettrIco<br />
Tecnico specializzato in grado di installare<br />
il prodotto in normali condizioni di lavoro.<br />
Tra le sue competenze rientrano tutti gli interventi<br />
di tipo elettrico come registrazioni,<br />
manutenzione e riparazioni. Egli è in grado<br />
di intervenire in quadri elettrici ad armadio<br />
oppure su prese per la corrente che si trovino<br />
sotto tensione.<br />
1<br />
Deutsch<br />
english<br />
Italiano
sIcherheItsvorschrIFteN<br />
Vor dem Einbau des Produktes muss<br />
geprüft werden, ob alle technologischen<br />
Ausrüstungen vorhanden sind.<br />
Vor der Ausführung von Reinigungs- und<br />
Wartungsarbeiten muss das Produkt auf<br />
den Energiezustand Null gebracht werden,<br />
d. h. Fehlerstrom-Schutzeinrichtung<br />
(RCD) auslösen.<br />
Der Einbau von elektrischen Vorrichtungen<br />
(Steckdosen, Schalter, Lampen,<br />
usw.) im Badezimmer bzw. im Installationsraum<br />
des Geräts muss nach den<br />
diesbezüglich gültigen Vorschriften<br />
erfolgen.<br />
achtuNg:<br />
Kein essigsäurehaltiges Silikon verwenden.<br />
Durch den Gebrauch von essigsäurehaltigem<br />
Silikon könnten die Acryl- bzw.<br />
Metallteile des Produktes beschädigt<br />
werden.<br />
Für das Verfugen zwischen den Elementen<br />
empfehlen wir die Verwendung<br />
von pilzhemmendem Sanitärsilikon.<br />
Dennoch kann es unter Umständen zu<br />
Verfärbungen des Silikondichtstoffes<br />
kommen. Falls durch Reinigung der<br />
Fugen die Verfärbung nicht zu entfernen<br />
ist, müssen die Silikonfugen ausgetauscht<br />
werden. Silikonfugen sind<br />
Wartungsfugen und unterliegen nicht<br />
der Gewährleistung.<br />
Damit keine Dampf in die Wände eindringen<br />
kann, müssen diese mit einer<br />
diffusionsdichten schicht versehen<br />
sein.<br />
achtuNg:<br />
Ausschliesslich chemikalienfeste Bodenfliesen<br />
oder Duschwanne einsetzen (z.B.<br />
Stahlemail).<br />
Durch austretenden Duftstoff wird ein<br />
nicht chemikalienfester Untergrund<br />
beschädigt.<br />
Das Produkt darf in seiner Bauart nicht<br />
verändert werden. Nur Originalersatzteile<br />
verwende<br />
16<br />
saFety PrecautIoNs PrescrIzIoNI DI sIcurezza<br />
Before installing the product check if all<br />
technological equipment are available.<br />
Set the product to the zero energy state<br />
prior to any cleaning and repair work, i.e.<br />
trigger the RCCB protective switch.<br />
Install electrical devices (sockets, switches,<br />
lamps, etc.) in the bathroom or in<br />
the equipment installation room according<br />
to the relevant regulations.<br />
atteNtIoN:<br />
Do not use silicone containing acetic<br />
acid!<br />
Acrylic or metal parts of the product<br />
can be damaged by the use of silicone<br />
containing acetic acid.<br />
For the flexible seals between the elements<br />
we advise to use schimmelwerende<br />
silicone kit. Despite this, and dependant<br />
on circumstances, colorchanges in<br />
the kit can happen. If cleaning does not<br />
bring the wanted result, the seals have<br />
to be exchanged. Renewing is not within<br />
our warranty.<br />
so that no steam can penetrate into the<br />
walls, these must be provided with a<br />
diffusion thick layer.<br />
caution:<br />
Use only chemical-resistant floor tiles or<br />
a shower tub (e.g. steel enamel).<br />
A non chemical-resistant base is damaged<br />
by emitted scents.<br />
The product’s construction must not be<br />
changed. Only original components<br />
may be used.<br />
Prima dell‘installazione del prodotto si<br />
deve controllare se sono disponibili tutte<br />
le apparecchiature tecnologiche.<br />
Prima di procedere ad interventi di<br />
pulizia e di manutenzione è necessario<br />
mettere il prodotto allo stato energetico<br />
zero, cioè, aprire l'interruttore di<br />
massima.<br />
L'installazione di dispositivi elettrici (presa<br />
per la corrente, interruttori, lampadine,<br />
ecc.) nel bagno oppure nel locale<br />
da installazione dell'apparecchiatura<br />
deve essere eseguita in conformità con<br />
le relative prescrizioni in vigore.<br />
atteNzIoNe:<br />
Non utilizzare silicone contenente acido<br />
acetico.<br />
Utilizzando silicone contenente acido<br />
acetico vi è il pericolo di danneggiare<br />
parti in materiale acrilico oppure parti<br />
metalliche del prodotto.<br />
Per la sigillatura tra gli elementi raccomandiamo<br />
l‘uso di silicone antimuffa<br />
per sanitari. Ciò nonostante si possono<br />
verificare macchie o scolorimenti del<br />
silicone sigillante. Nel caso in cui gli<br />
scolorimenti o macchie non si lasciano<br />
eliminare pulendo semplicemente i<br />
giunti, è necessario sostituirli. I giunti di<br />
silicone sono giunti soggetti a manutenzione<br />
e non fanno parte della garanzia<br />
concessa.<br />
Per non far penetrare del vapore nelle<br />
pareti bisogna applicarvi uno strato che<br />
impedisce la diffusione del vapore.<br />
attenzione:<br />
Impiegare esclusivamente piastrelle da<br />
pavimento resistenti a prodotti chimici<br />
oppure vasca per doccia (p. es. smalto<br />
d'acciaio).<br />
Un fondo base non resistente a prodotti<br />
chimici viene danneggiato da sostanze<br />
odoranti fuoriuscenti.<br />
Il sistema di costruzione del prodotto<br />
non può essere modificato. Utilizzare<br />
solo ed esclusivamente pezzi di ricambio<br />
originali.
stromversorgung:<br />
Der Elektroanschluss darf ausschließlich<br />
vom Elektrofachmann, Ihrem Elektro-Installateur<br />
durchgeführt werden. Die gesamte<br />
Stromversorgung erfolgt über einen<br />
230V/N/PE/50Hz Wechselstromanschluss<br />
(29612 DG 3,0 KW) bzw einen 400V/L1/L2/<br />
N/PE/50Hz Drehstrohm- mit 2Phasen Anschluß<br />
(29613 DG 4,5 KW) und muss über<br />
eine Fehlerstrom-Schutzeinrichtung (RCD)<br />
mit einem Bemessungsdifferenzstrom von<br />
≤ 30 mA abgesichert werden.<br />
Bei der Elektro-Installation sind die entsprechenden<br />
VDE-, Landes- und EVU-Vorschriften<br />
in der jeweils gültigen Fassung<br />
einzuhalten. Die Installations- und Prüfungsarbeiten<br />
sind von einem zugelassenen<br />
Elektrofachmann auszuführen, unter<br />
Berücksichtigung von VDE 0100 Teil 701.<br />
Sämtliche Arbeiten an der Dampfdusche<br />
dürfen nur im spannungsfreien Zustand<br />
vorgenommen werden!<br />
Power supply:<br />
The electrical connection may only be<br />
carried out by an electrician, i.e. your<br />
electrical installer. The entire power<br />
supply is realized via a 230 V/50 HzAC<br />
connection (29612 DG 3,0 KW) respectively<br />
via a 400V/L1/L2/N/PE/50Hz rotary<br />
current with 2 phases connection (29613<br />
DG 4,5 KW) and must be fused via a<br />
2-pole RCCB with a residual current of<br />
≤ 30 mA.<br />
For electrical installation, all applicable<br />
VDE, country-specific and EVU regulations<br />
in their respectively valid versions<br />
must be observed. All installation and inspection<br />
works must be carried out by an<br />
approved electrician and in accordance<br />
with VDE 0100 Part 701. All works at the<br />
steam shower may only be carried out<br />
in a de-energized state!<br />
alimentazione elettrica:<br />
L’allacciamento elettrico deve essere<br />
eseguito solo da un tecnico (elettricista<br />
esperto). L’intera alimentazione elettrica<br />
avviene tramite un allacciamento elettrico<br />
a tensione alternata a 230V/N/PE/50<br />
Hz oppure tramite un allacciamento elettrico<br />
a corrente trifase con 2 fasi a 400V/<br />
L1/L2/N/PE/50Hz e deve essere protetto<br />
attraverso un interruttore automatico<br />
a corrente residua (RCD) con corrente<br />
differenziale nominale di 30 mA.<br />
Per l’impianto elettrico si devono rispettare<br />
le norme CEI e dell’azienda elettrica<br />
vigenti.<br />
I lavori di installazione e di collaudo<br />
devono essere svolti da un tecnico autorizzato.<br />
Qualsiasi intervento sulla doccia<br />
a vapore va eseguito solo dopo aver<br />
staccato la tensione elettrica!<br />
1<br />
Deutsch<br />
english<br />
Italiano
eNötIgtes WerKzeug<br />
Sich vor dem Einbau mit folgendem<br />
Werkzeug ausrüsten:<br />
a Schlagbohrmaschine<br />
b Bohrer Ø 6 mm<br />
c Bohrer Ø 8 mm<br />
D Inbusschlüssel SW 5 mm<br />
e Inbusschlüssel SW 6 mm<br />
F Maulschlüssel SW 5 mm<br />
g Kreuzschlitzschraubendreher<br />
h kleiner Schlitzschraubendreher<br />
I Wasserwaage<br />
L Bleistift<br />
M Meterstab<br />
N Silikon<br />
aNMerKuNg<br />
Ausschließlich essigsäurefreies Silikon<br />
verwenden<br />
18<br />
requIreD tooLs<br />
Make sure the following tools are available<br />
before installation:<br />
a Hammer drill<br />
b Drill 6 mm diameter<br />
c Drill 8 mm diameter<br />
D Allen wrench SW 5 mm<br />
e Allen wrench SW 6 mm<br />
F Spanner SW 5 mm<br />
g Screwdriver for recessed-head<br />
screws<br />
h Small slotted screwdriver<br />
I Spirit level<br />
K Knife<br />
L Pencil<br />
M Meter rule<br />
N Silicone<br />
coMMeNt<br />
Only use silicone free from acetic acid<br />
uteNsILI rIchIestI<br />
Prima di procedere al montaggio, procurarsi<br />
i seguenti attrezzi:<br />
a trapano battente<br />
b punta Ø 6 mm<br />
c punta Ø 8 mm<br />
D chiave a brugola misura 5 mm<br />
e chiave a brugola misura 6 mm<br />
F chiave fissa misura 5 mm<br />
g cacciavite a stella<br />
h piccolo cacciavite a taglio<br />
I livella<br />
K taglierino<br />
L matita<br />
M metro<br />
N silicone<br />
avverteNza<br />
Utilizzare esclusivamente silicone privo<br />
da acido acetico
g<br />
h<br />
a<br />
D<br />
e<br />
b<br />
c<br />
N<br />
I<br />
M<br />
L<br />
F<br />
K<br />
19<br />
Deutsch<br />
english<br />
Italiano
MoNtage ecKschraNK<br />
1. Löcher Ø 8 mm für Eckschrank anzeichnen,<br />
bohren und Dübel setzen.<br />
a = 200 mm<br />
b = 285 mm<br />
c = 430 mm<br />
20<br />
Löcher Ø 6 mm für Eckabdeckung<br />
anzeichnen, bohren und Dübel setzen.<br />
D = 50 mm<br />
e = 740 mm<br />
2. Zulaufleitungen fachgerecht durchspülen,<br />
Eckventil eindichten, montieren<br />
und rundherum mit Silikon<br />
versiegeln. Das Eckventil muss nach<br />
oben zeigen.<br />
3. Dübel für die Eckschrankmontage<br />
mit Silikon versiegeln.<br />
Den Eckschrank mit integriertem<br />
<strong>Dampfgenerator</strong> mit den Schrauben<br />
g (Holzschraube 6 x 45) und Unterlagscheiben<br />
h (A 6,4 x 18) anschrauben,<br />
die vier Schrauben dabei nur leicht<br />
anziehen.<br />
4. Den Druckschlauch I für den <strong>Dampfgenerator</strong><br />
ans Eckventil J anschließen.<br />
Eckventil J öffnen.<br />
corNer cabINet<br />
INstaLLatIoN<br />
1. Draw holes 8 mm diameter for corner<br />
cabinet, drill holes and insert<br />
dowels.<br />
a = 200 mm<br />
b = 285 mm<br />
c = 430 mm<br />
Draw holes 6 mm diameter for corner<br />
cover, drill holes and insert dowels.<br />
D = 50 mm<br />
e = 740 mm<br />
2. Flush through the supply pipes, seal<br />
the corner bracket, fit and seal with<br />
silicone all around. The corner valve<br />
must point upwards.<br />
3. Seal dowels for corner cabinet installation<br />
with silicone.<br />
Screw corner cabinet with integrated<br />
steam generator on with screws g<br />
(wood screw 6 x 45) and washers h (A<br />
6.4 x 18), only tighten the four screws<br />
lightly.<br />
4. Connect pressure hose I for the steam<br />
generator to corner valve J.<br />
Open corner valve J.<br />
MoNtaggIo DeLL'<br />
arMaDIetto aNgoLare<br />
1. Segnare fori Ø 8 mm per l‘armadietto<br />
angolare, forare ed applicarvi i tasselli.<br />
a = 200 mm<br />
b = 285 mm<br />
c = 430 mm<br />
Segnare fori Ø 6 mm per l‘armadietto<br />
angolare, forare ed applicarvi i tasselli.<br />
D = 50 mm<br />
e = 740 mm<br />
2. Collegare le uscite principali, montare<br />
a tenuta la valvola angolare e renderne<br />
stagno il perimetro utilizzando silicone.<br />
La valvola angolare va posizionata<br />
verso l'alto.<br />
3. Sigillare i tasselli, per il montaggio<br />
dell'armadietto angolare, utilizzando<br />
del silicone.<br />
Avvitare l'armadietto angolare con<br />
il generatore di vapore integrato<br />
utilizzando le viti g (vite per legno 6<br />
x 45) e rondelle piatte h (A 6,4 x 18)<br />
avendo cura di stringere le quattro<br />
viti solo leggermente.<br />
4. Collegare il tubo flessibile di pressione<br />
I per il generatore di vapore alla<br />
valvola angolare J.<br />
Aprire la valvola angolare J.
1. 2.<br />
D<br />
a<br />
c<br />
b<br />
e<br />
4.<br />
3.<br />
I<br />
J<br />
h<br />
g<br />
21<br />
Deutsch<br />
english<br />
Italiano
MoNtage ecKschraNK<br />
1. Eckwinkel a mit Schrauben b (Holzschraube<br />
4,5 x 60) und Unterlegscheibe<br />
c (A 5,3 x 10) montieren.<br />
2. Trafokabel D durch das Leerrohr zum<br />
Eckschrank führen.<br />
Für Dg 3,0 kW gilt:<br />
Stromkabel 230V/50Hz e (im Lieferumfang<br />
durch das Leerrohr vom Eckschrank<br />
zur Verteilerdose führen.<br />
Für Dg 4, kW gilt:<br />
Stromkabel 400V/50Hz e (im Lieferumfang<br />
durch das Leerrohr vom Eckschrank<br />
zur Verteilerdose führen.<br />
22<br />
Gegebenenfalls Steuerkabel F für externe<br />
Beleuchtung durch das Leerrohr<br />
zum Eckschrank führen.<br />
3. Die Eckabdeckung mit Schrauben g<br />
(Zylinderschraube M5 x 20), Unterlegscheibe<br />
h (A 5,3 x 15) und Mutter I (M5)<br />
mit dem Eckschrank verschrauben.<br />
Den Eckschrank mit Eckabdeckung<br />
ausrichten und die Schrauben (4 Stück,<br />
Holzschraube 6 x 45) im Eckschrank<br />
fest anziehen.<br />
4. Die Eckabdeckung mit Schraube K<br />
(Zylinderkopfschraube M6 x 16) und<br />
Unterlegscheibe L (A 6,4 x 18) mit<br />
dem Eckwinkel verbinden.<br />
corNer cabINet<br />
INstaLLatIoN<br />
1. Mounting corner bracket a with screw<br />
b (wood screw 4,5 x 60) and washer<br />
c (A 5,3 x 10).<br />
2. Put the transformer cable D through<br />
wiring conduit (from outside to the<br />
corner cabinet).<br />
Dg 3,0 kW:<br />
Put the power supply cable (230V/50Hz<br />
e (included of scope of delivery)<br />
through wiring conduit (from corner<br />
cabinet to socket)<br />
Dg 4, kW:<br />
Put the power supply cable (400V/50Hz<br />
e (included of scope of delivery)<br />
through wiring conduit (from corner<br />
cabinet to socket)<br />
Possibly, put the control cable F<br />
through wiring conduit.<br />
3. Secure the corner cover with screw<br />
g (allen key screw M5 x 20), washer<br />
h (A 5,3 x 15) and nut I (M5) to the<br />
corner cabinet.<br />
Align the corner cabinet/corner cover<br />
and secure the screws (4 piece, wood<br />
screw 6 x 45) in the corner cabinet.<br />
4. Secure the corner cover to the corner<br />
bracket with screw K (allen key screw<br />
M6 x 16) and washer L (A 6,4 x 18).<br />
MoNtaggIo DeLL'<br />
arMaDIetto aNgoLare<br />
1. Montare l‘angolare a con le viti b (vite<br />
per legno 4,5 x 60) e la rondella c (A<br />
5,3 x 10).<br />
2. Far passare il cavo del trasformatore<br />
D attraverso il tubo vuoto di posa fino<br />
all’armadietto angolare.<br />
Dg 3,0 kW:<br />
Far passare il cavo della corrente<br />
230V/50Hz e (compreso nel volume<br />
di fornitura) attraverso il tubo vuoto<br />
di posa dall’armadietto angolare fino<br />
alla cassetta di distribuzione.<br />
Dg 4, kW:<br />
Far passare il cavo della corrente<br />
400V/50Hz e (compreso nel volume<br />
di fornitura) attraverso il tubo vuoto<br />
di posa dall’armadietto angolare fino<br />
alla cassetta di distribuzione.<br />
Possibilmente, far passare il cavo di<br />
controllo F per illuminazione esterna,<br />
attraverso il tubo vuoto di posa fino<br />
all’armadietto angolare.<br />
3. Utilizzando le viti g (vite a testa cilindrica<br />
M5 x 20), rondella h (A 5,3 x 15)<br />
e madrevite I (M5) fissare la copertura<br />
angolare con l’armadietto angolare.<br />
Allineare l‘armadietto angolare con la<br />
copertura angolare ed avvitare bene<br />
le viti (4 pezzi, vite per legno 6 x 45)<br />
nell‘armadietto angolare.<br />
4. Collegare la copertura angolare con<br />
la vite K (Vite a testa cilindrica M6 x<br />
16) e la rondella di compensazione<br />
L (A 6,4 x 18) con l’angolare.
1.<br />
2.<br />
4.<br />
3.<br />
D<br />
F<br />
I<br />
h<br />
h<br />
g<br />
L<br />
c<br />
a<br />
b<br />
e<br />
K<br />
23<br />
Deutsch<br />
english<br />
Italiano
MoNtage ecKschraNK<br />
1. Das Stromkabel a und das Sensorkabel<br />
b (graue Ummantelung, Adern braun<br />
und blau) in den Eckschrank führen<br />
und anschließen.<br />
2. Steuerkabel für <strong>Dampfgenerator</strong> c<br />
(Adern blau, grün, gelb, rot) verbinden.<br />
3. Trafokabel D (Adern grau und schwarz)<br />
mit Kabel e verbinden. Eventuell<br />
Steuerkabel für Licht F (Adern rosa<br />
und lila) mit Kabel g verbinden.<br />
24<br />
corNer cabINet<br />
INstaLLatIoN<br />
1. Route power supply cable a (230<br />
V / 50 Hz) and sensor cable b (grey<br />
sheathing, brown and blue wires) into<br />
corner cabinet and connect them.<br />
2. Connect control cable for steam<br />
generator c (blue, green, yellow, red<br />
wires).<br />
3. Connect transformer cable D (grey<br />
and black wires) with cable e. Connect<br />
possibly control cable for light F (pink<br />
and lilac wires) with cable g.<br />
MoNtaggIo DeLL'<br />
arMaDIetto aNgoLare<br />
1. Portare il cavo della corrente a (230<br />
V / 50 Hz) ed il cavo sensore b (rivestimento<br />
grigio, fili marrone e blu)<br />
nell’armadietto angolare e collegarli.<br />
2. Collegare il cavo di controllo per il<br />
generatore di vapore c (fili blu, verde,<br />
giallo, rosso).<br />
3. Collegare D il cavo del trasformatore<br />
(fili grigio e nero) con il cavo e.<br />
Collegare eventualmente il cavo di<br />
controllo per la luce F (fili rosa e lilla)<br />
con il cavo g.
1.<br />
2.<br />
3<br />
F<br />
g<br />
c<br />
a<br />
D<br />
e<br />
2<br />
Deutsch<br />
english<br />
Italiano
MoNtage ecKschraNK<br />
1. Steuerung a in Eckabdeckung einsetzen<br />
und mit Schrauben b (Blechschraube<br />
4 x 8 mm) sichern.<br />
2. Abdeckung c aufstecken.<br />
3.a<br />
Dampfmodul mit aromadispenser:<br />
Den Duftstoffbegrenzer F, das Duftsieb<br />
D und den Deckel e montieren.<br />
3.b<br />
Dampfmodul mit automatische Duftstoffdosierung:<br />
Das Duftsieb D und den Deckel e<br />
montieren.<br />
elektro-anschluss<br />
Der Elektroanschluss darf ausschließlich<br />
vom Elektrofachmann, Ihrem Elektro-<br />
Installateur durchgeführt werden.<br />
a) Trafo an Steckdose anschließen.<br />
b) Stromversorgungskabel in der vorbereiteten<br />
Anschlussdose fest mit der<br />
Hausinstallation (230V/N/PE/50Hz)<br />
verbinden.<br />
abb. 4 gilt nur für Dg 4, KW<br />
b) Stromversorgungskabel in der vorbereiteten<br />
Anschlussdose fest mit<br />
der Hausinstallation (400V/L1/L2/N/<br />
PE/50Hz) verbinden.<br />
26<br />
L1<br />
Pe<br />
L2<br />
N<br />
corNer cabINet INstaLLatIoN<br />
1. Fit in the control a into corner cover<br />
and secure it with screw b (self-tapping<br />
screw 4 x 8 mm).<br />
2. Push on cover c.<br />
3. a<br />
steam modul with aroma dispenser:<br />
Fit fragrance adjusting F, fragrance<br />
sieve D and cover e.<br />
3. b<br />
steam modul with automatically essential<br />
oils addition:<br />
Fit fragrance sieve D and cover e.<br />
electrician<br />
The electrical connection may only be<br />
carried out by an electrician, i.e. your<br />
electrical installer.<br />
a) Connecting the transformer to the<br />
power outlet.<br />
b) Connect the power supply to the<br />
installed socket (230V/N/PE/50Hz).<br />
Pic. 4 only apply for Dg 4, KW<br />
L1<br />
Pe<br />
L2<br />
N<br />
b) Connect the power supply to the<br />
installed socket (400V/L1/L2/N/<br />
PE/50Hz).<br />
MoNtaggIo DeLL'<br />
arMaDIetto aNgoLare<br />
1. Applicare l‘unità di comando a nella<br />
copertura angolare e fissare con le<br />
viti b (vite autofilettante 4 x 8 mm).<br />
2. Applicare la copertura c.<br />
3.a<br />
Modulo vapore con aromadispenser:<br />
Montare il dosatore contagocce delle<br />
essenze aromatiche F, il filtro delle<br />
essenze D e montare il coperchio e.<br />
3.b<br />
Modulo vapore con dosaggio automatico<br />
delle essenze aromatiche:<br />
Montare il filtro delle essenze D e<br />
montare il coperchio e.<br />
collegamento elettrico<br />
Il collegamento elettrico può essere<br />
eseguito esclusivamente da personale<br />
elettrico specializzato o dal Vostro<br />
elettrotecnico installatore.<br />
a) Collegare il trasformatore alla presa<br />
di alimentazione.<br />
b) Collegare il cavo d‘alimentazione<br />
elettrica alla scatola di collegamento<br />
installata nella casa. (230V/N/PE/<br />
50Hz).<br />
abb. 4 (4, KW)<br />
L1<br />
Pe<br />
L2<br />
N<br />
b) Collegare il cavo d‘alimentazione<br />
elettrica alla scatola di collegamento<br />
installata nella casa. (400V/L1/L2/N/<br />
Terra/50Hz).
1.<br />
2.<br />
3. a<br />
3. b<br />
F<br />
e<br />
b<br />
a<br />
b<br />
c<br />
D<br />
e<br />
D<br />
2<br />
Deutsch<br />
english<br />
Italiano
FuNKtIoNsPrÜFuNg<br />
1. Durch Drücken der Dampftaste b wird<br />
der <strong>Dampfgenerator</strong> aktiviert. Das Licht<br />
schaltet ein und im Display wird die<br />
Dampfdauer von 30 min angezeigt.<br />
Die Dampftaste b und die Lichttaste<br />
a sind stark hinterleuchtet. Nach ca.<br />
5 min sollte eine Dampfbildung zu<br />
erkennen sein.<br />
28<br />
Nun kann durch nochmaliges Drücken<br />
der Dampftaste b der <strong>Dampfgenerator</strong><br />
deaktiviert werden.<br />
Sollte etwas nicht funktionieren, alle<br />
elektrischen Zuleitungen und die Wasserversorgung<br />
überprüfen.<br />
Nach erfolgreicher Funktionsprüfung<br />
die Glasscheibe der Revisionsöffnung<br />
mit Glasschutzhülse a, mit Flachdichtung<br />
b (11x6x1) und Schraube c (SW 4<br />
mm) montieren.<br />
Die Schrauben nicht über Kreuz festziehen<br />
sondern im Uhrzeigersinn. Stopfen<br />
D in Schraubenkopf einsetzen.<br />
FuNctIoNaL checK<br />
1. Pressing steam push-button b activates<br />
the steam generator. The light goes<br />
on and the steam period of 30 min<br />
is displayed. Steam push-button b<br />
and light push-button a are strongly<br />
backlit. Steam should be noticeable<br />
after about 5 minutes.<br />
The steam generator can now be<br />
deactivated by pressing steam pushbutton<br />
b again.<br />
If anything does not operate properly,<br />
check all electrical supply lines and the<br />
water supply.<br />
After the performed functional check,<br />
install the glass panel of the inspection<br />
opening with glass protection sleeve a,<br />
flat seal b (11x6x1) and screw c (SW 4<br />
mm).<br />
Do not tighten the screws crosswise but<br />
clockwise. Insert plug D in screw head.<br />
coNtroLLo DeL FuNzIoNaMeNto<br />
1. Premendo il tasto bagno di vapore b si<br />
attiva il generatore di vapore. La luce<br />
si accende e sul display si visualizza<br />
la durata del bagno di vapore pari a<br />
30 min. Il tasto bagno di vapore b e<br />
quello del pulsante per l'illuminazione<br />
a sono illuminati. Dopo circa 5 minuti<br />
inizia la funzione bagno di vapore.<br />
A questo punto è possibile disattivare<br />
il generatore di vapore premendo<br />
nuovamente il tasto bagno di vapore<br />
b.<br />
Qualora qualcosa non dovesse funzionare<br />
correttamente, controllare tutte<br />
le linee elettriche e l'alimentazione<br />
dell'acqua.<br />
Una volta eseguito con successo il<br />
controllo del funzionamento, montare<br />
il pannello di vetro, dell‘apertura<br />
d'ispezione, utilizzando la bussola di<br />
protezione per vetro a, la guarnizione<br />
piatta b (11x6x1) e la vite c (misura 4<br />
mm).<br />
Non avvitare le viti in maniera incrociata<br />
ma in senso orario. Applicare il tappo D<br />
nella testa della vite.
a<br />
b<br />
1.<br />
b<br />
a<br />
D<br />
c<br />
29<br />
Deutsch<br />
english<br />
Italiano
steueruNg K Iv steaM PLus<br />
a = Lichttaste<br />
(Licht / Farblicht ein / aus)<br />
b = Display<br />
(Anzeige von Temperatur / Dampfzeit<br />
/ Dampfleistung / Duftstoffzugabe)<br />
c = + / - Wahltasten<br />
(Einstellung Dampfzeit / Dampfleistung<br />
/ Duftstoffzugabe)<br />
D = Mode-taste<br />
(Umschalten in Programmebenen)<br />
e = Dampftaste<br />
(Dampffunktion an / aus)<br />
Die steuerung K Iv Lite steam wird im<br />
Folgenden als vollversion beschrieben.<br />
Ist Ihr Produkt<br />
- nicht an eine externe beleuchtung<br />
angeschlossen,<br />
- nicht mit der automatischen Duftstoffdossierung<br />
ausgestattet,<br />
so entfallen die dazugehörigen Funktionen<br />
an Ihrer steuerung!<br />
1. Displayanzeige bei Inbetriebnahme<br />
Wird die Anlage mit Strom versorgt,<br />
erscheint im Display eine Zahlenkombination.<br />
Dahinter verbirgt sich<br />
der Softwarestand. Nach kurzer Zeit<br />
erlischt die LCD-Hinterleuchtung und<br />
im Display erscheint ein blinkender<br />
Punkt.<br />
2. Displayanzeige bei zustand<br />
„sleep“<br />
Im Display erscheint ein blinkender<br />
Punkt, d. h., die Anlage befindet<br />
sich jetzt im Zustand „Sleep“ (AUS).<br />
Tastenbeleuchtung, Displaybeleuchtung<br />
und die gesamte Anlage<br />
sind abgeschaltet. Das Gerät kann jetzt<br />
durch Betätigung irgend einer Taste<br />
wieder in den Zustand „Stand-by“<br />
(Bereitschaft) gebracht werden. Nach<br />
einem Dusch- bzw. Dampfvorgang<br />
und ausgeschaltetem Licht dauert<br />
es ca. 15 min bis der Zustand „Sleep“<br />
(AUS) erreicht ist.<br />
3. reset der Parameterwerte<br />
Durch gleichzeitiges Drücken der<br />
Lichttaste a und der "-" Taste c > 5<br />
sec wird die Steuerung zurück auf<br />
die Werkseinstellungen gestellt. Alle<br />
Tasten sind nicht mehr hinterleuchtet<br />
und im Display erscheint res, danach<br />
einmal die Lichttaste a drücken zum<br />
Speichern.<br />
Werkseinstellungen:<br />
Dampfzeit = 30 min<br />
Dampfleistung = 70 %<br />
Duftstoffzugabe = 70 %<br />
30<br />
K Iv steaM PLus coNtroL coNtroLLo K Iv steaM PLus<br />
a = light push-button<br />
(Light / coloured light on / off)<br />
b = display<br />
(Display of temperature / steam period<br />
/ steam performance / essential oil<br />
addition)<br />
c = + / - selector switches<br />
(Setting of steam period / steam performance<br />
/ essential oil addition)<br />
D = Mode button<br />
(Switching over to program levels)<br />
e = steam push-button<br />
(Steam function on / off)<br />
the following instruction of the K Iv steam<br />
Plus control describes the full version.<br />
If your product<br />
- was not connected to a external<br />
lighting,<br />
- was not equipped with the automatical<br />
essential oil addition,<br />
thus functions are dropped at your<br />
control!<br />
1. Display when putting into operation<br />
A number combination appears on the<br />
display when the power is switched<br />
on. This is the software version. After<br />
a short time, the LCD backlighting<br />
disappears and a flashing dot is shown<br />
on the display.<br />
2. Display in "sleep" mode<br />
A flashing dot is shown on the display,<br />
i.e. the equipment is now in<br />
"Sleep" mode (OFF). Button lights,<br />
display lights and the whole system<br />
are switched off. Pressing any button<br />
returns the system to "stand-by" mode<br />
(ready for use). "Sleep" mode (OFF)<br />
is switched to about 15 minutes after<br />
finishing showering or using steam<br />
and switching off the light.<br />
3. reset parameter values<br />
Press light push-button a and "-" button<br />
c simultaneously > 5 seconds to reset<br />
to factory settings. All buttons are no<br />
longer backlit and res is shown on the<br />
display, now press light push-button<br />
a once to save these settings.<br />
Factory settings:<br />
Steam period = 30 min<br />
Steam performance = 70%<br />
Essentila oil addition = 70 %<br />
a = pulsante per l'illuminazione<br />
(illuminazione acceso / spento)<br />
b = display<br />
(visualizzazione della temperatura /<br />
tempo di vaporizzazione / prestazione<br />
vapore / aggiunta dell‘essenza aromatica)<br />
c = + / - Pulsante di selezione<br />
(impostazione tempo di vaporizzazione<br />
/ prestazione vapore / aggiunta<br />
dell‘essenza aromatica)<br />
D = pulsante Mode<br />
(commutare nei diversi livelli di programma)<br />
e = tasto vapore<br />
(funzione vapore acceso / spento)<br />
L‘unità di controllo K Iv Lite steam viene in<br />
seguito descritta come versione completa.<br />
se il vostro prodotto<br />
- non è collegato ad un’illuminazione<br />
esterna,<br />
- non dispone di un dosaggio automatico<br />
di sostanza aromatica,<br />
vengono a mancare le rispettive funzioni<br />
alla vostra unità di comando!<br />
1. visualizzazione display in caso di messa<br />
in esercizio<br />
Alimentando l'impianto con la corrente<br />
elettrica sul display appare una<br />
combinazione di cifre che indica la<br />
versione di software disponibile. Dopo<br />
alcuni istanti si spegne l'illuminazione<br />
di fondo LCD e sul display appare un<br />
punto intermittente.<br />
2. visualizzazione display in caso di stato<br />
"sleep“<br />
Sul display di visualizzazione appare<br />
un punto ad intermittenza, che indica<br />
che, l'impianto si trova adesso allo<br />
stato "Sleep“ (OFF). L'illuminazione<br />
tasti ed il completo impianto sono<br />
spenti. Premendo un tasto qualunque,<br />
l'apparecchiatura può essere messa di<br />
nuovo allo stato "Stand-by“ (stato di<br />
pronto). Dopo una doccia oppure dopo<br />
un bagno di vapore ed illuminazione<br />
spenta, ci vuole ca. 15 h fino a quando<br />
si raggiunge lo stato "Sleep“ (OFF).<br />
3. resettaggio dei valori di parametro<br />
Premendo contemporaneamente il<br />
pulsante per l'illuminazione a ed il<br />
"-" tasto c > 5 sec si rimette il sistema<br />
operativo alle impostazioni predefinite.<br />
Il fondo di tutti i tasti non sono più illuminati<br />
e sul display appare res, una volta<br />
conclusa questa operazione, premere<br />
una volta il pulsante per l'illuminazione<br />
a per salvare in memoria.<br />
Impostazione di predefinite:<br />
Tempo di vaporizzazione = 30 min<br />
Prestazione vapore = 70 %<br />
Aggiunta sostanza aromatica = 70 %
1. 2.<br />
a<br />
b<br />
c<br />
D<br />
e<br />
3.<br />
a<br />
c<br />
31<br />
Deutsch<br />
english<br />
Italiano
steueruNg K Iv steaM PLus<br />
4. Licht ein / aus<br />
Durch kurzes Drücken der Lichttaste a<br />
wird die Duschbeleuchtung ein- bzw.<br />
ausgeschaltet. Im Display wird die aktuelle<br />
Mischwassertemperatur (z. B. 38<br />
°C) angezeigt. Die Beleuchtung schaltet<br />
automatisch nach ca. 60 min ab.<br />
. Dampffunktion<br />
Durch Drücken der Dampftaste e wird<br />
der <strong>Dampfgenerator</strong> aktiviert (Taste hell<br />
hinterleuchtet) bzw. deaktiviert (Taste<br />
schwach hinterleuchtet). Im Display wird<br />
die ablaufende Dampfzeit angezeigt. Das<br />
Licht schaltet sich an.<br />
eucafunktion<br />
Nach dem aktivieren der Dampffunktion<br />
und der Bildung von Dampf in der Kabine<br />
kann die Eucafunktion durch Drücken der<br />
Dampftaste e > 1 sec hinzugeschaltet<br />
werden (Taste blinkt kurz und ist dann<br />
hell hinterleuchtet). Im Display wird<br />
die ablaufende Dampfzeit angezeigt.<br />
Durch kurzes Drücken schaltet sich die<br />
Eucafunktion und die Dampffunktion ab.<br />
Die Dampffunktion kann durch Drücken<br />
der Dampftaste e wieder aufgenommen<br />
werden.<br />
6. Dampfzeit einstellen<br />
Durch Drücken der Wahltasten c kann<br />
ein anderer Wert zwischen 2 und 60<br />
Minuten eingegeben werden.<br />
. Dampfleistung einstellen<br />
Durch einmaliges Drücken der Mode-Taste<br />
D erscheint im Display die Dampfleistung,<br />
z. B. 70 %. Durch Drücken der Wahltasten<br />
c kann ein anderer Wert zwischen 30<br />
und 100 % eingegeben werden.<br />
8. Duftstoffzugabe einstellen<br />
Durch zweimaliges Drücken der Mode-<br />
Taste D erscheint im Display die Euca-<br />
Zugabe, z. B. 60 %. Durch Drücken der<br />
Wahltasten c kann ein anderer Wert<br />
zwischen 30 und 100 % eingegeben<br />
werden.<br />
9. Kabineninnentemperatur<br />
Durch mehrmaliges Drücken der<br />
Mode-Taste D erscheint im Display die<br />
Kabineninnentemperatur. Nach 10 sec<br />
wird automatisch wieder die Dampfzeit<br />
im Display angezeigt.<br />
Alle Programmfunktionen können durch<br />
Drücken der Mode-Taste D aufgerufen und<br />
verändert werden.<br />
- Dampfzeit einstellen<br />
- Dampfleistung einstellen<br />
- Duftstoffzugabe einstellen<br />
- Kabineninnentemperatur anzeigen<br />
32<br />
K Iv steaM PLus coNtroL coNtroLLo K Iv steaM PLus<br />
4. Light on / off<br />
Briefly pressing light push-button a<br />
switches the shower lighting on or off.<br />
The display shows the current mixed<br />
water temperature (e.g.38 °C). The<br />
lighting is automatically switched off<br />
after about 60 minutes.<br />
. steam function<br />
Press steam push-button e to activate<br />
the steam generator (button with<br />
bright backlighting) or deactivate the<br />
steam generator (button with weak<br />
backlighting). The display shows<br />
the expiring steam period. The light<br />
is switching on.<br />
essential oil function (eucafunction)<br />
After activating the steam function<br />
and steam was form in the cabin, the<br />
essential oil function can be activated<br />
by pressing button e > 1 sec. (button is<br />
blinking for a short time then it is bright<br />
backlighting)<br />
The display shows the expiring<br />
steam period. Short pressing steam<br />
push-button deactivate the steam<br />
generator and the essential oil<br />
function. Press steam push-button<br />
e to activate the steam generator<br />
once more again.<br />
6. adjustment of steam period<br />
Press selector switches c to enter<br />
a different value between 2 and 60<br />
minutes.<br />
. adjustment of steam performance<br />
Press Mode button D once to display<br />
the steam performance, e.g. 70%. Press<br />
selector switches c to enter a different<br />
value between 30 and 100%.<br />
8. adjustment of essential oil addition<br />
Press Mode button D twice to display<br />
the Essential oil addition, e.g. 70%. Press<br />
selector switches c to enter a different<br />
value between 30 and 100%.<br />
9. temperature in cabin<br />
Press Mode button D several times<br />
to display the temperature in the<br />
cabin. The display switches back to<br />
the steam period automatically after<br />
10 seconds.<br />
All program functions can be selected<br />
and changed by pressing the Mode<br />
button D.<br />
- adjustment of steam period<br />
- adjustment of steam performance<br />
- addjustment of Essential oil addition<br />
- display temperature in cabin<br />
4. Luce acceso / spento<br />
Premendo brevemente il pulsante per<br />
l'illuminazione a si accende e si spegne<br />
l'illuminazione della cabina doccia. Sul<br />
display si visualizza l'attuale temperatura<br />
dell'acqua miscelata (p. es. 38 °C).<br />
L'illuminazione si spegne automaticamente<br />
dopo ca. 60 min.<br />
. Funzione vapore<br />
Premendo il tasto vapore e si attiva il generatore<br />
di vapore (pulsante illuminato)<br />
oppure la si disattiva (pulsante debolmente<br />
illuminato). Il tempo di vaporizzazione<br />
attualmente in corso viene visualizzata<br />
sul display. L‘illuminazione si mette in<br />
funzione.<br />
Funzione euca (aroma)<br />
Dopo l‘attivazione della funzione vapore<br />
e la formazione di vapore nella cabina è<br />
possibile attivare anche la Funzione Euca<br />
pigiando il tasto vapore e > 1 sec (il tasto<br />
s’illumina brevemente ad intermittenza<br />
e resta dunque illuminato a pieno).<br />
Il tempo di vaporizzazione attualmente<br />
in corso viene visualizzata sul display.<br />
Premendo brevemente si disattiva la<br />
Funzione Euca e la funzione vapore. La<br />
funzione vapore può essere di nuovo<br />
attivata premendo il tasto vapore e.<br />
6. Impostazione del tempo di vaporizzazione<br />
Premendo i pulsanti di selezione c è<br />
possibile impostare un altro valore tra 2<br />
e 60 minuti.<br />
. Impostazione della percentuale vapore<br />
Premendo una sola volta il pulsante<br />
Mode D sul display appare la prestazione<br />
vapore, per es. 70 %. Premendo i pulsanti<br />
di selezione c è possibile impostare un<br />
altro valore tra 30 e 100 %.<br />
8. regolazione dell‘aggiunta di sostanza<br />
aromatica<br />
Premendo due volte il pulsante Mode D<br />
sul display appare la l’Aggiunta Euca, per<br />
es. 60 %. Pigiando i pulsanti di selezione<br />
c è possibile impostare un altro valore<br />
tra 30 e 100 %.<br />
9. temperatura interna della cabina<br />
Premendo ripetutamente il pulsante Mode<br />
D sul display appare la temperatura interna<br />
della cabina. Dopo 10 sec sul display si<br />
visualizza di nuovo automaticamente il<br />
tempo di vaporizzazione.<br />
Tutte le funzioni del programma possono<br />
essere richiamate e modificate premendo<br />
il pulsante Mode D.<br />
- Impostazione del tempo di vaporizzazione<br />
- Impostazione della prestazione vapore<br />
- Aggiunta dell‘essenza aromatica<br />
- Temperatura interna della cabina
4.<br />
a<br />
c<br />
D<br />
.<br />
e<br />
.<br />
8.<br />
c<br />
D<br />
6.<br />
c<br />
9.<br />
a<br />
D<br />
33<br />
Deutsch<br />
english<br />
Italiano
eDIeNINg K Iv steaM PLus<br />
Sobald eine Warnung im Display erscheint ist ein weiteres Nutzen der Steam-Funktion nicht mehr möglich!<br />
Warnungen sind nicht löschbar, durch Drücken der Lichttaste wird die Warnung ignoriert. Ändert sich der Funktionszustand<br />
nicht, tritt nach weiterem Aufruf der entsprechenden Funktion die Warnung erneut auf.<br />
Bei der Fehlermeldung A19 wird nach dem Drücken der Lichttaste ein automatischer Drainagevorgang durchgeführt.<br />
Durch einen Netzreset (FI-Schalter ausschalten, nach 10 sec wieder einschalten) können Fehlermeldungen ohne Datenverlust<br />
eliminiert werden.<br />
34<br />
Warnung Art der Störung /<br />
Ursache<br />
A13 - Befüllung bei Beginn<br />
des Dampfens in den<br />
ersten 3 min<br />
misslungen, d.h.<br />
unterer und oberer<br />
Wasserlevel nicht<br />
erreicht (z.B. bei<br />
Erstinbetriebnahme)<br />
- Fehler Magnetventil<br />
- Fehler Levelsensor<br />
(Erkennung: Wasser<br />
tritt bei Dampfbetrieb<br />
am Drainagerohr aus)<br />
- Fehler Dampfmodul<br />
A14 - Befüllung bei Beginn oder<br />
während des Dampfens<br />
innerhalb von 3 min nicht<br />
ausreichend, d. h. unterer<br />
Wasserlevel erreicht,<br />
jedoch nicht oberer<br />
A16 - Max.<br />
Kabinentemperatur<br />
von 55 °C<br />
überschritten<br />
A17 - Drainage-Vorgang des<br />
<strong>Dampfgenerator</strong>s<br />
abgebrochen.<br />
A18 - Meßwerte<br />
Kabinentemperatur-<br />
Sensor außer Toleranz<br />
A19 - <strong>Dampfgenerator</strong> ist<br />
bei Inbetriebnahme<br />
teilweise oder ganz<br />
mit Wasser befüllt<br />
Mögliche Ursache Mögliche Abhilfe<br />
- Kugelventil vor dem<br />
<strong>Dampfgenerator</strong><br />
geschlossen<br />
- Sieb im Anschlußwinkel<br />
des DG verstopft<br />
- bauseits unzureichende<br />
Wasserversorgung<br />
- kein/ geringer Zulauf zum<br />
DG/ Zulauf d.h.<br />
Schmutzfangsieb im<br />
Eckventil, RV oder<br />
Durchflußbegrenzer zum<br />
DG verschmutzt<br />
- Schlauch zwischen DG +<br />
Eckventil und/oder RV<br />
falsch montiert<br />
- Magnetventil defekt oder<br />
ausgesteckt<br />
- Levelsensor defekt oder<br />
ausgesteckt<br />
- Dampfmodul defekt oder<br />
Spannungsversorgung<br />
nicht vorhanden<br />
- Kugelventil vor dem<br />
<strong>Dampfgenerator</strong><br />
geschlossen<br />
- Sieb im Anschlußwinkel<br />
des DG verstopft<br />
- bauseits unzureichende<br />
Wasserversorgung<br />
- Magnetventil defekt oder<br />
ausgesteckt<br />
- Sicherheitsabschaltung bei<br />
Überschreitung der max.<br />
zulässigen<br />
Kabinentemperatur.<br />
- Generator verkalkt, d. h.<br />
Drainageausgang und /<br />
oder -rohr verstopft.<br />
Schmutzfangsieb im<br />
Eckventil und/ oder<br />
Durchflussbegrenzer zum<br />
DG verschmutzt.<br />
- Kabinentemperatur-Sensor<br />
defekt oder ausgesteckt<br />
- Magnetventil defekt<br />
(undicht)<br />
- Kugelventil öffnen<br />
- Sieb im Anschlußwinkel<br />
reinigen<br />
- Wasserversorgung<br />
sicherstellen<br />
- Schmutzfangsiebe, RV und<br />
Duchflussbegrenzer reinigen.<br />
- Schlauch mit RV richtig<br />
montieren<br />
- Magnetventil-Membrane<br />
austauschen oder Kabel<br />
einstecken (Kabel am<br />
Dampfmodul mit Aufdruck<br />
„Fill“)<br />
- Levelsensor tauschen oder<br />
Kabel einstecken (Kabel am<br />
Dampfmodul mit Aufdruck<br />
„Level“)<br />
- Dampfmodul austauschen<br />
oder einstecken (Kabel am<br />
Dampfmodul mit Aufdruck<br />
„Mains 230V“)<br />
- Kugelventil öffnen<br />
- Sieb im Anschlußwinkel<br />
reinigen<br />
- Wasserversorgung<br />
sicherstellen<br />
- Magnetventil-Membrane<br />
austauschen oder Kabel<br />
einstecken (Kabel am<br />
Dampfmodul mit Aufdruck<br />
„Fill“)<br />
- Kabine abkühlen lassen<br />
- Generator ausbauen und<br />
inklusive Drainagerohr,<br />
Schmutzfansieb im Eckventil<br />
und Durchflussbegrenzer zum<br />
DG reinigen/tauschen<br />
- Kabinentemperatur-Sensor<br />
austauschen oder einstecken<br />
- Magnetventil-Membrane<br />
reinigen oder austauschen
K Iv coNtroL<br />
Warning Type of Malfunction / Cause Possible Cause Possible Clearance<br />
A13 - Filling failure at the start of<br />
steaming in the first 3<br />
minutes, i.e. lower and<br />
upper water levels not<br />
reached (e.g. during initial<br />
start-up)<br />
- Solenoid valve error<br />
- Level sensor error<br />
(Symptom: Water emerges<br />
from the drain pipe during<br />
steam operation)<br />
- Steam module error<br />
A14 - Filling at the start of<br />
steaming in the first 3<br />
minutes insufficient, i.e.<br />
lower water level reached,<br />
but not upper water level<br />
A16 - Maximum cabin<br />
temperature of 55°C<br />
exceeded<br />
A17 - Drain process of steam<br />
generator defective<br />
A18 - Measured values from<br />
cabin temperature sensor<br />
out of tolerance<br />
A19 - Steam generator is filled up<br />
or is filled particular when<br />
starting<br />
- Ball valve before steam<br />
generator closed<br />
- Filter in connection bracket<br />
of steam generator clogged<br />
- Insufficient on-site water<br />
supply<br />
- Solenoid valve defective or<br />
disconnected<br />
- Level sensor defective or<br />
disconnected<br />
- Steam module defective or<br />
no voltage supply<br />
- Ball valve before steam<br />
generator closed<br />
- Filter in connection bracket<br />
of steam generator clogged<br />
- Insufficient on-site water<br />
supply<br />
- Solenoid valve defective or<br />
disconnected<br />
- Safety cut-out when<br />
maximum allowed cabin<br />
temperature exceeded<br />
- Generator calcified, i.e. drain<br />
outlet and / or pipe clogged<br />
- Cabin temperature sensor<br />
defective or disconnected<br />
- Solenoid valve defective<br />
(untight)<br />
As soon as a warning is displayed, the steam function can no longer be used!<br />
- Open ball valve<br />
- Clean filter in connection<br />
bracket<br />
- Ensure sufficient water<br />
supply<br />
- Replace solenoid valve<br />
membrane or connect<br />
cable (cable on steam<br />
module with “Fill” marking)<br />
- Replace level sensor or<br />
connect cable (cable on<br />
steam module with “Level”<br />
marking)<br />
- Replace steam module or<br />
connect cable (cable on<br />
steam module with “Mains<br />
230V” marking)<br />
- Open ball valve<br />
- Clean filter in connection<br />
bracket<br />
- Ensure sufficient water<br />
supply<br />
- Replace solenoid valve<br />
membrane or connect<br />
cable (cable on steam<br />
module with “Fill” marking)<br />
- Allow cabin to cool down<br />
- Remove generator and<br />
clean generator including<br />
drain pipe<br />
- Replace or connect cabin<br />
temperature sensor<br />
- Clean solenoid valve<br />
membrane or replace it<br />
Warnings can be not deleted; press the light push-button to ignore a warning. If the functional state does not change, the<br />
warning is displayed again when the respective function is selected again.<br />
After pressing the light push-buttom at warning A19, an automatic drain process of steam generator will be starting.<br />
Error messages can be eliminated without loss of data with a mains reset (switching the FI switch off and on again after 10<br />
seconds).<br />
3<br />
Deutsch<br />
english<br />
Italiano
coNtroLLo K Iv<br />
allarme tipo anomalie / causa Possibili cause Possibili rimedi<br />
a 13 -Riempimento fallito all‘inizio della<br />
vaporizzazione primi 3 min, ovvero<br />
non si è raggiunto il livello inferiore<br />
e superiore dell‘acqua (p.es. in caso<br />
di prima messa in esercizio)<br />
-Malfunzionamento valvola magnetica<br />
-Malfunzionamento del sensore di<br />
livello (fuoriuscita di acqua in caso<br />
di esercizio con vapore al tubo di<br />
drenaggio)<br />
-Malfunzionamento del modulo<br />
vapore<br />
a 14 -Riempimento insufficiente all‘inizio<br />
oppure durante i primi 3min di<br />
vaporizzazione, cioè si è raggiunto<br />
il livello inferiore dell‘acqua ma non<br />
quello superiore<br />
a 16 -La temperatura max. 55° C<br />
dell‘ambiente interno della cabina<br />
è stata superata!<br />
a 1 -Anomalia nell‘operazione di<br />
drenaggio del generatore di<br />
vapore.<br />
a 18 -Valori di misurazione Sensore<br />
temperatura della cabina fuori<br />
della tolleranza<br />
a 19 -Durante la messa in funzione il<br />
generatore di vapore è riempito<br />
in parte oppure del tutto con<br />
dell’acqua<br />
-Valvola a sfera chiusa prima del<br />
generatore di vapore<br />
-Filtro otturato all‘angolare<br />
di attacco del generatore di<br />
vapore<br />
-Insufficiente alimentazione<br />
dell‘acqua sul luogo di posa<br />
-Valvola magnetica difettosa<br />
oppure staccata<br />
-Sensore di livello difettoso<br />
oppure staccato<br />
-Modulo di vapore difettoso<br />
oppure l’alimentazione di rete<br />
è non disponibile<br />
-Valvola a sfera chiusa prima del<br />
generatore di vapore<br />
-Filtro otturato all‘angolare<br />
di attacco del generatore di<br />
vapore.<br />
-Insufficiente alimentazione<br />
dell‘acqua sul luogo di posa<br />
-Valvola magnetica difettosa<br />
oppure staccata<br />
-Le predisposizioni di sicurezza<br />
non funzionano in caso di<br />
superamento della temperatura<br />
ammessa all‘interno della<br />
cabina.<br />
-Generatore calcificato, cioè<br />
otturazione dell‘uscita del<br />
drenaggio e/o del tubo di<br />
drenaggio<br />
-Sensore della temperatura<br />
della cabina difettosa oppure<br />
staccato dalla presa<br />
-La valvola elettromagnetica è<br />
difettosa (non tiene)<br />
-Aprire la valvola a sfera<br />
-Pulire il filtro nell‘angolare<br />
di attacco<br />
-Assicurare l‘alimentazione<br />
dell‘acqua<br />
-Sostituire la membrana<br />
della valvola magnetica<br />
oppure inserire il cavo (cavo<br />
al modulo vapore con dicitura<br />
„Fill“)<br />
-Sostituire il sensore di livello<br />
oppure inserire il cavo<br />
(cavo al modulo vapore con<br />
dicitura „Level“)<br />
-Sostituire il modulo di vapore<br />
oppure inserire il cavo<br />
(cavo al modulo vapore con<br />
dicitura „Mains 230V“)<br />
-Aprire la valvola a sfera<br />
-Pulire il filtro nell‘angolare<br />
di attacco<br />
-Assicurare l‘alimentazione<br />
dell‘acqua<br />
-Sostituire la membrana<br />
della valvola magnetica<br />
oppure inserire il cavo<br />
(cavo al modulo vapore<br />
con dicitura „Fill“)<br />
-Aspettare che si raffreddi<br />
la cabina<br />
-Smontare il generatore<br />
e pulire anche il tubo di<br />
drenaggio<br />
-Sostituire il sensore della<br />
temperatura della cabina<br />
oppure innestare<br />
-Pulire oppure sostituire le<br />
membrane della valvola<br />
elettromagnetica<br />
Non appena sul display appare un messaggio di avvertenza non sarà più possibile continuare ad utilizzare la funzione<br />
vapore!<br />
I messaggi di avvertenza possono essere cancellati; premendo il pulsante per l’illuminazione si ignora l’avviso.<br />
Se lo stato di funzionamento non si modifica, in seguito ad un’ulteriore attivazione della rispettiva funzione si ripresenta nuovamente<br />
l’avviso.<br />
Se appare la segnalazione d’errore A19 e premendo poi il tasto per l’illuminazione, viene effettuato un drenaggio automatico.<br />
Attraverso un resettaggio della rete (spegnere l’interruttore a corrente di guasto FI, riaccenderlo dopo 10 sec) è possibile<br />
eliminare i messaggi di anomalia senza nessuna perdita di dati.<br />
36
3<br />
Deutsch<br />
english<br />
Italiano
eDIeNuNg<br />
Dampfmodul mit aromadispenser:<br />
1.1 In den umgedrehten Deckel a des<br />
Aromadispenser kann flüssiger<br />
Duftstoff eingefüllt werden. Die<br />
Duftintensität kann über den Hebel<br />
b gesteuert werden. Zeigt der Hebel<br />
b nach hinten, wird eine maximale<br />
Duftintensität erreicht.<br />
38<br />
Der Deckel a wird während der Dampfphase<br />
sehr heiss, vor dem Berühren<br />
den Deckel a erst auskühlen lassen.<br />
Nach dem Dampfbad den Deckel a<br />
sorgfälltig ausspülen. Er kann auch<br />
zur Reinigung in die Spülmaschine<br />
gegeben werden.<br />
1.2 In den Siebeinsatz c des Aromadispenser<br />
kann fester Duftstoff eingefüllt<br />
werden, z. B. getrocknete Blätter oder<br />
auch ein mit Duftstoff getränkter<br />
Wattebausch. Die Duftintensität kann<br />
über den Hebel b gesteuert werden.<br />
Zeigt der Hebel b nach hinten, wird<br />
eine maximale Duftintensität erreicht.<br />
Der Deckel a muss während des<br />
Dampfvorgangs die Duftanlage verschliessen.<br />
Der Deckel a wird während der Dampfphase<br />
sehr heiss, vor dem Berühren<br />
den Deckel a erst auskühlen lassen.<br />
Nach dem Dampfbad den Siebeinsatz<br />
c, den Deckel a und den Einsatz des<br />
Aromadispenser sorgfältig ausspülen.<br />
Zum Herausnehmen des Aromadispensereinsatzes<br />
muss der Hebel auf<br />
das Symbol D zeigen. Alle Teile können<br />
zur Reinigung in die Spülmaschine<br />
gegeben werden.<br />
Dampfmodul mit automatische Duftstoffdossierung:<br />
2. Der Duftstofftank e kann mit flüssigem<br />
Duftstoff befüllt werden.<br />
Duftstoffe von Pharo:<br />
Eucalyptus Best.-Nr: 21453000<br />
Eucaminze Best.-Nr: 21454000<br />
Tannenduft Best.-Nr: 21455000<br />
Zitrone Best.-Nr: 21456000<br />
Die Duftstoff-Zugabe wird über die<br />
Steuerung K4 reguliert.<br />
oPeratIoN<br />
steam modul with aroma dispenser:<br />
1.1 Liquid essential oils can be filled into<br />
turned over cover a of the aroma dispenser.<br />
Lever b controls the fragrance<br />
intensity. Maximum fragrance intensity<br />
is achieved when lever b points to the<br />
rear.<br />
Cover a becomes very hot during the<br />
steam phase, therefore allow cover a<br />
to cool down before touching.<br />
Carefully rinse cover a after the steam<br />
bath. It can also be put into the dishwasher<br />
for cleaning.<br />
1.2 Solid fragrances can be filled into<br />
sieve insert c of the aroma dispenser,<br />
e.g. dried leaves or also cotton wool<br />
soaked in essential oils. Lever b controls<br />
the fragrance intensity. Maximum<br />
fragrance intensity is achieved when<br />
lever b points to the rear. Cover a<br />
has to lock the fragrance equipment<br />
during the steam process.<br />
Cover a becomes very hot during the<br />
steam phase, therefore allow cover a<br />
to cool down before touching.<br />
After the steam bath, carefully rinse<br />
sieve insert c, cover a and the insert<br />
of the aroma dispenser. To remove<br />
the aroma dispenser, the lever must<br />
point to symbol D. All parts can be put<br />
into the dishwasher for cleaning.<br />
steam modul with automatically essential<br />
oils addition<br />
2. The essential oil tank e can be filled<br />
with liquid essential oils.<br />
Essential oils from Pharo:<br />
Eucalyptus Order.-No: 21453000<br />
Eucaminze Order.-No: 21454000<br />
Fir fragrance Order.-No: 21455000<br />
Lemon Order.-No: 21456000<br />
The essential oil addition was controled<br />
by the K4 control.<br />
uso<br />
Modulo vapore con aromadispenser:<br />
1.1 Capovolgendo il coperchio a del Aromadispenser<br />
è possibile inserire dell'essenza<br />
aromatica liquida. L'intensità dell'aroma<br />
può essere regolata attraverso la levetta<br />
b. La massima intensità aromatica si raggiunge<br />
quando la leva b è posizionata<br />
all'indietro.<br />
Durante la funzione di vapore il coperchio<br />
a diventa molto caldo. Prima di toccarlo,<br />
aspettare che il coperchio a si sia raffreddato.<br />
In seguito ad una doccia con vapore,<br />
sciacquare accuratamente il coperchio<br />
a. Per pulirlo è anche possibile metterlo<br />
nella lavastoviglie.<br />
1.2 Nell'inserto filtro c dell'Aromadispenser<br />
è possibile inserire anche essenza aromatica<br />
di tipo solido come, p. es. foglie<br />
secche oppure anche un tampone di<br />
ovatta impregnato di essenza aromatica.<br />
L'intensità dell'aroma può essere regolata<br />
attraverso la levetta b. La massima intensità<br />
aromatica si raggiunge quando la leva b è<br />
posizionata all'indietro.. Durante il bagno<br />
di vaporeil coperchio a deve chiudere<br />
l'impianto aromatico.<br />
Durante il bagno di vapore il coperchio<br />
a diventa molto caldo. Prima di toccarlo,<br />
aspettare che il coperchio a si sia raffreddato<br />
sufficientemente.<br />
In seguito alla doccia con vapore, sciacquare<br />
accuratamente l'inserto filtro c, il coperchio<br />
a e l'inserto dell'Aromadispenser. Per<br />
estrarre l'inserto dell'Aromadispenser è<br />
necessario che la levetta sia posizionata<br />
sul simbolo D. Tutte le parti possono essere<br />
messe nella lavastoviglie per essere<br />
ripulite.<br />
Modulo vapore con dosaggio automatico<br />
delle essenze aromatiche:<br />
2. Il serbatoio essenza E può essere riempito<br />
con essenza aromatica liquida.<br />
Essenze aromatiche Pharo:<br />
Eucalipto Cod. ordin.: 21453000<br />
Eucamenta Cod. ordin.: 21454000<br />
Essenza di abete<br />
Cod. ordin.: 21455000<br />
Limone Cod. ordin.: 21456000<br />
La regolazione dell‘aggiunta di essenza<br />
aromatica avviene attraverso<br />
il sistema di controllo K4.
1.1<br />
1.2<br />
2.<br />
A<br />
A<br />
C<br />
D<br />
B<br />
B<br />
E<br />
39<br />
Deutsch<br />
English<br />
Italiano
eDIeNuNg<br />
1. Die Lamellen in der Dampfaustrittsdüse<br />
können verstellt werden, so dass<br />
die Ausströmrichtung des Dampfes<br />
beeinflusst wird.<br />
40<br />
verbrühungsgefahr!<br />
Das Ausrichten der Lamellen darf<br />
ausschließlich im ausgeschalteten<br />
Zustand des <strong>Dampfgenerator</strong>es und<br />
bei erkalteter Dampfdüse erfolgen.<br />
2. Die Dampfaustrittsdüse wird während<br />
eines Dampfvorgangs sehr heiss!<br />
3. 15 min nachdem das Licht ausgegangen<br />
ist bzw. nach letzter Tastenbedienung<br />
findet eine automatische<br />
Drainage des <strong>Dampfgenerator</strong>s statt.<br />
Dabei tritt unterhalb des Eckschranks<br />
heisses Wasser aus.<br />
verbrühungsgefahr!<br />
Während dieses vorgangs darf sich<br />
niemand im bereich zwischen eckschrank<br />
und Wasserablauf aufhalten!<br />
Eventuell herausgespülte Schmutz- /<br />
Kalkpartikel können anschließend<br />
mit der Handbrause weggespült<br />
werden.<br />
oPeratIoN<br />
1. The fins in steam nozzle can be<br />
adjusted. With this adjustment the<br />
exhaust way can be enhanced.<br />
Danger of scalding!<br />
The adjustment of the fins must be done<br />
only by switched off steam generator<br />
and by cold steam nozzle.<br />
2. The steam outlet nozzle becomes<br />
very hot during a steam process!<br />
3. The steam generator is automatically<br />
drained 15 minutes after the light goes<br />
out or after the last button activation.<br />
Hot water emerges below the corner<br />
cabinet.<br />
Danger of scalding!<br />
Nobody is allowed to remain between<br />
the corner cabinet and the drain<br />
during this operation!<br />
Use the hand shower to flush out any<br />
rinsed out dirt/lime particles.<br />
uso<br />
1. Le lamelle negli ugelli di spruzzo del<br />
vapore possono essere spostate in<br />
modo da poter regolare la direzione<br />
dell‘efflusso del vapore.<br />
Pericolo di scottatura!<br />
La regolazione della posizione delle<br />
lamelle può avvenire esclusivamente<br />
quando il generatore di vapore è spento<br />
e l‘ugello per vapore è freddo.<br />
2. L'ugello di spruzzo del vapore diventa<br />
molto caldo nel corso della funzione di<br />
vapore!<br />
3. Dopo15 min che la luce si è spenta oppure<br />
dopo l‘ultima attivazione di uno dei<br />
tasti Il generatore di vapore si svuota<br />
automaticamente.<br />
Così facendo, nella parte inferiore dell‘armadietto<br />
angolare si ha una fuoriuscita di acqua<br />
bollente.<br />
Pericolo di scottatura!<br />
Nel corso di questa operazione nessuna<br />
persona deve soffermarsi nella<br />
zona tra l’armadietto angolare e lo<br />
scarico dell’acqua!<br />
Eventuali particelle di sporcizia o di calce<br />
scaturite insieme all’acqua in uscita possono<br />
essere sciacquate via con la doccetta una<br />
volta terminata l’operazione.
1.<br />
2.<br />
3.<br />
41<br />
Deutsch<br />
english<br />
Italiano
eNtKaLKeN<br />
Um die Entkalkungsintervalle zu verlängern,<br />
bzw. Ihre Hausinstallation vor Schäden<br />
zu bewahren, muss ab 14° dH (~2,5<br />
mmol/l) eine zentrale Enthärtungsanlage<br />
eingebaut werden.<br />
Wann sollte entkalkt werden:<br />
• die Dampfleistung lässt nach<br />
• das Erreichen der ausgewählten<br />
Kabinentemperatur dauert länger wie<br />
bisher<br />
• während des Dampfbetriebs kommt<br />
heißes Wasser aus der Düse<br />
entkalken (siehe Abb. A)<br />
Der Aus- und Einbau el. Komponenten darf nur<br />
von einer konzessionierten Elektrofachkraft<br />
nach VDE 0100 vorgenommen werden.<br />
verbrühungsgefahr!<br />
Das Entkalken darf nur im abgekühlten<br />
Zustand des <strong>Dampfgenerator</strong> durchgeführt<br />
werden.<br />
1. + 2. Energiezufuhr abschalten, Schutzmatte<br />
in Wanne legen und Glasscheibe<br />
der Revisionsöffnung entfernen.<br />
3. Die Stecker zum <strong>Dampfgenerator</strong><br />
lösen.<br />
4. + . Das Eckventil für den Wasseranschluss<br />
des <strong>Dampfgenerator</strong>s schließen<br />
und den Druckschlauch lösen.<br />
6. Die Dampfleitung vom <strong>Dampfgenerator</strong><br />
schrauben.<br />
. Die Schrauben am <strong>Dampfgenerator</strong><br />
lösen, den <strong>Dampfgenerator</strong> anheben und<br />
aus dem Eckschrank nehmen. Restwasser<br />
aus dem <strong>Dampfgenerator</strong> leeren.<br />
8. Den <strong>Dampfgenerator</strong> mit handelsüblichem<br />
Schnellentkalker auf Zitronensäurebasis<br />
füllen. Hierfür die Herstellerangaben<br />
für Mischungsverhältnis und Einwirkzeit<br />
beachten. <strong>Dampfgenerator</strong> in waagerechter<br />
Position lagern!<br />
9. <strong>Dampfgenerator</strong> entleeren und das<br />
Drainagerohr entfernen.<br />
10. Den <strong>Dampfgenerator</strong> und das<br />
Drainagerohr mit klarem Wasser ausspülen.<br />
Restliche Kalk- und Schmutzpartikel<br />
aus dem <strong>Dampfgenerator</strong> und dem<br />
Drainagerohr entfernen.<br />
Der Einbau erfolgt in umgekehrter Reihenfolge.<br />
Nach dem entkalken einen Dampfdurchgang<br />
ohne benutzer durchführen!<br />
42<br />
DecaLcIFyINg<br />
If your water has a hardness degree of<br />
14 (~2,5 mmol/l) or higher, a water softening<br />
system must be integrated in the<br />
water supply to extend the decalcifying<br />
intervals resp. to save your domestic<br />
installation!<br />
Decalcifying the steam generator:<br />
• if the steam power gets lower<br />
• if it takes longer to achieve the chosen<br />
cabin temperauture like until now<br />
• if hot water will come out of the steam<br />
nozzle during the operating time<br />
Decalcifying (Fig. A)<br />
Assemble and disassemble from electrical<br />
components is only allowed by electrican<br />
specialists (VDE 0100 ).<br />
scalding danger!<br />
Please note - The decalcifying must be<br />
done only when the generator is cold.<br />
1. + 2. Turn off the electrical supply,lay<br />
a dustsheet/blanket in the shower tray<br />
and then remove the glass inspection<br />
opening panel.<br />
3. Disconnect electrical cables from the<br />
steam generator.<br />
4. + . Turn the water supply off to the<br />
steam generator (corner valve) and disconnect<br />
the chrome pressure hose.<br />
6. Disassemble the steam pipe from the<br />
steam generator.<br />
. Loosen the screws for the steam generator,<br />
and then push the generator<br />
up and remove from the corner cabinet.<br />
Drain any remaining water from the steam<br />
generator.<br />
8. Fill steam generator with customary<br />
fast decalcify agent. Therefore attend<br />
manufacturer information for mix ratio<br />
and residence time. NB-Store steam<br />
generator in a horizontal position.<br />
9. After 1 Hour drain the steam generator<br />
and disassemble the drainage pipe from<br />
the steam generator,<br />
10. After decalcifying thoroughly rinse<br />
the steam generator and drainage pipe.<br />
Remove any remaining calc particles and<br />
dirt particles from the steam generator<br />
and drainage pipe.<br />
Mounting will happen in the opposite<br />
order.<br />
execute one steam passageway without<br />
users executes after decalcifying!<br />
Per togLIere IL caLcare<br />
In caso di acqua dura (14° o più), è necessario<br />
dotarsi di un apparecchio di dolcificazione<br />
dell‘acqua, da inserire in prossimità delle<br />
condutture idrauliche, per evitare danni alle<br />
installazioni!<br />
togliere il calcare dal generatore di vapore:<br />
• se l‘intensità del diffusore di vapore è ridotta<br />
al minimo.<br />
• se per raggiungere una determinata<br />
temperatura all‘interno della cabina si deve<br />
attendere a lungo.<br />
• se dal diffusore di vapore esce acqua calda<br />
durante la funzione del bagno di vapore.<br />
Per togliere il calcare (fig. A):<br />
L’installazione e la sostituzione di parti<br />
elettriche devono essere eseguite solamente<br />
da uno specialista con concessione a norma<br />
VDE 0100.<br />
Pericolo di scottatura!<br />
Attenzione - la decalcificazione deve<br />
essere fatta solo quando il generatore<br />
e’ freddo.<br />
1. + 2. Togliere la corrente elettrica,<br />
mettere un telo /una coperta sul piatto<br />
doccia e rimuovere il pannello ispezionabile.<br />
3. Disconnettere i cavi elettrici dal generatore<br />
di vapore.<br />
4. + . Chiudere l’erogazione d’acqua al<br />
generatore di vapore ( valvola angolare)<br />
e scollegare il tubo flessibile cromato<br />
della pressione.<br />
6. Smontare il tubo dal generatore di<br />
vapore.<br />
. Allentare le viti del generatore di vapore,<br />
sollevarlo e rimuoverlo dall’angolo<br />
della cabina. Far defluire l’acqua rimasta<br />
dal generatore di vapore.<br />
8. Decalcificare la doccetta manuale con<br />
decalcificante rapido a base di acido<br />
citrico normalmente in commercio. Osservare<br />
a ciò le indicazioni del produttore<br />
per il rapporto di miscelazione e tempo<br />
d'efficacia. ATTN : Posizionare il generatore<br />
di vapore orizzontalmente.<br />
9. Dopo un’ora, togliere l’agente decalcificante<br />
e smontare il tubo di drenaggio<br />
dal generatore di vapore<br />
10. Dopo la decalcificazione, risciacquare<br />
accuratamente il generatore di vapore<br />
ed il tubo di drenaggio. Rimuovere<br />
eventuali particelle calcaree e polvere<br />
residue dal generatore di vapore e dal<br />
tubo di drenaggio.<br />
Per l’installazione procedere in ordine<br />
contrario.<br />
Dopo la decalcificazione fare un bagno di<br />
vapore senza alcuna persona all’interno della<br />
cabina doccia!
a<br />
4.<br />
.<br />
10.<br />
1.<br />
2. 3.<br />
.<br />
4.<br />
3.<br />
1.<br />
2.<br />
6.<br />
8. 9.<br />
43<br />
Deutsch<br />
english<br />
Italiano
46<br />
<strong>Hansgrohe</strong> · Postfach 1145 · D-77761 Schiltach · Telefon +49 (0) 78 36/51-1282 · Telefax +49 (0) 7836/511440<br />
E-Mail: info@hansgrohe.com · Internet: www.hansgrohe.com 05/08<br />
9.05517.03