Pharo® FunPool - Hansgrohe
Pharo® FunPool - Hansgrohe
Pharo® FunPool - Hansgrohe

You also want an ePaper? Increase the reach of your titles
YUMPU automatically turns print PDFs into web optimized ePapers that Google loves.
Pharo<br />
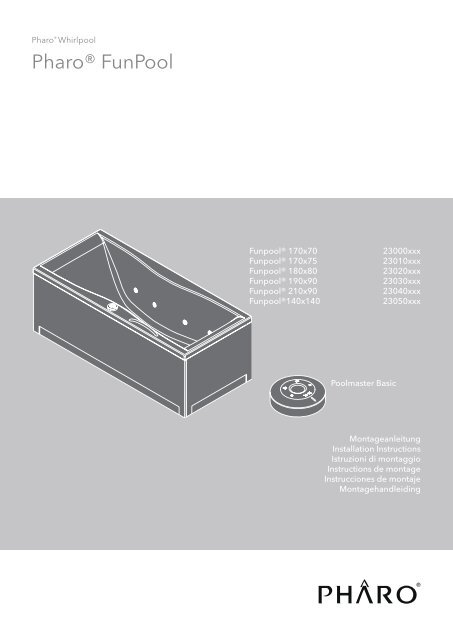
<strong>Pharo®</strong> <strong>FunPool</strong><br />
® Whirlpool<br />
Funpool® 170x70 23000xxx<br />
Funpool® 170x75 23010xxx<br />
Funpool® 180x80 23020xxx<br />
Funpool® 190x90 23030xxx<br />
Funpool® 210x90 23040xxx<br />
Funpool®140x140 23050xxx<br />
Poolmaster Basic<br />
Montageanleitung<br />
Installation Instructions<br />
Istruzioni di montaggio<br />
Instructions de montage<br />
Instrucciones de montaje<br />
Montagehandleiding
InhaltsverzeIchnIs<br />
contents<br />
InDIce<br />
Deutsch<br />
vorwort 3<br />
sicherheitshinweise 5<br />
In der anleitung<br />
verwendete symbole 7<br />
technische Daten 8<br />
170x70 / Maße / technische Daten 12<br />
170x75 / Maße / technische Daten 14<br />
180x80 / Maße / technische Details 16<br />
190x90 / Maße / technische Details 18<br />
140 x 140 / Maße /<br />
technische Daten 20<br />
210 x 90/ Maße / technische Daten 22<br />
ausstattung 24<br />
verpackungsinhalt 25<br />
Benötigte Werkzeuge 27<br />
Montagebeispiele 28<br />
Whirlpoolmontage mit schürze 30<br />
stromversorgung 34<br />
Bedienelement Basic Poolmaster 36<br />
allgemeines / Pflegeanleitung Wanne<br />
38<br />
störungen und abhilfe 39<br />
service 42<br />
service teile 44<br />
typenschilderklärung/<br />
Konformitätserklärung 46<br />
English<br />
Preface 3<br />
safety Precautions 5<br />
symbols Used in the Instructions 7<br />
technical Data 9<br />
170x70 / Dimensions /<br />
technical Data 12<br />
170x75 / Dimensions /<br />
technical Data 14<br />
180x80 / Dimensions /<br />
technical Data 16<br />
190x90 / Dimensions /<br />
technical Data 18<br />
140 x 140 / Dimensions /<br />
technical Data 20<br />
210 x 90 / Dimensions /<br />
technical Data 22<br />
equipment 24<br />
Packaging contents 25<br />
required tools 27<br />
Installation example 28<br />
Whirlpool installation with skirt 30<br />
Power sUpply 34<br />
Basic Poolmaster operation 36<br />
Generally / care instruction for tub 38<br />
trouble shooting 40<br />
service 42<br />
spare Parts 44<br />
explanation of nameplate /<br />
declaration of conformity 46<br />
Italiano<br />
Introduzione 3<br />
Prescrizioni di sicurezza 5<br />
simboli utilizzati nel manuale 7<br />
dati tecnici 10<br />
170x70 / Dimensioni /dati tecnici 12<br />
170x75 / Dimensioni /dati tecnici 14<br />
180x80 / Dimensioni /dati tecnici 16<br />
190x90 / Dimensioni /dati tecnici 18<br />
140 x 140 / Dimensioni /dati tecnici 20<br />
210 x 90 / Dimensioni /dati tecnici 22<br />
equipaggiamento 24<br />
accessori coontenuti 25<br />
attrezzi necessari 27<br />
esempio di montaggio 28<br />
Funzionalità del Basic Poolmaster 36<br />
Generale/ precauzioni per<br />
l’installazione della vasca 38<br />
risoluzione dei Problemi 41<br />
Manutenzione 42<br />
Parti Di ricambio<br />
spiegazione targhetta/<br />
44<br />
dichiarazione di conformità 46
Deutsch<br />
Information<br />
Die Montageanleitung enthält die wichtigsten<br />
Montageschritte und Installationshinweise.<br />
sie vermeiden Montagefehler wenn sie die<br />
Montageanleitung aufmerksam durchlesen.<br />
Unsachgemäße Montage kann zu verletzungen<br />
führen!<br />
Die verwendeten abbildungen sind<br />
Prinzipdarstellungen. Das aussehen Ihres<br />
Whirlpools kann von diesen abbildungen<br />
abweichen.<br />
In der Montageanleitung wird der einbau mit<br />
der optional erhältlichen Wannenschürze für<br />
Whirlpools der serie Funpool beschrieben.<br />
Dementsprechend entfallen Montageschritte<br />
bei einem Whirlpool ohne schürzen.<br />
Die Montageanleitung an einem sicheren<br />
ort aufbewahren. Und an nachfolgende<br />
eigentümer/nutzer weitergeben.<br />
Normen und Richtlinien<br />
Die anwendung des Whirlpools ist durch<br />
folgende richtlinien gewährleistet:<br />
niederspannungsrichtlinie 2006/95/eWG<br />
richtlinie 89/336/eWG<br />
en61000-6-3<br />
en61000-3-3<br />
DIn vDe 100 teil 701: 2002<br />
en 60335-2-60-2003<br />
en 14516<br />
en 12764<br />
en 198<br />
Stromversorgung:<br />
Die gesamte stromversorgung erfolgt<br />
über:<br />
- Wechselstromanschluss mit 230v/n/<br />
Pe/50hz.<br />
- hauptschalter zur netztrennung mit<br />
3 mm Kontaktöffnung.<br />
Die stromversorgung muss eine<br />
Fehlerstrom-schutzeinrichtung (rcD)<br />
besitzen, der Bemessungsdifferenzstrom<br />
ist von ≤ 30 ma abgesichert.<br />
Elektro- Installation<br />
Bei der elektro-Installation sind die<br />
entsprechenden vDe-, landes- und<br />
evU-vorschriften, in der jeweils gültigen<br />
Fassung, einzuhalten.<br />
Die Installations- und Prüfungsarbeiten<br />
sind von einem zugelassenen<br />
elektrofachmann auszuführen.<br />
arbeiten am Whirlpool dürfen nur im<br />
spannungsfreien zustand vorgenommen<br />
werden!<br />
Wasserablauf und Wasserzulauf<br />
anschluss für Wasserablauf und<br />
Wasserzulauf sind nach den derzeitig<br />
gültigen DIn 1988/en1717<br />
DIn1986/en12056<br />
und den örtlichen vorschriften<br />
durchzuführen.<br />
English<br />
Information<br />
these installation instructions contain the<br />
most important installing procedures and<br />
installation notes.<br />
Please read these instructions carefully in order<br />
to avoid incorrect installation. any improper<br />
installation may lead to injuries!<br />
the used illustrations are schematic<br />
diagrams.<br />
the following installation instructions will<br />
describe the mounting of whirlpools with tub<br />
skirt for whirlpools of 200 series. according to<br />
this, mounting steps wouldn’t be done if these<br />
tub skirt wouldn’t be installed.<br />
Keep the installation / operating instructions<br />
in a safe place and pass on to subsequent<br />
owners/users.<br />
Standards and Directives<br />
the use of the whirlpool is safeguarded<br />
by the following Directives:<br />
low voltage Directive 2006/95/eec<br />
Directive 89/336/eec<br />
en61000-6-3<br />
en61000-3-3<br />
DIn vDe 100 teil 701: 2002<br />
en 60335-2-60-2003<br />
en 14516<br />
en 12764<br />
en 198<br />
Power supply:<br />
the complete power supply is performed<br />
by means of:<br />
- a.c. connection with 230v/n/Pe/<br />
50hz.<br />
- circuit breaker for disconnection<br />
from power supply with 3 mm<br />
contact opening.<br />
the power supply must have a residual<br />
current device (rcD) which must provide<br />
protection with a rated residual current<br />
of ≤ 30 ma fuse.<br />
Electrical installation<br />
For electrical installation, all applicable<br />
vDe, country-specific and evU<br />
regulations in their respectively<br />
valid versions must be observed. all<br />
installation and inspection works must<br />
be carried out by an approved electrician<br />
and in accordance with vDe 0100 Part<br />
701. all works at the whirlpool may only<br />
be carried out in a de-energized state!<br />
Water inlet / Water drain<br />
connections for water inlet and drain<br />
have to be installed according to the<br />
currently valid DIn 1988/en1717 /<br />
DIn1986/en12056 as well as local<br />
regulations.<br />
Italiano<br />
vorWort<br />
PreFace<br />
IntroDUzIone<br />
Informazione<br />
le istruzioni di montaggio descrivono le<br />
più importanti operazioni di montaggio e<br />
le avvertenze di installazione per i prodotti<br />
indicati nella pagina di copertina. leggere<br />
attentamente le istruzioni di montaggio per<br />
evitare errori.<br />
Il montaggio scorretto può provocare lesioni!<br />
le illustrazioni d’uso sono schematizzate con<br />
diagrammi.<br />
le seguenti istruzioni di montaggio<br />
descriveranno il montaggio delle vasche con<br />
i pannelli Funpool. Per questo motivo, le fasi<br />
di montaggio descritte vanno tralasciate se la<br />
vasca non va installata con i pannelli.<br />
riporre le istruzioni di montaggio e d‘uso in<br />
un luogo sicuro. consegnarle ai proprietari/<br />
utenti futuri.<br />
Norme e direttive<br />
l’uso della vasca idromassaggio è<br />
garantito dalle seguenti direttive:<br />
direttiva sulla bassa tensione 2006/95/cee<br />
direttiva 89/336/cee<br />
en61000-6-3<br />
en61000-3-3<br />
DIn vDe 100 teil 701: 2002<br />
en 60335-2-60-2003<br />
en 14516<br />
en 12764<br />
en 198<br />
Alimentazione elettrica:<br />
l’intero sistema elettrico viene<br />
alimentato:<br />
- a tensione alternata a 230v/n/Pe/<br />
50hz.<br />
- con interruttore bipolare, con<br />
apertura dei contatti di almeno 3<br />
mm.<br />
Il sistema elettrico deve possedere<br />
un Interruttore magnetotermico<br />
differenziale nominale ≤ 30 ma<br />
Installazione elettrica<br />
Per l'impianto elettrico si devono<br />
rispettare le norme ceI e dell'azienda<br />
elettrica vigenti.<br />
I lavori di installazione e di collaudo<br />
devono essere svolti da un tecnico<br />
autorizzato. Qualsiasi intervento sulla<br />
vasca va eseguito solo dopo aver<br />
staccato la tensione elettrica!<br />
Ingresso acqua/ scarico acqua<br />
I collegamenti per acqua di mandata<br />
e per l‘acqua di uscita devono essere<br />
installati secondo le attuali norme DIn<br />
1988/en1717 / DIn1986/en12056 ed<br />
in conformità con le vigenti normative<br />
locali.<br />
Deutsch<br />
english<br />
Italiano
vorWort<br />
PreFace<br />
IntroDUzIone<br />
Deutsch<br />
English<br />
Italiano<br />
Vor dem Einbau bitte prüfen:<br />
Please assure before installation: Da controllare prima del montaggio:<br />
• türbreite, im für die Installation • observe door width in the room Fare attenzione all’apertura della<br />
vorgesehenen raum, beachten. where the whirlpool is to be porta nel bagno dove verrà installata<br />
• einbau des Produktes, in verbindung mit installed.<br />
la vasca.<br />
optionalen schürzen, in fertig gefliestes • Installation of product, in Il montaggio del prodotto, con<br />
Bad (Boden und Wände gefliest). combination with optional skirting, pannelli di protezione disponibili<br />
in a tiled bathroom (floor and walls come optional, deve essere fatto in<br />
Boden/ - ablauf<br />
tiled).<br />
un bagno già piastrellato (pavimento<br />
•<br />
•<br />
•<br />
Die tragfähigkeit des Fußbodens<br />
e parete).<br />
muss einer Belastung von 300 kg/m²<br />
Floor/ floor drain<br />
entsprechen.<br />
• the floor's carrying capacity must Pavimento/ scarico a pavimento<br />
Der Fußboden muss ausreichend correspond to a load of 300 kg/m². la portata minima del pavimento deve<br />
nivelliert sein, d.h. der Fußboden ist • the floor must be sufficiently leveled, essere di 300 kg/m².<br />
waagerecht und eben.<br />
i.e. it must be horizontal and even. Il pavimento deve essere livellato e<br />
Der Whirlpool muss auf einem, • the whirlpool must be installed to sufficientemente piano.<br />
für Feuchträume geeigneten a sealed floor for damp locations. la vasca deve essere installata su<br />
Boden montiert werden. Durch die Water can be splashed to the wall un pavimento resistente all’umidità.<br />
Whirlfunktion gelangt spritzwasser aus and to the floor!<br />
l’acqua può essere spruzzata sul muro<br />
der Wanne!<br />
Water/ waste water<br />
and sul pavimento!<br />
Wasser/ Abwasser<br />
• Please pay attention to the position of Acqua/ acqua di scarico<br />
• aufgrund des Wannenträgersystems the tub feet and installation area when lo scarico deve essere posizionato al<br />
muss der ablauf im Bodenbereich installing the water and waste supplies! livello del pavimento. Generalmente<br />
vorgesehen werden. ein the waste pipe must be positioned at non potete far uscire il tubo di scarico<br />
abwasserseitiger anschluss aus der floor level. Generally you cannot have dal muro a causa del telaio della vasca!<br />
Wand ist nicht möglich!<br />
the waste pipe coming out from the Fare attenzione alla posizione dei piedini<br />
• nach DIn en 12764 muss eine geeignete wall due to the Whirlpool Frame! della vasca e all‘area di installazione,<br />
sicherungseinrichtung gegen rückfluss • according to DIn en 12764, a suitable quando installate gli allacciamenti idrici<br />
bauseits installiert werden. Dies safety device preventing backflow has to e lo scarico!<br />
muss mindestens, nach en 1717 eine be installed by the customer. according secondo la DIn en 12764, in sede<br />
sicherungskombination hD oder nach to en 1717 this must at least consist of a di montaggio deve essere installato<br />
DIn 1988 ein rohrunterbrecher a1 in hD safety combination or according to un dispositivo di sicurezza idoneo<br />
der jeweils richtigen Montagehöhe sein. DIn 1988 of a pipe interrupter a1 at the contro il riflusso. secondo la en 1717,<br />
• vor dem anschließen der respectively correct installation height. questo dispositivo deve essere una<br />
Wasserzuleitungen müssen diese nach • Flush the water supply circuits according combinazione di sicurezza hD o,<br />
DIn fachgerecht durchgespült werden. to local regulations before installing. secondo la DIn 1988, un disconnettore<br />
Elektro<br />
Electric powered<br />
a1 all‘altezza di montaggio corretta.<br />
• elektrischer anschluss: Kabel 3 x 1,5 • electrical connection: cable 3 x 1.5 mm² Il riempimento tramite il circuito<br />
mm² / Kabellänge 3500 mm<br />
/ cable length 3500 mm<br />
idraulico deve esse in conformità alle<br />
• Potentialausgleich (erdung): Kabel 4 • earthing cable: cable 4 mm² / cable vigenti normative locali.<br />
mm² / Kabellänge 3500 mm<br />
length 3500 mm<br />
Elettrico<br />
connessione elettrica: cavo 3 x 1,5 mm 2<br />
/ lunghezza 3500 mm<br />
connessione terra: cavo 4 mm 2 •<br />
•<br />
•<br />
•<br />
•<br />
•<br />
•<br />
•<br />
•<br />
•<br />
•<br />
/<br />
lunghezza 3500 mm
Deutsch<br />
English<br />
sIcherheItshInWeIse<br />
saFety PrecaUtIons<br />
PrescrIzIonI DI sIcUrezza<br />
Italiano<br />
Esempi di uso<br />
Hinweise zur Verwendung<br />
Tip for using<br />
• le persone anziane e disabili che hanno<br />
• In ihrer Bewegung eingeschränkte ältere • elderly and handicapped persons<br />
difficoltà a muoversi devono prestare<br />
und behinderte Personen sollten bei should exercise particular care when<br />
particolare attenzione quando usano la<br />
der nutzung des Whirlpools besondere using the whirlpool.<br />
vasca idromassaggio.<br />
sorgfalt walten lassen.<br />
• the water temperature should not<br />
• la temperatura dell’acqua non<br />
• Die Badewassertemperatur darf 40 °c exceed 40 °c.<br />
dovrebbe superare i 40°c.<br />
nicht übersteigen.<br />
• Do not exceed 20 minutes bathing time<br />
• la durata del bagno non deve superare<br />
• Keine Überschreitung der Badezeit von with a water temperature of >= 38°c.<br />
i 20 minuti con una temperatura<br />
20 Minuten bei einer Wassertemperatur • Please contact your doctor if you have<br />
dell’acqua di >= 38°c.<br />
von >= 38°c.<br />
health concerns.<br />
• consultate il vostro medico se avete<br />
• Falls sie gesundheitliche Bedenken • the pool must be emptied after each<br />
qualche malattia.<br />
haben, setzen sie sich mit Ihrem arzt in bath.<br />
• la vasca deve essere svuotata dopo<br />
verbindung.<br />
•<br />
ogni bagno.<br />
• nach jedem Bad muss der Pool entleert<br />
werden.<br />
Esempi di uso improprio<br />
Examples for non-using<br />
• la vasca idromassaggio non può essere<br />
Beispiele zur Nichtverwendung • the whirlpools may not be used in<br />
usata in luoghi pubblici.<br />
• Die Whirlpools dürfen nicht im public areas.<br />
• la vasca idromassaggio non può essere<br />
öffentlichen Bereich eingesetzt werden. • the whirlpools may not be used<br />
usata all’aperto.<br />
• Die Whirlpools dürfen nicht im outdoors.<br />
• I bambini non devono essere lasciati<br />
außenbereich installiert werden. • children must not be left unattended in<br />
incustoditi nella vasca.<br />
• Kinder dürfen nicht unbeaufsichtigt den the Whirlpool.<br />
• Per esempio i cani, i gatti o altri animali<br />
Whirlpool benutzen.<br />
• e.g. dogs, cats or other animals must not<br />
non devono essere lavati nella vasca,<br />
• z. B. hunde, Katzen oder sonstige be wash in the whirlpool.<br />
per questioni igeniche.<br />
haustiere dürfen nicht im Whirlpool der<br />
hygiene unterzogen werden.<br />
Deutsch<br />
english<br />
Italiano
sIcherheItshInWeIse<br />
saFety PrecaUtIons<br />
PrescrIzIonI DI sIcUrezza<br />
Deutsch<br />
- Während reinigungs- und<br />
Wartungsarbeiten muss der haupt<br />
schalter auf "oFF" gestellt sein.<br />
- Wartungs- und einstellarbeiten dürfen<br />
nur von einem Fachmann durchgeführt<br />
werden.<br />
- nach Wartungsarbeiten müssen<br />
die serviceabdeckungen ordnungs<br />
gemäß montiert werden.<br />
- Bestehende sicherheitsvorkehr<br />
ungen und sicherheitseinrichtungen<br />
dürfen nicht verändert oder entfernt<br />
werden.<br />
- Der Whirlpool darf in seiner Bauart<br />
nicht verändert werden. nur<br />
originalersatzteile verwenden.<br />
- elektrische verbraucher > 12 v (radio,<br />
Föhn, usw.) dürfen nicht in der nähe<br />
oder im Whirlpool verwendet werden!<br />
Kein essigsäurehaltiges Silikon<br />
verwenden.<br />
Durch Gebrauch von essigsäurehaltigem<br />
silikon können acryl- bzw. Metallteile des<br />
Whirlpools beschädigt werden.<br />
Für das verfugen zwischen den elementen<br />
pilzhemmendes sanitärsilikon verwenden.<br />
Dennoch kann es unter Umständen zu<br />
verfärbungen des silikondichtstoffes<br />
kommen.<br />
silikonfugen sind Wartungsfugen und<br />
unterliegen nicht der Gewährleistung.<br />
Die Wanne vor Inbetriebnahme oder test<br />
der Whirlfunktionen gründlich mit der<br />
handbrause ausspülen!<br />
Dichtheitsprüfung und<br />
Inbetriebnahmeprüfung gemäß EN 12764<br />
durchführen<br />
English<br />
- the main switch must be set to "oFF"<br />
during cleaning and maintenance<br />
works.<br />
- Maintenance and adjustment works<br />
must be carried out by experts only.<br />
- all service covers must be appropriately<br />
re-installed after maintenance works.<br />
- any installed safety provisions or safety<br />
equipment may not be modified or<br />
removed.<br />
- the whirlpool’s construction must not<br />
be changed. only original components<br />
may be used.<br />
- Do not use higher voltage than 12 volts<br />
(radio, hair-dryer, etc) in or close to the<br />
whirlpool!<br />
Do not use silicone containing acetic acid!<br />
acrylic or metal parts of the whirlpool can be<br />
damaged by the use of silicone containing<br />
acetic acid.<br />
For the flexible seals between the elements<br />
we advise to use schimmelwerende<br />
silicone kit. Despite this, and dependant<br />
on circumstances, colorchanges in the kit<br />
can happen. If cleaning does not bring<br />
the wanted result, the seals have to be<br />
exchanged. renewing is not within our<br />
warranty.<br />
the tub must be cleaned thoroughly with<br />
the handshower befor using or testing the<br />
whirlpool functions!<br />
Perform leak test.<br />
Italiano<br />
- Durante i lavori di pulizia e di<br />
manutenzione, l'interruttore generale<br />
deve essere su "oFF".<br />
- Gli interventi di manutenzione e<br />
regolazione devono essere svolti solo<br />
da un tecnico autorizzato.<br />
- al termine della manutenzione si<br />
devono rimontare correttamente le<br />
coperture di servizio.<br />
- I dispositivi di sicurezza installati non<br />
devono essere né modificati né rimossi.<br />
- la costruzione della vasca non deve<br />
essere cambiata. Devono essere<br />
utilizzati solo componenti originali.<br />
- non utilizzare apparecchi elettrici<br />
>12v (radio, asciuga capelli...etc) nelle<br />
vicinanze o all‘interno della vasca!<br />
Non utilizzare silicone contenente acido<br />
acetico.<br />
Utilizzando silicone contenente acido<br />
acetico vi è il pericolo di danneggiare parti<br />
in materiale acrilico oppure parti metalliche<br />
della vasca.<br />
Per la sigillatura tra gli elementi<br />
raccomandiamo l‘uso di silicone antimuffa<br />
per sanitari. nonostante ciò, si possono<br />
verificare macchie o colorimenti del silicone<br />
sigillante. nel caso in cui gli scolorimenti o<br />
macchie non si lasciano eliminare pulendo<br />
semplicemente i giunti, è necessario<br />
sostituirli. I giunti di silicone sono giunti<br />
soggetti a manutenzione e non fanno parte<br />
della garanzia concessa.<br />
Prima della messa in esercizio oppure<br />
prima di eseguire la prova delle funzioni<br />
dell‘impianto whirlpool, la vasca deve essere<br />
sciacquata meticolosamente con la doccetta<br />
a mano!<br />
Verificare possibili perdite d’acquta.
Deutsch<br />
In der vorliegenden einbauanleitung und an<br />
einigen stellen auf dem Produkt selbst befinden<br />
sich symbole, die hier unten beschrieben<br />
werden.<br />
ACHTUNG STROMSCHLAGGEFAHR<br />
Meldet dem betreffenden Personal, dass der<br />
beschriebene vorgang, falls nicht unter einhaltung<br />
der sicherheitsvorschriften ausgeführt, das risiko<br />
eines elektrischen schlags birgt.<br />
ACHTUNG ALLGEMEINE GEFAHR<br />
Meldet dem betreffenden Personal, dass der<br />
beschriebene vorgang, falls nicht unter einhaltung<br />
der sicherheitsvorschriften ausgeführt, das risiko<br />
von Körperverletzungen birgt.<br />
ACHTUNG ZWEI PERSONEN NOTWENDIG<br />
Bezeichnet eine bestimmte vorgehensweise. Wenn<br />
diese nicht eingehalten wird kann das Produkt<br />
oder etwas in seiner Umgebung beschädigt<br />
werden. (Die Montage muss von zwei Personen<br />
durchgeführt werden)!<br />
HINWEIS<br />
Weist das betreffende Personal auf Informationen<br />
hin, deren Inhalt wichtig ist und berücksichtigt<br />
werden soll.<br />
ELEKTRISCHER INSTALLATEUR<br />
Fachtechniker, der imstande ist, das Produkt unter<br />
normalen Bedingungen einzubauen. er ist für<br />
alle eingriffe elektrischer art wie einstellungen,<br />
Wartung und reparaturen zuständig. er ist<br />
imstande, unter spannung in schaltschränken oder<br />
elektrischen Dosen zu arbeiten.<br />
English<br />
the symbols described below appear in these<br />
Installation Instructions and in some locations on<br />
the product itself.<br />
ATTENTION RISK OF ELECTRIC SHOCK<br />
Informs the personnel concerned that the process<br />
described, unless performed in compliance with<br />
the safety rules, bears the risk of electric shock.<br />
ATTENTION GENERAL HAZARD<br />
Informs the personnel concerned that the process<br />
described, unless performed in compliance with<br />
the safety rules, bears the risk of injury.<br />
ATTENTION: TWO PEOPLE REQUIRED!<br />
Describes a specific procedure. If this procedure<br />
is not observed, the product or objects within<br />
its environment may be damaged. (the steam<br />
shower's installation must be carried out by two<br />
people)!<br />
NOTE<br />
Informs the personnel concerned of information<br />
with important contents to be observed.<br />
ELECTRICIAN<br />
specialist technician capable of installing the<br />
product under normal conditions. he is responsible<br />
for all electrical work, such as setting, maintenance<br />
and repairs. he is capable of working in energized<br />
control cabinets or on electrical sockets.<br />
In Der anleItUnG verWenDete syMBole<br />
syMBols UseD In the InstrUctIons<br />
sIMBolI UtIlIzzatI nel ManUale<br />
Italiano<br />
nel presente manuale di istruzioni di montaggio si<br />
trovano dei simboli alcuni dei quali si trovano applicati<br />
in alcuni punti del prodotto stesso. In questa parte<br />
della documentazione si procede alla descrizione del<br />
significato di questi simboli.<br />
ATTENZIONE PERICOLO DI SCOSSA<br />
ELETTRICA<br />
segnala al personale interessato che l'operazione<br />
descritta può comportare il rischio di una scossa<br />
elettrica se non eseguita nel pieno rispetto delle<br />
norme di sicurezza.<br />
ATTENZIONE PERICOLO GENERALE<br />
segnala al personale interessato che l'operazione<br />
descritta può comportare il rischio di seri incidenti<br />
se non eseguita nel pieno rispetto delle norme di<br />
sicurezza.<br />
ATTENZIONE: SONO NECESSARIE DUE<br />
PERSONE!<br />
Indica un determinato procedimento. se non viene<br />
rispettato, il prodotto o oggetti nelle sue vicinanze<br />
possono essere danneggiati (il montaggio della<br />
doccia a vapore deve essere eseguito da due<br />
persone)!<br />
NOTA BENE<br />
segnala al personale interessato informazioni con<br />
un contenuto importante che deve essere tenuto<br />
in considerazione.<br />
INSTALLATORE ELETTRICO<br />
tecnico specializzato in grado di installare il prodotto<br />
in normali condizioni di lavoro. tra le sue competenze<br />
rientrano tutti gli interventi di tipo elettrico come<br />
registrazioni, manutenzione e riparazioni. egli è in grado<br />
di intervenire in quadri elettrici ad armadio oppure su<br />
prese per la corrente che si trovino sotto tensione.<br />
Deutsch<br />
english<br />
Italiano
technIsche Daten<br />
170x70 170x75 180x80 190x90 210x90 140x40<br />
Form rechteck rechteck rechteck rechteck sechseck eck<br />
Inhalt + 1 Person (70kg) in l 110 178 217 254 214 230<br />
Material aBs 20%, PMMa 80%<br />
abwasseranschluss Dn 50<br />
elektr. zuleitung 230v / 50hz<br />
schutzart IPX 5<br />
leistung hydropumpe Basic max.0,8 kW<br />
leistung hydropumpe combi max.0,85 kW<br />
Förderleistung max. 380 l/min<br />
anzahl der hydrodüsen 10 10 12 12 12 10<br />
verpackungsgröße l x B x h<br />
in mm<br />
(B) einstellbare höhe der<br />
Wanne min/max in mm<br />
1895x895x970<br />
1970x1610<br />
x980<br />
575 - 630 635 - 690<br />
Option Exafill<br />
Wasseranschluss kalt/warm Dn 20 3/4” aussengewinde<br />
Option Schürzen<br />
(a) schürzenhöhe in mm 545 605<br />
schürzenmontage auf gefliesten Boden und vor gefliester Wand<br />
(c) höhe der Wanne mit<br />
schürze inkl. 10mm lüftungsabstand<br />
in mm<br />
Deutsch<br />
605 660<br />
1600x1600<br />
x1010<br />
1600x1600<br />
x1010
English<br />
170x70 170x75 180x80 190x90 210x90 140x40<br />
Form oblong oblong oblong oblong hexagon corner<br />
tub capacity + 1 person<br />
(70kg)<br />
110 178 217 254 214 230<br />
Material aBs 20%, PMMa 80%<br />
Drain Dn 50<br />
electrical supply 230v / 50hz<br />
Degree of prot. against water IPX 5<br />
connected load hydropump<br />
basic<br />
connected load hydropump<br />
combi<br />
max.0,8 kW<br />
max.0,85 kW<br />
Max.delivery rate max. 380 l/min<br />
number of water nozzles 10 10 12 12 12 10<br />
Packaging dim. l x B x h in<br />
mm<br />
(B) height of tub variable<br />
min/max in mm<br />
1895x895x970<br />
1970x1610<br />
x980<br />
575 - 630 635 - 690<br />
option Exafill<br />
Water connection hot/cold Dn 20 3/4” external screw thread<br />
option skirt<br />
(a) height of skirt in mm 545 605<br />
skirtmontage on tiled floor and against tiled wall<br />
(c) height of tub with skirt<br />
incl. 10mm aering-distance<br />
in mm<br />
605 660<br />
1600x1600<br />
x1010<br />
technIcal Data<br />
1600x1600<br />
x1010<br />
Deutsch<br />
english<br />
Italiano
DatI tecnIcI<br />
10<br />
Italian<br />
170x70 170x75 180x80 190x90 210x90 140x40<br />
Forma rettangolo rettangolo rettangolo rettangolo esagono ad angolo<br />
capacità della vasca + 1 persona<br />
(70kg)<br />
110 178 217 254 214 230<br />
Materiale aBs 20%, PMMa 80%<br />
scarico Dn 50<br />
alimentazione elettrica 230v / 50hz<br />
Grado di protezione IPX 5<br />
Potenza pompa idraulica Basic max.0,8 kW<br />
Potenza pompa idraulica combi max.0,85 kW<br />
Portata max. 380 l/min<br />
numero bocchette<br />
idromassaggio<br />
Imballo dim. l x B x h in mm 1895x895x970<br />
(B) altezza variabile della vasca<br />
min/max in mm<br />
connessione acqua<br />
fredda/calda<br />
(a) altezza del pannello esterno<br />
in mm<br />
Montaggio pannelli di protezione<br />
(c) altezza della vasca con<br />
pannello incluso 10 mm<br />
di areazione.<br />
10 10 12 12 12 10<br />
1970x1610<br />
x980<br />
575 - 630 635 - 690<br />
Opzione Exafill<br />
Opzione pannelli di protezione<br />
Dn 20 3/4” filetto esterno della vite<br />
545 605<br />
1600x1600<br />
x1010<br />
su pavimento piastrellato e davanti parete piastrellata<br />
605 660<br />
1600x1600<br />
x1010
11<br />
Deutsch<br />
english<br />
Italiano
170X70 / Masse / technIsche Daten<br />
170X70 / DIMensIons / technIcal Data<br />
170X70 / DIMensIonI /DatI tecnIcI<br />
1<br />
Deutsch<br />
Legende:<br />
Die abb. ist ein Montagebeispiel, es<br />
sind noch weitere einbausituationen<br />
möglich.<br />
a 1,2... mögliche serviceöffnungen für<br />
technik (abmessung 500x500 mm)<br />
X empfohlener Bereich für den Kalt-<br />
(rechts) und den Warmwasseranschluss<br />
(links) Dn 15.<br />
y empfohlener Bereich für den<br />
Wasserablauf Dn 50 (Boden: oberkante<br />
anschlussmuffe bündig standfläche<br />
Wannenfüße)<br />
z anschluss der elektrischen zuleitung<br />
und des Potentialausgleichs (erdung)*<br />
im gesamten Bereich der Wand<br />
möglich. ausreichend abstand zu den<br />
außenkanten einhalten!<br />
Wannenfuß<br />
Poolmaster Basic<br />
haltegriff<br />
Pos.<br />
Einbauposition mit Serviceöffnung und<br />
Pumpe links<br />
Pos.<br />
Einbauposition mit Serviceöffnung und<br />
Pumpe rechts<br />
* Querschnitt von mindestens 4 mm 2<br />
English<br />
Legend:<br />
the picture is an installation example,<br />
it‘s possible to install other situations.<br />
a 1,2... possible service opening area for<br />
maintenance (dimensions 500x500 mm)<br />
X recommended position for cold<br />
water connection (right) and hot water<br />
connection (left) Dn 15.<br />
y recommended position for the water<br />
drainage Ø 50 (floor: upper rim of<br />
connection pipe flush with tub feet<br />
contact area).<br />
z the electrical supply and the earth cable<br />
connection* are made out of the wall.<br />
Keep an adequate distance to the outer<br />
edges of the tub!<br />
tub feet<br />
Poolmaster Basic<br />
grab bar<br />
Pos.<br />
Installation position with service<br />
opening area and pump left<br />
Pos.<br />
Installation position with service<br />
opening area and pump right<br />
* cross-section at least 4 mm 2<br />
Italiano<br />
Legenda:<br />
Il disegno è un esempio di installazione,<br />
è possibile installare la vasca in altre<br />
configurazioni.<br />
a 1,2,3... possibili aree di ispezione tecnica<br />
(dimensioni 500x500 mm)<br />
X Posizione raccomandata per<br />
connessione acqua fredda (destra)<br />
e connessione acqua calda (sinistra)<br />
Dn15.<br />
y Posizione raccomandata per lo scarico<br />
d’acqua Ø 50 (Pavimento: il bordo più<br />
alto della connessione a livello dei<br />
piedini della vasca)<br />
z la fornitura elettrica e cavo di<br />
connessione terra(*) sono fatte fuori dal<br />
muro. tenere una adeguata distanza dai<br />
bordi della vasca!<br />
piedini vasca<br />
Poolmaster Basic<br />
Maniglia<br />
Pos.<br />
area di ispezione e pompa con<br />
posizione sinistra<br />
Pos.<br />
area di ispezione e pompa con<br />
posizione destra<br />
* sezione minima 4 mm 2
Pos. 1 Pos. 2<br />
Y<br />
Z<br />
X<br />
X<br />
Z<br />
Y<br />
1<br />
Deutsch<br />
English<br />
Italiano
170X75 / Masse / technIsche Daten<br />
170X75 / DIMensIons / technIcal Data<br />
170X75 / DIMensIonI /DatI tecnIcI<br />
1<br />
Deutsch<br />
Legende:<br />
Die abb. ist ein Montagebeispiel, es<br />
sind noch weitere einbausituationen<br />
möglich.<br />
a 1,2... mögliche serviceöffnungen für<br />
technik (abmessung 500x500 mm)<br />
X empfohlener Bereich für den Kalt-<br />
(rechts) und den Warmwasseranschluss<br />
(links) Dn 15.<br />
y empfohlener Bereich für den<br />
Wasserablauf Dn 50 (Boden: oberkante<br />
anschlussmuffe bündig standfläche<br />
Wannenfüße)<br />
z anschluss der elektrischen zuleitung<br />
und des Potentialausgleichs (erdung)*<br />
im gesamten Bereich der Wand<br />
möglich. ausreichend abstand zu den<br />
außenkanten einhalten!<br />
Wannenfuß<br />
Poolmaster Basic<br />
haltegriff<br />
Pos.<br />
Einbauposition mit Serviceöffnung und<br />
Pumpe links<br />
Pos.<br />
Einbauposition mit Serviceöffnung und<br />
Pumpe rechts<br />
* Querschnitt von mindestens 4 mm 2<br />
English<br />
Legend:<br />
the picture is an installation example,<br />
it‘s possible to install other situations.<br />
a 1,2... possible service opening area for<br />
maintenance (dimensions 500x500 mm)<br />
X recommended position for cold<br />
water connection (right) and hot water<br />
connection (left) Dn 15.<br />
y recommended position for the water<br />
drainage Ø 50 (floor: upper rim of<br />
connection pipe flush with tub feet<br />
contact area).<br />
z the electrical supply and the earth cable<br />
connection* are made out of the wall.<br />
Keep an adequate distance to the outer<br />
edges of the tub!<br />
tub feet<br />
Poolmaster Basic<br />
grab bar<br />
Pos.<br />
Installation position with service<br />
opening area and pump left<br />
Pos.<br />
Installation position with service<br />
opening area and pump right<br />
* cross-section at least 4 mm 2<br />
Italiano<br />
Legenda:<br />
Il disegno è un esempio di installazione,<br />
è possibile installare la vasca in altre<br />
configurazioni.<br />
a 1,2,3... possibili aree di ispezione tecnica<br />
(dimensioni 500x500 mm)<br />
X Posizione raccomandata per<br />
connessione acqua fredda (destra)<br />
e connessione acqua calda (sinistra)<br />
Dn15.<br />
y Posizione raccomandata per lo scarico<br />
d’acqua Ø 50 (Pavimento: il bordo più<br />
alto della connessione a livello dei<br />
piedini della vasca)<br />
z la fornitura elettrica e cavo di<br />
connessione terra(*) sono fatte fuori dal<br />
muro. tenere una adeguata distanza dai<br />
bordi della vasca!<br />
piedini vasca<br />
Poolmaster Basic<br />
Maniglia<br />
Pos.<br />
area di ispezione e pompa con<br />
posizione sinistra<br />
Pos.<br />
area di ispezione e pompa con<br />
posizione destra<br />
* sezione minima 4 mm 2
Pos. 1 Pos. 2<br />
X<br />
Y<br />
Z<br />
Y<br />
Z<br />
X<br />
1<br />
Deutsch<br />
English<br />
Italiano
180X80 / Masse / technIsche DetaIls<br />
180X80 / DIMensIons / technIcal Data<br />
180X80 / DIMensIonI /DatI tecnIcI<br />
1<br />
Deutsch<br />
Legende:<br />
Die abb. ist ein Montagebeispiel, es<br />
sind noch weitere einbausituationen<br />
möglich.<br />
a 1,2... mögliche serviceöffnungen für<br />
technik (abmessung 500x500 mm)<br />
X empfohlener Bereich für den Kalt-<br />
(rechts) und den Warmwasseranschluss<br />
(links) Dn 15.<br />
y empfohlener Bereich für den<br />
Wasserablauf Dn 50 (Boden: oberkante<br />
anschlussmuffe bündig standfläche<br />
Wannenfüße)<br />
z anschluss der elektrischen zuleitung<br />
und des Potentialausgleichs (erdung)*<br />
im gesamten Bereich der Wand<br />
möglich. ausreichend abstand zu den<br />
außenkanten einhalten!<br />
Wannenfuß<br />
Poolmaster Basic<br />
haltegriff<br />
Pos.<br />
Einbauposition mit Serviceöffnung und<br />
Pumpe links<br />
Pos.<br />
Einbauposition mit Serviceöffnung und<br />
Pumpe rechts<br />
* Querschnitt von mindestens 4 mm 2<br />
English<br />
Legend:<br />
the picture is an installation example,<br />
it‘s possible to install other situations.<br />
a 1,2... possible service opening area for<br />
maintenance (dimensions 500x500 mm)<br />
X recommended position for cold<br />
water connection (right) and hot water<br />
connection (left) Dn 15.<br />
y recommended position for the water<br />
drainage Ø 50 (floor: upper rim of<br />
connection pipe flush with tub feet<br />
contact area).<br />
z the electrical supply and the earth cable<br />
connection* are made out of the wall.<br />
Keep an adequate distance to the outer<br />
edges of the tub!<br />
tub feet<br />
Poolmaster Basic<br />
grab bar<br />
Pos.<br />
Installation position with service<br />
opening area and pump left<br />
Pos.<br />
Installation position with service<br />
opening area and pump right<br />
* cross-section at least 4 mm 2<br />
Italiano<br />
Legenda:<br />
Il disegno è un esempio di installazione,<br />
è possibile installare la vasca in altre<br />
configurazioni.<br />
a 1,2,3... possibili aree di ispezione tecnica<br />
(dimensioni 500x500 mm)<br />
X Posizione raccomandata per<br />
connessione acqua fredda (destra)<br />
e connessione acqua calda (sinistra)<br />
Dn15.<br />
y Posizione raccomandata per lo scarico<br />
d’acqua Ø 50 (Pavimento: il bordo più<br />
alto della connessione a livello dei<br />
piedini della vasca)<br />
z la fornitura elettrica e cavo di<br />
connessione terra(*) sono fatte fuori dal<br />
muro. tenere una adeguata distanza dai<br />
bordi della vasca!<br />
piedini vasca<br />
Poolmaster Basic<br />
Maniglia<br />
Pos.<br />
area di ispezione e pompa con<br />
posizione sinistra<br />
Pos.<br />
area di ispezione e pompa con<br />
posizione destra<br />
* sezione minima 4 mm 2
Pos. 1 Pos. 2<br />
X<br />
Y<br />
Z<br />
Y<br />
Z<br />
X<br />
1<br />
Deutsch<br />
English<br />
Italiano
190X90 / Masse / technIsche DetaIls<br />
190X90 / DIMensIons / technIcal Data<br />
190X90 / DIMensIonI /DatI tecnIcI<br />
1<br />
Deutsch<br />
Legende:<br />
Die abb. ist ein Montagebeispiel, es<br />
sind noch weitere einbausituationen<br />
möglich.<br />
a 1,2... mögliche serviceöffnungen für<br />
technik (abmessung 500x500 mm)<br />
X empfohlener Bereich für den Kalt-<br />
(rechts) und den Warmwasseranschluss<br />
(links) Dn 15.<br />
y empfohlener Bereich für den<br />
Wasserablauf Dn 50 (Boden: oberkante<br />
anschlussmuffe bündig standfläche<br />
Wannenfüße)<br />
z anschluss der elektrischen zuleitung<br />
und des Potentialausgleichs (erdung)*<br />
im gesamten Bereich der Wand<br />
möglich. ausreichend abstand zu den<br />
außenkanten einhalten!<br />
Wannenfuß<br />
Poolmaster Basic<br />
haltegriff<br />
Pos.<br />
Einbauposition mit Serviceöffnung und<br />
Pumpe links<br />
Pos.<br />
Einbauposition mit Serviceöffnung und<br />
Pumpe rechts<br />
* Querschnitt von mindestens 4 mm 2<br />
English<br />
Legend:<br />
the picture is an installation example,<br />
it‘s possible to install other situations.<br />
a 1,2... possible service opening area for<br />
maintenance (dimensions 500x500 mm)<br />
X recommended position for cold<br />
water connection (right) and hot water<br />
connection (left) Dn 15.<br />
y recommended position for the water<br />
drainage Ø 50 (floor: upper rim of<br />
connection pipe flush with tub feet<br />
contact area).<br />
z the electrical supply and the earth cable<br />
connection* are made out of the wall.<br />
Keep an adequate distance to the outer<br />
edges of the tub!<br />
tub feet<br />
Poolmaster Basic<br />
grab bar<br />
Pos.<br />
Installation position with service<br />
opening area and pump left<br />
Pos.<br />
Installation position with service<br />
opening area and pump right<br />
* cross-section at least 4 mm 2<br />
Italiano<br />
Legenda:<br />
Il disegno è un esempio di installazione,<br />
è possibile installare la vasca in altre<br />
configurazioni.<br />
a 1,2,3... possibili aree di ispezione tecnica<br />
(dimensioni 500x500 mm)<br />
X Posizione raccomandata per<br />
connessione acqua fredda (destra)<br />
e connessione acqua calda (sinistra)<br />
Dn15.<br />
y Posizione raccomandata per lo scarico<br />
d’acqua Ø 50 (Pavimento: il bordo più<br />
alto della connessione a livello dei<br />
piedini della vasca)<br />
z la fornitura elettrica e cavo di<br />
connessione terra(*) sono fatte fuori dal<br />
muro. tenere una adeguata distanza dai<br />
bordi della vasca!<br />
piedini vasca<br />
Poolmaster Basic<br />
Maniglia<br />
Pos.<br />
area di ispezione e pompa con<br />
posizione sinistra<br />
Pos.<br />
area di ispezione e pompa con<br />
posizione destra<br />
* sezione minima 4 mm 2
Pos. 1 Pos. 2<br />
X<br />
Y<br />
Z<br />
Y<br />
Z<br />
X<br />
1<br />
Deutsch<br />
English<br />
Italiano
140 X 140 / Masse / technIsche Daten<br />
140 X 140 / DIMensIons / technIcal Data<br />
140 X 140 / DIMensIonI /DatI tecnIcI<br />
0<br />
Deutsch<br />
Legende:<br />
Die abb. ist ein Montagebeispiel, es<br />
sind noch weitere einbausituationen<br />
möglich.<br />
a 1,2... mögliche serviceöffnungen für<br />
technik (abmessung 500x500 mm)<br />
X empfohlener Bereich für den Kalt-<br />
(rechts) und den Warmwasseranschluss<br />
(links) Dn 15.<br />
y empfohlener Bereich für den<br />
Wasserablauf Dn 50 (Boden: oberkante<br />
anschlussmuffe bündig standfläche<br />
Wannenfüße)<br />
z anschluss der elektrischen zuleitung<br />
und des Potentialausgleichs (erdung)*<br />
im gesamten Bereich der Wand<br />
möglich. ausreichend abstand zu den<br />
außenkanten einhalten!<br />
Wannenfuß<br />
Poolmaster Basic<br />
haltegriff<br />
Pos.<br />
Einbauposition mit Serviceöffnung und<br />
Pumpe links<br />
Pos.<br />
Einbauposition mit Serviceöffnung und<br />
Pumpe rechts<br />
* Querschnitt von mindestens 4 mm 2<br />
English<br />
Legend:<br />
the picture is an installation example,<br />
it‘s possible to install other situations.<br />
a 1,2... possible service opening area for<br />
maintenance (dimensions 500x500 mm)<br />
X recommended position for cold<br />
water connection (right) and hot water<br />
connection (left) Dn 15.<br />
y recommended position for the water<br />
drainage Ø 50 (floor: upper rim of<br />
connection pipe flush with tub feet<br />
contact area).<br />
z the electrical supply and the earth cable<br />
connection* are made out of the wall.<br />
Keep an adequate distance to the outer<br />
edges of the tub!<br />
tub feet<br />
Poolmaster Basic<br />
grab bar<br />
Pos.<br />
Installation position with service<br />
opening area and pump left<br />
Pos.<br />
Installation position with service<br />
opening area and pump right<br />
* cross-section at least 4 mm 2<br />
Italiano<br />
Legenda:<br />
Il disegno è un esempio di installazione,<br />
è possibile installare la vasca in altre<br />
configurazioni.<br />
a 1,2,3... possibili aree di ispezione tecnica<br />
(dimensioni 500x500 mm)<br />
X Posizione raccomandata per<br />
connessione acqua fredda (destra)<br />
e connessione acqua calda (sinistra)<br />
Dn15.<br />
y Posizione raccomandata per lo scarico<br />
d’acqua Ø 50 (Pavimento: il bordo più<br />
alto della connessione a livello dei<br />
piedini della vasca)<br />
z la fornitura elettrica e cavo di<br />
connessione terra(*) sono fatte fuori dal<br />
muro. tenere una adeguata distanza dai<br />
bordi della vasca!<br />
piedini vasca<br />
Poolmaster Basic<br />
Maniglia<br />
Pos.<br />
area di ispezione e pompa con<br />
posizione sinistra<br />
Pos.<br />
area di ispezione e pompa con<br />
posizione destra<br />
* sezione minima 4 mm 2
Pos. 1 Pos. 2<br />
X<br />
Z<br />
Y<br />
Z<br />
Y<br />
X<br />
1<br />
Deutsch<br />
English<br />
Italiano
210 X 90/ Masse / technIsche Daten<br />
210 X 90 / DIMensIons / technIcal Data<br />
210 X 90 / DIMensIonI /DatI tecnIcI<br />
Deutsch<br />
Legende:<br />
Die abb. ist ein Montagebeispiel, es<br />
sind noch weitere einbausituationen<br />
möglich.<br />
a 1,2... mögliche serviceöffnungen für<br />
technik (abmessung 500x500 mm)<br />
X empfohlener Bereich für den Kalt-<br />
(rechts) und den Warmwasseranschluss<br />
(links) Dn 15.<br />
y empfohlener Bereich für den<br />
Wasserablauf Dn 50 (Boden: oberkante<br />
anschlussmuffe bündig standfläche<br />
Wannenfüße)<br />
z anschluss der elektrischen zuleitung<br />
und des Potentialausgleichs (erdung)*<br />
im gesamten Bereich der Wand<br />
möglich. ausreichend abstand zu den<br />
außenkanten einhalten!<br />
Wannenfuß<br />
Poolmaster Basic<br />
haltegriff<br />
Pos.<br />
Einbauposition mit Serviceöffnung und<br />
Pumpe links<br />
Pos.<br />
Einbauposition mit Serviceöffnung und<br />
Pumpe rechts<br />
* Querschnitt von mindestens 4 mm 2<br />
English<br />
Legend:<br />
the picture is an installation example,<br />
it‘s possible to install other situations.<br />
a 1,2... possible service opening area for<br />
maintenance (dimensions 500x500 mm)<br />
X recommended position for cold<br />
water connection (right) and hot water<br />
connection (left) Dn 15.<br />
y recommended position for the water<br />
drainage Ø 50 (floor: upper rim of<br />
connection pipe flush with tub feet<br />
contact area).<br />
z the electrical supply and the earth cable<br />
connection* are made out of the wall.<br />
Keep an adequate distance to the outer<br />
edges of the tub!<br />
tub feet<br />
Poolmaster Basic<br />
grab bar<br />
Pos.<br />
Installation position with service<br />
opening area and pump left<br />
Pos.<br />
Installation position with service<br />
opening area and pump right<br />
* cross-section at least 4 mm 2<br />
Italiano<br />
Legenda:<br />
Il disegno è un esempio di installazione,<br />
è possibile installare la vasca in altre<br />
configurazioni.<br />
a 1,2,3... possibili aree di ispezione tecnica<br />
(dimensioni 500x500 mm)<br />
X Posizione raccomandata per<br />
connessione acqua fredda (destra)<br />
e connessione acqua calda (sinistra)<br />
Dn15.<br />
y Posizione raccomandata per lo scarico<br />
d’acqua Ø 50 (Pavimento: il bordo più<br />
alto della connessione a livello dei<br />
piedini della vasca)<br />
z la fornitura elettrica e cavo di<br />
connessione terra(*) sono fatte fuori dal<br />
muro. tenere una adeguata distanza dai<br />
bordi della vasca!<br />
piedini vasca<br />
Poolmaster Basic<br />
Maniglia<br />
Pos.<br />
area di ispezione e pompa con<br />
posizione sinistra<br />
Pos.<br />
area di ispezione e pompa con<br />
posizione destra<br />
* sezione minima 4 mm 2
Pos. 1 Pos. 2<br />
X<br />
Y<br />
Z<br />
Z<br />
Y<br />
X<br />
23<br />
Deutsch<br />
English<br />
Italiano
aUsstattUnG<br />
eQUIPMent<br />
eQUIPaGGIaMento<br />
Deutsch<br />
Wassersystem:<br />
• Wasserdüsen<br />
• Poolmaster Basic<br />
• Flexaplus ab-/Überlaufkombination<br />
option:<br />
• schürze lang<br />
• schürze kurz<br />
• exafill<br />
• haltegriff<br />
• nackenkissen<br />
Watersystem:<br />
•<br />
•<br />
•<br />
English<br />
hydro nozzle<br />
Poolmaster Basic<br />
Flexaplus water-/overflow combination<br />
option:<br />
•<br />
•<br />
•<br />
•<br />
•<br />
skirt front<br />
skirt side<br />
exafill<br />
hand grip<br />
neck<br />
Italiano<br />
Sistema acqua:<br />
• Bocchette idromassaggio<br />
• Poolmaster Basic<br />
• Flexaplus scarico/ troppopieno<br />
opzioni:<br />
• Pannello frontale<br />
• Pannello laterale<br />
• exafill<br />
• Maniglia<br />
•<br />
Poggiatesta
a<br />
d<br />
Deutsch<br />
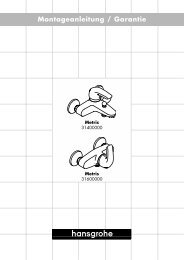
Verpackungsinhalt:<br />
a 1x Wanne mit anbauteilen<br />
b 2x Wandhalter<br />
c 12x Dübel (Ø 6x 30 mm)<br />
option:<br />
d schürze<br />
e schrauben M6 x 35mm<br />
f schraubenmuttern M6<br />
g linsenkopfschrauben (4x34mm)<br />
h 12x senkkopfschrauben (4x39mm)<br />
i Unterlegscheiben<br />
k abdeckkappen<br />
l abstandhalter<br />
m Kunststoffklammern<br />
n Befestigungsbügel<br />
o nackenkissen<br />
b<br />
English<br />
Packing Contents:<br />
a 1x tub with attachment parts<br />
b 2x Wall brackets<br />
c 12x Dowel (Ø 6 x 30 mm)<br />
option:<br />
d skirt<br />
e screws M6 x 35mm<br />
f nut M6<br />
g rounded head screw (4x34mm)<br />
h 12x counter sunk screw (4 x 39mm)<br />
i Washer<br />
k cap<br />
l spacer<br />
m Brackets<br />
n Fastening brackets<br />
o neck pillow<br />
e g h i k l<br />
f<br />
o<br />
c<br />
m n<br />
verPacKUnGsInhalt<br />
PacKaGInG contents<br />
accessorI coontenUtI<br />
Italiano<br />
Contenuti nell’imballo:<br />
a 1x vasca assemblata<br />
b 2x molla fissaggio a muro<br />
c 12x tassello (6x30)<br />
opzionale:<br />
d Pannelli<br />
e vite M6x35<br />
f Dado M6<br />
g vite tcB 4x34<br />
h 12x vite tsP 4x39<br />
i rondella<br />
k cappuccio<br />
l staffa millefori<br />
m Molla per pannello<br />
n staffa tubo quadro<br />
o Poggiatesta<br />
Deutsch<br />
English<br />
Italiano
Deutsch<br />
Folgend aufgeführtes Werkzeug und Zubehör<br />
ist für die Montage notwendig:<br />
- Wasserwaage<br />
- Meterstab<br />
- zeichenstift und Körner<br />
- Wasserpumpenzange<br />
- Maulschlüssel-set (sW 10, 15)<br />
- Kreuzschlitzschraubendreher<br />
- hammer (kleiner schlosserhammer)<br />
- armaturenfett<br />
- silikon (essigsäurefrei)<br />
- Bohrer (Ø6 mm)<br />
- Messer<br />
- Bohrmaschine<br />
- 2 Montageböcke<br />
English<br />
The following tools and accessories are required<br />
for installation:<br />
- spirit level<br />
- Pocket rule<br />
- Pencil and punch<br />
- Water pump pliers<br />
- Wrench set (sW 10,15)<br />
- crosstip screwdriver<br />
- hammer (small fitter's hammer)<br />
- Fittings grease<br />
- silicone (free of acetic acid)<br />
- Drill (Ø6 mm)<br />
- Knife<br />
- Drilling machine<br />
- 2 installation blocks<br />
BenötIGte WerKzeUGe<br />
reQUIreD tools<br />
attrezzI necessarI<br />
Italiano<br />
Per il montaggio sono necessari i seguenti<br />
attrezzi ed accessori:<br />
- livella a bolla d'aria<br />
- Metro<br />
- Matita e punzone (per piastrelle)<br />
- chiave stringitubo<br />
- set di chiavi fisse (da 10,15)<br />
- cacciavite a stella<br />
- Martello (non da fabbro)<br />
- Grasso per rubinetteria<br />
- silicone (privo di acido acetico)<br />
- Punta (Ø6 mm)<br />
- coltello<br />
- trapano<br />
- 2 cavalletti di montaggio<br />
Deutsch<br />
english<br />
Italiano
MontaGeBeIsPIele<br />
InstallatIon eXaMPle<br />
eseMPIo DI MontaGGIo<br />
Deutsch<br />
A<br />
Montagebeispiele ohne Wannenrandthermostat<br />
Whirlpool mit mindestens einer längs seite<br />
oder mehreren seiten zur Wand montiert.<br />
Mit Wannenschürze(n) der Whirlpool serie<br />
Funpool verkleidet.<br />
lüftung und service durch abnehmbare<br />
schürze(n) gewährleistet. (Die Montage mit<br />
schürze wird ab seite 34 beschrieben).<br />
B<br />
Montagebeispiel ohne Wannenrandthermostat<br />
Whirlpool mit mindestens einer längs seite<br />
oder mehreren seiten zur Wand montiert.<br />
lüftungöffnung min. 150 cm 2 (3)und<br />
serviceöffnung min. 300 cm 2 (2).<br />
Diese öffnung kann wahlweise:<br />
- an längsseite der Wannenverkleidung<br />
- an Querseite der Wannenverkleidung<br />
- oder im nebenraum<br />
angebracht sein.<br />
C<br />
Montagebeispiel Whirlpool aufgelegt<br />
lüftung durch lüftungsluke(3) gewährleistet.<br />
service durch herausheben des kompletten<br />
Whirlpools möglich.<br />
es ist zu beachten, daß:<br />
- die anschlussleitungen (strom, Wasser,<br />
abwasser) von der lüftungsluke (3)<br />
montiert und demontiert werden<br />
können.<br />
- die Befestigungspunkte von der<br />
lüftungsluke (3) gelöst werden können.<br />
- bei einer Dachschräge der Whirlpool<br />
für servicezwecke komplett nach oben<br />
aus der Ummauerung gehoben werden<br />
kann.<br />
- die Wanne am rand (4) mit<br />
essigsäurefreiem silikon abgedichtet ist.<br />
Wird die Wanne fest ummauert gilt:<br />
- im Bereich der verkleidung muß eine<br />
sicherheitsöffnung vorhanden sein.<br />
- Die Position der sicherheitsöffnung<br />
liegt 20 mm unter den elektrischen<br />
aggregaten (abb D)!<br />
so kann bei einer lekage das Wasser sichtbar<br />
abfließen.<br />
English<br />
A<br />
Installation examples, without tub rim thermostat<br />
Whirlpool installed with at least one long side<br />
or several sides to the wall and covered with<br />
tub skirt(s) of the Whirlpool series Funpool.<br />
ventilation and service<br />
ensured by removable skirt(s).<br />
(the installation of Whirlpool with skirt is<br />
described in the following).<br />
B<br />
Installation examples, without tub rim thermostat<br />
Whirlpool installed with at least one<br />
longitudinal side or several sides against the<br />
wall.<br />
air opening: 150 cm 2 (3) minimum and<br />
service opening: 300 cm 2 (2) minimum.<br />
this opening can be located optionally:<br />
- on the longitudinal side of the tub panelling<br />
- on the transverse side of the tub panelling<br />
- or in a neighbouring room.<br />
C<br />
Installation example<br />
Laid on whirlpool installation<br />
ventilation ensured by ventilation hatch (3).<br />
service possible by lifting out the complete<br />
whirlpool.<br />
- Make sure during the installation that<br />
the connections (electricity, water, drain)<br />
can be connected and disconnected<br />
through the ventilation hatch (3)!<br />
- It must be possible to disconnect<br />
the attachment points through the<br />
ventilation hatch (3).<br />
- It must be possible to lift out the<br />
complete whirlpool upward out of<br />
the embedding for service purposes!<br />
caution when installing the whirlpool<br />
under a pitched roof!<br />
- the tub must be sealed at the edge (4)<br />
with silicone (free from acetic acid).<br />
If the tub is walled in or otherwise enclosed,<br />
a safety hatch must be present in the lower<br />
area of the enclosure according to the tÜv<br />
regulations so that, when a leak occurs under<br />
the tub, the water can be seen to flow away.<br />
the bottom edge of the safety opening must<br />
be 20 mm below the electrical assemblies of<br />
the whirlpool tub (Fig. D)!<br />
Italiano<br />
A<br />
Esempi di montaggio senza termostato<br />
bordo vasca<br />
vasche installate con uno o più lati a muro<br />
e con pannelli/o per vasche serie Funpool.<br />
la ventilazione e il servizio è assicurato dai<br />
pannelli ispezionabili. (l’installazione delle<br />
vasche con i pannelli è descritta in seguito).<br />
B<br />
Esempi di montaggio senza termostato<br />
bordo vasca<br />
Whirlpool con almeno un lato lungo o più lati<br />
montati al muro.<br />
apertura di ventilazione min. 150 cm² (3) ed<br />
apertura d’ispezione min. 300 cm² (2).<br />
Questa apertura può essere montata a<br />
scelta:<br />
- sul lato lungo del rivestimento della vasca<br />
- sul traverso del rivestimento della vasca<br />
- o nella stanza attigua.<br />
C<br />
Esempio di installazione<br />
Installazione vasca in centro stanza.<br />
la ventilazione è assicurata dalla grata (3).<br />
Il servizio è possibile solo sollevando<br />
completamente la vasca.<br />
- essere sicuri che durante l’installazione<br />
le connessioni(elettrica, idrica e scarico)<br />
possono essere effettuate attraverso la<br />
grata di ventilazione (3)!<br />
- Deve essere possibile disconnettere i<br />
punti di attacco attraverso la grata di<br />
ventilazione.<br />
- Deve essere possibile sollevare<br />
completamente la vasca fuori dalla<br />
muratura per il servizio tecnico!<br />
- la vasca deve essere siliconata ai bordi<br />
(4) con silicone non acetico.<br />
Se la vasca è circondata da mura bisogna<br />
osservare quanto segue:<br />
- la presenza di un’apertura di sicurezza<br />
nell’area della muratura è obbligatoria.<br />
- la posizione dell’apertura di sicurezza<br />
è 20 mm sotto il gruppo elettrico della<br />
vasca (fig. D)!<br />
così in caso di una perdita l’acqua può<br />
scorrere fuori dalla vasca.
A<br />
B<br />
C<br />
4<br />
3<br />
D<br />
2<br />
3<br />
Deutsch<br />
english<br />
Italiano
WhIrlPoolMontaGe MIt schÜrze<br />
WhIrlPool InstallatIon WIth sKIrt<br />
MontaGGIo vasca con Pannello<br />
0<br />
Deutsch<br />
Whirlpoolmontage mit schürze:<br />
Die Montage des Whirlpools muss von zwei<br />
Personen durchgeführt werden!<br />
Whirlpool ausschließlich am Gestell oder am<br />
Wannenrand anheben.<br />
vorbereitungen zur Installation<br />
abb. a:<br />
a) Whirlpool an den einbauort bringen<br />
und vorsichtig verpackung entfernen.<br />
b) Den Whirlpool umdrehen und auf<br />
geschützte Montageböcke lagern.<br />
c) Die Kunststoffklammern (1) in<br />
die halteschienen (2) unter dem<br />
Wannenrand einschieben.<br />
Die abstandsbügel müssen symmetrisch<br />
ausgerichtet werden!<br />
schutzfolie an Wannenschürze nicht<br />
entfernen!<br />
d) Die abstandshalter (3) und<br />
Befestigungsbügel (4) mit schrauben<br />
M6 x 40 (5) und Muttern M6 (6) am<br />
rahmen (7) befestigen und leicht<br />
anziehen.<br />
e) Die Wannenschürzen anbringen und<br />
mit Wasserwaage und durch verstellen<br />
der abstandsbügel vertikal ausrichten.<br />
anschließend Muttern M6 (6) fest<br />
anziehen.<br />
abb. B:<br />
f) schürze mit Unterlegscheibe (8) und<br />
linsenkopfschraube 4 x 34mm (9) mit<br />
den abstandhaltern verschrauben.<br />
g) Die Kontermuttern (sW 15) an den<br />
Wannenfüßen lösen und diese mit<br />
Wasserwaage ausnivelieren, so dass<br />
zwischen standfläche Wannenfüße und<br />
Unterkante schürze ein abstand von 10<br />
mm entsteht.<br />
h) schürzen entfernen und Whirlpool von<br />
den Böcken nehmen.<br />
English<br />
Installation of whirlpool with skirt:<br />
two persons are required to install the<br />
whirlpool!<br />
always lift the whirlpool by the frame or the<br />
tub rim.<br />
Preparations for installation<br />
Fig. A:<br />
a) transport the whirlpool to the<br />
installation position and carefully<br />
remove the packaging.<br />
b) turn the whirlpool over and place it on<br />
protected assembly stands.<br />
c) slide the plastic clamps (1) into the<br />
support rails (2) underneath the tub rim.<br />
the spacers have to be aligned<br />
symmetrically!<br />
Do not remove the protective foil from the<br />
tub skirt!<br />
d) attach spacers (3) and attachment<br />
brackets (4) to the frame (7) and lightly<br />
tighten with screws M6 x 40 (5) and nuts<br />
M6 (6).<br />
e) Install the tub skirt(s) and align them<br />
vertically by means of a spirit level by<br />
adjusting the spacers. then fully tighten<br />
the nut M6 (6).<br />
Fig. B:<br />
f) screw the skirt with the washer (8) and<br />
the cross head screw 4 x 34 mm (9) to<br />
the spacers.<br />
g) loosen the locking nuts (15 mm<br />
spanner) from the tub feet and level<br />
them with the spirit level so that there<br />
is a 10 mm space between the tub feet<br />
contact area and the lower rim of the<br />
skirt.<br />
h) remove the skirt(s) and take the<br />
whirlpool from the stands.<br />
Italiano<br />
Montaggio vasca con pannello:<br />
sono richieste due persone per installare la<br />
vasca!<br />
sollevare sempre la vasca dal telaio o dai<br />
bordi vasca.<br />
Preparazione per l’installazione<br />
Fig. A:<br />
a) Portare la vasca vicino nella posizione di<br />
installazione e facendo attenzione nel<br />
rimuovere l’imballo.<br />
b) Girare la vasca sottosopra e piazzarla<br />
sui cavalletti.<br />
c) Inserire la molla per pannello (1)<br />
all’interno del supporto (2) posti sotto il<br />
bordo vasca.<br />
le staffe millefori devono essere allineate<br />
simmetricamente!<br />
non rimuovere il film protettivo dal<br />
pannello!<br />
d) Montare le staffe millefori (3) e la staffa<br />
tubo quadro (4) al telaio (7) fissandole<br />
leggermente con le viti M6x40 (5) e il<br />
dado M6 (6).<br />
e) Installare il pannello/i e allinearlo<br />
verticalmente facendo uso di una bolla<br />
aggiustando la posizione della staffa<br />
millefori. Poi chiudere il dado M6 (6).<br />
Fig. B:<br />
f) sul pannello fare un foro da 4 mm in<br />
corrispondenza di ogni staffa millefori e<br />
avvitare con il sottocappuccio (8) la vite<br />
tcB 3,9x34 (9) alla staffa.<br />
g) con la chiave da 15 allentare i dadi dai<br />
piedini della vasca e regolarli utilizzando<br />
una livella in modo che ci siano 10 mm<br />
di spazio tra i piedini e il punto più<br />
basso del pannello.<br />
h) rimuovere i pannelli e prendere la vasca<br />
dalle gambe.
A<br />
B<br />
ca.10 mm<br />
8<br />
9<br />
1<br />
6<br />
2<br />
5<br />
4<br />
7<br />
3<br />
1<br />
Deutsch<br />
english<br />
Italiano
WhIrlPoolMontaGe MIt schÜrze<br />
WhIrlPool InstallatIon WIth sKIrt<br />
MontaGGIo vasca con Pannello<br />
Deutsch<br />
Abb. A: Wandmontage Wanne<br />
1 Wand<br />
2 Fliesen<br />
4 Wanne<br />
5 schallschutzband<br />
6 Wannenanker<br />
7 Unterkonstruktion<br />
Abb. B:<br />
a) an den Wannenrand, mit Kontakt<br />
zur Wand, das schallschutzband (5)<br />
anbringen.<br />
Abb. C:<br />
a) Wanne an endgültiger Position<br />
positionieren und nivellierung<br />
überprüfen. Gegebenenfalls müssen<br />
die Füße nachjustiert werden.<br />
Kontermuttern (sW 15) an den<br />
Wannenfüßen anziehen.<br />
b) Unterer Wannenrand an der Wand<br />
anzeichnen und Wanne von der Wand<br />
entfernen.<br />
Abb. D: Wannenankermontage<br />
a) Die Wannenanker mit Klemmbügel (1<br />
und 2) werden an den außenenden der<br />
Wanne montiert.<br />
Dabei sollte der abstand von der<br />
außenkante des Wannenkörpers ca<br />
50 - 70 mm betragen, bzw. so gewählt<br />
werden, dass der Klemmbügel nach<br />
auflegen der Wanne bequem arretiert<br />
werden kann.<br />
Der Wannenanker ohne Klemmbügel (3)<br />
wird in der ecke montiert.<br />
b) Die Wanne nach Montage der<br />
Wannenanker auflegen und die<br />
nivellierung nochmals überprüfen.<br />
c) Flügelmutter am Wannenanker lösen,<br />
spannbügel nach oben drücken und<br />
Flügelmutter festdrehen (siehe abb. a /<br />
Wannenmontage)<br />
ohne Abbildung<br />
Wasserablauf anschließen<br />
abwasseranschluss Dn 50<br />
vormontieren, Wanenablauf<br />
anschließen.<br />
English<br />
Fig. A: Wall installation of tub<br />
1 wall<br />
2 tiles<br />
4 tub<br />
5 sound insulation tape<br />
6 wall anchor<br />
7 substructure<br />
Fig. B:<br />
a) attach sound insulation tape (5) to the<br />
tub edge with contact to the wall.<br />
Fig. C:<br />
a) Place whirlpool in it‘s final position and<br />
check the alignement with the spirit<br />
level. as necessary re-adjust the tub<br />
feets. tighten the locking nuts (sW 15)<br />
at the tub feets.<br />
b) Draw lower bath tub edge and replace<br />
it.<br />
Fig. D: wall anchor installation<br />
a) the wall anchors with clamping yoke (1<br />
and 2) are mounted at the outer ends of<br />
the tub.<br />
the distance to the outer ends of the<br />
tub should be 50 -70 mm or should be<br />
voted so that the clamping yokes can be<br />
adjusted comfortably after establishing<br />
the tub.<br />
the wall anchors without clamping yoke<br />
(3) is mounted at the edge.<br />
b) after mounting of the wall anchors<br />
establishing the tub and check the<br />
alignement again.<br />
c) Unsrew wing nut at the wall anchor,<br />
presseing up clamping yoke and tighten<br />
wing nut (see Fig. a / tub installation).<br />
without figure<br />
connection of water drainage<br />
connect drain to the prepared drain<br />
connection Dn 50.<br />
Italiano<br />
Fig. A: Montaggio a parete della vasca<br />
1 parete<br />
2 piastrelle<br />
4 vasca<br />
5 nastro insonorizzante<br />
6 ancoraggio vasca<br />
7 sottostruttura<br />
Fig. B:<br />
a) attaccare il nastro isolante al bordo<br />
superiore (5) della vasca a contatto con<br />
il muro.<br />
Fig. C:<br />
a) Posizionare la vasca nella posizione<br />
finale e controllare con la livella. se<br />
necessario riaggiustare l’altezza dei<br />
piedini. Fissare i dadi da 15 alle gambe<br />
della vasca.<br />
b) segnare il bordo inferiore della vasca<br />
sul muro e togliere la vasca dalla parete.<br />
Fig. D: Montaggio degli ancoraggi per<br />
la vasca<br />
a) Montare gli ancoraggi della vasca con<br />
i morsetti (1 e 2) alle estremità esterne<br />
della vasca.<br />
la distanza tra il bordo esterno ed il<br />
corpo vasca dovrebbe essere di ca. 50 -<br />
70 mm, oppure scelto in modo da poter<br />
facilmente bloccare il morsetto dopo<br />
aver posizionato la vasca. l’ancoraggio<br />
vasca senza morsetto (3) viene montato<br />
all’angolo.<br />
b) Posizionare la vasca dopo il montaggio<br />
degli ancoraggi e controllare<br />
nuovamente con la livella.<br />
c) svitare il dado ad alette dall’ancoraggio<br />
vasca, premere la staffa di fissaggio in<br />
alto ed avvitare bene il dado ad alette<br />
(vedi fig. a / montaggio vasca).<br />
senza figura<br />
Collegare lo scarico dell’acqua<br />
a) connettere lo scarico al sifone con tubo<br />
Dn 50.
A<br />
1<br />
2<br />
5<br />
7<br />
6<br />
C D<br />
4<br />
B<br />
1<br />
5<br />
3<br />
2<br />
Deutsch<br />
english<br />
Italiano
stroMversorGUnG<br />
PoWer sUPPly<br />
Deutsch<br />
A<br />
Elektrischer Anschluss<br />
m) Gummiband mittels schere trennen und<br />
abdeckung der anschlussdose öffnen.<br />
n) Whirlpool an stromversorgung<br />
230v/50hz mit einem 3-adrigen Kabel<br />
anschließen. Der anschluss erfolgt im<br />
verteilerkasten (7).<br />
(8): elektrischer anschluss zur steuerung<br />
(vormontiert).<br />
(9): elektrischer anschluß zur<br />
hydropumpe (vormontiert).<br />
(10):elektrischer anschluß zum<br />
Wasserstandsensor (vormontiert).<br />
o) abdeckung festschrauben (4<br />
schrauben)<br />
- Dichtheitsprüfung durchführen.<br />
- Funktionstest durchführen.<br />
- Whirlpoolfüße an den vorbereiteten<br />
löchern mit senkkopfschrauben 4 x<br />
39mm am Boden fixieren.<br />
B<br />
Wannenschürze montieren<br />
vorbereitete Wannenschürze anbringen.<br />
schutzfolie von Wannenschürze entfernen.<br />
Bei verwendung einer Wannenschürze<br />
darf diese nur eingehängt und an<br />
den vorgesehenen stellen mit dem<br />
Whirlpoolrahmen verschraubt werden.<br />
Übergänge zwischen Wannenschürze/Wand<br />
und Wannenschürze/Fußboden dürfen nicht<br />
mit silikon oder ähnlichem abgedichtet<br />
werden um eine ausreichende Belüftung zu<br />
gewährleisten.<br />
English<br />
A<br />
Electrical connection<br />
m) Intersect elastic band with scissors than<br />
opening cover of connexion-box.<br />
n) connect the whirlpool to the power<br />
supply 230v/50hz (9) with a three-wire<br />
cable. the connection is made in the<br />
distributing box (7).<br />
connect the voltage equalising cable<br />
4mm2 (10) to the terminal strip.<br />
(8): electrical connection to basic<br />
control (pre-fitted)<br />
(9): electrical supply lines 230v/50hz<br />
(10): earthing cable 4mm2<br />
o) tighten the cover with 4 screws<br />
- Perform leak test.<br />
- Perform function test.<br />
- Fasten the whirlpool feet at the<br />
prepared holes with the countersunk<br />
head screws 4 x 39 mm to the floor.<br />
B<br />
Installation of the tub skirt<br />
attach the prepared tub skirt.<br />
remove the protective foil from the tub skirt.<br />
When using a tub skirt, it may be hung in and<br />
screwed onto the whirlpool framework only<br />
at the positions intended. the transitions<br />
between the tub skirt/wall and the tub skirt/<br />
floor should not be sealed with silicone<br />
or anything similar to ensure adequate<br />
ventilation.<br />
Italiano<br />
A<br />
Connessione elettrica<br />
m) tagliare l‘elastico e aprire la scatola di<br />
connessione.<br />
n) connettere la vasca alla rete elettrica<br />
230v/50hz (9) con un cavo a tre poli.<br />
la connessione è fatta nella scatola di<br />
derivazione (7).<br />
connettere il cavo di terra 4 mm2 (10) al<br />
connettore.<br />
(8): connessione elettrica alla centralina<br />
(pre-fissata)<br />
(9): connessione alla rete elettrica<br />
23v/50hz<br />
(10): cavo di terra 4mm2<br />
o) chiudere attentamente il coperchio con<br />
le 4 viti.<br />
- verificare possibili perdite d’acqua.<br />
- verificare le funzioni della vasca.<br />
- Fissare i piedini della vasca fori eseguiti<br />
sul pavimento con i tasselli e le viti 4x39.<br />
B<br />
Installazione con il pannello<br />
Fissare i pannelli preparati alla vasca.<br />
rimuovere il film protettivo dai pannelli.<br />
Quando vi sono i pannelli, fissarli al telaio<br />
dopo aver spostato la vasca nella posizione<br />
definitiva. tra pannello e muro, tra pannello<br />
e pavimento non si dovrebbe siliconare per<br />
assicurare una adeguata ventilazione.
m)<br />
A<br />
o)<br />
B<br />
n)<br />
7<br />
L<br />
N<br />
PE<br />
9 10<br />
8<br />
Deutsch<br />
english<br />
Italiano
BeDIeneleMent BasIc PoolMaster<br />
BasIc PoolMaster oPeratIon<br />
FUnzIonalItà Del BasIc PoolMaster<br />
Deutsch<br />
Bedienung Basic Poolmaster (Abb. A)<br />
1. Basic Poolmaster ein/aus<br />
2. Umstellring<br />
Funktionsbeschreibung<br />
abb. B:<br />
Wassermassagestrahl mit airMix (alle<br />
Düsen)<br />
abb. c:<br />
Wassermassagestrahl (alle Düsen)<br />
abb. D:<br />
Wassermassagestrahl mit airMix (rücken und<br />
Fußdüsen<br />
abb. e:<br />
Wassermassagestrahl mit airMix<br />
(seitendüsen)<br />
English<br />
Basic Poolmaster operation (Fig. A)<br />
1. Basic Poolmaster on/off<br />
2. ring to convert<br />
Functional description<br />
Fig. B:<br />
Massage water jet with airMix (all nozzles)<br />
Fig. c:<br />
Massage water jet (all nozzles)<br />
Fig. D:<br />
Massage water jet with airMix (back- or<br />
featnozzles<br />
Fig. e:<br />
Massage water jet with airMix (sidenozzles)<br />
Italiano<br />
Funzionalità Basic Poolmaster (Fig. A)<br />
1. on/off Basic Poolmaster<br />
2.Ghiera girevole<br />
Descrizione funzioni<br />
Fig. B<br />
Massaggio con Getto d’acqua e aria airMix<br />
(tutti gli ugelli).<br />
Fig. c<br />
Massaggio con Getto d’acqua (tutti gli<br />
ugelli).<br />
Fig. D<br />
Massaggio con Getto d’acqua e aria airMix<br />
(ugelli schiena o piedi)<br />
Fig. e<br />
Massaggio con Getto d’acqua e aria airMix<br />
(ugelli laterali)
A<br />
1<br />
2<br />
B C<br />
D E<br />
Deutsch<br />
english<br />
Italiano
Allgemeines / PflegeAnleitung WAnne<br />
geneRAlly / CARe instRuCtiOn fOR tuB<br />
geneRAle/ PReCAuziOni PeR l’instAllAziOne DellA VAsCA<br />
38<br />
Deutsch<br />
Verwendung von Badesalzen und Ölen,<br />
Schaum, Kräutern und Algen<br />
Der gebrauch von shampoos oder<br />
Badeschaum ist nicht empfehlenswert. Die<br />
Verwendung von Badesalzen und Badeölen<br />
in normalen mengen ist jedoch völlig<br />
unproblematisch.<br />
Pflegeanleitung<br />
Oberflächenpflege Wanne<br />
Acrylprodukte sind sehr einfach zu reinigen<br />
und zu pflegen. Auf der glatten Oberfläche<br />
bleiben kaum Verunreinigungen zurück. für<br />
die tägliche Pflege empfiehlt sich ein weicher<br />
schwamm oder ein weiches tuch und einige<br />
tropfen eines antistatischen Reinigungsmittels.<br />
Die Wanne erhält so den früheren glanz zurück<br />
und es entsteht eine schmutzabweisende<br />
Wirkung. starke Verschmutzungen können<br />
sie mit einem flüssigen Haushaltsreiniger oder<br />
seifenlauge reinigen (Verdünnungsvorschriften<br />
beachten). Verwenden sie nur neutralreiniger,<br />
keine scheuernden Reinigungsmittel, um die<br />
Wanne zu säubern. Verwenden sie keine<br />
scharfen Reinigungsmittel (flüssig oder fest),<br />
die Alkohol, säuren, Aceton oder andere<br />
lösungsmittel enthalten. Diese können zu<br />
schäden an Acryl- und Chromteilen der Wanne<br />
führen.<br />
Kalk<br />
Kalkablagerungen mit Citrus-Reiniger entfernen,<br />
mit klarem Wasser nachspülen und<br />
polieren.<br />
Schäden, die durch unsachgemäße Behandlung<br />
entstehen, unterliegen nicht der Gewährleistung.<br />
Beschädigungen<br />
geringfügige Kratzer in der Acryloberfläche<br />
können unter umständen mit dem <strong>Hansgrohe</strong><br />
Polierset entfernt werden (Best.-nr.:<br />
21800000).<br />
Brandflecken oder tiefe Kratzer können unter<br />
umständen mit dem <strong>Hansgrohe</strong> Reparaturset<br />
ausgebessert werden (Best.-nr.: 21801xxx).<br />
Wenn sie keine Desinfektionsfunktion an<br />
Ihrem Whirlpool besitzen, desinfizieren sie<br />
das Hydro-System wie folgt:<br />
nach jedem Benutzen oder längerem<br />
nichtbenutzen des Whirlpools ist das Hydrosystem<br />
zu desinfizieren.<br />
es kann gebrauchtes Badewasser für die<br />
English<br />
Using bath salts, oils, foam, herbs and<br />
algae<br />
using shampoos or bubble baths is not<br />
recommended. the use of normal quantities<br />
of bath salts and bath oils causes no problems<br />
whatsoever.<br />
Care instructions<br />
Tub surface care instructions<br />
Acrylic products are very easy to clean and<br />
service. Hardly any soiling remains on the<br />
smooth surface. A soft sponge or soft cloth<br />
and some drops of antistatic cleaning agent<br />
are recommended for daily cleaning. this<br />
restores the gloss of the tub and creates a<br />
dirt-repelling effect. Remove stronger soiling<br />
with a liquid domestic cleaner or soapy water<br />
(observe dilution guidelines).use only neutral<br />
liquid detergents that are not abrasive to clean<br />
the bath. Do not use abrasive detergents,<br />
liquid or solid, alcohol, acid for domestics use,<br />
acetone or others solvents. they can damage<br />
the acrylic and chrome parts of the bath.<br />
Calcium<br />
Remove calcification with a citric based<br />
cleaning agent, rinse with clear water and<br />
polish with a cloth.<br />
Damage caused by improper handling is<br />
not covered by our guarantee.<br />
Damage<br />
minor scratches in the acrylic surface can<br />
possibly be removed with <strong>Hansgrohe</strong><br />
polishing paste (Order no.: 21800000).<br />
Burning stains or deep scratches can possibly<br />
be repaired with the <strong>Hansgrohe</strong> repair set<br />
(Order no.: 21801xxx).<br />
If your whirlpool is not equipped with a<br />
disinfecting function, disinfect the hydro<br />
system as follows:<br />
After each use or if the pool has not be used<br />
for an extended period of time, you must<br />
disinfect the hydro system.<br />
you can use used bath water for the<br />
Italiano<br />
Uso di sali da bagno, oli, schiuma, erbe<br />
ed alghe<br />
non è raccomandato l’uso di shampoo o<br />
bagnoschiuma. l’uso di quantità normali di<br />
sali da bagno o di oli non causa problemi<br />
come sopra.<br />
Precauzioni per la superficie della vasca<br />
i prodotti in acrilico sono molti semplici da<br />
pulire e mantenere. Difficilmente rimane<br />
qualche macchia sulla superficie liscia. Per<br />
la pulizia giornaliera usare una spugna<br />
morbida o un soffice panno e qualche<br />
goccia di detergente. Questo ripristina la<br />
lucentezza della vasca e crea una repulsione<br />
alla polvere. Per rimuovere lo sporco più duro<br />
usare un detergente per la pulizia domestica<br />
o acqua insaponata. ( attenersi alle istruzioni<br />
per la diluizione ). Per pulire la vasca da<br />
bagno utilizzare solo detergenti neutri, non<br />
prodotti di pulizia strofinanti. non utilizzare<br />
prodotti di pulizia (detergenti) forti (liquidi o<br />
solidi) che contengono alcol, acido, acetone<br />
o altre soluzioni. Questi potrebbero causare<br />
danni a parti acriliche e cromate della vasca<br />
da bagno.<br />
Calcare<br />
Rimuovere il calcare con il succo di limone,<br />
risciacquare con acqua pulita e asciugare con<br />
un panno.<br />
Danni causati da un uso improprio non<br />
sono coperti dalla garanzia.<br />
Danni<br />
graffi superficiali sull’acrilico possono essere<br />
rimossi usando la pasta pulente <strong>Hansgrohe</strong><br />
(cod. 21800000).<br />
macchie da bruciatura o graffi più profondi<br />
possono essere riparati con il set <strong>Hansgrohe</strong><br />
(cod. 21801xxx).<br />
Se nella vostra vasca idromassaggio non<br />
disponete della funzione di disinfezione<br />
procedete come segue per disinfettare il<br />
sistema idro:<br />
Dopo ogni uso o dopo un periodo prolungato<br />
di inattività della vasca idromassaggio occorre<br />
disinfettare il sistema idro.<br />
si può utilizzare per la disinfezione l’acqua<br />
disinfecting process.<br />
utilizzata per il bagno..<br />
• use sodium hypochloride solution (12%) as • Come disinfettante utilizzare una soluzione<br />
a disinfectant (available at the pharmacy). al 12% di ipoclorito di sodio (disponibile<br />
Desinfektion benutzt werden.<br />
the dosing of the sodium hypochloride is in farmacia). il dosaggio dell’ipoclorito di<br />
• Als Desinfektionsmittel Natriumhypochlorid- 25 ml for every 100 l of water.<br />
sodio è di 25 ml per 100 litri d’acqua.<br />
Lösung 12% verwenden (in der Apotheke • Add the disinfectant to the used bath • Aggiungere il disinfettante all’acqua già<br />
erhältlich). Die Dosierung von natriumhypochlorid water.<br />
utilizzata.<br />
ist 25 ml auf 100 liter Wasser.<br />
• you may fill the tub to the overflow level. • Rabboccare eventualmente la vasca fino<br />
• Das Desinfektionsmittel dem gebrauchten • turn on the jets (whirl system) for approx. al troppo pieno.<br />
Badewasser zugeben.<br />
1 to 2 minutes; now the disinfectant will • far funzionare l’idromassaggio per ca.<br />
• eventl. die Wanne bis Überlauf füllen. distribute.<br />
1-2 min., in questo modo il disinfettante si<br />
• Whirlsystem für ca. 1-2 min. einschalten, das • let the disinfectant soak for about 30 ripartisce nella vasca.<br />
Desinfektionsmittel verteilt sich jetzt. minutes.<br />
• far agire il disinfettante per ca. 30 min.<br />
• Desinfektionsmittel ca. 30 min. einwirken • turn on the jets for another 2 minutes. • far funzionare ancora per 2 min.<br />
lassen.<br />
• Drain the water.<br />
l’idromassaggio.<br />
•<br />
•<br />
•<br />
Whirlsystem nochmals 2 min. einschalten. •<br />
Wasser ablassen.<br />
mit der Handbrause die Wanne, Blenden •<br />
Rinse and clean the tub, the panels and the •<br />
accessories using the hand shower. •<br />
Ventilate the room generously.<br />
scaricare l’acqua.<br />
Pulire a fondo con molta acqua la vasca, le<br />
bocchette e gli altri componenti utilizzando<br />
und Anbauteile gründlich mit viel Wasser<br />
la doccetta.<br />
nachspülen.<br />
•<br />
Areare bene il locale.
Deutsch<br />
Art der Störung / Ursache Mögliche Ursache Mögliche Abhilfe<br />
Luftsystem arbeitet nicht Liegt Spannung an?<br />
Störung im Elektrizitätsnetz<br />
Sitzen die Steckverbindungen zur<br />
Steuerung richtig?<br />
Steuerung reagiert nicht<br />
Steuerung defekt<br />
Bedienelement defekt<br />
Gebläse defekt<br />
Wassersystem arbeitet<br />
ungenügend<br />
Wassersystem arbeitet nicht<br />
System schaltet sich ohne<br />
ersichtlichen Grund ein<br />
Schmutzfangsieb am<br />
Ansaugstutzen ist verstopft<br />
Düse verschmutzt<br />
Liegt Spannung an?<br />
Störung im Elektrizitätsnetz<br />
Sitzen die Steckverbindungen zur<br />
Steuerung richtig?<br />
Ist der Wasserstand hoch genug?<br />
Wasserstandsensor reagiert nicht<br />
Steuerung reagiert nicht<br />
Steuerung defekt<br />
Bedienelement defekt<br />
Hydropumpe defekt<br />
Automatische Reinigungsfunktion<br />
der Luftdüsen<br />
Hat sich die Raumtemperatur<br />
geändert (z.B. Fußbodenheizung<br />
unter dem Whirlpool)<br />
Hat sich die Luftfeuchtigkeit im<br />
Raum geändert (z.B. Benutzung<br />
einer Dusche im selben Raum)<br />
Sind Kabel, Wasserleitungen oder<br />
sonstige elektrisch leitende<br />
Materialien im Bereich des<br />
Wasserstandsensors verlegt?<br />
Werden/Wurden<br />
Reinigungsarbeiten in der Wanne<br />
durchgeführt? (z.B. feuchtes<br />
Reinigungstuch in der Nähe der<br />
Wasserstandsensoren)<br />
Wasserdüse arbeitet nicht Düse verschmutzt<br />
Düsenkugel nicht einstellbar<br />
Sitzt fest, Ist lose<br />
Undichtigkeit:<br />
Luft<br />
Wasser unter der Wanne<br />
Unterwasserbeleuchtung<br />
funktioniert nicht.<br />
Desinfektion:<br />
kann nicht gestartet werden<br />
schaltet sich während des Vorgangs<br />
aus<br />
Luftschlauch gelöst am:<br />
Gebläse<br />
Luftverteiler<br />
Luftdüse<br />
Wasserschlauch gelöst an:<br />
Pumpe<br />
Hydrodüsen<br />
Ab- /Überlauf defekt?<br />
Dichtung an Düsen undicht?<br />
Acryl beschädigt?<br />
Anschluss Wanneneinlauf undicht?<br />
Ist der Wasserstand hoch genug?<br />
Leuchtmittel defekt?<br />
Liegt Spannung an?<br />
Störung im Elektrizitätsnetz<br />
Sitzen die Steckverbindungen zur<br />
Steuerung richtig?<br />
Wasserstandsensor reagiert nicht<br />
Ist der Wasserstand hoch genug?<br />
Ist der Wasserstand hoch genug?<br />
Ist der Desinfektionsbehälter<br />
ausreichend gefüllt?<br />
störUnGen UnD aBhIlFe<br />
Elektriker rufen<br />
Stecker abziehen und neu einstecken<br />
Poolmaster neu konfigurieren<br />
Steuerung austauschen<br />
Bedienelement austauschen<br />
Gebläse austauschen<br />
Abdeckung am Ansaugstutzen<br />
entfernen und Schmutzfangsieb<br />
reinigen (siehe Service)<br />
Düse reinigen (siehe Service)<br />
Elektriker rufen<br />
Stecker abziehen und neu einstecken<br />
Wanne weiter füllen<br />
Sensor justieren oder austauschen<br />
Poolmaster neu konfigurieren<br />
Steuerung austauschen<br />
Bedienelement austauschen<br />
Hydropumpe austauschen<br />
In Ordnung<br />
Empfindlichkeit des<br />
Wasserstandsensors nachjustieren<br />
Empfindlichkeit des<br />
Wasserstandsensors nachjustieren<br />
Kabel, Wasserleitungen oder<br />
ähnliches neu verlegen<br />
Gegenstände aus Wanne entfernen<br />
Düse reinigen (siehe Service)<br />
O-Ring hinter Kugel neu platzieren<br />
O-Ring hinter Kugel ersetzen<br />
Schlauchklemme nachspannen /<br />
Schlauch abziehen und neu<br />
aufstecken<br />
Schlauchklemme nachspannen<br />
Dichtungen austauschen<br />
Dichtungen austauschen<br />
Acryl mit Reparaturset reparieren<br />
Dichtungen austauschen<br />
Wanne weiter füllen<br />
Leuchtmittel austauschen<br />
Elektriker rufen<br />
Stecker abziehen und neu einstecken<br />
Sensor justieren<br />
Sensor austauschen<br />
Wanne weiter füllen<br />
Wanne weiter füllen<br />
Behälter mit Desinfektionsmittel<br />
auffüllen.<br />
Deutsch<br />
english<br />
Italiano
troUBle shootInG<br />
0<br />
Type of Malfunction / Cause Possible Cause Possible Clearance<br />
Air system does not function Check you have an electricity supply?<br />
Malfunction in electrical mains<br />
Are the plug connections to the<br />
control correctly seated?<br />
Control does not react<br />
Control defective<br />
Control element defective<br />
Blower defective<br />
Hydro system function insufficient Filter at intake socket is blocked<br />
Hydro system does not function<br />
System switches itself on without an<br />
obvious reason<br />
Nozzle dirty<br />
Is voltage applied?<br />
Malfunction in electrical mains<br />
Are the plug connections to the<br />
control correctly seated?<br />
Is the water level high enough?<br />
Water level sensor does not react<br />
Control does not react<br />
Control defective<br />
Control element defective<br />
Hydraulic pump defective<br />
Automatic cleaning function of the air<br />
nozzles<br />
Has the room temperature changed<br />
(e.g. floor heating underneath the<br />
whirlpool)<br />
Has the humidity in the room changed<br />
(e.g. use of a shower in the same room)<br />
Were cables, water pipes or other<br />
electrically conductive materials laid in<br />
the area of the water level sensor?<br />
Is/was cleaning work performed near<br />
the tub? (e.g. moist cleaning cloth near<br />
the water level sensors)<br />
Water nozzle Nozzle dirty<br />
Nozzle head not adjustable<br />
is seized<br />
is loose<br />
Leakage:<br />
air<br />
Water underneath the tub<br />
Air hose loosened on:<br />
Blower<br />
Air distributor<br />
Air nozzle<br />
Hydro hose loose on:<br />
Pump<br />
Hydro nozzles<br />
Drain/overflow defective?<br />
Seals on nozzles leaking?<br />
Acrylic material damaged?<br />
Tub inflow connection leaking?<br />
Underwater lighting does not switch on Is the water level high enough?<br />
Lighting element defective?<br />
Is voltage applied?<br />
Malfunction in electrical mains<br />
Are the plug connections to the<br />
control correctly seated?<br />
Water level sensor does not react<br />
Disinfektion:<br />
Can not be started<br />
Switches off during the process<br />
English<br />
Is the water level high enough?<br />
Is the water level high enough?<br />
Is the disinfectant container adequately<br />
filled?<br />
Call electrician<br />
Pull and reinsert plug<br />
Reconfigure Poolmaster<br />
Replace control<br />
Replace control element<br />
Replace blower<br />
Remove cover at intake socket and<br />
clean filter (see service)<br />
Clean nozzle (see service)<br />
Call electrician<br />
Pull and reinsert plug<br />
Continue to fill tub<br />
Adjust sensor<br />
Replace sensor<br />
Reconfigure Poolmaster<br />
Replace control<br />
Replace control element<br />
Replace hydraulic pump<br />
Okay<br />
Readjust sensitivity of the water level<br />
sensor<br />
Readjust sensitivity of the water level<br />
sensor<br />
Reposition cables, water pipes or similar<br />
Remove objects from the tub<br />
Clean nozzle (see service)<br />
Reposition O-ring behind head<br />
Replace O-ring behind head<br />
Tighten hose clamp / disconnect and<br />
reconnect hose<br />
Retighten hose clamp<br />
Replace seals<br />
Replace seals<br />
Repair acrylic material with repair sets<br />
Replace seals<br />
Continue to fill tub<br />
Replace lighting element<br />
Call electrician<br />
Pull and reinsert plug<br />
Adjust sensor<br />
Replace sensor<br />
Continue to fill tub<br />
Continue to fill tub<br />
Replenish container with disinfectant.
Tipo di Malfunzionamento /<br />
Guasto<br />
Possibili cause Possibile soluzione<br />
Il sistema aria non funziona C’è tensione?<br />
Malfunzionamento nell’impianto elettrico Chiamare l’elettricista<br />
La spina di alimentazione è correttamente<br />
inserita?<br />
Togliere e reinserire la spina<br />
Il pannello di controllo non reagisce<br />
Riconfigurare il Poolmaster<br />
Il pannello di controllo è difettoso<br />
Sostituire il pannello di controllo<br />
Componente difettoso<br />
Sostituire il componente difettoso<br />
La soffiante è difettoso<br />
Sostituire la soffiante<br />
Il circuito acqua non è<br />
Il filtro antisporcizia della bocchetta di Rimuovere la copertura della bocchetta di<br />
sufficiente<br />
aspirazione è otturato<br />
aspirazione e pulire il filtro antisporcizia<br />
(vedere Assistenza)<br />
Pulire i getti (vedere Assistenza)<br />
Il sistema idro non funziona<br />
Il sistema si accende<br />
automaticamente senza<br />
un’ovvia ragione<br />
Getti sporchi<br />
C’è tensione?<br />
Malfunzionamento nell’impianto elettrico<br />
La spina di alimentazione è correttamente<br />
inserita?<br />
Il livello d’acqua è sufficiente?<br />
Il sensore di livello non funziona<br />
Getti acqua Getti sporchi<br />
Getti non regolabili<br />
grippati<br />
allentati<br />
Perdita di<br />
aria<br />
acqua sotto la vasca<br />
La luce subacquea non si<br />
accende<br />
Disinfezione:<br />
non si lascia accendere<br />
si spegne durante il programma<br />
di disinfezione<br />
Italiano<br />
Il pannello di controllo non reagisce<br />
Il pannello di controllo è difettoso<br />
Componente difettoso<br />
La pompa è difettosa<br />
Pulizia automatica degli ugelli aria<br />
La temperatura ambiente è cambiata? (Es.<br />
riscaldamento a pavimento sotto la vasca)<br />
L’umidità ambiente è cambiata (Es. uso della<br />
doccia nella stessa stanza)<br />
Ci sono cavi, tubazioni idrauliche o altri parti<br />
di materiale elettricamente conduttivo<br />
nell’area del sensore di livello?<br />
Si sta lavando biancheria nella vasca? (Es.<br />
capi bagnati/umidi sopra il sensore di<br />
livello)<br />
Perdita d’aria nel tubo del:<br />
soffiante<br />
distributore d’aria<br />
ugelli<br />
Perdita d’acqua nel tubo della:<br />
pompa<br />
getti<br />
Scarico/troppo pieno difettoso?<br />
Sigillatura difettosa nei getti?<br />
Acrilico danneggiato?<br />
Perdita dal circuito di aspirazione?<br />
Il livello d’acqua è sufficiente?<br />
La lampada è difettosa?<br />
C’è tensione?<br />
Malfunzionamento nell’impianto elettrico<br />
La spina di alimentazione è correttamente<br />
inserita?<br />
Il sensore di livello non funziona<br />
Il livello d’acqua è sufficiente?<br />
Il livello d’acqua è sufficiente?<br />
Il contenitore per il liquido disinfettante è<br />
abbastanza pieno?<br />
Chiamare l’elettricista<br />
Togliere e reinserire la spina<br />
Aspetta il riempimento della vasca<br />
Regolare il sensore<br />
Sostituire il sensore di livello<br />
Riconfigurare il Poolmaster<br />
Sostituire il pannello di controllo<br />
Sostituire il componente difettoso<br />
Sostituire la pompa<br />
Aspettare la fine della fase di pulizia<br />
Regolare la sensibilità del sensore di livello<br />
Regolare la sensibilità del sensore di livello<br />
Riposizionare cavi, tubi, ecc …<br />
Rimuovere gli oggetti dalla vasca<br />
Pulire i getti (vedere Assistenza)<br />
riposizionare l’O-Ring dietro il getto<br />
sostituire l’O-Ring dietro il getto<br />
Stringere la fascetta / Disconnettere e<br />
connettere il tubo<br />
stringere le fascette<br />
Sostituire la guarnizione<br />
Sostituire la guarnizione<br />
Impiegare il kit di riparazione dell’acrilico<br />
Sostituire la guarnizione<br />
Riempire la vasca<br />
Sostituire la lampada<br />
Chiamare l’elettricista<br />
Togliere e reinserire la spina<br />
Regolare il sensore<br />
Sostituire il sensore di livello<br />
rIsolUzIone DeI ProBleMI<br />
Riempire la vasca<br />
Riempire la vasca<br />
Riempire il contenitore con del liquido<br />
disinfettante.<br />
1<br />
Deutsch<br />
english<br />
Italiano
servIce<br />
servIce<br />
ManUtenzIone<br />
Deutsch<br />
Abb. A:<br />
reinigen des schmutzfangsiebs im<br />
ansaugstutzen<br />
Abb. B:<br />
austausch hydrodüse<br />
oberflächenschäden vermeiden!<br />
Abb. C:<br />
Wartung Rückflussverhinderer<br />
rückflussverhinderer müssen gemäß DIn en<br />
1717 regelmäßig in Übereinstimmung mit<br />
nationalen oder regionalen Bestimmungen<br />
auf ihre Funktion geprüft werden (mindestens<br />
einmal jährlich).<br />
a) rückflussverhinderer in<br />
ansaugsicherung<br />
English<br />
Fig. A:<br />
cleaning of filter at the intake socket<br />
Fig. B:<br />
replacement hydro nozzle<br />
avoid surface damages!<br />
Fig. C:<br />
Maintenance of non return valve<br />
the non return valves must be checked<br />
regularly according to DIn en 1717 in<br />
accordance with national or regional<br />
regulations (at least once a year).<br />
a) non return valve (rv Dn15) and filter<br />
inside angled hose connecton (with<br />
isolation valve)<br />
Italiano<br />
Fig. A:<br />
Pulizia del filtro antisporcizia nella bocchetta<br />
di aspirazione<br />
Fig. B:<br />
sostituzione dell’idrogetto<br />
attenzione non rovinare le superfici!<br />
Fig. C:<br />
Manutenzione della valvola di non<br />
ritorno<br />
la valvola di non ritorno deve essere<br />
controllata regolarmente come da DIn en<br />
1717, secondo le normative nazionali e<br />
regionali (almeno una volta all‘anno).<br />
a) valvola di non ritorno(rv Dn15) e filtro<br />
nei gomiti per tubi flessibili con valvole<br />
di intercettazione
A B<br />
C a<br />
2.<br />
1.<br />
Ø 22 x 2,25 mm<br />
Deutsch<br />
english<br />
Italiano
servIce teIle<br />
sPare Parts<br />
PartI DI rIcaMBIo<br />
Pos.<br />
1<br />
2<br />
3<br />
4<br />
5<br />
6<br />
7<br />
8<br />
9<br />
10<br />
11<br />
12<br />
13<br />
30<br />
31<br />
32<br />
33<br />
34<br />
35<br />
36<br />
37<br />
38<br />
39<br />
40<br />
41<br />
42<br />
43<br />
44<br />
45<br />
46<br />
--<br />
xxx<br />
000<br />
320<br />
410<br />
420<br />
880<br />
Bezeichnung<br />
Fertigset hydrodüse<br />
Grundkörper hydrodüse<br />
haltegriff<br />
Wasserstandssensor<br />
Wannenfuß<br />
hydropumpe<br />
Kondensator für Motorsteuerung<br />
abgangsstutzen<br />
anschlusstutzen<br />
abdeckung ansaugstutzen<br />
siebeinsatz<br />
ansaugstutzen zum einkleben<br />
rückflussverhinderer luftansaugung<br />
Poolmaster Basic<br />
Umstellring<br />
steckaufnahme<br />
nackenstütze<br />
Frontschürze 170x 70<br />
Frontschürze 170x 75<br />
Frontschürze 180x 80<br />
Frontschürze 190x 90<br />
Frontschürze 210x90<br />
Frontschürze 140x140<br />
seitenschürze 170x70<br />
seitenschürze 170x75<br />
seitenschürze 180x80<br />
seiteschürze 190x90<br />
schürzenbefestigungsset<br />
Drehgriff<br />
Befestigungsring<br />
Formring<br />
Überwurfmutter<br />
Flachdichtung<br />
sifon kpl.<br />
abgangsbogen<br />
Überwurfmutter<br />
Formring<br />
hohlschraube<br />
stopfen groß<br />
auslaufkörper kpl.<br />
schieber<br />
abdeckung für exafill<br />
Befestigungsring<br />
spannschraube<br />
abdeckung<br />
Polierset für Wanne<br />
reparaturset für Wanne<br />
rückflussverhinderer DW15<br />
schlauchklemme Ø 43+ Ø 32<br />
schlauch Ø 32 mm<br />
schlauch Ø 25 mm<br />
schlauch Ø 10 mm<br />
satz zierkappen<br />
Farbcodierung<br />
chrom<br />
weiß (alpin)<br />
pergamon<br />
platin<br />
edelmatt<br />
colors<br />
chromeplated<br />
white (alpin)<br />
pergamon<br />
platin<br />
satin chrome<br />
Description<br />
hydro nozzle trim kit<br />
body hydro nozzle<br />
grab bar<br />
water level sensor<br />
bath tub feet<br />
hydro pump<br />
capacitor for motor control<br />
extraction connection<br />
pivoting connection<br />
cover for aspiration port<br />
screen insert for for aspiration port<br />
aspiration port to stick in<br />
non return valve for air inlet<br />
Poolmaster Basic<br />
switch-over ring<br />
Plug receptacle<br />
head rest<br />
front skirt 170x 70<br />
front skirt 170x 75<br />
front skirt 180x 80<br />
front skirt 190x 90<br />
front skirt 210x90<br />
front skirt 140x140<br />
side skirt 170x70<br />
side skirt 170x75<br />
side skirt 180x80<br />
side skirt 190x90<br />
skirt fixation set<br />
turning handle<br />
fixing ring<br />
form ring<br />
sleeve nut<br />
flat seal<br />
trap cpl.<br />
bent outlet<br />
sleeve nut<br />
form ring<br />
sleeve nut<br />
plug<br />
spout body<br />
lever handle for pop-up<br />
back plate for exafi ll cover<br />
fixing ring<br />
locking screw<br />
cover<br />
polish-set for bathtub<br />
service set for bathtub<br />
non return valve DW15<br />
hose clamp Ø 43+ Ø 32<br />
hose Ø 32 mm<br />
hose Ø 25 mm<br />
hose Ø 10 mm<br />
set of caps<br />
trattamento<br />
chromato<br />
bianco (alpino)<br />
pergamon<br />
platin<br />
Descrizione<br />
set colorato bocchetta<br />
corpo bocchetta<br />
maniglia<br />
sensore die livello acqua<br />
piedi del piatto doccia<br />
pompa<br />
condens. per il controllo del motore<br />
raccordo ingresso acqua<br />
raccordo uscita acqua<br />
copertura aspirazione<br />
filtro aspirazione<br />
bocchetta di aspirazione adesiva<br />
valvola non ritorno circuito aria<br />
Poolmaster Basic<br />
anello di regolazione<br />
supporto<br />
cuscino poggiatesta<br />
Pannello frontale170x 70<br />
Pannello frontale170x 75<br />
Pannello frontale 180x 80<br />
Pannello frontale 190x 90<br />
Pannello frontale 210x90<br />
Pannello frontale 140x140<br />
pannello laterale 170x70<br />
pannello laterale 170x75<br />
pannello laterale 180x80<br />
pannello laterale 190x90<br />
set fissaggio pannello<br />
manopola di apertura<br />
anello di fissaggio<br />
guarnizione troppo pieno<br />
ghiera fissaggio<br />
guarnizione piatta<br />
sifone compl.<br />
tubo curvo<br />
ghiera fissaggio<br />
guarnizione troppo pieno<br />
ghiera di fissaggio<br />
tappino<br />
corpo erogatore compl.<br />
cursore<br />
copertura per exafi ll<br />
guarnizione ad anello<br />
vite a spanna<br />
copertura<br />
set per avvivare vasca<br />
set de servicio per vasca<br />
valvola non ritorno DW15<br />
facetta di fissaggio Ø 43+ Ø 32<br />
tubo flessibile Ø 32 mm<br />
tubo flessibile Ø 25 mm<br />
tubo flessibile Ø 10 mm<br />
set di cappa<br />
nr.<br />
98761000<br />
97299000<br />
21940XXX<br />
98767000<br />
97320000<br />
98761000<br />
98762000<br />
98965000<br />
98966000<br />
97318000<br />
97319000<br />
97435000<br />
97323000<br />
98763XXX<br />
98764XXX<br />
98766000<br />
23900000<br />
23910XXX<br />
23912XXX<br />
23914XXX<br />
23916XXX<br />
23918XXX<br />
23919XXX<br />
23911XXX<br />
23913XXX<br />
23915XXX<br />
23917XXX<br />
97322000<br />
96329000<br />
96327000<br />
96331000<br />
95094000<br />
97075000<br />
56373000<br />
96221000<br />
96332000<br />
96093000<br />
94301000<br />
96153000<br />
97576000<br />
97574XXX<br />
97575XXX<br />
97579000<br />
97573000<br />
97580000<br />
21800000<br />
21801XXX<br />
94074000<br />
96700000<br />
97321000<br />
97436000<br />
97437000<br />
97434000<br />
ve<br />
1<br />
1<br />
1<br />
1<br />
1<br />
1<br />
1<br />
1<br />
1<br />
1<br />
1<br />
1<br />
1<br />
1<br />
1<br />
1<br />
1<br />
1<br />
1<br />
1<br />
1<br />
1<br />
1<br />
1<br />
1<br />
1<br />
1<br />
1<br />
1<br />
1<br />
1<br />
1<br />
1<br />
1<br />
1<br />
1<br />
1<br />
1<br />
1<br />
1<br />
1<br />
1<br />
1<br />
1<br />
1<br />
1<br />
1<br />
1<br />
1<br />
1<br />
1<br />
1<br />
1
8<br />
7<br />
33<br />
6<br />
34<br />
35<br />
2<br />
32<br />
3<br />
31<br />
4<br />
30<br />
40<br />
39<br />
38<br />
10<br />
9<br />
37<br />
36<br />
1<br />
5<br />
46<br />
44<br />
34<br />
35<br />
45<br />
41<br />
11<br />
12<br />
42<br />
43<br />
40<br />
39<br />
38<br />
37<br />
13<br />
36<br />
Deutsch<br />
english<br />
Italiano
tyPenschIlDerKlärUnG/ KonForMItätserKlärUnG<br />
eXPlanatIon oF naMePlate / DeclaratIon oF conForMIty<br />
sPIeGazIone tarGhetta/ DIchIarazIone DI conForMItà<br />
Deutsch<br />
Vorbereitungen für einen Anruf beim<br />
<strong>Hansgrohe</strong> Meisterservice:<br />
Wenn ihre selbsthilfe zur Behebung einer<br />
störung nicht erfolgreich war, halten<br />
sie folgende Informationen bevor sie<br />
anrufen bereit, damit der Kundendienst<br />
schnellstmöglich eine lösung anbieten<br />
kann:<br />
- name des Produktes/<br />
Modellbezeichnung<br />
- artikel-nummer<br />
- Kaufdatum<br />
- symptome, unter denen das Problem<br />
auftritt.<br />
- eventl. angezeigte Fehlermeldungen<br />
Abb. A<br />
Produktionsdatum und seriennummer<br />
oberflächenschäden vermeiden!<br />
auf dem Wannenrand befindet sich ein Pharo<br />
logo.<br />
Pharo logo mit einem flachen Gegenstand<br />
lösen.<br />
auf der Innenseite des logos befindet sich das<br />
Produktionsdatum und die seriennummer.<br />
Abb. B<br />
Typenschildbeschreibung:<br />
a artikelnummer - tag - Jahr<br />
B typ Bezeichnung<br />
c elektrospezifische angaben<br />
D seriennummer<br />
English<br />
Preparations for a telephone call to the<br />
<strong>Hansgrohe</strong> Master Service:<br />
If your self-help for clearing a malfunction<br />
was not successful, have the following<br />
information available before making a call so<br />
that the customer service can quickly provide<br />
a solution:<br />
- name of product / model<br />
- Part number<br />
- Date of purchase<br />
- symptoms of the problem<br />
- error messages displayed<br />
Fig. A<br />
Date of production and serial number<br />
avoid surface damage!<br />
a Pharo logo is attached to the tub rim.<br />
loosen the Pharo logo with a flat object.<br />
the date of production and the serial number<br />
are on the inside of the logo.<br />
Fig. B<br />
nameplate description:<br />
a Part number - day - year<br />
B type description<br />
c electrical data<br />
D serial numbert<br />
Italiano<br />
Informazioni utili per chiamare il centro<br />
assistenza di <strong>Hansgrohe</strong>:<br />
se non riuscite a risolvere il problema, tenga a<br />
disposizione le seguenti informazioni, in modo<br />
che il servizio cliente può offrire velocemente<br />
quanto possibile una soluzione:<br />
- nome del prodotto / etichetta<br />
d‘identificazione<br />
- codice articolo-giorno-anno<br />
- Data dell‘acquisto<br />
- tipo di malfunzionamento che presenta<br />
il prodotto.<br />
- eventuali messaggi di errore<br />
Fig. A<br />
Data di produzione e numero di serie<br />
evitare di danneggiare le superfici!<br />
sul bordo della vasca è raffigurato il logo<br />
della Pharo.<br />
togliere il logo della Pharo con un oggetto<br />
piatto.<br />
all’interno del logo si trova la data di<br />
produzione ed il numero di serie.<br />
Fig. B<br />
Descrizione dell‘etichetta d‘identificazione<br />
del prodotto:<br />
a codice articolo-giorno-anno<br />
B tipo<br />
c specifiche elettriche<br />
D numero di matricola
A<br />
B<br />
a<br />
MODEL<br />
22713000 - 185 06<br />
B<br />
TYPE<br />
WP 280<br />
P: 00R6 V: 0000000084<br />
Vac = 230 V P = 1600 W<br />
c<br />
f = 50 Hz IP = X5<br />
SERIAL N° = 08380488000001<br />
serial number 27/02/2007<br />
D<br />
Deutsch<br />
english<br />
Italiano
96<br />
<strong>Hansgrohe</strong> · Postfach 1145 · D-77761 Schiltach · telefon +49 (0) 78 36/51-1282 · telefax +49 (0) 7836/511440<br />
e-mail: info@hansgrohe.com · internet: www.hansgrohe.com<br />
2/2011<br />
90435101