Page 1 Gebrauchsinformation Aquarium-Heizer TRIXIE ...
Page 1 Gebrauchsinformation Aquarium-Heizer TRIXIE ...
Page 1 Gebrauchsinformation Aquarium-Heizer TRIXIE ...

You also want an ePaper? Increase the reach of your titles
YUMPU automatically turns print PDFs into web optimized ePapers that Google loves.
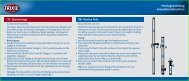
Installation<br />
Fasten heater vertically or horizontally with help of the suction fixings onto<br />
the aquarium wall. Set the desired temperature with help of the adjustment<br />
knob. To ensure even heat distribution install the heater in such a way to allow<br />
a free circulation of water around the glass heater tube. The heater must<br />
always be submerged. Make sure that the water level does not drop under the<br />
MIN marker. After the heater has been submerged for 10 minutes connect the<br />
heater with the mains. The red light shows that the appliance heats. As soon as<br />
the desired temperature is reached the heater switches itself off. Check the<br />
water temperature with a precision thermometer after about 5–10 hours.<br />
Please note that the real temperature may deviate from the temperature<br />
shown on the heater‘s scale. This may depend on the heater’s position, on<br />
whether the aquarium is covered with a hood or on the presence of light.<br />
Spare part: Set of suction pads (item 87307)<br />
Guarantee<br />
The company <strong>TRIXIE</strong> grants for this product a 1 year limited guarantee in case<br />
of faults, which could be put down to faulty material or defective production.<br />
Faulty products will be repaired or replaced by the manufacturer’s decision on<br />
condition that the fault has not been caused by carelessness, misuse or normal<br />
wear and tear. The guarantee period starts with the purchase of the product<br />
and has to be proved by the receipt.<br />
Important safety precautions:<br />
The aquarium heater is for indoor use only. The power cord of this<br />
appliance cannot be replaced. If cord or glass tube are damaged the whole<br />
heater has to be replaced. Make sure that the voltage on the product<br />
tallies with your local power supply. The heater must always be submerged.<br />
Unplug all appliances before putting your hand into the water.<br />
➍<br />
<strong>TRIXIE</strong> Heimtierbedarf GmbH & Co. KG · 24963 Tarp · www.trixie.de<br />
<strong>Gebrauchsinformation</strong><br />
Manual/Manuel/Manuale<br />
<strong>Aquarium</strong>-<strong>Heizer</strong> <strong>Aquarium</strong> Heater/Chauffage pour aquarium/Riscaldatore automatico per acquari<br />
➊ ➎<br />
➋<br />
➌<br />
Installation<br />
Après avoir fixé les supports à ventouses sur le thermostat, placez celui-ci à un<br />
endroit approprié, soit en vertical ou en horizontal dans l’aquarium. Ensuite, ré-<br />
glez le thermostat à la température désirée. Afin de permettre un échange ther-<br />
mique optimal il est recommandé de placer le thermostat à un endroit de circu-<br />
lation d’eau homogène. Le niveau d’eau n’est doit jamais aller en dessous de la<br />
ligne du MIN. Après environ 10 minutes rebranchez la fiche à la prise de courant.<br />
La lampe de contrôle rouge indique la mise en marche du thermostat. Dès que<br />
la température désirée est atteinte celui-ci s’arrête automatiquement. Après<br />
environ 5–10 heures à partir de la mise en marche contrôlez la température<br />
d’eau avec un thermomètre de précision. Il faut, cependant, observer que la<br />
température effective peut dévier de la température affichée sur l’échelle du<br />
thermostat. Ceci dépend, le cas échéant, de la position du thermostat, du<br />
couvercle de l’aquarium ou bien des lampes d’éclairage<br />
Pièce détachée: Set de ventouses (article 87307)<br />
Garantie<br />
Pour ce produit la société <strong>TRIXIE</strong> accorde une garantie d’un an (à partir de la<br />
date d’achat) en cas de défauts de fabrication ou des matériaux. Tout produit<br />
défectueux sera réparé gratuitement ou, selon le choix du fabricant, remplacé<br />
par celui-ci, à condition que le défaut ne soit pas dû à la négligence, à des<br />
mauvaises manipulations ou à l’usure normale du produit. Une preuve de la<br />
date d’achat doit être fournie pour toute réclamation.<br />
Observations importantes pour la sécurité:<br />
Ce thermostat est conçu exclusivement pour l’intérieur de l’aquarium. Le<br />
câble d’alimentation ne peut pas être remplacé; en cas de détérioration du<br />
câble ou du corps en verre le thermostat doit être remplacé. Avant la mise<br />
en service, contrôlez que le voltage indiqué sur l’emballage correspond à la<br />
tension du réseau local. La mise en service du thermostat doit se faire<br />
uniquement sous l’eau. Avant toute intervention dans l’aquarium, débran-<br />
chez l’alimentation de tous les appareils dans l’eau. (Retirez la fiche).<br />
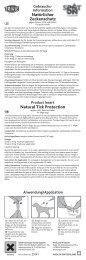
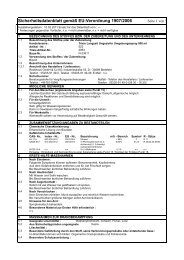
➊<br />
Knob/Poignée/Manopola<br />
➋ Temperature display/Display pour la<br />
température/Display per la temperatura<br />
➌ Indication light/Lumière de signalisation/<br />
Luce di controllo<br />
<strong>TRIXIE</strong> Heimtierbedarf GmbH & Co. KG · 24963 Tarp · www.trixie.de<br />
➍<br />
➎<br />
Installazione<br />
Fissate il riscaldatore verticalmente o orizzontalmente con l’aiuto delle ventose<br />
sulla parete dell’acquario. Regolate la temperatura desiderata con la manopola.<br />
Per permettere la propagazione del calore installate l’apparecchio in modo da<br />
permettere una buona circolazione dell’acqua attorno al contenitore di vetro. Il<br />
riscaldatore deve essere sempre immerso. Assicuratevi che il livello dell’acqua<br />
non scenda sotto il livello di sicurezza (segno MIN). Dopo aver posizionato il<br />
congegno da almeno 10 minuti, collegatelo alla linea d’alimentazione. La luce<br />
rossa indica che sta riscaldando. Non appena viene raggiunta la temperatura<br />
desiderata, il riscaldatore si spegne da solo. Controllate la temperatura<br />
dell’acqua con un termometro di precisione dopo circa 5–10 ore. Fate<br />
attenzione poiché la reale temperatura potrebbe essere diversa da quella<br />
rilevata dalla scala del riscaldatore. Questo potrebbe dipendere dalla posizione<br />
del riscaldatore, dall’acquario se coperto con del legno o dalla presenza di luci.<br />
Pezzo di ricambio: Set di ventose (articolo 87307)<br />
Garanzia<br />
La ditta Trixie garantisce questo prodotto per 1 anno. La garanzia è limitata ai<br />
difetti di fabbricazione o del materiale. Durante questo periodo ogni articolo<br />
difettoso sarà riparato o sostituito gratuitamente dal fabbricante. Sono esclusi<br />
i prodotti difettosi per negligenza, per cattiva manipolazione o per la normale<br />
usura del prodotto. Il periodo di garanzia inizia dalla data di acquisto con<br />
relativa ricevuta.<br />
Importanti precauzioni di sicurezza:<br />
Il riscaldatore per acquari è indicato solamente per uso interno. Il filo<br />
elettrico di questo dispositivo non può essere sostituito. Se il filo o il tubo<br />
in vetro fosse danneggiato, l’intero riscaldatore dovrebbe essere rimpiazzato.<br />
Assicuratevi che il voltaggio del prodotto combaci con l’alimentazione<br />
locale. Il riscaldatore deve essere sempre immerso. Staccate ogni<br />
apparecchio prima di immergere le vostre mani nell’acqua.<br />
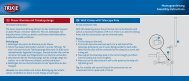
Water flow/Flux d'eau/Flusso d'acqua<br />
Maximum allowed dip depth/Immersion maximum<br />
possible/Massima profondità:<br />
Socket has to be above the bend of the wire/La prise doit<br />
être placée au-dessus de la courbure du fil électrique/La<br />
presa deve essere posizionata sopra la curvatura del filo<br />
elettrico!