Scarica l'allegato - Unical
Scarica l'allegato - Unical
Scarica l'allegato - Unical

Create successful ePaper yourself
Turn your PDF publications into a flip-book with our unique Google optimized e-Paper software.
MPUN 10H - MPUN 13H<br />
INVERTER SPLIT AIR CONDITIONER<br />
CLIMATIZZATORI D’ARIA A PARETE INVERTER<br />
USER MANUAL<br />
MANUALE DI USO E MANUTENZIONE
MPUN 10H - MPUN 13H<br />
INVERTER SPLIT AIR CONDITIONER<br />
CLIMATIZZATORI D’ARIA A PARETE INVERTER<br />
USER MANUAL<br />
MANUALE DI USO E MANUTENZIONE
Manual switch<br />
<br />
-<br />
<br />
Lift the front panel of the unit to reach the manual control of the<br />
conditioner.<br />
AUTO: the conditioner is in automatic function; it is possible to<br />
switch the conditioner on if the remote control is not working. For<br />
the automatic function see paragraph 2.1.<br />
/
1<br />
The remote control has been designed for an easy and fast use.<br />
USE OF THE REMOTE CONTROL<br />
1. Direct the remote control toward the conditioner.<br />
2. Check that there are no objects between the remote control<br />
and the receiver on the conditioner.<br />
3. The signal of the remote control can be sent from a max.<br />
distance of 10 mt.<br />
4. Never leave the remote control exposed to the rays of the<br />
sun<br />
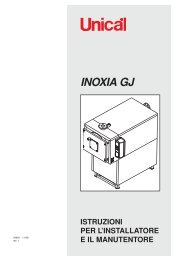
REMOTE CONTROL – PUSHBUTTONS AND MAIN FUNCTIONS<br />
2<br />
4<br />
6<br />
8<br />
1<br />
10<br />
12<br />
14<br />
15<br />
3<br />
5<br />
7<br />
9<br />
11<br />
13<br />
16<br />
1<br />
2<br />
3<br />
4<br />
5<br />
6<br />
7<br />
8<br />
9<br />
10<br />
11<br />
12<br />
13<br />
14<br />
15<br />
16<br />
ON/OFF<br />
Press it to start or stop operation.<br />
-<br />
+<br />
: Press it to decrease temperature<br />
setting.<br />
: Press it to increase temperature<br />
setting.<br />
MODE<br />
Press it to select operation mode<br />
(AUTO/COOL/DRY/FAN/HEAT).<br />
FAN<br />
Press it to set fan speed.<br />
SWING<br />
Press it set swing angle.<br />
I FEEL<br />
/<br />
Press it to set HEALTH or AIR function.<br />
SLEEP<br />
TEMP<br />
QUIET<br />
Press it to set<br />
CLOCK<br />
Press it set clock.<br />
<br />
T-ON T-OFF<br />
Press it to set auto-off/auto-on timer.<br />
TURBO<br />
<br />
LIGHT<br />
Press Pr it to turn on/off the light.<br />
X-FAN<br />
QUIET function.<br />
N.B.The unit confirms the correct reception of each pushbutton with a beep. 5
6<br />
2 WORKING MODE<br />
The conditioner is designed to create the ideal climatic<br />
conditions for the wellbeing of the people in<br />
the room.<br />
It is able to cool and dehumidify (and heat in the<br />
models with heat pump) the air in a completely<br />
automatic way.<br />
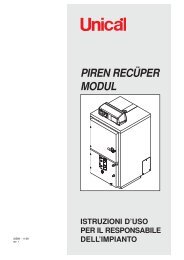
The air sucked by the fan enters from the grill of<br />
the front panel and passes through the filter, which<br />
keeps the dust. Then it is conveyed between the<br />
flaps of a "heat exchanger" and cooled and dehumidified<br />
or heated through a flapped coil.<br />
The heat removed from the room is drained outside.<br />
When the cycle is finished the fan gives back the<br />
fresh air in the room; the outlet direction of the air is<br />
regulated by the flaps, which are motorized up and<br />
down, and by the vertical deflectors (right and left),<br />
manually moved.<br />
2.1<br />
“AUTO” SYSTEM OF AUTOMATIC ADJUSTMENT<br />
Press pushbutton<br />
to access this mode<br />
In the “AUTO” working the electronic control automatically<br />
selects the working mode as to the room<br />
temperature (taken by the probe which is incorporated<br />
in the indoor unit):<br />
· if the room temperature falls under 20° C, a heating<br />
cycle is activated. It remains in function till the<br />
temperature doesnʼt rise above 22° C;<br />
· if the room temperature exceeds 25° C a cooling<br />
cycle is activated. It remains in function till the temperature<br />
doesnʼt fall under 23° C.<br />
The “AUTO” mode can be activated also selecting<br />
the pushbutton placed inside the front panel of the<br />
indoor unit.<br />
To optimize the working of the conditioner, adjust<br />
the speed (1) (see chapter 2,6)<br />
and the direction of the air flow (2) by pressing the<br />
pushbuttons indicated in the figure.<br />
Filter<br />
The device can automatically select the ideal temperature as to the user's desire.<br />
1 2<br />
Heat exchanger<br />
Fan<br />
1
2.2<br />
Press the key until the symbol<br />
appears on the display, the conditioner cools the room<br />
and at the same time reduces the humidity in the air.<br />
The cooling cycle is activated by setting the keys<br />
“TEMP” + or - at a temperature lower than that of the<br />
room.<br />
Example: the room temperature is 28° C, if we set the<br />
cooling at a temperature lower than 27°, the compressor<br />
will immediately start. The device automatically adjusts<br />
the working cycles of the compressor keeping the<br />
wished temperature in the room.<br />
2.3<br />
COOLING<br />
Example:<br />
If the room temperature is higher than 27°C, set a value<br />
between 24°C and 27°C on the remote control. Close curtains<br />
and windows to protect the room from the sun.<br />
To optimize the functioning of the conditioner adjust the<br />
temperature (1), the speed (2) (see chapter 2,6) and the<br />
direction of the air flow (3) by pressing the keys indicated<br />
in the figure.<br />
DEHUMIDIFICATION<br />
Press the key until the symbol appears on the<br />
display: a completely automatic function of alternating cooling<br />
cycles and air fan is activated. This allows the humidity<br />
and the room temperature to be kept constant without relevant<br />
variations in temperature (the temperature can also be set by<br />
the user.<br />
The working is completely automatic and the device<br />
adjusts the speed of the fan.<br />
This function reduces the humidity of the air to make<br />
the room more comfortable.<br />
To optimize the functioning of the conditioner adjust<br />
the temperature (1), the speed (2) by pressing the keys<br />
indicated in the figure.<br />
The dehumidification “DRY” automatically selects the cooling keeping the temperature set and the room temperature<br />
on balance.<br />
1 3<br />
1 2<br />
1<br />
1<br />
2<br />
7
8<br />
2.4<br />
2.5<br />
FAN<br />
Press the key until the symbol , appears on<br />
the display, the conditioner works in fan mode only.<br />
To optimize the functioning of the conditioner adjust the<br />
the speed (1) (see chapter 2,6) and the<br />
direction of the air flow (2) by pressing the keys indicated<br />
in the figure.<br />
HEATING<br />
Press the key until the symbol<br />
appears on the display, the conditioner heats the room<br />
at an economic consumption level thanks to the “heat<br />
pump”. With the “HEAT” function the room is heated<br />
using the warmth of the external air at a low temperature.<br />
With the keys “TEMP” + or – set a temperature higher<br />
than the room temperature to start the heating cycle.<br />
CAUTION: during the working with the heat pump the<br />
conditioner can automatically activate a defrost cycle,<br />
which is essential to free the condensing unit from an<br />
excessive deposit of frost.<br />
Examples:<br />
· The room temperature is 18° C, if we set the heating<br />
at a temperature higher than 19° C, the compressor starts<br />
immediately..<br />
· When the temperature is lower than 14°C, set a value<br />
between 16°C and 20°C on the remote control.<br />
· Donʼt use the heating mode when the outdoor temperature<br />
is lower than - 7°C.<br />
To optimize the functioning of the conditioner adjust the<br />
temperature (1), the speed (2) (see chapter 2,6) and the<br />
direction of the air flow (3) by pressing the keys indicated<br />
in the figure.<br />
NB: In heating mode, if appear H1 on display of indor unit, defrosting mode<br />
is activated: It is normal function to optimize the heating capacity.<br />
2<br />
3<br />
1<br />
1<br />
2
2.6 ADJUSTMENT OF THE FAN SPEED<br />
By pressing the key<br />
“AUTO -<br />
2.7<br />
ADJUSTMENT OF THE DIRECTION OF THE AIR FLOW<br />
The key activates the “FLAP” and the air flow<br />
is directed alternatively from up to down and vice-versa,<br />
in order to guarantee an even diffusion of the air in the<br />
room.<br />
· In mode cooling, orient the flaps in horizontal direction;<br />
· In mode heating, orient the flaps downward as the<br />
warm air always tends to rise upward.<br />
The deflectors are positioned manually and placed under<br />
the flaps. They allow to direct the air flow rightward or<br />
leftward.<br />
Caution: never position “Flaps”, manually, the delicate<br />
mechanism activating them could be seriously damaged!<br />
2.8<br />
you can chose the wished fan speed among:<br />
(LOW) - (MID.) - (HIGH)” when the “COOL” - “HEAT” functions are selected.<br />
T h e “AUTO” mode sets the automatic electronic control of the speed of the fan. The<br />
temperature is adjusted at an optimal level, in constant reference with the conditions of the room climate. The<br />
speed of the fan increases when a greater cooling or heating effect is required.<br />
“SWING” CONTROL OF THE AIR FLOW<br />
· The air flow in outlet is uniformly distributed in the<br />
room.<br />
· it is possible to position the direction of the air in the<br />
optimal solution.<br />
SWING<br />
“SLEEP” FUNCTION<br />
This mode is activated by selecting the key .<br />
The symbol appears on the display. The function<br />
“SLEEP” automatically adjusts the temperature to make<br />
the room more comfortable during the night sleep.<br />
In cooling or dehumidification mode the set temperature<br />
is progressively increased of 2° C during the first<br />
two hours of working. In heating mode the set temperature<br />
is progressively decreased of 2° C during the first 2<br />
hours of working.<br />
“Flap” movement “Flaps”<br />
DANGER!<br />
Never insert your hand or objects in the air outlet of<br />
the units!<br />
These units contains a fan that turns at high speed.<br />
9
10<br />
2.9<br />
X-FAN<br />
This mode is activated by selecting the key<br />
In COOLING and DRY function there are still water<br />
exit inside the indoor unit when the air conditioner is<br />
turned off.<br />
With X-FAN function, <strong>Unical</strong> air Conditioners can<br />
make its fan continue to work in breeze state for about<br />
10 minutes when it is turned off.<br />
Dry water to remain the inside of unit clean and dry.<br />
2.10<br />
TURBO<br />
X-FAN<br />
When the TURBO is turned on, the whole units runs<br />
at the high fan speed to make the ambient temperature<br />
swiftly approach to the setting temperature. Turn off the<br />
TURBO, the whole units runs at the setting fan speed.<br />
2.11<br />
LOCK<br />
To press + and - button, can lock or unlock the keyboard,<br />
after locked, the symbol of the lock<br />
will be displayed as this time, to press any key, the<br />
symbol will flash for 3 times.<br />
After it is unlocked, the symbol will disappear.<br />
2.12<br />
I FEEL<br />
This mode is activated by selecting the key I FEEL<br />
The mini sensor in the wireless remote controller can sense its<br />
surrounding temperature and transmit the signal back to the<br />
indoor umit so the unit can adjust the air flow volume and temperature<br />
accordingly to provide maximum comfort and the same time save energy.
2.13<br />
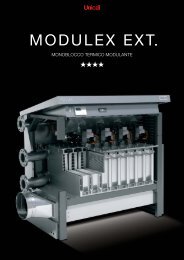
TIMED STOP (fig. 1)<br />
The timed stop is programmed with the appliance on.<br />
Pressing T-ON/T-OFF at every selection of the key + or - the<br />
Timer goes on of 1 minutes till it reaches the 24 hours.<br />
Press the key + or - more times till on the display you<br />
can read the time in hours which passes between the<br />
programming and the timed stop: press T-ON/T-OFF<br />
to confirm!<br />
TIMED START (fig. 1)<br />
To program the timed start, the appliance should be off<br />
Press T-ON/T-OFF : every time you press the key + or - the<br />
Timer goes on of 1 minute till it reaches the 24 hours.<br />
Press the key + or - more times till on the display you<br />
can read the time in hours which passes between the<br />
programming and the timed start: press T-ON/T-OFF<br />
to confirm!<br />
IMPORTANT<br />
Before proceeding with the timed start:<br />
· program the working mode with the key and<br />
the fan speed with the key .<br />
· switch the conditioner off (with the key ON/OFF).<br />
3<br />
TIMER<br />
T-ON/T-OFF<br />
T-ON/T-OFF<br />
The function allows to automatically activate or deactivate the conditioner at the wished time and thus saving a lot of<br />
energy.<br />
TRICKS TO SAVE ENERGY<br />
· The use of the Timer is advised whenever you want to program the timed start in order to avoid the<br />
conditioner to work unnecessarily when you are out of the house.<br />
· Never program a too high temperature in heating and a too low one in cooling.<br />
· Try not to frequently open and close doors and windows; the continuous warmth exchange with the outside<br />
hinders the conditioner work.<br />
· it is better not to install the units in places directly exposed to the sun.<br />
· Use the function "SLEEP" during the night.<br />
fig. 1<br />
11
2.13<br />
TIMED STOP (fig. 1)<br />
The timed stop is programmed with the appliance on.<br />
Pressing T-ON/T-OFF at every selection of the key + or - the<br />
Timer goes on of 1 minutes till it reaches the 24 hours.<br />
Press the key + or - more times till on the display you<br />
can read the time in hours which passes between the<br />
programming and the timed stop: press T-ON/T-OFF<br />
to confirm!<br />
TIMED START (fig. 1)<br />
To program the timed start, the appliance should be off<br />
Press T-ON/T-OFF : every time you press the key + or - the<br />
Timer goes on of 1 minute till it reaches the 24 hours.<br />
Press the key + or - more times till on the display you<br />
can read the time in hours which passes between the<br />
programming and the timed start: press T-ON/T-OFF<br />
to confirm!<br />
IMPORTANT<br />
Before proceeding with the timed start:<br />
· program the working mode with the key and<br />
the fan speed with the key .<br />
· switch the conditioner off (with the key ON/OFF).<br />
3<br />
TIMER<br />
T-ON/T-OFF<br />
T-ON/T-OFF<br />
The function allows to automatically activate or deactivate the conditioner at the wished time and thus saving a lot of<br />
energy.<br />
TRICKS TO SAVE ENERGY<br />
· The use of the Timer is advised whenever you want to program the timed start in order to avoid the<br />
conditioner to work unnecessarily when you are out of the house.<br />
· Never program a too high temperature in heating and a too low one in cooling.<br />
· Try not to frequently open and close doors and windows; the continuous warmth exchange with the outside<br />
hinders the conditioner work.<br />
· it is better not to install the units in places directly exposed to the sun.<br />
· Use the function "SLEEP" during the night.<br />
fig. 1<br />
11
Manual switch<br />
.<br />
<br />
<br />
<br />
<br />
Sollevare il pannello frontale dell’unità per accedere al comando<br />
manuale del climatizzatore.<br />
AUTO: il climatizzatore é in funzione automatico; é possibile<br />
accendere il climatizzatore nel caso il telecomando non fosse funzionante.<br />
La funzione automatico é illustrata dettagliatamente nel<br />
paragrafo 2.1.<br />
/
1<br />
TELECOMANDO - TASTI E FUNZIONI PRINCIPALI<br />
Il telecomando è stato studiato in modo da rendere facile e rapido lʼutilizzo del climatizzatore.<br />
UTILIZZO DEL TELECOMANDO<br />
1. Dirigere il telecomando verso il climatizzatore.<br />
2.Verificare che non vi siano oggetti interposti tra il telecomando e il<br />
ricevitore posto sul climatizzatore.<br />
3.Il segnale del telecomando può essere trasmesso da una distanza massima<br />
di 10 mt.<br />
4.Non lasciare il telecomando in zone direttamente esposte ai raggi solari.<br />
2<br />
4<br />
6<br />
8<br />
1<br />
10<br />
12<br />
14<br />
15<br />
3<br />
5<br />
7<br />
9<br />
11<br />
13<br />
16<br />
1<br />
2<br />
3<br />
4<br />
5<br />
6<br />
7<br />
8<br />
9<br />
10<br />
11<br />
12<br />
13<br />
14<br />
15<br />
16<br />
ON/OFF<br />
Premere per accesione/spegnimento del climatizzatore<br />
-<br />
+<br />
: Premere per diminuire la temperatura<br />
: Premere per aumentare la temperatura<br />
MODE<br />
Premere per selezionare la modalità di funziomamento<br />
(AUTO/COOL/DRY/FAN/HEAT).<br />
FAN<br />
Premere per selezionare la velocità del ventilatore.<br />
SWING<br />
Premere per orientare le alette.<br />
I FEEL<br />
/<br />
(Funzione non abilitata).<br />
SLEEP<br />
TEMP<br />
QUIET<br />
(Funzione non abilitata).<br />
CLOCK<br />
Premere per impostare l'orario.<br />
T-ON T-OFF<br />
Premere per impostare timer accensione/spegnimento.<br />
TURBO<br />
LIGHT<br />
Premere per disattivare/riattivare display.<br />
X-FAN<br />
N.B. LʼUnità conferma la corretta ricezione di ogni tasto premuto con un bip.
17<br />
2 MODALITÀ DI FUNZIONAMENTO<br />
Il climatizzatore è un apparecchio progettato per<br />
creare le condizioni climatiche ideali per il benessere<br />
delle persone nellʼambiente.<br />
Eʼ in grado di raffreddare, deumidificare (e riscaldare<br />
nelle versioni pompa di calore) lʼaria in modo<br />
totalmente automatico.<br />
Lʼaria, aspirata dal ventilatore, entra dalla griglia del<br />
pannello frontale e passa attraverso il filtro, che ne<br />
trattiene la polvere; viene quindi convogliata tra le<br />
alette di uno “scambiatore di calore” e raffrescata e<br />
deumidificata o riscaldata, per mezzo della serpentina<br />
alettata.<br />
Il calore sottratto allʼambiente viene smaltito<br />
allʼesterno.<br />
A ciclo ultimato, il ventilatore restituisce lʼaria<br />
fresca (o calda in pompa di calore) nellʼambiente;<br />
la direzione di uscita dellʼaria viene regolata dalle<br />
alette “Flap” motorizzate nel senso verticale e dai<br />
deflettori manuali nel senso orizzontale.<br />
2.1<br />
Si accede a questa modalità premendo il tasto<br />
: sul display verrà visualizzato il simbolo<br />
Nel funzionamento “AUTO” il controllo<br />
elettronico seleziona automaticamente la modalità<br />
di funzionamento a seconda della temperatura<br />
ambiente (rilevata dalla sonda incorporata nellʼUnità<br />
Interna):<br />
· se la temperatura ambiente scende al di sotto di<br />
20° C si avvia il ciclo in riscaldamento, che rimane<br />
in funzione finché la temperatura non sale al di sopra<br />
dei 22° C;<br />
· se la temperatura ambiente supera 25° C si avvia il<br />
ciclo in raffreddamento, che rimane in funzione finché<br />
la temperatura non scende al di sotto dei 23° C.<br />
La modalità “AUTO” si può attivare anche selezionando<br />
il tasto posizionato allʼinterno del pannello<br />
frontale dellʼUnità Interna.<br />
Lʼapparecchio è in grado di selezionare automaticamente<br />
la temperatura ideale a seconda delle condizioni ambientali.<br />
Filtro<br />
“AUTO”: SISTEMA DI REGOLAZIONE AUTOMATICO<br />
Per ottimizzare il funzionamento del climatizzatore é<br />
opportuno regolare la velocità del ventilatore (1) e<br />
la direzione del flusso dellʼaria<br />
(2) con la pressione dei tasti segnalati in figura.<br />
1 2<br />
Scambiatore di<br />
calore<br />
Ventilatore<br />
1
2.2<br />
2.3<br />
RAFFREDDAMENTO<br />
Premere il tasto<br />
<br />
finché sul display non<br />
compare il simbolo . Il climatizzatore raffresca lʼambiente<br />
e contemporaneamente riduce lʼumidità dellʼaria.<br />
Il ciclo in raffreddamento viene attivato impostando i<br />
tasti “TEMP” + o - ad una temperatura inferiore a quella<br />
dellʼambiente.<br />
Esempio: supponiamo che la temperatura del locale<br />
sia di 28° C, se noi impostiamo il raffreddamento ad<br />
una temperatura minore di 27°, questo farà partire<br />
immediatamente il compressore. Lʼapparecchio, infatti,<br />
regola automaticamente i cicli di funzionamento del<br />
compressore, mantenendo la temperatura desiderata<br />
nellʼambiente.<br />
Esempio:<br />
Quando la temperatura ambiente supera i 27°C, impostare<br />
sul telecomando un valore compreso tra 24°C e 27°C.<br />
Chiudere tende e finestre per riparare dal sole il locale.<br />
Per ottimizzare il funzionamento del climatizzatore é<br />
opportuno regolare la temperatura (1), la velocità (2)<br />
(vedi paragrafo 2,6) e la direzione del flusso dellʼaria<br />
(3) con la pressione dei tasti segnalati in figura.<br />
DEUMIDIFICAZIONE<br />
Premere il tasto finché sul display non<br />
compare il simbolo : si attiva una funzione totalmente<br />
automatica di alternanza di cicli di raffreddamento e<br />
ventilazione dellʼambiente, che consentono di mantenere<br />
costante lʼumidità e la temperatura, senza variazioni<br />
rilevanti della stessa (questa può anche essere anche<br />
impostata dallʼutente).<br />
Il funzionamento é completamente automatico: lʼapparecchio<br />
regola la velocità del ventilatore.<br />
Questa funzione riduce lʼumidità dellʼaria per rendere<br />
lʼambiente più confortevole.<br />
Per ottimizzare il funzionamento del climatizzatore é<br />
opportuno regolare la temperatura (1) e la direzione<br />
del flusso dellʼaria (2) con la pressione dei tasti<br />
segnalati in figura.<br />
La deumidificazione “DRY” seleziona automaticamente il raffreddamento, nellʼequilibrio costante tra la temperatura<br />
impostata e la temperatura del locale.<br />
1 3<br />
1 2<br />
1<br />
1<br />
2<br />
18
19<br />
2.4<br />
Per ottimizzare il funzionamento del climatizzatore é<br />
opportuno regolare la velocità (1) (vedi capitolo 2,6) e<br />
la direzione del flusso dellʼaria (2) con la pressione dei<br />
tasti segnalati in figura.<br />
2.5<br />
VENTILAZIONE<br />
Premere il tasto finché sul display non<br />
compare il simbolo , il climatizzatore funziona in sola<br />
ventilazione.<br />
RISCALDAMENTO<br />
<br />
Premere il tasto finché sul display non<br />
compare il simbolo , il climatizzatore riscalda lʼambiente<br />
in modo economico, grazie alla funzione “pompa<br />
di calore”. In funzionamento “HEAT” il riscaldamento<br />
dellʼambiente è prodotto utilizzando il calore dellʼaria<br />
esterna a bassa temperatura.<br />
Perché si avvii il ciclo in riscaldamento impostare con i<br />
tasti “TEMP” + o - una temperatura superiore alla temperatura<br />
ambiente.<br />
ATTENZIONE: il climatizzatore, durante il funzionamento<br />
pompa di calore, può attivare automaticamente<br />
un ciclo di sbrinamento, indispensabile per poter liberare<br />
lʼunità condensante da un eccessivo deposito di brina.<br />
Esempi:<br />
· Supponiamo che la temperatura del locale sia 18° C,<br />
se noi impostiamo il riscaldamento ad una temperatura<br />
superiore di 19° C, questo farà partire immediatamente<br />
il compressore.<br />
· Quando la temperatura è minore di 14°C, impostare<br />
sul telecomando un valore compreso tra 16°C e 20°C.<br />
· Non utilizzare la modalità riscaldamento quando la<br />
temperatura esterna è inferiore a - 7°C.<br />
Per ottimizzare il funzionamento del climatizzatore é<br />
opportuno regolare la temperatura (1), la velocità (2)<br />
(vedi capitolo 2,6) e la direzione del flusso dellʼaria (3)<br />
con la pressione dei tasti segnalati in figura.<br />
NB: Se nella modalità riscaldamento, compare sul display dell’unità interna<br />
il codice H1, è attiva la funzione sbrinamento: ale funzione è normale<br />
e serve per ottimizzare la capacità di riscaldamento.<br />
2<br />
3<br />
1<br />
1<br />
2
2.6 REGOLAZIONE DELLA VELOCITÀ DEL VENTILATORE<br />
Premendo il tasto è possibile scegliere la velocità desiderata di ventilazione fra:<br />
“AUTO - (LOW) - (MID.) - (HIGH)”.<br />
La modali- tà “AUTO” imposta il controllo elettronico automatico della velocità del ventilatore.<br />
La temperatura viene regolata ad un livello ottimale, in costante riferimento alle condizioni del clima dellʼambiente.<br />
La velocità del ventilatore aumenta nelle condizioni in cui si renda necessario un maggior effetto di raffreddamento<br />
o riscaldamento.<br />
2.7<br />
· Il flusso dʼaria in uscita viene distribuito unifor-<br />
· É possibile selezionare la direzione dellʼaria nella<br />
memente nellʼambiente.<br />
2.8<br />
“SWING” CONTROLLO DEL FLUSSO DELLʼARIA<br />
posizione ottimale.<br />
REGOLAZIONE DELLA DIREZIONE DEL FLUSSO DELLʼARIA<br />
Con il tasto si attivano le alette “FLAP” e il<br />
flusso dellʼaria viene direzionato alternativamente dallʼalto<br />
verso il basso e viceversa; in modo da garantire la<br />
diffusione uniforme dellʼaria nellʼambiente.<br />
· in modalità raffreddamento è consigliabile orientare le<br />
· in modalità riscaldamento è consigliabile orientare le<br />
alette nel senso orizzontale;<br />
alette verso il basso, dato che lʼaria calda tende<br />
sempre a salire verso lʼalto.<br />
I deflettori vengono posizionati manualmente. Sono<br />
collocati al di sotto delle alette “Flap” e consentono di<br />
dirigere il flusso dellʼaria verso destra o verso sinistra.<br />
Attenzione: non posizionare mai manualmente le alette<br />
“Flap”, il delicato meccanismo che le aziona potrebbe<br />
venire seriamente danneggiato!<br />
FUNZIONE “SLEEP”<br />
Questa modalità si attiva selezionando il tasto .<br />
Sul display compare il simbolo la funzione<br />
“SLEEP” regola automaticamente la temperatura ren-<br />
dendo lʼambiente più confortevole nella fase del sonno<br />
notturno,disattivando il display dll'unita' interna.<br />
In modalità raffreddamento o deumidificazione la temperatura<br />
impostata viene aumentata progressivamente<br />
di 2° C durante le prime due ore di funzionamento. In<br />
modalità riscaldamento la temperatura impostata viene<br />
diminuita progressivamente di 2° C durante le prime 2<br />
ore di funzionamento.<br />
Movimento “Flap” Alette “Flap”<br />
PERICOLO!<br />
Non inserire mai mani o oggetti di alcun genere<br />
nellʼuscita dʼaria delle unità !<br />
Queste unità contengono un ventilatore che<br />
gira ad alta velocità.<br />
20
21<br />
2.9<br />
X-FAN<br />
Questa modalità si attiva premendo il tasto<br />
Nel funzionamento COOL (raffrescamento) e D RY<br />
(deumidificazione) avviene la creazione di condensa<br />
nello scambiatore interno: se viene attivata la funzione<br />
X-FAN , quando il climatizzatore viene spento il ventilatore<br />
interno continua a ruotare per asciugare lo scambiatore,<br />
eliminando le goccioline residue di condensa,<br />
altrimenti causa di formazione di muffe e batteri.<br />
Il ventilatore verrà disattivato automaticamente dopo<br />
circa 10 minuti.<br />
2.10<br />
TURBO<br />
Questa modalità permette al climatizzatore di raggiungere<br />
più rapidamente la temepratura desiderata in<br />
ambiente; il ventilatore dell'unità interna ruoterà alla<br />
massima velocità.<br />
Disattivando la funzione TURBO, il ventilatore tornerà<br />
a girare alla velocità selezionata.<br />
2.11<br />
BLOCCO TASTI<br />
Premendo il tasto + e - contemporaneamente è possibile<br />
bloccare i tasti del telecomando.<br />
Sul display apparirà l'icona<br />
Ripremere i tasti + e - per riabilitare la tastiera.<br />
2.12<br />
I FEEL<br />
X-FAN<br />
Questa modalità si attiva premendo il tasto I FEEL<br />
Il climatizzatore inizierà a rilevare la temperatura effettiva in ambiente<br />
tramite un sensore posto nel telecomando e non in prossimità dell'unità.<br />
.
2.12<br />
TIMER<br />
SPEGNIMENTO TEMPORIZZATO<br />
Lo spegnimento temporizzato si programma ad apparecchio<br />
acceso.<br />
Premendo ogni selezione del tasto + o -<br />
il Timer avanza di 1 minutofino a raggiungere le 24 ore.<br />
Premere il tasto + o - più volte fino a leggere sul display<br />
il tempo, espresso in ore, che intercorre dal momento<br />
della programmazione al momento dello spegnimento<br />
temporizzato: ripremere il tasto<br />
per riconfermare il tempo di spegnimento.<br />
ACCENSIONE TEMPORIZZATA<br />
Per programmare lʼaccensione temporizzata lʼapparecchio<br />
deve essere spento.<br />
Premere<br />
: ad ogni pressione del tasto + o -<br />
il Timer avanza di (1 minuto) fino a raggiungere le 24 ore.<br />
Premere il tasto + o - più volte fino a leggere sul display<br />
il tempo, espresso in ore, che intercorre dal momento<br />
della programmazione al momento dellʼaccensione tem<br />
porizzata: ripremere il tasto per confermare<br />
il tempo di accensione.<br />
IMPORTANTE<br />
Prima di procedere allʼaccensione temporizzata:<br />
· programmare la modalità di funzionamento<br />
con il tasto e la velocità di ventilazione con il<br />
tasto .<br />
· spegnere il climatizzatore (con il tasto ON/OFF).<br />
La funzione permette di attivare o disattivare automaticamente il climatizzatore allʼorario desiderato, consentendo<br />
un notevole risparmio di energia.<br />
3 ACCORGIMENTI AI FINI DEL RISPARMIO ENERGETICO<br />
· Lʼuso del Timer è consigliato ogni volta che si voglia programmare lʼaccensione temporizzata, al fine di evitare<br />
che il climatizzatore lavori inutilmente quando si è fuori casa.<br />
· Non programmare una temperatura troppo elevata (in riscaldamento) o troppo bassa (in raffreddamento).<br />
· Cercare di non aprire e chiudere frequentemente porte e finestre; il continuo scambio termico con lʼesterno<br />
ostacola il lavoro del climatizzatore.<br />
· É preferibile non installare le unità in punti esposti alla luce diretta del sole.<br />
· Usare la funzione “SLEEP” durante il periodo notturno.<br />
22