Talimatlar – Garaj Kapisi Operatörü Model LM60K, LM60R-128
Talimatlar – Garaj Kapisi Operatörü Model LM60K, LM60R-128
Talimatlar – Garaj Kapisi Operatörü Model LM60K, LM60R-128

Create successful ePaper yourself
Turn your PDF publications into a flip-book with our unique Google optimized e-Paper software.
23 Program your Keyless Entry<br />
Activate the opener only when door is in full view, free of<br />
obstruction and properly adjusted. No one should enter or leave<br />
garage while door is in motion. Do not allow children to operate<br />
push button(s) or remote(s). Do not allow children to play near<br />
the door.<br />
NOTE: Your new Keyless Entry must be programmed to operate your<br />
garage door opener.<br />
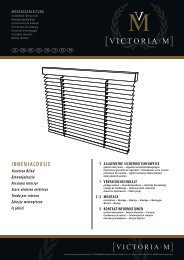
Program the Receiver to Match Additional Remote Control Code<br />
Using the orange “LEARN” Button:<br />
1. Press and release the orange “learn” button (1) on opener. The<br />
learn indicator light will glow steadily for 30 seconds.<br />
2. Within 30 seconds, enter a four digit personal identification number<br />
(PIN) of your choice on the keypad (2), then press and hold the<br />
ENTER button.<br />
3. Release the button when the opener light blinks (3). It has learned<br />
the code. If the light bulb is not installed, two clicks will be heard.<br />
NOTE: This method requires two people if the Keyless Entry is already<br />
mounted outside the garage.<br />
Using the Multi-Function Door Control:<br />
1. Enter a four digit personal identification number (PIN) of your choice<br />
on the keypad, then press and hold ENTER.<br />
2. While holding the ENTER button, press and hold the LIGHT button<br />
on the Multi-Function Door Control.<br />
3. Continue holding the ENTER and LIGHT buttons while you press<br />
the push bar on the Multi-Function Door Control (all three buttons<br />
are held).<br />
4. Release buttons when the opener light blinks. It has learned the<br />
code. If the light bulb is not installed, two clicks will be heard.<br />
24 Using the Wall-Mounted Door Control<br />
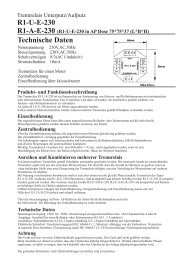
THE MULTI-FUNCTION DOOR CONTROL<br />
Press the push bar (1) to open or close the door. Press again to stop<br />
the door.<br />
Light feature<br />
Press the Light button (2) to turn the opener light on or off. It will not<br />
control the opener light when the door is in motion. If you turn it on<br />
and then activate the opener, the light will remain on for 2-1/2 minutes.<br />
Press again to turn it off sooner.<br />
Lock feature<br />
Designed to prevent operation of the door from hand-held remote<br />
controls. However, the door will open and close from the Door Control,<br />
the Outside Keylock and the Keyless Entry Accessories.<br />
To activate, press and hold the Lock button (3) for 2 seconds. The<br />
push bar light will flash as long as the Lock feature is on.<br />
To turn off, press and hold the Lock button again for 2 seconds.The<br />
push bar light will stop flashing. The Lock feature will also turn off<br />
whenever the “LEARN” button on the opener panel is activated.<br />
ADJUSTMENT SECTION<br />
25 Setting the Limits<br />
Travel limits regulate the points at which the door will stop when<br />
moving up or down. Follow the steps below to set the limits.<br />
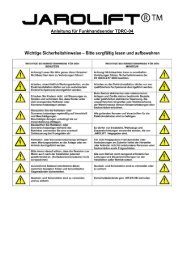
To program the travel limits:<br />
1. Open the light lens. Press and hold the black button (1) until the<br />
yellow indicator light (3) starts flashing slowly and then release.<br />
2. Push and hold the black button (1) until the door reaches the<br />
desired open position. Adjust the position of the door by using the<br />
black (1) and orange (2) buttons. Black moves the door UP, orange<br />
moves the door DOWN.<br />
3. Push the programmed remote control (4) or push bar on the door<br />
control that was shipped with your opener. This sets the full UP<br />
(open) position. The door will travel to the floor and reverse back to<br />
the UP (open) position. The opener has learned its travel limits.<br />
Check to be sure the door is high enough for your vehicle. Adjust<br />
if necessary.<br />
4. The indicator light (3) will stop flashing when the limits have been<br />
learned.<br />
If the door stops or reverses before it reaches the floor<br />
repeat steps 1-3 immediately. If this does not set the<br />
limits, proceed to #15 of the Having a Problem? section<br />
and follow the instructions for setting the limits manually.<br />
NOTE: The worklight blinks 11 times whenever the Limits Setting<br />
routine fails. If you get this error, proceed to #15 of the Having a<br />
Problem? section and follow the instructions for setting the limits<br />
manually.<br />
26 Setting the Force<br />
The force setting button is located behind the light lens of the<br />
opener. The force setting regulates the amount of power required<br />
to open and close the door.<br />
1. Open the light lens. Locate the orange button (2).<br />
2. Push the orange button (2) twice to enter unit into Force Adjustment<br />
Mode. The LED (3) (indicator light) will flash quickly.<br />
3. Push the programmed remote control (4) or push bar on the door<br />
control that was shipped with your opener. The door will travel to<br />
the DOWN (close) position. Push the remote control (4) again, the<br />
door will travel to the UP (open) position.<br />
The LED (3) (indicator light) will stop flashing when the force has been<br />
learned.<br />
The door must travel through a complete cycle, UP and DOWN, in<br />
order for the force to be set properly. If the unit cannot open and close<br />
your door fully, inspect your door to insure that it is balanced properly<br />
and is not sticking or binding.<br />
The force MUST be learned in order to properly complete<br />
the setting of the limits.<br />
27<br />
Test the Safety Reverse System<br />
The safety reverse system test is important. Garage door must<br />
reverse on contact with a 40mm obstacle laid flat on the floor.<br />
Failure to properly adjust opener may result in serious personal<br />
injury from a closing garage door. Repeat test once a month and<br />
adjust as needed.<br />
Procedure: Place a 40mm obstacle (1) laid flat on the floor under the<br />
garage door. Operate the door in the down direction. The door must<br />
reverse on the obstruction. If the door stops on the obstruction,<br />
remove obstruction and repeat Setting the Limits step 25. Repeat test.<br />
When the door reverses on the 40mm obstacle, remove the<br />
obstruction and run the opener through a complete travel cycle. Door<br />
must not reverse in closed position. If it does, repeat Setting the<br />
Limits and Force steps 25 and 26 and repeat safety reverse test.<br />
Place 20kg at the center of the door and ensure that the door will not<br />
move up more than 500mm.<br />
5-en