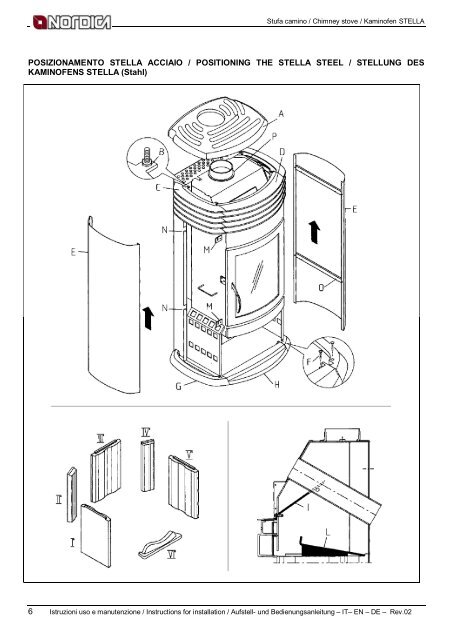
Stufa camino / Chimney stove / <strong>Kaminofen</strong> <strong>STELLA</strong> POSIZIONAMENTO <strong>STELLA</strong> ACCIAIO / POSITIONING THE <strong>STELLA</strong> STEEL / STELLUNG DES KAMINOFENS <strong>STELLA</strong> (Stahl) 6 Istruzioni uso e manutenzione / Instructions for installation / Aufstell- und <strong>Bedienungsanleitung</strong> – IT– EN – DE – Rev.02
Stufa camino / Chimney stove / <strong>Kaminofen</strong> <strong>STELLA</strong> 2. POSIZIONAMENTO <strong>STELLA</strong> MAIOLICA (pagina 8) Dopo aver tolto l’imballo dalla stufa-camino, prima di proce<strong>de</strong>re al posizionamento nel luogo prescelto, eseguire lo smontaggio <strong>de</strong>i particolari come indicato di seguito: 1. Togliere dal vano focolare i particolari ivi contenuti 2. Togliere il cappello in maiolica (A) posto sulla parte superiore <strong>de</strong>lla stufa 3. Dopo aver svitato i 4 dadi (B), togliere le griglie in ghisa : laterali (C) e anteriori (D) 4. Svitare le 6 viti (F) e levare gli zoccoli : laterali (G) e anteriore (H) 5. Collocare la stufa nel posto previsto proce<strong>de</strong>re come segue: a) posizionare il <strong>de</strong>flettore superiore (I) come mostrato nella figura di sezione in basso a <strong>de</strong>stra (anteriormente <strong>de</strong>ve appoggiare sulle 3 viti 6MA) b) proce<strong>de</strong>re al montaggio <strong>de</strong>l focolare in refrattario seguendo la sequenza mostrata in figura in basso a sinistra c) posizionare, quindi, il <strong>de</strong>flettore inferiore (L) 6. Rimontare gli zoccoli e fissarli con le relative 6 viti 7. Iniziando dall’alto, agganciare una <strong>de</strong>lle piastrelle (E) nelle apposite cavità <strong>de</strong>lla parete laterale e infilare le due astine di ancoraggio fino all’estremità inferiore <strong>de</strong>lla piastrella. Seguendo la stessa procedura montare le tre rimanenti piastrelle. Quando tutte le piastrelle sono state fissate fare attenzione che le astine siano inserite completamente. Proce<strong>de</strong>re, quindi, con l’altro lato <strong>de</strong>lla stufa. 8. Rimontare le griglie seguendo la numerazione segnata sui pezzi partendo dalla nr. 1 anteriore . Fissare infine i 4 dadi 9. Posizionare il cappello in maiolica nell’apposita se<strong>de</strong> ATTENZIONE: Verificare la centratura <strong>de</strong>llo scarico camino (P) rispetto al foro <strong>de</strong>l cappello in maiolica. Eventualmente allentare le griglie e spostarle dove richiesto. . 2. POSITIONING THE <strong>STELLA</strong> MAJOLICA (page 8) After removing the packaging from the chimney stove, before positioning it in the specific place, perform the disassembly of the parts as indicated here below: 1- Remove from the hearth case the parts insi<strong>de</strong> 2- Remove the majolica cap (A) placed on the upper part of the stove 3- After unscrewing the 4 nuts (B), remove the cast iron grates: on the si<strong>de</strong>s (C) and on the front (D) 4- Unscrew the 6 screws (F) and remove the sockets: on the si<strong>de</strong>s (G) and on the front (H) 5- After positioning the stove in its place, proceed as follows: a) position the upper <strong>de</strong>flector (I) as shown in the figure of the lower right section (frontally it must lay on the 3 screws 6MA) b) mount the hearth in refractory, following the sequence indicated on the left bottom c) then place the lower <strong>de</strong>flector (L) 6- Mount again the sockets and fix them with the related 6 screws 7- Starting from the top, hook one of the tiles (E) into the suitable cavities of the si<strong>de</strong> wall and introduce the two anchoring rods up to the lower end of the tile. Following the same procedure, mount the three remaining tiles. When all tiles have been fixed, pay attention that the rods are totally introduced. Proceed then with the other si<strong>de</strong> of the stove. 8- Mount again the grates, following the numbering indicated on the parts, starting from front nr. 1. Then fix the 4 nuts. 9- Place the majolica cap into the suitable seat CAUTION: Verify the centering of the chimney exhaust (P) compared to the hole in the majolica cap. If necessary, loosen the grates and move them where required. 2. STELLUNG DES KAMINOFENS <strong>STELLA</strong> MAJOLIKA (seihte 8) Nach<strong>de</strong>m Sie die Verpackung weggenommen haben, und früher <strong>de</strong>r Stellung <strong>de</strong>s <strong>Kaminofen</strong>s, <strong>de</strong>montieren Sie die Teile wie folgt: 1. Nehmen Sie die Teile weg, die in <strong>de</strong>m Feuerraum befin<strong>de</strong>n. 2. Nehmen Sie <strong>de</strong>n Deckel auf Majolika weg (A), <strong>de</strong>r in <strong>de</strong>m oberen Teil <strong>de</strong>s Ofens steht. 3. Drehen Sie die 4 Schrauben aus (B), nehmen Sie die seitlichen (C) und vor<strong>de</strong>ren (D) Roste aus Gusseisen weg. 4. Drehen Sie die 6 Schrauben (F) und ziehen Sie die seitlichen (G) und vor<strong>de</strong>ren (H) Schamotte aus. 5. Stellen Sie <strong>de</strong>n Ofen in <strong>de</strong>m bestimmten Platz und dann fortfahren Sie wie folgt: a) Stellen Sie <strong>de</strong>n oberen Ablenker (I) wie gezeigt in <strong>de</strong>r unteren rechten Abbildung, (In <strong>de</strong>m vor<strong>de</strong>ren Teil muß er auf die 3 Schrauben 6MA stützen). b) Montieren Sie <strong>de</strong>n Herd auf Schamotte wie gezeigt in <strong>de</strong>r unteren linken Abbildung c) Stellen Sie <strong>de</strong>n unteren Ablenker (L). 6. Montieren Sie die Schamotte und befestigen Sie die 6 Schrauben 7. Hängen Sie von oben herab die Kacheln (E) in <strong>de</strong>n dafür vorgesehenen seitlichen Höhlen an und dann stecken Sie die Stäbchen bis die untere En<strong>de</strong> <strong>de</strong>r Kachel. Sowie alle Kacheln fixiert wor<strong>de</strong>n sein, müssen die Stäbchen völlig gesteckt sein. Vorgehen Sie nach diesem Verfahren in <strong>de</strong>r an<strong>de</strong>ren Seite <strong>de</strong>s Ofens. 8. Montieren Sie die Roste nach <strong>de</strong>r Nummerierung <strong>de</strong>r Teile, (ab <strong>de</strong>m vor<strong>de</strong>ren Teil, Nummer 1) dann befestigen Sie die 4 Schrauben. 9. Bringen <strong>de</strong>n Deckel auf Majolika in <strong>de</strong>m Gehäuse an. WARNUNG: Prüfen Sie die Zentrierung <strong>de</strong>s Kaminauspuffrohrs (P) im Vergleich zu <strong>de</strong>m Loch <strong>de</strong>s Deckels auf Majolika. Im Falle, lösen und verschieben Sie die Roste. Istruzioni uso e manutenzione / Instructions for installation / Aufstell- und <strong>Bedienungsanleitung</strong> – IT – EN – DE – Rev.02 7