Bedienungsanleitung LaNordica STELLA - Kaminofen-Shop24h.de
Bedienungsanleitung LaNordica STELLA - Kaminofen-Shop24h.de
Bedienungsanleitung LaNordica STELLA - Kaminofen-Shop24h.de
Create successful ePaper yourself
Turn your PDF publications into a flip-book with our unique Google optimized e-Paper software.
Stufa camino / Chimney stove / <strong>Kaminofen</strong> <strong>STELLA</strong><br />
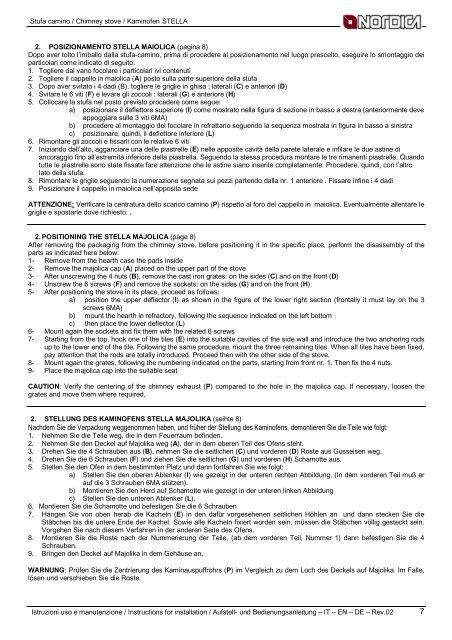
2. POSIZIONAMENTO <strong>STELLA</strong> MAIOLICA (pagina 8)<br />
Dopo aver tolto l’imballo dalla stufa-camino, prima di proce<strong>de</strong>re al posizionamento nel luogo prescelto, eseguire lo smontaggio <strong>de</strong>i<br />
particolari come indicato di seguito:<br />
1. Togliere dal vano focolare i particolari ivi contenuti<br />
2. Togliere il cappello in maiolica (A) posto sulla parte superiore <strong>de</strong>lla stufa<br />
3. Dopo aver svitato i 4 dadi (B), togliere le griglie in ghisa : laterali (C) e anteriori (D)<br />
4. Svitare le 6 viti (F) e levare gli zoccoli : laterali (G) e anteriore (H)<br />
5. Collocare la stufa nel posto previsto proce<strong>de</strong>re come segue:<br />
a) posizionare il <strong>de</strong>flettore superiore (I) come mostrato nella figura di sezione in basso a <strong>de</strong>stra (anteriormente <strong>de</strong>ve<br />
appoggiare sulle 3 viti 6MA)<br />
b) proce<strong>de</strong>re al montaggio <strong>de</strong>l focolare in refrattario seguendo la sequenza mostrata in figura in basso a sinistra<br />
c) posizionare, quindi, il <strong>de</strong>flettore inferiore (L)<br />
6. Rimontare gli zoccoli e fissarli con le relative 6 viti<br />
7. Iniziando dall’alto, agganciare una <strong>de</strong>lle piastrelle (E) nelle apposite cavità <strong>de</strong>lla parete laterale e infilare le due astine di<br />
ancoraggio fino all’estremità inferiore <strong>de</strong>lla piastrella. Seguendo la stessa procedura montare le tre rimanenti piastrelle. Quando<br />
tutte le piastrelle sono state fissate fare attenzione che le astine siano inserite completamente. Proce<strong>de</strong>re, quindi, con l’altro<br />
lato <strong>de</strong>lla stufa.<br />
8. Rimontare le griglie seguendo la numerazione segnata sui pezzi partendo dalla nr. 1 anteriore . Fissare infine i 4 dadi<br />
9. Posizionare il cappello in maiolica nell’apposita se<strong>de</strong><br />
ATTENZIONE: Verificare la centratura <strong>de</strong>llo scarico camino (P) rispetto al foro <strong>de</strong>l cappello in maiolica. Eventualmente allentare le<br />
griglie e spostarle dove richiesto. .<br />
2. POSITIONING THE <strong>STELLA</strong> MAJOLICA (page 8)<br />
After removing the packaging from the chimney stove, before positioning it in the specific place, perform the disassembly of the<br />
parts as indicated here below:<br />
1- Remove from the hearth case the parts insi<strong>de</strong><br />
2- Remove the majolica cap (A) placed on the upper part of the stove<br />
3- After unscrewing the 4 nuts (B), remove the cast iron grates: on the si<strong>de</strong>s (C) and on the front (D)<br />
4- Unscrew the 6 screws (F) and remove the sockets: on the si<strong>de</strong>s (G) and on the front (H)<br />
5- After positioning the stove in its place, proceed as follows:<br />
a) position the upper <strong>de</strong>flector (I) as shown in the figure of the lower right section (frontally it must lay on the 3<br />
screws 6MA)<br />
b) mount the hearth in refractory, following the sequence indicated on the left bottom<br />
c) then place the lower <strong>de</strong>flector (L)<br />
6- Mount again the sockets and fix them with the related 6 screws<br />
7- Starting from the top, hook one of the tiles (E) into the suitable cavities of the si<strong>de</strong> wall and introduce the two anchoring rods<br />
up to the lower end of the tile. Following the same procedure, mount the three remaining tiles. When all tiles have been fixed,<br />
pay attention that the rods are totally introduced. Proceed then with the other si<strong>de</strong> of the stove.<br />
8- Mount again the grates, following the numbering indicated on the parts, starting from front nr. 1. Then fix the 4 nuts.<br />
9- Place the majolica cap into the suitable seat<br />
CAUTION: Verify the centering of the chimney exhaust (P) compared to the hole in the majolica cap. If necessary, loosen the<br />
grates and move them where required.<br />
2. STELLUNG DES KAMINOFENS <strong>STELLA</strong> MAJOLIKA (seihte 8)<br />
Nach<strong>de</strong>m Sie die Verpackung weggenommen haben, und früher <strong>de</strong>r Stellung <strong>de</strong>s <strong>Kaminofen</strong>s, <strong>de</strong>montieren Sie die Teile wie folgt:<br />
1. Nehmen Sie die Teile weg, die in <strong>de</strong>m Feuerraum befin<strong>de</strong>n.<br />
2. Nehmen Sie <strong>de</strong>n Deckel auf Majolika weg (A), <strong>de</strong>r in <strong>de</strong>m oberen Teil <strong>de</strong>s Ofens steht.<br />
3. Drehen Sie die 4 Schrauben aus (B), nehmen Sie die seitlichen (C) und vor<strong>de</strong>ren (D) Roste aus Gusseisen weg.<br />
4. Drehen Sie die 6 Schrauben (F) und ziehen Sie die seitlichen (G) und vor<strong>de</strong>ren (H) Schamotte aus.<br />
5. Stellen Sie <strong>de</strong>n Ofen in <strong>de</strong>m bestimmten Platz und dann fortfahren Sie wie folgt:<br />
a) Stellen Sie <strong>de</strong>n oberen Ablenker (I) wie gezeigt in <strong>de</strong>r unteren rechten Abbildung, (In <strong>de</strong>m vor<strong>de</strong>ren Teil muß er<br />
auf die 3 Schrauben 6MA stützen).<br />
b) Montieren Sie <strong>de</strong>n Herd auf Schamotte wie gezeigt in <strong>de</strong>r unteren linken Abbildung<br />
c) Stellen Sie <strong>de</strong>n unteren Ablenker (L).<br />
6. Montieren Sie die Schamotte und befestigen Sie die 6 Schrauben<br />
7. Hängen Sie von oben herab die Kacheln (E) in <strong>de</strong>n dafür vorgesehenen seitlichen Höhlen an und dann stecken Sie die<br />
Stäbchen bis die untere En<strong>de</strong> <strong>de</strong>r Kachel. Sowie alle Kacheln fixiert wor<strong>de</strong>n sein, müssen die Stäbchen völlig gesteckt sein.<br />
Vorgehen Sie nach diesem Verfahren in <strong>de</strong>r an<strong>de</strong>ren Seite <strong>de</strong>s Ofens.<br />
8. Montieren Sie die Roste nach <strong>de</strong>r Nummerierung <strong>de</strong>r Teile, (ab <strong>de</strong>m vor<strong>de</strong>ren Teil, Nummer 1) dann befestigen Sie die 4<br />
Schrauben.<br />
9. Bringen <strong>de</strong>n Deckel auf Majolika in <strong>de</strong>m Gehäuse an.<br />
WARNUNG: Prüfen Sie die Zentrierung <strong>de</strong>s Kaminauspuffrohrs (P) im Vergleich zu <strong>de</strong>m Loch <strong>de</strong>s Deckels auf Majolika. Im Falle,<br />
lösen und verschieben Sie die Roste.<br />
Istruzioni uso e manutenzione / Instructions for installation / Aufstell- und <strong>Bedienungsanleitung</strong> – IT – EN – DE – Rev.02 7


