

Skin Chart Customer Service Information
Skin Chart Customer Service Information
Skin Chart Customer Service Information

You also want an ePaper? Increase the reach of your titles
YUMPU automatically turns print PDFs into web optimized ePapers that Google loves.
Getting Acquainted With i-Light<br />
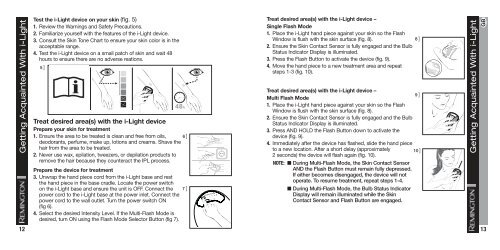
Test the i-Light device on your skin (fig. 5)<br />
1. Review the Warnings and Safety Precautions.<br />
2. Familiarize yourself with the features of the i-Light device.<br />
3. Consult the <strong>Skin</strong> Tone <strong>Chart</strong> to ensure your skin color is in the<br />
acceptable range.<br />
4. Test the i-Light device on a small patch of skin and wait 48<br />
hours to ensure there are no adverse reations.<br />
5 ]<br />
Treat desired area(s) with the i-Light device<br />
Prepare your skin for treatment<br />
1. Ensure the area to be treated is clean and free from oils,<br />
deodorants, perfume, make up, lotions and creams. Shave the<br />
hair from the area to be treated.<br />
2. Never use wax, epilation, tweezers, or depilation products to<br />
remove the hair because they counteract the IPL process.<br />
Prepare the device for treatment<br />
3. Unwrap the hand piece cord from the i-Light base and rest<br />
the hand piece in the base cradle. Locate the power switch<br />
on the i-Light base and ensure the unit is OFF. Connect the<br />
power cord to the i-Light base at the power inlet. Connect the<br />
power cord to the wall outlet. Turn the power switch ON<br />
(fig 6).<br />
4. Select the desired Intensity Level. If the Multi-Flash Mode is<br />
desired, turn ON using the Flash Mode Selector Button (fig 7).<br />
48h<br />
6 ]<br />
7 ]<br />
Treat desired area(s) with the i-Light device –<br />
Single Flash Mode<br />
1. Place the i-Light hand piece against your skin so the Flash<br />
Window is flush with the skin surface (fig. 8).<br />
2. Ensure the <strong>Skin</strong> Contact Sensor is fully engaged and the Bulb<br />
Status Indicator Display is illuminated.<br />
3. Press the Flash Button to activate the device (fig. 9).<br />
4. Move the hand piece to a new treatment area and repeat<br />
steps 1-3 (fig. 10).<br />
Treat desired area(s) with the i-Light device –<br />
9 ]<br />
Multi Flash Mode<br />
1. Place the i-Light hand piece against your skin so the Flash<br />
Window is flush with the skin surface (fig. 8).<br />
2. Ensure the <strong>Skin</strong> Contact Sensor is fully engaged and the Bulb<br />
Status Indicator Display is illuminated.<br />
3. Press AND HOLD the Flash Button down to activate the<br />
device (fig. 9).<br />
4. Immediately after the device has flashed, slide the hand piece<br />
to a new location. After a short delay (approximately<br />
10 ]<br />
2 seconds) the device will flash again (fig. 10).<br />
NOTE: ■ During Multi-Flash Mode, the <strong>Skin</strong> Contact Sensor<br />
AND the Flash Button must remain fully depressed.<br />
If either becomes disengaged, the device will not<br />
operate. To resume treatment, repeat steps 1-4.<br />
■ During Multi-Flash Mode, the Bulb Status Indicator<br />
Display will remain illuminated while the <strong>Skin</strong><br />
Contact Sensor and Flash Button are engaged.<br />
12 13<br />
8 ]<br />
Getting Acquainted With i-Light<br />
GB<br />
100827_REM_IFU_IPL5000_21L GB12-GB13 05.11.10 13:25