INSTRUCTIONS FOR USE BUILT-IN SEPARATOR - Brabantia
INSTRUCTIONS FOR USE BUILT-IN SEPARATOR - Brabantia
INSTRUCTIONS FOR USE BUILT-IN SEPARATOR - Brabantia

You also want an ePaper? Increase the reach of your titles
YUMPU automatically turns print PDFs into web optimized ePapers that Google loves.
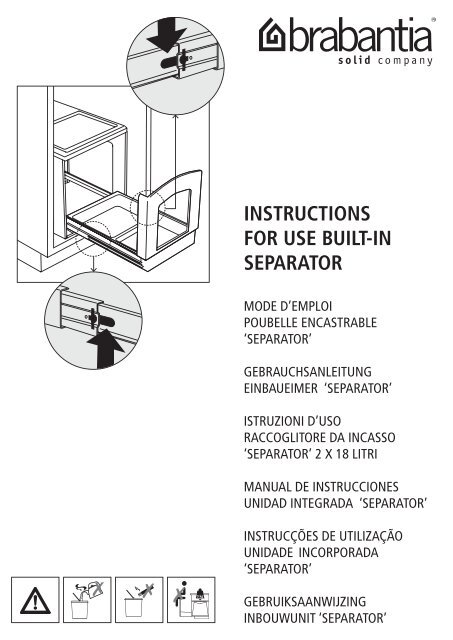
<strong><strong>IN</strong>STRUCTIONS</strong><br />
<strong>FOR</strong> <strong>USE</strong> <strong>BUILT</strong>-<strong>IN</strong><br />
<strong>SEPARATOR</strong><br />
MODE D’EMPLOI<br />
POUBELLE ENCASTRABLE<br />
‘<strong>SEPARATOR</strong>’<br />
GEBRAUCHSANLEITUNG<br />
E<strong>IN</strong>BAUEIMER ‘<strong>SEPARATOR</strong>’<br />
ISTRUZIONI D’USO<br />
RACCOGLITORE DA <strong>IN</strong>CASSO<br />
‘<strong>SEPARATOR</strong>’ 2 x 18 LITRI<br />
MANUAL DE <strong>IN</strong>STRUCCIONES<br />
UNIDAD <strong>IN</strong>TEGRADA ‘<strong>SEPARATOR</strong>’<br />
<strong>IN</strong>STRUCÇÕES DE UTILIZAÇÃO<br />
UNIDADE <strong>IN</strong>CORPORADA<br />
‘<strong>SEPARATOR</strong>’<br />
GEBRUIKSAANWIJZ<strong>IN</strong>G<br />
<strong>IN</strong>BOUWUNIT ‘<strong>SEPARATOR</strong>’
CONTENTS • CONTENU DE L’EMBALLAGE • <strong>IN</strong>HALT VERPACKUNG • CONTENUTO CONFEZIONE<br />
CONTENIDO DEL PAQUETE • CONTEÚDO DA EMBALAGEM • <strong>IN</strong>HOUD VERPAKK<strong>IN</strong>G<br />
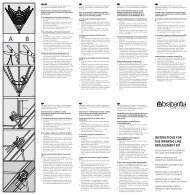
FIX<strong>IN</strong>G • FIXATION • BEFESTIGUNG • FISSAGGIO • FIJACIÓN • FIXAÇÃO • BEVESTIG<strong>IN</strong>G<br />
01 02<br />
• Beware not to drill through electric, water or gas pipes.<br />
• Please allow for the thickness of the hinges on the inside of the<br />
cupboard door. Check whether the cupboard door will close properly,<br />
and if needed move the Separator a little bit further into the cupboard<br />
before finally fixing.<br />
min. 400 mm<br />
03<br />
• Attention à ne pas percer fils éléctriques, tuyaux d’eau ou de gaz.<br />
• Veuillez considérer une possible épaisseur des charnières à l’intérieur<br />
de la porte du placard. Vérifiez avant le montage final que la porte<br />
du placard se referme convenablement et déplacez si nécessaire la<br />
‘Separator’ un peu plus loin dans le placard.<br />
04<br />
• Bitte achten Sie darauf nicht in Elektro-/ Wasser-/ oder Gasleitungen<br />
zu bohren.<br />
• Bitte berücksichtigen Sie auch die Dicke der Scharniere an der Innenseite<br />
der Schranktüre. Bevor Sie die endgültige Befestigung vornehmen,<br />
überprüfen Sie zunächst, ob die Schranktüre sich komplett schließen<br />
läßt. Falls notwendig, können Sie so den Mülltrenner immer noch<br />
weiter in den Schrank schieben.<br />
Ø 2 mm<br />
05<br />
• Assicurarsi di non forare le tubazioni di gas, acqua o energia elettrica.<br />
• Tenere in considerarazione lo spessore delle cerniere all’interno<br />
dell’armadietto. Prima del fissaggio definitivo, controllare che lo<br />
sportello si apra e si richiuda perfettamente ed eventualmente spingere<br />
ancora un poco il raccoglitore all’interno.<br />
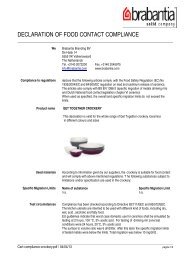
402<br />
48<br />
65<br />
48<br />
06<br />
• Tenga cuidado de no taladrar conductos eléctricos, de agua o gas.<br />
• Debe contar con un posible grosor de las bisagras en la parte interior<br />
de la puerta del armario. Antes de fijar el cubo definitivamente,<br />
compruebe si la puerta del armario cierra correctamente y mueva el<br />
Separator un poco más hacia el interior del armario.<br />
286<br />
07<br />
• Tenha cuidado para não perfurar tubos eléctricos, de água ou de gás.<br />
• Por favor, contar com a possível espessura das dobradiças no interior<br />
do armário. Antes da fixação final verifique se a porta do armário fecha<br />
correctamente e se necessário afaste um pouco mais o Separator.<br />
•<br />
08<br />
• Let op dat u niet in gas-, water- of electriciteitsleidingen boort.<br />
• Houd rekening met een eventuele dikte van de scharnieren aan de<br />
binnenzijde van de kastdeur. Controleer voor de bevestiging of de deur<br />
nog goed sluit en schuif indien nodig de Separator wat dieper in de<br />
kast.<br />
5