drive - Leister
drive - Leister
drive - Leister

Create successful ePaper yourself
Turn your PDF publications into a flip-book with our unique Google optimized e-Paper software.
Welding preparation<br />
<strong>Leister</strong> DRIVE<br />
120<br />
230<br />
Connect tool to rated voltage.<br />
Rated voltage stated on the device must correspond to line/mains voltage.<br />
Extract hot-air blower in case of power breakdown.<br />
• Start up hot air blower <strong>Leister</strong> TRIAC AT or TRIAC ST (see separate operating<br />
instructions):<br />
– Adjust temperature by means of potentiometer<br />
– Switch on mains switch<br />
– Warm up time approx. 4 min.<br />
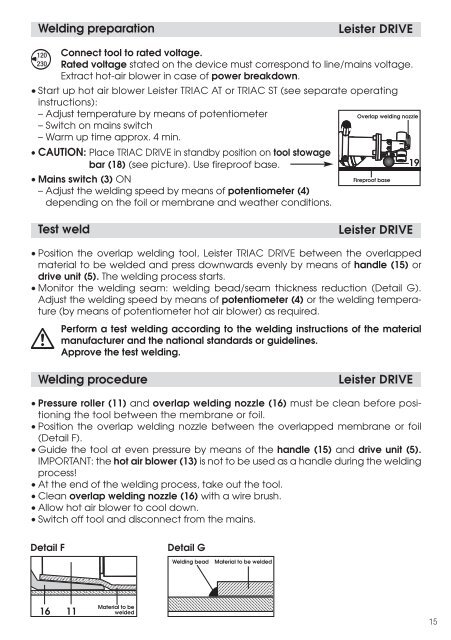
• CAUTION: Place TRIAC DRIVE in standby position on tool stowage<br />
bar (18) (see picture). Use fireproof base.<br />
• Mains switch (3) ON<br />
Fireproof base<br />
– Adjust the welding speed by means of potentiometer (4)<br />
depending on the foil or membrane and weather conditions.<br />
Overlap welding nozzle<br />
19<br />
Test weld<br />
<strong>Leister</strong> DRIVE<br />
• Position the overlap welding tool, <strong>Leister</strong> TRIAC DRIVE between the overlapped<br />
material to be welded and press downwards evenly by means of handle (15) or<br />
<strong>drive</strong> unit (5). The welding process starts.<br />
• Monitor the welding seam: welding bead/seam thickness reduction (Detail G).<br />
Adjust the welding speed by means of potentiometer (4) or the welding temperature<br />
(by means of potentiometer hot air blower) as required.<br />
Perform a test welding according to the welding instructions of the material<br />
manufacturer and the national standards or guidelines.<br />
Approve the test welding.<br />
Welding procedure<br />
<strong>Leister</strong> DRIVE<br />
• Pressure roller (11) and overlap welding nozzle (16) must be clean before positioning<br />
the tool between the membrane or foil.<br />
• Position the overlap welding nozzle between the overlapped membrane or foil<br />
(Detail F).<br />
• Guide the tool at even pressure by means of the handle (15) and <strong>drive</strong> unit (5).<br />
IMPORTANT: the hot air blower (13) is not to be used as a handle during the welding<br />
process!<br />
• At the end of the welding process, take out the tool.<br />
• Clean overlap welding nozzle (16) with a wire brush.<br />
• Allow hot air blower to cool down.<br />
• Switch off tool and disconnect from the mains.<br />
Detail F<br />
Detail G<br />
Welding bead<br />
Material to be welded<br />
16 11<br />
Material to be<br />
welded<br />
15