EQUINOX - Peavey.com
EQUINOX - Peavey.com
EQUINOX - Peavey.com

You also want an ePaper? Increase the reach of your titles
YUMPU automatically turns print PDFs into web optimized ePapers that Google loves.
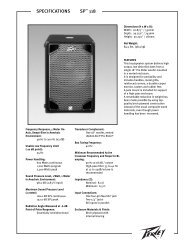
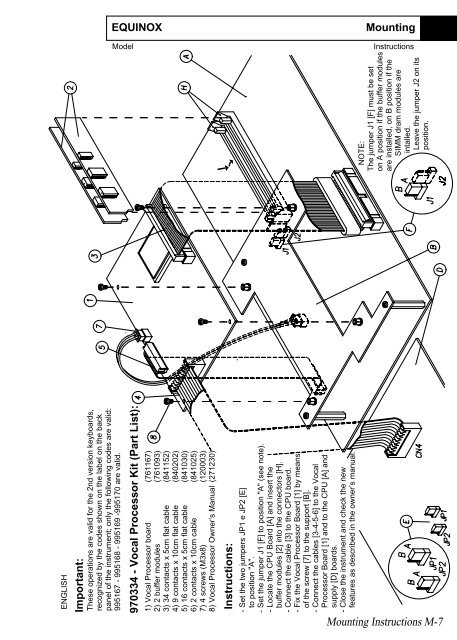
NOTE:<br />
The jumper J1 [F] must be set<br />
on A position if the buffer modules<br />
are installed, on B position if the<br />
SIMM dram modules are<br />
intalled.<br />
Leave the jumper J2 on its<br />
position.<br />
<strong>EQUINOX</strong><br />
Model<br />
Mounting<br />
Instructions<br />
Mounting Instructions M-7<br />
ENGLISH<br />
Important:<br />
These operations are valid for the 2nd version keyboards,<br />
recognized by the codes shown on the label on the back<br />
panel of the instrument; only the following codes are valid:<br />
995167 - 995168 - 995169 -995170 are valid.<br />
970334 - Vocal Processor Kit (Part List):<br />
1) Vocal Processor board<br />
(761167)<br />
2) 2 buffer modules<br />
(761093)<br />
3) 34 contacts x 5cm flat cable (841152)<br />
4) 9 contacts x 10cm flat cable (840202)<br />
5) 16 contacts x 5cm flat cable (841030)<br />
6) 2 contacts x 10cm cable (841025)<br />
7) 4 screws (M3x8)<br />
(120003)<br />
8) Vocal Processor Owner’s Manual (271230)<br />
Instructions:<br />
- Set the two jumpers JP1 e JP2 [E]<br />
to position "A".<br />
- Set the jumper J1 [F] to position "A" (see note).<br />
- Locate the CPU Board [A] and insert the<br />
buffer modules [2] into the connectors [H].<br />
- Connect the cable [3] to the CPU board.<br />
- Fix the Vocal Processor Board [1] by means<br />
of the screw [7] to the support [B].<br />
- Connect the cables [3-4-5-6] to the Vocal<br />
Processor Board [1] and to the CPU [A] and<br />
supply [D] boards.<br />
- Close the instrument and check the new<br />
features as described in the owner’s manual.