ECE R44.04 UnivERsal 9-18kg 04444201 - Halfords
ECE R44.04 UnivERsal 9-18kg 04444201 - Halfords
ECE R44.04 UnivERsal 9-18kg 04444201 - Halfords

You also want an ePaper? Increase the reach of your titles
YUMPU automatically turns print PDFs into web optimized ePapers that Google loves.
GB<br />
If you need help. Please contact our Customer Service<br />
Department with any questions you may have concerning<br />
parts, use, or maintenance. When you contact us, please<br />
have your product’s model number and manufactured<br />
in (date) ready so that we may help you efficiently. The<br />
numbers can be found on a sticker on the underside of your<br />
child restraint.<br />
UK & Ireland<br />
Graco Children’s Products<br />
Halifax Avenue<br />
Fradley Park<br />
Lichfield WS13 8SS<br />
United Kingdom<br />
Newell Rubbermaid A/S<br />
Stamholmen 157<br />
3.sal DK-2650 Hvidovre<br />
Konsumentkontakt<br />
RUBBERMAID FRANCE SAS<br />
18 AVENUE DU GUIMAND<br />
26120 MALISSARD<br />
FRANCE<br />
WARNINGS to parents and other users.<br />
Failure to properly use this child restraint increases the risk of<br />
serious injury or death in a sharp turn, sudden stop or crash.<br />
Your child’s safety depends on you installing and using this<br />
child restraint correctly. Use ONLY forward facing.<br />
Even if using this child restraint seems easy to figure out on<br />
your own, it is very important to READ, UNDERSTAND AND<br />
FOLLOW THE OWNER’S MANUAL.<br />
The manual should be stored in the slot below the recline<br />
lever. You must also read your vehicle owner’s manual.<br />
Your child’s safety depends on:<br />
1. Inserting the harness straps in the proper slots for<br />
your child.<br />
2. Properly securing your child in the child restraint.<br />
3. Selecting a suitable location for the child restraint in<br />
your vehicle.<br />
4. Properly routing and securing the vehicle seat belt.<br />
IMPORTANT WARNING<br />
1. This is a “Universal” child restraint. It is approved to Regulation<br />
No. 44, 04 series of amendments, for general use in<br />
vehicles and it will fit most, but not all, car seats.<br />
2. A correct fit is likely if the vehicle manufacturer has<br />
declared in the vehicle handbook that the vehicle is<br />
capable of accepting a “Universal” child restraint for this<br />
age group.<br />
3. This child restraint has been classified as “Universal” under<br />
more stringent conditions than those which applied to<br />
earlier designs which do not carry this notice.<br />
4. If in doubt, consult either the child restraint manufacturer<br />
or the retailer.<br />
5. Only suitable if the approved vehicles are fitted with 3<br />
point/static/with retractor safetybelts, approved to UN/<br />
<strong>ECE</strong> Regulation No. 16 or other equivalent standards.<br />
1<br />
IMPORTANT PLEASE READ<br />
• DO NOT INSTALL OR USE THIS CHILD RESTRAINT<br />
UNTIL YOU READ AND UNDERSTAND THE INSTRUC-<br />
TIONS IN THIS MANUAL AND IN YOUR VEHICLE<br />
OWNER’S MANUAL. DO NOT let others install or use the<br />
child restraint unless they understand how to use it.<br />
• FAILURE TO PROPERLY USE THIS CHILD RESTRAINT<br />
INCREASES THE RISK OF SERIOUS INJURY OR DEATH<br />
IN A SHARP TURN, SUDDEN STOP OR CRASH. Your<br />
child can be injured in a vehicle even if you are not in a<br />
crash. Sudden braking and sharp turns can injure your<br />
child if the child restraint is not properly installed or if<br />
your child is not properly secured in the child restraint.<br />
• PLACE THIS CHILD RESTRAINT IN A FORWARD FAC-<br />
ING POSITION ONLY.<br />
• NEVER PLACE THIS CHILD RESTRAINT IN A VEHICLE<br />
SEATING LOCATION THAT HAS A FRONT AIR BAG. If<br />
an air bag inflates, it can hit the child and child restraint<br />
with great force and cause serious injury or death to your<br />
child. Refer to your vehicle owner’s manual for information<br />
about side air bags and child restraint installation.<br />
• According to accident statistics, CHILDREN ARE SAFER<br />
WHEN PROPERLY RESTRAINED IN REAR VEHICLE<br />
SEATING POSITIONS RATHER THAN FRONT SEATING<br />
POSITIONS. For a vehicle with a front passenger air bag,<br />
refer to your vehicle owner’s manual as well as these<br />
instructions for child restraint installation.<br />
• NEVER LEAVE YOUR CHILD UNATTENDED.<br />
• NEVER LEAVE A CHILD RESTRAINT UNSECURED IN<br />
YOUR VEHICLE. An unsecured child restraint can be<br />
thrown around and may injure occupants in a sharp turn,<br />
sudden stop or crash. Remove it or make sure that it is<br />
securely belted in the vehicle.<br />
• It is recommended that any luggage or other objects<br />
liable to cause injuries in the event of a collision shall be<br />
properly secured.<br />
• REPLACE THE CHILD RESTRAINT AFTER AN ACCIDENT<br />
OF ANY KIND.<br />
An accident can cause damage to the child restraint that<br />
you cannot see.<br />
• DO NOT MODIFY YOUR CHILD RESTRAINT or use any<br />
accessories or parts supplied by other manufacturers.<br />
• NEVER USE CHILD RESTRAINT IF IT HAS DAMAGED<br />
OR MISSING PARTS. DO NOT use a cut, frayed or damaged<br />
child restraint harness or vehicle seat belt.<br />
• THE HARNESS COVERS ARE IMPORTANT for the safety<br />
of your child, therefore use them at all times.<br />
DO NOT use another manufacturers seat cover with this<br />
child restraint. See your retailer for Graco replacement<br />
parts only.<br />
DO NOT USE in any configuration not shown in the<br />
instructions.<br />
DO NOT MODIFY YOUR child restraint or use any<br />
accessories or parts supplied by other manufacturers.<br />
• THE RIGID ITEMS AND PLASTIC PARTS of this child<br />
restraint must be so located and installed that they are<br />
not liable, during everyday use of the vehicle, to become<br />
trapped by a movable seat or in a door of a vehicle.<br />
• THE CHILD RESTRAINT CAN BECOME VERY HOT<br />
IF LEFT IN THE SUN. Contact with these parts can<br />
burn your child’s skin. Always touch the surface of any<br />
metal or plastic parts before putting your child in the<br />
child restraint.<br />
• THIS CHILD RESTRAINT CONFORMS to the European<br />
Regulation R44-04 for Group 1 (9-<strong>18kg</strong>).<br />
2<br />
TO AVOID SERIOUS INJURY OR DEATH DO NOT USE THE<br />
CHILD RESTRAINT FOR A CHILD LARGER OR SMALLER<br />
THEN THE WEIGHT RANGE LISTED BELOW.<br />
Your child MUST meet ALL requirements:<br />
• WEIGHT: 9 to 18 kg (20 to 40 lbs)<br />
• At least one year old and can sit upright unassisted<br />
• Top harness slots are AT OR ABOVE child’s shoulders.<br />
• The child’s ears are below top of child restraint.<br />
3<br />
4<br />
5<br />
6<br />
7<br />
8<br />
9<br />
10<br />
11<br />
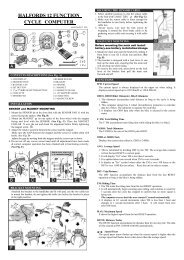
Using Child Restraint Harness<br />
Positioning the Harness Straps<br />
1. Loosen the harness straps by lifting the adjustment<br />
lever on the front of the seat and pulling the straps<br />
out as far as they will come at the shoulders.<br />
2. Unbuckle harness straps. Lay the harness straps over the<br />
sides of the seat to avoid the harness twisting.<br />
3. Place child in the seat. The harness straps must go in<br />
the slots even with or just above the shoulders.<br />
If straps are already in the proper slots, go to step 6.<br />
4. To adjust harness straps:<br />
a) Recline the seat by squeezing the recline lever up and<br />
pulling the seat forward, so you will have access to the<br />
back of the seat.<br />
b) From the side of the seat, pull the harness and metal junction<br />
plate out and remove straps from metal junction plate.<br />
c) Pull strap ends through slots and reinsert them in the<br />
correct slots as determined in step 3.<br />
Check that the straps are not twisted.<br />
d) Reassemble straps onto metal junction plate exactly as<br />
shown. Check that straps are completely within the slots<br />
and that they are not twisted.<br />
e) Check that the straps are inserted at the same level and<br />
that they are not twisted. A twisted belt may keep the<br />
harness from working properly. Pull on harness to make<br />
sure it is secure.<br />
12<br />
13<br />
14<br />
5. Harness Adjustment<br />
Loosen the harness straps by lifting the harness release<br />
lever on the front of the seat while pulling the straps out at<br />
the shoulders as shown.<br />
Tighten the harness straps by pulling the adjustment strap<br />
on the front of the seat.<br />
(See also, Securing Your Child in the Child Restraint)<br />
REMEMBER to check the shoulder straps as your child<br />
grows and move them to the next position when<br />
necessary. The harness straps must go in the slots even<br />
with or just above the shoulders.<br />
Securing Your Child in the Child Restraint<br />
• ADJUST THE HARNESS SYSTEM SNUGLY EVERY TIME<br />
you place your child in the child restraint.<br />
• Avoid bulky clothing.<br />
6. Place child in child restraint with child’s back flat against<br />
back of child restraint.<br />
7. Place harness straps over child’s shoulders and insert<br />
tongues into buckle.<br />
CHECK that straps are not twisted.<br />
CHECK that harness is securely latched by pulling up<br />
on straps.<br />
DO NOT use child restraint if harness does not latch.<br />
15<br />
16<br />
17<br />
18<br />
19<br />
8. Pull the adjustment strap to securely tighten the<br />
harness.<br />
9. Make sure straps are flat and tight against<br />
child’s shoulders. You should not be able to pinch<br />
the harness straps. A snug strap should not allow any<br />
slack. It lies in a relatively straight line without<br />
sagging. It does not press on the child’s flesh or push<br />
the child’s body into an unnatural position.<br />
Child Restraint Location<br />
Vehicle Seat Requirements<br />
IMPROPER PLACEMENT OF THE CHILD RESTRAINT<br />
INCREASES THE RISK OF SERIOUS INJURY<br />
OR DEATH. Some seating positions in your vehicle may<br />
not be safe for this child restraint. Some vehicles do<br />
not have any seating positions that can be used safely<br />
with the child restraint.<br />
• Children are safer when properly restrained in<br />
rear vehicle seating positions.<br />
Whenever possible secure the child restraint in<br />
the center position of the seat directly behind the<br />
front seats.<br />
• The vehicle seat must face forward.<br />
20<br />
21<br />
22<br />
23<br />
24<br />
Vehicle Seat Belt Requirements<br />
MANY SEAT BELT SYSTEMS ARE NOT SAFE TO USE<br />
WITH THE CHILD RESTRAINT. THE VEHICLE SEAT BELT<br />
MUST BE DESIGNED TO HOLD THE CHILD RESTRAINT<br />
TIGHTLY AT ALL TIMES.<br />
Pay careful attention to these systems; some of the seat<br />
belts that are not safe to use look very much like seat belts<br />
that are safe to use.<br />
UNSAFE Vehicle Belt Systems<br />
DO NOT USE ANY OF THE FOLLOWING SYSTEMS TO SECURE<br />
THE CHILD RESTRAINT.<br />
• Lap Belts with Emergency Locking Retractor (ELR)<br />
This lap belt stays loose and can move until it locks in<br />
a crash or sudden stop.<br />
• Combination Lap/Shoulder Belt with Retractor<br />
Each strap has a retractor at one end and is attached<br />
to the latch plate at the other end.<br />
• Passive Restraint -Lap or Shoulder Belt Mounted<br />
on Door<br />
• Passive Restraint -Lap Belt with Motorized<br />
Shoulder Belt<br />
DO NOT use vehicle belts that are attached to the door<br />
in any way or that move along a track to automatically<br />
surround the passenger when the door is closed.<br />
• Lap Belts Forward of Seat Crease<br />
3 4 5<br />
25<br />
26<br />
27<br />
SAFE Vehicle Belt Systems<br />
THE FOLLOWING BELT SYSTEMS CAN BE USED WITH<br />
YOUR CHILD RESTRAINT, IF the seat location meets all<br />
other requirements of these instructions and those in your<br />
vehicle owner’s manual.<br />
• Combination Lap/Shoulder Belt with Locking<br />
Latch Plate<br />
Once it is buckled, this type of belt has a latch plate that<br />
will not allow the lap portion of the belt to loosen. Belt is<br />
tightened by pulling hard on the shoulder portion of the<br />
vehicle belt while pushing down on the child restraint.<br />
• Combination Lap/Shoulder Belt with Sliding Latch<br />
Plate<br />
This belt has a latchplate that slides freely along the belt.<br />
Belt is tightened by pulling hard on the shoulder<br />
portion of the vehicle belt while pushing down on the<br />
child restraint.<br />
Securing the Child Restraint in Your<br />
Vehicle With a Vehicle Lap/Shoulder Belt<br />
10. Place the child restraint firmly against the back of a<br />
forwardfacing vehicle seat.<br />
11. NEVER place the vehicle belt over the top of the child<br />
restraint.<br />
Recline the child restraint and thread the vehicle belt<br />
through the belt path.<br />
12. Buckle the vehicle belt.<br />
The vehicle belt should not be twisted or turned.<br />
28<br />
29<br />
30<br />
Only suitable for use in vehicles fitted with 3 point/static/with<br />
retractor safety-belts, approved to <strong>ECE</strong> Regulation No. 16 or<br />
other equivalent standards.<br />
13. Tighten vehicle seat belt<br />
Push down with your free hand or knee in the middle of<br />
the child restraint. Then pull and tighten the shoulder<br />
portion of the lap/shoulder belt.<br />
14. While pulling the shoulder portion of the lap/shoulder<br />
belt, lay the shoulder belt inside the opened lock-off and<br />
snap the lock-off over the shoulder belt.<br />
Place vehicle belt through the shoulder belt guide<br />
as shown.<br />
Two lock-offs are provided to allow for the seat to be<br />
installed on the right or left side of the vehicle seat.<br />
Only use one lock-off at a time. NEVER try to use both<br />
lock-offs when installing the child restraint.<br />
DO NOT try to close the lock-off over anything but the<br />
shoulder portion of the vehicle lap/shoulder belt.<br />
If any other part of the belt is in the way then try<br />
another seat location.<br />
15. Safety Check for Secure Installation<br />
31<br />
Perform this test every time you drive with your child.<br />
Holding the child restraint near the vehicle belt path,<br />
TWIST AND PULL the child restraint forward and to both<br />
sides to make sure the vehicle belt does not lengthen or<br />
loosen and the child restraint does not easily move.<br />
The child restraint should not move side to side or<br />
forward more than 1 inch (2.5 cm).<br />
If child restraint is loose or not secure, repeat procedure.<br />
32<br />
33<br />
34<br />
Using Recline<br />
16. To use recline: squeeze on recline lever at front of the<br />
seat and pull the seat forward into one of the 5 recline<br />
positions. When the seat is in the desired position,<br />
release the handle and push on the seat until you hear<br />
the seat lock into position.<br />
17. To put seat back into one of the upright positions,<br />
squeeze the recline handle and push the seat back.<br />
When the seat is in the desired position, release the<br />
handle and push on the seat until you hear the seat<br />
lock into position.<br />
Seat may be adjusted while child is seated. NEVER adjust<br />
the recline while driving.<br />
Using Body Support<br />
Body support is only to be used when the harness is threaded<br />
through the bottom set of slots. As the child grows and the<br />
harness moves to the top set of slots, remove body support.<br />
Care and Maintenance<br />
• CONTINUOUS USE OF CHILD RESTRAINT MAY CAUSE<br />
DAMAGE TO VEHICLE SEAT. Use a child restraint mat,<br />
towel or thin blanket to protect upholstery.<br />
• METAL AND PLASTIC PARTS:<br />
clean with mild soap and cool water. NO BLEACH OR<br />
DETERGENTS.<br />
• HARNESS STRAPS may be spot cleaned or replaced.<br />
DO NOT IMMERSE THE STRAPS IN WATER. Doing so may<br />
weaken the straps. NEVER iron the harness straps.<br />
• IF HARNESS STRAPS have cuts, fraying or become badly<br />
twisted, you must replace the straps.<br />
• BUCKLE AND HARNESS ADJUSTER may be cleaned<br />
with a damp cloth.<br />
• NEVER LUBRICATE THE BUCKLE. If buckle or harness<br />
adjuster sticks or will not remain tight, check for foreign<br />
objects such as food, dirt, etc. Remove objects with<br />
tweezers and/or clean with a cotton swab. If you cannot<br />
get the harness to remain tight with the buckle securely<br />
locked, do not use this child restraint. Call Graco to<br />
purchase a replacement harness or buckle.<br />
• NEVER USE A SECOND-HAND CHILD RESTRAINT or a<br />
child restraint whose history you do not know.<br />
• SEAT COVER may be cleaned with a damp sponge<br />
using mild soap and cool water. If necessary, cover may<br />
be removed for cleaning. DO NOT use child restraint<br />
without seat pad.<br />
To Wash Seat Pad<br />
18. DO NOT USE child restraint without the seat cover.<br />
19. Machine wash cover in cold water on delicate cycle and<br />
drip-dry. DO NOT USE BLEACH.