4287 RING BRL0379 Instructions Q7:BRL0373 Instructions - Halfords
4287 RING BRL0379 Instructions Q7:BRL0373 Instructions - Halfords
4287 RING BRL0379 Instructions Q7:BRL0373 Instructions - Halfords

Create successful ePaper yourself
Turn your PDF publications into a flip-book with our unique Google optimized e-Paper software.
A. Lamp<br />
B. Lamp<br />
C. Earth<br />
D. Switch<br />
E. Ignition Supply<br />
F. Scotchlok<br />
G. Vehicle Sidelight Circuit<br />
H. Electrical Connector<br />
I. 3A Blade Fuse<br />
1. Black and White tracer wire<br />
2. Black wire<br />
A. Faro<br />
B. Faro<br />
C. Tierra<br />
D. Interruptor<br />
E. Enchufe para la Ignición<br />
F. Conector Eléctrico<br />
G. Circuito de las luces de posición<br />
del vehiculo<br />
H. Conector Eléctrico<br />
I. Fusible de cuchilla 3A<br />
1. Hilo testigo blanco y negro<br />
2. Negro<br />
A. Lamp<br />
B. Lamp<br />
C. Aarde<br />
D. Schakelaar<br />
E. Ontstekingsstroom<br />
F. Elektriciteitscontact<br />
G. Stadslichtcircuit<br />
H. Elektriciteitscontact<br />
I. 3 A steekzekering<br />
1. Zwart-witte veiligheidsdraad<br />
2. Zwart<br />
Fitting <strong>Instructions</strong> for Ring Automotive<br />
Cruise-lite Ice Lamp Set (<strong>BRL0379</strong>) and<br />
Cruise-lite Diamond Ice Lamp Set (BRL0395)<br />
<strong>Instructions</strong> de Montage des Kits Lumière Ring Automotive<br />
Cruise-lite Ice (<strong>BRL0379</strong>) et Cruise-lite Diamond Ice (BRL0395)<br />
Einbauanleitung für Ring Automotive Cruise-lite Ice Lampen-Set (<strong>BRL0379</strong>)<br />
und Cruise-lite Diamond Ice Lampen-Set (BRL0395)<br />
A. Phare<br />
B. Phare<br />
C. Masse<br />
D. Interrupteur<br />
E. Alimentation Contact<br />
F. Connecteur électrique<br />
G. Circuit des feux de position<br />
du véhicule<br />
H. Connecteur électrique<br />
I. Fusible à lame 3A<br />
1. Fill rayé noir et blanc<br />
2. Noir<br />
A. Lys<br />
B. Lys<br />
C. Stelforbindelse<br />
D. Kontakt<br />
E. Tændingsforsyning<br />
F. Elektrisk stik<br />
G. Køretøjets sidelyskredsløb<br />
H. Elektrisk stik<br />
I. 3A-stiksikring<br />
1. Sort og hvid sporingsledning<br />
2. Sort<br />
A. Lampa<br />
B. Lampa<br />
C. Uziemienie<br />
D. Wyłącznik<br />
E. Zasilanie zapłonu<br />
F. Złącze elektryczne<br />
G. Obwód światel pozycyjnych<br />
pojazdu<br />
H. Złącze elektryczne<br />
I. Bezpiecznik samochodowy 3A<br />
1. Czarno-biały przewód znakujący<br />
2. Czarny<br />
Istruzioni di montaggio per luci Ring Automotive<br />
tipo Cruise-lite Ice (<strong>BRL0379</strong>) e Cruise-lite Diamond Ice (BRL0395)<br />
Instrucciones para la instalación del Juego de Luces para Coches<br />
"Cruise-lite Ice" (<strong>BRL0379</strong>) y "Cruise-lite Diamond Ice" (BRL0395)<br />
Monteringsvejledning for Ring Automotive Cruise-lite Ice-lampesæt<br />
(<strong>BRL0379</strong>) og Cruise-lite Diamond Ice-lampesæt (BRL0395)<br />
Instruções de montagem para: Conjunto de Lâmpadas Cruise-Lite Ice (<strong>BRL0379</strong>)<br />
e Conjunto de Lâmpadas Cruise-Lite Diamond Ice (BRL0395) da Ring Automotive.<br />
Monteringsanvisningar för Ring Automotive Cruise-lite is-lampsats<br />
(<strong>BRL0379</strong>) och Cruise-lite Diamond is-lampsats (BRL0395)<br />
A. Leuchte<br />
B. Leuchte<br />
C. Erde<br />
D. Schalter<br />
E. Zündungsspeisung<br />
F. Elektrischer Verbinder<br />
G. Schaltkreis<br />
Fahrzeugbgrenzungsleuchte<br />
H. Elektrischer Verbinder<br />
I. 3A Flachsicherung<br />
1. Schwarzweiße Ortungsleitung<br />
2. Schwarz<br />
A. Lâmpada<br />
B. Lâmpada<br />
C. Fio terra<br />
D. Interruptor<br />
E. Sistema de ignição<br />
F. Conector eléctrico<br />
G. Circuito de Luz Lateral<br />
do Veiculo<br />
H. Conector eléctrico<br />
I. Fusível de lamina de 3A<br />
1. Fio marcador preto e branco<br />
2. Preto<br />
A. Světlo<br />
B. Světlo<br />
C. Uzemnění<br />
D. Spínač<br />
E. Napájení zapalování<br />
F. Elektrický konektor<br />
G. Obvod postrannich světel<br />
vozidla<br />
H. Elektrický konektor<br />
I. 3A plochá pojistka<br />
1. Černý a bílý polohovací vodič<br />
2. Černý<br />
Montage-instructies voor de Ring Automotive Cruise-lite Ice Lamp Set<br />
(<strong>BRL0379</strong>) en de Cruise-lite Diamond Ice Lamp Set (BRL0395)<br />
Instrukcja montażu zestawu lamp Ring Automotive Cruise-lite (<strong>BRL0379</strong>)<br />
oraz zestawu lamp Cruise-lite Diamond Ice (BRL0395)<br />
Návod k montáži sady světel Ring Automotive Cruise-lite Ice (<strong>BRL0379</strong>)<br />
a sady světel Cruise-lite Diamond Ice (BRL0395)<br />
A. Lampade<br />
B. Lampade<br />
C. Massa<br />
D. Interruttore<br />
E. Alimentazione accensione<br />
F. Connettore elettrico<br />
G. Circuito delle luci di posizone<br />
H. Connettore elettrico<br />
I. 3A fusibile a lama<br />
1. Cavo bianco e nero<br />
2. Nero<br />
A. Lampa<br />
B. Lampa<br />
C. Jord<br />
D. Brytare<br />
E. Tändning<br />
F. Elkontakt<br />
G. Fordonets sidolampskrets<br />
H. Elkontakt<br />
I. 3A bladsäkring<br />
1. Svart och vit spårtråd<br />
2. Svart<br />
Ring Automotive Limited,<br />
Gelderd Road, Leeds, England LS12 6NA<br />
UK Sales:+44 (0)113 213 7389 Export Sales: +44 (0)113 213 7309<br />
+44 (0)113 231 0266 autosales@ringautomotive.co.uk<br />
www.ringautomotive.co.uk<br />
L243
Fitting <strong>Instructions</strong> for Ring Automotive<br />
Cruise-lite Ice Lamp Set (<strong>BRL0379</strong>) and<br />
Cruise-lite Diamond Ice Lamp Set (BRL0395)<br />
Carefully read the instructions prior to installation. Retain the instructions for future reference.<br />
UK REQUIREMENTS ONLY<br />
LEGAL REQUIREMENTS<br />
OTHER COUNTRIES CONSULT LOCAL REGULATIONS<br />
Obligatory front position lights<br />
These regulations only apply if the front position lights are not to be wired in or<br />
used in conjunction with the vehicle’s current front position lights (sidelights).<br />
When fitting a pair of front position lamps you should obey the following legal<br />
requirements:<br />
Obligatory front position lamps should be fitted at a maximum<br />
distance from the side of the vehicle of 400mm, with no minimum separation distance between each lamp. They should<br />
also be fitted at a maximum height above the ground of 1500mm or if the structure of the vehicle makes this<br />
impracticable, 2100mm. There is no minimum height requirement above the ground.<br />
Optional front position lights<br />
There are no legal requirements if the front position lights are to be wired into the vehicle’s current sidelight circuit and<br />
operated in conjunction with the sidelights.<br />
THE ROAD VEHICLES LIGHTING REGULATIONS 1989<br />
Equipment Required<br />
• Electrical and a cross headed screwdriver<br />
• Terminal crimp or pliers<br />
Other Parts Required<br />
• 2x earth rings<br />
• Dashboard mounting switch (required for obligatory wiring only)<br />
• Suitable length of cable<br />
• 2x “Scotchlok” connectors (required for optional wiring only)<br />
• Electrical connector block<br />
• In-line fuse (Optional)<br />
Useful Accessories<br />
RLFK200 Pre wired accessory lighting fitting kit including relay or<br />
RLFK600 remote fitting kit will help reduce the fitting time (optional wiring only)<br />
Important<br />
Before commencing any of the fitting operations, ensure that the vehicle is parked safely off the road with the handbrake<br />
on and the correct fuse or fuses are removed to isolate the circuit.<br />
Read the instructions carefully before starting to fit the lamps, if in doubt consult a qualified auto electrician.<br />
Warning, disconnecting the battery may disable management systems, radio codes etc.<br />
Remove the protective plastic strip from the front of each lamp at the end of the installation before first switching on.<br />
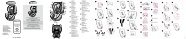
Mounting the lamps<br />
The lamps can be fitted above or below the bumper.<br />
1. Check any chosen position carefully to ensure it does not foul any piping or wiring.<br />
2. The lamps must be fitted symmetrically.<br />
3. Using a minimum of 2, or up to 4 self-tapping screws provided, mount the lamp in a suitable position.<br />
4. Ensure that the lamp is mounted rigidly and does not vibrate.<br />
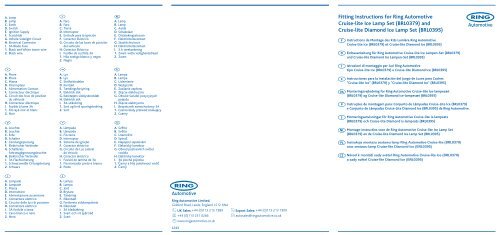
Wiring Diagram<br />
Diagramme de câblage<br />
Schaltbild<br />
Schema di cablaggio<br />
Diagrama de cableado<br />
Ledningsføringsdiagram<br />
Obligatory Wiring<br />
(If the unit is not to be used in conjunction<br />
with the vehicle’s existing sidelights)<br />
1. Connect the black and white tracer wire<br />
through to an ignition controlled 12v<br />
supply via a switch on the dashboard.<br />
2. It is always advisable to fit a separate<br />
in-line fuse holder. Fit this as close to<br />
the ignition feed as possible to<br />
minimise voltage drop. Clip the fuse<br />
into position to protect the circuit.<br />
3. Connect the plain black wire to a good<br />
earth on the chassis using an earth ring<br />
and a self-tapping screw. Ensure that<br />
there is a good metal to metal contact.<br />
4. Replace any fuses removed.<br />
Diagrama da Cablagem<br />
Kopplingsschema<br />
Bedradingsschema<br />
Schemat połączeń<br />
Schéma zapojení<br />
2<br />
1<br />
H<br />
D<br />
1<br />
2<br />
I<br />
Optional Wiring<br />
(If being used in conjunction with the<br />
vehicle’s existing sidelights)<br />
1. Connect the black and white tracer<br />
wire to the vehicle sidelight circuit<br />
using a scotchlok connector, (check<br />
your handbook for the appropriate<br />
wire colour).<br />
2. Connect the plain black wire to a good<br />
earth on the chassis using an earth<br />
ring and self tapping screw. Ensure that<br />
there is a good metal to metal contact.<br />
3. Replace any fuses removed.<br />
1<br />
1<br />
2 2<br />
Aftercare<br />
Wash lamps with a mild solution of soap and water to remove dirt etc. Do not use harsh or abrasive cleaners.