BT-SS 405 E - Svh24
BT-SS 405 E - Svh24
BT-SS 405 E - Svh24
Create successful ePaper yourself
Turn your PDF publications into a flip-book with our unique Google optimized e-Paper software.
GB<br />
5. Before starting the equipment<br />
5.1 General information<br />
• All covers and safety devices have to be properly<br />
fitted before the machine is switched<br />
on.<br />
• It must be possible for the blade to run freely.<br />
• When working with wood that has been<br />
processed before, watch out for foreign bodies<br />
such as nails or screws etc.<br />
• Before you actuate the On/Off switch, make<br />
sure that the saw blade is correctly fitted and<br />
that the machine’s moving parts run smoothly.<br />
• Before you connect the machine to the power<br />
supply, make sure the data on the rating plate<br />
is the same as that for your mains.<br />
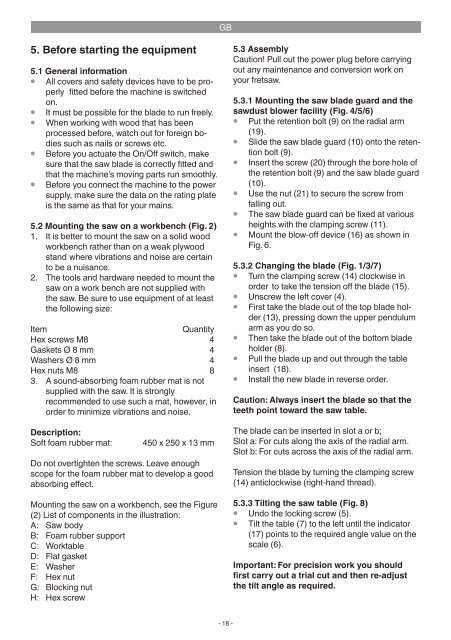
5.2 Mounting the saw on a workbench (Fig. 2)<br />
1. It is better to mount the saw on a solid wood<br />
workbench rather than on a weak plywood<br />
stand where vibrations and noise are certain<br />
to be a nuisance.<br />
2. The tools and hardware needed to mount the<br />
saw on a work bench are not supplied with<br />
the saw. Be sure to use equipment of at least<br />
the following size:<br />
Item<br />
Quantity<br />
Hex screws M8 4<br />
Gaskets Ø 8 mm 4<br />
Washers Ø 8 mm 4<br />
Hex nuts M8 8<br />
3. A sound-absorbing foam rubber mat is not<br />
supplied with the saw. It is strongly<br />
recommended to use such a mat, however, in<br />
order to minimize vibrations and noise.<br />
Description:<br />
Soft foam rubber mat:<br />
450 x 250 x 13 mm<br />
Do not overtighten the screws. Leave enough<br />
scope for the foam rubber mat to develop a good<br />
absorbing effect.<br />
Mounting the saw on a workbench, see the Figure<br />
(2) List of components in the illustration:<br />
A: Saw body<br />
B: Foam rubber support<br />
C: Worktable<br />
D: Flat gasket<br />
E: Washer<br />
F: Hex nut<br />
G: Blocking nut<br />
H: Hex screw<br />
5.3 Assembly<br />
Caution! Pull out the power plug before carrying<br />
out any maintenance and conversion work on<br />
your fretsaw.<br />
5.3.1 Mounting the saw blade guard and the<br />
sawdust blower facility (Fig. 4/5/6)<br />
• Put the retention bolt (9) on the radial arm<br />
(19).<br />
• Slide the saw blade guard (10) onto the retention<br />
bolt (9).<br />
• Insert the screw (20) through the bore hole of<br />
the retention bolt (9) and the saw blade guard<br />
(10).<br />
• Use the nut (21) to secure the screw from<br />
falling out.<br />
• The saw blade guard can be fixed at various<br />
heights with the clamping screw (11).<br />
• Mount the blow-off device (16) as shown in<br />
Fig. 6.<br />
5.3.2 Changing the blade (Fig. 1/3/7)<br />
• Turn the clamping screw (14) clockwise in<br />
order to take the tension off the blade (15).<br />
• Unscrew the left cover (4).<br />
• First take the blade out of the top blade holder<br />
(13), pressing down the upper pendulum<br />
arm as you do so.<br />
• Then take the blade out of the bottom blade<br />
holder (8).<br />
• Pull the blade up and out through the table<br />
insert (18).<br />
• Install the new blade in reverse order.<br />
Caution: Always insert the blade so that the<br />
teeth point toward the saw table.<br />
The blade can be inserted in slot a or b;<br />
Slot a: For cuts along the axis of the radial arm.<br />
Slot b: For cuts across the axis of the radial arm.<br />
Tension the blade by turning the clamping screw<br />
(14) anticlockwise (right-hand thread).<br />
5.3.3 Tilting the saw table (Fig. 8)<br />
• Undo the locking screw (5).<br />
• Tilt the table (7) to the left until the indicator<br />
(17) points to the required angle value on the<br />
scale (6).<br />
Important: For precision work you should<br />
first carry out a trial cut and then re-adjust<br />
the tilt angle as required.<br />
- 18 -<br />
Anleitung_<strong>BT</strong>-<strong>SS</strong>_<strong>405</strong>_E_SPK1.indb 18 27.09.11 11:15


