Victoria Arduino Via Madonna d'Antegiano, 6 ... - Nuova Simonelli
Victoria Arduino Via Madonna d'Antegiano, 6 ... - Nuova Simonelli
Victoria Arduino Via Madonna d'Antegiano, 6 ... - Nuova Simonelli

Create successful ePaper yourself
Turn your PDF publications into a flip-book with our unique Google optimized e-Paper software.
<strong>Victoria</strong> <strong>Arduino</strong> <strong>Via</strong> <strong>Madonna</strong> <strong>d'Antegiano</strong>, 6 • 62020 Belforte del Chienti (MC) • Italy<br />
T +39-0733-950243 • F +39-0733-950247 • Videoconf +39-0733-950201 • info@victoriaarduino.com • www.victoriaarduino.com
dal 1905<br />
VENUS CENTURY<br />
manuale tecnico d’uso - technical manual - technische bedienungsanleitung - manual técnico de empleo
I<br />
VENUS CENTURY<br />
Complimenti, lei ha scelto una macchina unica nel suo genere.<br />
Legga con attenzione ciò che il libretto delle istruzioni consiglia di fare per “preparare”<br />
la sua “Venus Century”. Si accorgerà di quanto sia facile fare ottimi caffè e cremosi<br />
cappuccini. Col tempo, si renderà conto anche di quanta poca manutenzione servirà.<br />
<strong>Victoria</strong> <strong>Arduino</strong><br />
1
2<br />
I
I<br />
VENUS CENTURY<br />
Modello: Venus Century 3 Gruppi - Peso netto: 76 Kg - Peso Lordo: 86 Kg - Potenza termica: 1800 W - Capacità caldaia 12 lt Volts 208-240V<br />
50/60Hz Dimensioni: L 490 mm A 1070 mm P 490 mm - Lamiera: Acciaio inox<br />
Il marchio di approvazione certifica che tutte le macchine sono state sottoposte ad accuratissimi collaudi e controlli<br />
3
I<br />
NOTE GENERALI ALLA CONSEGNA<br />
PRESCRIZIONI DI SICUREZZA<br />
Il presente libretto costituisce parte integrante<br />
ed essenziale del prodotto e dovrà essere<br />
consegnato all’utilizzatore. Leggere attentamente<br />
le avvertenze contenute nel presente libretto in<br />
quanto forniscono importanti indicazioni riguardanti<br />
la sicurezza di installazione, d’uso e<br />
manutenzione.<br />
Conservare con cura questo libretto per ogni<br />
ulteriore consultazione.<br />
Dopo aver tolto l’imballaggio assicurarsi dell’integrità<br />
dell’apparecchio. In caso di dubbio non<br />
utilizzare l’apparecchio e rivolgersi a personale<br />
professionalmente qualificato. Gli elementi dell’imballaggio<br />
non devono essere lasciati alla portata<br />
dei bambini in quanto potenziali fonti di<br />
pericolo, né essere dispersi nell’ambiente.<br />
m PERICOLO DI INQUINAMENTO<br />
Prima di collegare l’apparecchio accertarsi<br />
che i dati di targa siano rispondenti a quelli della<br />
rete di distribuzione elettrica. L’installazione<br />
deve essere effettuata in ottemperanza alle<br />
norme vigenti nel paese dove la macchina viene<br />
installata, secondo le istruzioni del costruttore e<br />
da personale qualificato.<br />
Il costruttore non può essere considerato<br />
responsabile per eventuali danni causati dalla<br />
mancanza di messa a terra dell’impianto. Per la<br />
sicurezza elettrica di questo apparecchio è<br />
obbligatorio predisporre l’impianto di messa a<br />
terra, rivolgendosi ad un elettricista munito di<br />
idoneità tecnica certificata, che dovrà verificare<br />
che la portata elettrica dell’impianto sia adeguata<br />
alla potenza massima dell’apparecchio<br />
indicata in targa.<br />
In particolare dovrà anche accertare che la<br />
sezione dei cavi dell’impianto sia idonea alla<br />
potenza assorbita dall’apparecchio.<br />
È vietato l’uso di adattatori, prese multiple e<br />
prolunghe.<br />
Qualora il loro uso si rendesse<br />
indispensabile è necessario chiamare un<br />
elettricista munito di patentino.<br />
La macchina deve essere installata in accordo<br />
alle normative sanitarie locali vigenti per gli<br />
impianti idraulici. Quindi per l’impianto idraulico<br />
rivolgersi ad un tecnico autorizzato.<br />
4
I<br />
Questo apparecchio dovrà essere destinato<br />
solo all’uso descritto in questo manuale.<br />
Il costruttore non può essere considerato responsabile<br />
per eventuali danni causati da usi impropri,<br />
erronei ed irragionevoli.<br />
m AVVERTENZA<br />
Prima di utilizzare la macchina leggere<br />
interamente il manuale d’uso o quantomeno le<br />
prescrizioni di sicurezza e la messa a punto.<br />
L’uso di un qualsiasi apparecchio elettrico<br />
comporta l’osservanza di alcune regole fondamentali.<br />
In particolare:<br />
• non toccare l’apparecchio con mani o piedi<br />
bagnati;<br />
• non usare l’apparecchio a piedi nudi;<br />
• non usare, prolunghe in locali adibiti a bagno o<br />
doccia;<br />
• non tirare il cavo di alimentazione, per scollegare<br />
l’apparecchio dalla rete di alimentazione;<br />
• non lasciare esposto l’apparecchio ad agenti<br />
atmosferici (pioggia, sole, ecc.);<br />
• non permettere che l’apparecchio sia usato da<br />
bambini, o da personale non autorizzato e che<br />
non abbia letto e ben compreso questo manuale.<br />
Il tecnico autorizzato deve, prima di effettuare<br />
qualsiasi operazione di manutenzione, staccare<br />
la spina dopo aver spento l’interruttore della<br />
macchina.<br />
bis Per le operazioni di pulizia portare la<br />
macchina a stato energetico “O”, cioè “interruttore<br />
macchina spento e spina staccata”<br />
ed attenersi esclusivamente a quanto previsto nel<br />
presente libretto.<br />
In caso di guasto o di cattivo funzionamento<br />
dell’apparecchio, spegnerlo. È severamente vietato<br />
intervenire. Rivolgersi esclusivamente a personale<br />
professionalmente qualificato.<br />
L’eventuale riparazione dei prodotti dovrà essere<br />
effettuata solamente dalla casa costruttrice o da<br />
centro di assistenza autorizzato utilizzando esclusivamente<br />
ricambi originali.<br />
Il mancato rispetto di quanto sopra può compromettere<br />
la sicurezza dell’apparecchio.<br />
All’installazione, l’elettricista munito di patentino<br />
dovrà prevedere un interruttore unipolare<br />
come previsto dalle normative di sicurezza<br />
vigenti con distanza di apertura dei contatti<br />
uguale o superiore a 3 mm.<br />
Per evitare surriscaldamenti pericolosi si raccomanda<br />
di svolgere per tutta la sua lunghezza il<br />
cavo di alimentazione.<br />
Il cavo di alimentazione di questo apparecchio<br />
non deve essere sostituito dall’utente. In caso di<br />
5
I<br />
danneggiamento, spegnere l’apparecchio e per<br />
la sua sostituzione rivolgersi esclusivamente a<br />
personale professionalmente qualificato.<br />
Allorché si decida di non utilizzare più un<br />
apparecchio di questo tipo si raccomanda di<br />
renderlo inoperante dopo aver staccato la spina,<br />
tagliare il cavo di alimentazione.<br />
di esso e non toccarla subito dopo l’uso.<br />
m ATTENZIONE PERICOLO DI USTIONE<br />
Ricordare che prima di effettuare qualsiasi<br />
operazione di installazione, manutenzione, scarico,<br />
regolazione, l’operatore qualificato deve<br />
indossare i guanti da lavoro e le scarpe antinfortunistiche.<br />
m ATTENZIONE PERICOLO DI INQUINAMENTO<br />
Non disperdere la macchina nell’ambiente: per lo<br />
smaltimento rivolgersi ad un centro autorizzato o<br />
contattare il costruttore che darà indicazioni in<br />
merito.<br />
Per favorire l’areazione della macchina posizionarla<br />
a cm 15 da muri da altre macchine.<br />
Durante l’uso della lancia del vapore, prestare<br />
molta attenzione e non mettere le mani sotto<br />
6
DESCRIZIONE COMANDI E<br />
OPERABILITÀ MACCHINA<br />
Simbolo <strong>Victoria</strong> <strong>Arduino</strong><br />
I<br />
Manometro caldaia<br />
Quadro comandi<br />
Cupola<br />
Piano scaldatazze a doppio<br />
accesso<br />
Lancia acqua calda<br />
Vaschetta di scarico<br />
Targa con numero di serie<br />
Portafiltro<br />
Targa con numerazione limitata<br />
Lancia vapore<br />
Interruttore macchina<br />
7
I<br />
TRASPORTO E MOVIMENTAZIONE<br />
IDENTIFICAZIONE MACCHINA<br />
Per qualsiasi comunicazione con il costruttore<br />
<strong>Victoria</strong> <strong>Arduino</strong>, citare sempre il numero di<br />
matricola della macchina.<br />
La macchina viene trasportata in pallett con più<br />
macchine dentro scatoloni assicurati al pallett<br />
con delle centine.<br />
Prima di procedere a qualsiasi operazione di<br />
trasporto o movimentazione, l’operatore deve:<br />
• indossare guanti e scarpe antinfortunistici ed<br />
una tuta con elastici alle estremità.<br />
Il trasporto del pallett deve essere effettuato con un<br />
mezzo di sollevamento adeguato (tipo muletto).<br />
m ATTENZIONE PERICOLO DI URTO O SCHIACCIAMENTO<br />
L’operatore durante tutta la movimentazione,<br />
deve avere l’attenzione che non ci siano persone,<br />
cose od oggetti nell’area di operazione.<br />
Sollevare lentamente il pallett a circa 30 cm da<br />
terra e raggiungere la zona di carico. Dopo aver<br />
verificato che non ci siano ostacoli, cose o persone,<br />
procedere al carico.<br />
Una volta arrivati a destinazione, sempre con un<br />
mezzo di sollevamento adeguato (es. muletto),<br />
dopo essersi assicurati che non ci siano cose o<br />
persone nell’area di scarico, portare il pallett a<br />
terra e movimentarlo a circa 30 cm da terra, fino<br />
all’area di immagazzinamento.<br />
m ATTENZIONE PERICOLO DI URTO O SCHIACCIAMENTO<br />
Prima della seguente operazione verificare che il<br />
carico sia a posto e che con il taglio delle centine<br />
non cada.<br />
L’operatore con guanti e scarpe antinfortunistiche,<br />
deve procedere al taglio delle centine e<br />
allo stoccaggio del prodotto, in questa operazione<br />
consultare le caratteristiche tecniche del<br />
prodotto per vedere il peso della macchina da<br />
immagazzinare e potersi regolare di conseguenza.<br />
m ATTENZIONE PERICOLO DI INQUINAMENTO<br />
Una volta liberata la macchina del pallett o del<br />
contenitore, non disperderlo nell’ambiente, pericolo<br />
di inquinamento.<br />
8
I<br />
ISTRUZIONI PER L’INSTALLAZIONE<br />
Dopo aver verificato che nulla manchi nell’imballo,<br />
installare i 3 piedini mancanti e posizionare<br />
la macchina nell’alloggiamento previsto.<br />
Connettere l’entrata acqua del depuratore <br />
alla presa d’acqua, collegare il tubo di uscita<br />
del depuratore con l’entrata della pompa,<br />
allacciare poi il tubo di carico all’uscita<br />
della pompa. Inserire infine il tubo di scarico<br />
fornito in dotazione nel raccordo previsto<br />
sotto il basamento della macchina assicurando<br />
la tenuta con l’apposita fascetta.<br />
Posizionare negli appositi alloggiamenti il piatto<br />
scaldatazze, la fascia scaldatazze, la cupola,<br />
le vaschette di scarico ed infine l’aquila.<br />
In seguito curare la messa in piano agendo<br />
sugli appositi piedini di regolazione.<br />
Controllare che le caratteristiche dell’impianto<br />
elettrico siano compatibili con i dati elettrici<br />
riportati sulla targhetta di identificazione della<br />
macchina.<br />
Collegare il cavo elettrico che esce dalla<br />
macchina con la pompa e la spina di alimentazione<br />
ad una presa di corrente dotata di<br />
messa a terra.<br />
Si raccomanda di evitare strozzature nei tubi,<br />
di curare lo scarico e di usare un cavo elettrico<br />
di pari sezione, qualora quello fornito non<br />
fosse sufficiente.<br />
La macchina deve essere sempre protetta con<br />
un interruttore automatico di adeguata<br />
potenza.<br />
La ditta non risponde di alcun danno a cose o<br />
persone derivante dalla mancata osservanza<br />
delle vigenti norme di sicurezza.<br />
MESSA IN FUNZIONE<br />
Ruotare l’interruttore generale dalla posizione<br />
0 alla posizione 1 per consentire il corretto<br />
riempimento della caldaia. Per raggiungere il<br />
livello adeguato di riempimento può essere<br />
necessario più volte spegnere la macchina e<br />
riportare l’interruttore generale nella posizione<br />
1. Solo dopo che il livello massimo risulta raggiunto<br />
è possibile posizionare l’interruttore<br />
nella posizione 2.<br />
Dopo circa 20 minuti la macchina avrà raggiunto<br />
la pressione d’esercizio che si può rilevare<br />
dal manometro a doppia scala.<br />
Per modificare la pressione di esercizio della<br />
caldaia (e quindi la temperatura) in funzione<br />
delle varie esigenze o delle caratteristiche del<br />
caffe’ utilizzato è sufficiente sollevare il piatto<br />
9
I<br />
scaldatazze ed agire sulla vite del pressostato,<br />
girando in senso orario si provoca un abbassamento<br />
della pressione e viceversa (normalmente<br />
la macchina collaudata è regolata a<br />
circa 0,8 - 1,2 bar).<br />
La pressione della pompa in fase di installazione<br />
deve essere regolata alla pressione di 9 bar.<br />
USO DEL VAPORIZZATORE<br />
Per utlizzare il vapore è sufficiente ruotare in<br />
senso antiorario il rubinetto del vapore: è possibile<br />
una regolazione del flusso di vapore in<br />
uscita dalla lancia.<br />
Durante l’erogazione del vapore, non toccare<br />
con le parti del corpo la lancia né mettere le<br />
mani sotto la lancia.<br />
m ATTENZIONE PERICOLO DI USTIONE<br />
10
Per ottenere la crema durante il riscaldamento<br />
del latte, immergere il beccuccio del vapore in<br />
fondo al recipiente pieno per 3/4 (preferibilmente<br />
a forma tronco-conica). Quando il latte<br />
ha raggiunto lo stato di ebollizione spostare il<br />
beccuccio del vapore sulla superficie facendo<br />
sfiorare il latte con i piccoli spostamenti in<br />
senso verticale per ottenere la crema desiderata.<br />
Alla fine di ogni operazione ricordarsi di<br />
pulire accuratamente la lancia del vapore con<br />
un panno umido.<br />
UTILIZZO ACQUA CALDA<br />
Per utilizzare l’acqua calda è sufficiente ruotare<br />
in senso antiorario il rubinetto dell’acqua calda.<br />
Durante l’erogazione del acqua calda, non toccare<br />
con le parti del corpo la lancia né mettere<br />
le mani sotto la lancia.<br />
m ATTENZIONE PERICOLO DI USTIONE<br />
PREPARAZIONE DEL CAFFE’ ESPRESSO<br />
Sganciare il portafiltro dal gruppo ed immettervi<br />
una o due dosi di caffe’ macinato a seconda del<br />
filtro utilizzato; pressare il caffe’ con l’apposito<br />
pressino fornito in dotazione e prima d’innestare<br />
il portafiltro al gruppo, pulire il bordo anulare<br />
del filtro per togliere eventuali residui di caffe’<br />
che a lungo andare potrebbero compromettere<br />
la perfetta tenuta del gruppo e portafiltro.<br />
Per erogare il caffe’ bisogna premere il pulsante<br />
relativo alla dose desiderata riconoscibile<br />
dalla grafica.<br />
1 2 3 4 5<br />
Esistono 4 possibilità di erogazione dosata:<br />
tasto 1 un caffe’ corto ; tasto 2 un caffè<br />
lungo ; tasto 3 due caffe’ corti<br />
; tasto 4 due caffe’ lunghi . Il taso 5 caffè<br />
continuo permette l’utilizzo della macchina<br />
in modo semiautomatico. Le 4 possibilità programmabili<br />
per ogni gruppo possono essere<br />
ovviamente predeterminate in fase di installazione<br />
programmando la quantità di caffe’ per<br />
ogni singolo tasto e per ogni gruppo a seconda<br />
delle varie esigenze.<br />
Terminata l’erogazione nel caso non si debba<br />
fare caffe’ di seguito, lasciare il portafiltro innestato<br />
nel gruppo affinché rimanga sempre<br />
caldo. I gruppi di erogazione sono termocompensati<br />
a circolazione totale di acqua calda per<br />
cui rimangono a temperatura costante in ogni<br />
condizione di esercizio.<br />
ITA<br />
11
I<br />
PROGRAMMAZIONE DELLE DOSI<br />
Per entrare nello stato di programmazione dosi<br />
di ognuno dei gruppi è necessario premere per<br />
5 secondi il tasto 5 .<br />
PULSANTIERA GRUPPO<br />
1 2 3 4 5<br />
L'ingresso in programmazione è segnalato dal<br />
lampeggio dei 5 pulsanti. Premendo un qualsiasi<br />
dei tasti dose si attiva l'erogazione del<br />
gruppo; una volta raggiunta la quantità desidera<br />
premendo il tasto 5 si interrompe l'erogazione<br />
e si memorizza la dose fino ad allora<br />
erogata. Dopodiché il tasto della dose appena<br />
memorizzata, rimane spento mentre gli altri<br />
tasti continuano a lampeggiare e si può procedere<br />
all'impostazione di un'altra dose oppure<br />
uscire dallo stato di programmazione tramite il<br />
tasto 5 . Questa procedura è identica per<br />
ognuno dei gruppi, l'unico vincolo è che solamente<br />
un gruppo alla volta può entrare in programmazione;<br />
gli altri gruppi continuano a<br />
lavorare normalmente.<br />
REGOLAZIONE ALTEZZA PIATTINI POG-<br />
GIATAZZE<br />
E' possibile regolare l'altezza dei piattini poggiatazze<br />
in maniera da poter utilizzare tazze di<br />
diverse dimensioni . Operativamente:<br />
1 Sbloccare il dado di serraggio 1 della fig.<br />
1<br />
2 Avvitare/svitare ruotando in senso antiorario/orario<br />
il piattino 2 della fig. 1 in<br />
maniera da diminuirne/aumentarne l'altezza<br />
fino a portalo al livello desiderato<br />
3 Bloccare di nuovo il dado di serraggio 1<br />
della fig. 1.<br />
1 2<br />
fig.1<br />
12
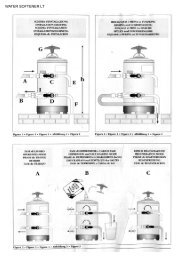
REGOLAZIONE LANCIA TURBOCREAM<br />
(OVE INSTALLATA)<br />
Per aumentare/diminuire la quantità di aria<br />
iniettata nel latte tramite lancia TurboCream<br />
(ed quindi aumentare/diminuire la percentuale<br />
di crema nel latte montato) procedere come<br />
illustarto in fig. 1:<br />
1 Svitare la cannula in acciaio inox (1)<br />
come illustrati in fig.2.A.<br />
2 Per aumentare/diminuire la quantità di<br />
aria avvitare (ruotando in senso<br />
orario)/svitare (ruotando in senso antiorario)<br />
la cannula in teflon (2) come illustrato<br />
in fig. 2.B.<br />
3 Avvitare di nuovo la cannula in acciaio<br />
inox.<br />
fig.2.A<br />
2<br />
1<br />
fig.2.B<br />
fig.2<br />
Osservazione: Riducendo o aumentando la<br />
lunghezza ( avvitando o svitandola) della cannula<br />
in teflon di qualche frazione di mm o mm<br />
si ottengono sensibili differenze nel livello di<br />
crema del latte montato.<br />
CICLO AUTOMATICO DI PULIZIA<br />
Ciclo automatico di pulizia gruppi<br />
Il ciclo di pulizia si compone di 2 fasi: lavaggio<br />
(con filtro cieco e detergente puly caff) e<br />
risciacquo (solamente con filtro cieco), ognuna<br />
di 10 erogazioni di 10 secondi intervallate da<br />
una pausa di 5 secondi. I cicli possono essere<br />
avviati contemporaneamente ed indipendentemente<br />
per ogni gruppo.<br />
Per entrare nello stato di pulizia automatica si<br />
deve spegnere la macchina e riaccenderla mantenendo<br />
premuti i tasti 5 del primo (gruppo<br />
di sinistra guardando la macchina di fronte) e<br />
del secondo (gruppo centrale) gruppo durante<br />
il Lamp-test iniziale.<br />
ITA<br />
13
I<br />
Al termine del Lamp-test iniziano a lampeggiare<br />
i tasti 5 ed i tasti 2 di tutti i gruppi.<br />
Premendo un tasto 2 inizia il ciclo di lavaggio<br />
del relativo gruppo. Terminato il ciclo di<br />
lavaggio si può effettuare il ciclo di risciacquo<br />
sullo stesso gruppo, ripremendo il tasto 1 .<br />
Se si vuole eseguire il ciclo di risciacquo in un<br />
secondo momento è sufficiente spegnere la<br />
macchina: la scheda mantiene memorizzati i<br />
cicli di pulizia da terminare.<br />
Alla successiva accensione , infatti, la scheda<br />
entrerà automaticamente nello stato di pulizia<br />
gruppi, senza premere i tasti 5 .<br />
Premendo i tasti 5 del primo e secondo gruppo<br />
per 2 secondi si esce dallo stato di pulizia<br />
nel caso in cui non ci siano cicli da terminare,<br />
altrimenti rimarranno lampeggianti i tasti 2<br />
dei gruppi in cui si deve ancora eseguire il ciclo<br />
di risciacquo. Mantenendo i tasti 5 del primo<br />
e del secondo gruppo per altri 2 secondi si<br />
forza l'uscita dallo stato di pulizia azzerando<br />
l'informazione sui risciacqui da terminare. Se il<br />
ciclo di pulizia viene completato il tasto 2<br />
del gruppo si spegne; se non ci sono altri<br />
risciacqui da seguire la scheda esce dallo stato<br />
di pulizia.<br />
PULIZIA DELLA CARROZZERIA<br />
Affinché la macchina mantenga inalterate le proprie<br />
caratteristiche nel tempo, occorre curare<br />
assiduamente la pulizia della stessa. Non usare<br />
alcun prodotto detergente, usare soltanto una<br />
spugna morbida e ben pulita con dell’acqua.<br />
Eventuali ossidazioni della carrozzeria sono del<br />
tutto normali essendo questa realizzata con ottone<br />
o rame naturali (a seconda della versione).<br />
PULIZIA DEL GRUPPO CON L’AUSILIO<br />
DEL FILTRO CIECO<br />
Dopo aver sostituito il filtro normale nel portafiltro<br />
con quello cieco in dotazione, mettervi<br />
due cucchiaini del detersivo specifico e quindi<br />
innestare il portafiltro nel gruppo e premere il<br />
pulsante di erogazione continua.<br />
Dopo circa 30’’ arrestare l’erogazione e ripetere<br />
per 3 volte quest’ultima operazione.<br />
Infine ripristinare il filtro normale ed erogare un<br />
caffe’ da gettare per togliere ogni eventuale<br />
residuo di detergente.<br />
PULIZIA DEI FILTRI E PORTAFILTRI<br />
Mettere due cucchiaini del detergente specifico<br />
in mezzo litro di acqua bollente ed immergervi<br />
filtri e portafiltri per circa mezz’ora. Dopodiché<br />
risciacquare in abbondante acqua corrente.<br />
Aver cura di usare recipienti in vetro o in acciaio<br />
inox e mantenere i manici del portafiltro fuori<br />
dei liquidi detergenti.<br />
14
UK<br />
VENUS CENTURY<br />
Congratulations, you have chosen an unique in its kind machine.<br />
Read carefully what is advised in the instruction manual for “setting-up” of your “Venus<br />
Century”. You will see how easy it is to make delicious coffee and creamy cappuccinos. With<br />
the passing of time, you will also realise how little maintenance is needed.<br />
<strong>Victoria</strong> <strong>Arduino</strong><br />
15
16<br />
UK
UK<br />
VENUS CENTURY<br />
Model: Venus Century 3 Gruoups - Net weight: 76 Kg - Gross weight: 86 Kg - Thermal power: 1800 W - Boiler capacity 12 lt Volts 208-240V<br />
50/60Hz Dimensions: L 490 mm A 1070 mm W 490 mm - Sheet metal: Stainless steel<br />
The approval mark certifies that all machines have been subjected to accurate inspection tests and checks<br />
17
GENERAL REMARKS ON THE CONSIGNMENT<br />
UK<br />
SAFETY REGULATIONS<br />
The present manual is an integral and<br />
essential part of the product and will have to be<br />
handed over to the user. Read carefully the<br />
written warnings in the present manual as they<br />
give important suggestions concerning the safety<br />
of installation and set-up, use and maintenance.<br />
Keep this manual in a safe place for further<br />
information.<br />
After removing the packaging, check the<br />
integral parts of the machine are intact. If in<br />
doubt, do not use the machine and contact the<br />
professionally qualified personnel. The<br />
elements of the packaging must be kept out of<br />
children’s reach as they can be potential<br />
sources of danger and they mustn’t be<br />
disposed of in the environment.<br />
m POLLUTION DANGER<br />
Before connecting the machine, make sure<br />
that the data of the plate correspond to those of<br />
the electrical distribution network. The plate is<br />
located under the machine’s base. The<br />
installation has to be carried out in compliance<br />
with the regulations of the Country where the<br />
machine is set-up, according to the instructions<br />
by the manufacturer and qualified personnel.<br />
The manufacturer can’t be considered<br />
responsible for possible damage caused by<br />
failure in earthing the plant. For the electrical<br />
safety of this machine it is obligatory to arrange<br />
the earthing plant, contact an electrician with<br />
proper and certified technical suitability, to check<br />
the electrical capacity of the plant is adequate to<br />
the maximum power of the machine, stated on<br />
the plate. In particular the electrician will have to<br />
make sure that the section of the plants’ cables is<br />
suitable to the power absorbed by the machine.<br />
The use of adaptors, multi-sockets and<br />
extensions is forbidden. If their use is necessary,<br />
it is compulsory to call a licensed electrician.<br />
The machine must be set-up according to the<br />
sanitary and health regulations valid for hydraulic<br />
plants. For the hydraulic plant contact an<br />
authorised technician.<br />
18
This machine will have to be used only for the<br />
purpose described in this manual.<br />
The manufacturer can’t be considered<br />
responsible for possible damage caused by<br />
improper, wrong, or unreasonable uses.<br />
m WARNING<br />
Before using the machine read carefully and<br />
completely the instruction manual, safety<br />
regulations and the machine tuning/ directions.<br />
The use of any electrical device must comply<br />
with fundamental regulations. In particular:<br />
• do not touch the machine with wet hands or<br />
feet;<br />
m WARNING DANGER OF ELECTRICAL SHOCK<br />
Any cleaning operation, the washing or other<br />
interventions inside the machine must be<br />
carried out when the "energetic state is<br />
zero", connecting plug to the net (3)<br />
disconnected from the net itself.<br />
• do not use the machine barefoot;<br />
• do not use extensions in places used as a bath<br />
or shower;<br />
• do not pull the supply cable, to disconnect the<br />
machine from the supplying net;<br />
• do not leave the machine exposed to<br />
atmospheric agents (rain, sun, etc);<br />
• do not allow the machine to be used by<br />
children or by non-authorised personnel that<br />
haven’t read and understood this manual.<br />
The authorised technician has to, before<br />
carrying out any maintenance operation, unplug<br />
the socket after having switched off the<br />
machine switch.<br />
bis For the cleaning operations bring the<br />
machine to energetic state “O”, that is to say<br />
“machine is switched off and socket<br />
unplugged” and keep exclusively to what is<br />
stated in the present manual.<br />
In case of breakdown or wrong<br />
functioning of the machine, switch it off.<br />
Any intervention is strictly forbidden.<br />
Contact exclusively professionally authorised<br />
personnel.<br />
The possible repair of the products will have<br />
to be made by the manufacturer only or by an<br />
authorised service using exclusively original<br />
spare parts.<br />
Non-compliance with the above stated can<br />
compromise the safety of the machine.<br />
When setting it up, the licensed electrician<br />
will have to check an omni-polar switch is<br />
provided by the actual safety regulations with<br />
opening distance from the contacts the same or<br />
bigger than 3 mm.<br />
UK<br />
19
To avoid dangerous overheating, we do<br />
recommend you uncoil the supply cable to its full<br />
length.<br />
To help the aeration of the machine place it<br />
15 cm from the walls or from other machines on<br />
the aeration side.<br />
UK<br />
The user mustn’t replace the supply cable of<br />
this machine. In case of damage, switch the<br />
machine off and for its replacement contact<br />
exclusively professionally qualified personnel.<br />
When using the vapour spear, pay much<br />
attention and do not place hands under it and do<br />
not touch it immediately after its use.<br />
m WARNING DANGER OF BURNING<br />
In the event that you decide not to use a<br />
machine of this kind anymore, we advise you<br />
make it ineffective by unplugging the socket,<br />
then cut the supply cable.<br />
Remember that before carrying out any setup<br />
operation, maintenance, download, or<br />
tuning, the qualified operator has to wear<br />
working gloves and safety shoes.<br />
m WARNING DANGER OF POLLUTION<br />
Do not dispose of the machine in the environment:<br />
for waste disposal, contact a specialised authorised<br />
centre or contact the manufacturer that will give<br />
you information about this.<br />
20
DESCRIPTION OF MACHINE<br />
CONTROLS AND OPERATION<br />
<strong>Victoria</strong> <strong>Arduino</strong> symbol<br />
Dome<br />
Boiler tank pressure gauge<br />
Control panel<br />
Cup warmer shelf with<br />
dual access<br />
UK<br />
Hot water nozzle<br />
Drain tray<br />
Plate with serial number<br />
Filter-holder<br />
Plate with limited edition number<br />
Steam nozzle<br />
Machine switch<br />
21
TRANSPORT AND HANDLING<br />
UK<br />
Always quote the machine serial number in all<br />
communications to the manifacturer, <strong>Victoria</strong><br />
<strong>Arduino</strong>.<br />
When contacting the manufacturer, <strong>Victoria</strong><br />
<strong>Arduino</strong> for any reason, always quote the<br />
machine serial number.<br />
The machine is transported on pallets containing<br />
several machines inside boxes secured to<br />
the pallet by straps.<br />
Before performing any transport or handling<br />
operation, the operator must:<br />
• wear safety gloves and footwear and overalls<br />
with elasticised ends.<br />
Pallets must be transported using an adequate<br />
lifting mechanism (fork-lift truck type).<br />
m CAUTION: COLLISION OR CRUSHING HAZARD<br />
During the entire handling operation, the operator<br />
must make sure no one or nothing is inside<br />
the operating area.<br />
Slowly lift the pallet to about 30 cm from the<br />
ground and move to the loading area. After<br />
making sure there are no obstacles, persons or<br />
things, proceed with loading.<br />
Once at destination, always using an adequate<br />
lifting mechanism (eg. fork-lift), after making<br />
sure there is no one or nothing within the unloading<br />
area, lower the pallet to about 30 cm from<br />
the ground and transport it to the storage area.<br />
m CAUTION: COLLISION OR CRUSHING HAZARD<br />
Before performing the following operation,<br />
make sure the load is in place and is not likely<br />
to fall when the straps are cut.<br />
The operator, wearing safety gloves and<br />
footwear, must now cut the straps and store<br />
the product. To perform this operation, check<br />
the technical characteristics of the product to<br />
determine the weight of the machine to be<br />
stored and take consequent precautions.<br />
m CAUTION: POLLUTION HAZARD<br />
Once the machine has been freed of the pallet<br />
or container, do not discard these in the environment<br />
- pollution hazard.<br />
22
INSTALLATION INSTRUCTIONS<br />
After making sure nothing is missing in the<br />
packaging, fit the 2 missing feet and position<br />
the machine in the housing provided.<br />
Connect the water cleaner inlet up to the<br />
water supply point; connect the cleaner outlet<br />
pipe b to the pump inlet; next connect the supply<br />
pipe c to the pump outlet. Finally fit the<br />
drain pipe d provided to the connection point<br />
underneath the machine bed and secure the<br />
seal using the special clip.<br />
Position the cup-warming plate, the cup-warming<br />
strip, the dome, the drain trays and finally<br />
the eagle in the housings provided.<br />
Next make sure the machine is level by means<br />
of the adjustment feet.<br />
Make sure the power supply system is compatible<br />
with the details shown on the machine<br />
identification plate.<br />
Connect the power cable coming from the<br />
machine to the pump and the power plug f to<br />
a properly earthed power socket.<br />
Avoid any bends and blockages in the pipes.<br />
Make sure the drain is free and, if the power<br />
cable provided is inadequate, use another with<br />
the same cross section.<br />
The machine must always be protected by<br />
means of an automatic switch of adequate<br />
power.<br />
The company disclaims liability for any damage<br />
to things or injury to persons caused by failure<br />
to observe the applicable safety regulations.<br />
STARTING UP<br />
Turn the master switch from position 0 to position<br />
1 so the boiler can correctly fill up. To<br />
reach suitable filling level, the machine may<br />
have to be switched off several times and the<br />
master switch returned to position.<br />
1. The switch can only be moved to position 2<br />
once maximum level has been reached.<br />
After about 20 minutes, the machine will have<br />
reached operating pressure. This is indicated on<br />
the double-scale pressure gauge.<br />
To change the operating pressure of the boiler<br />
(and consequently the temperature) according<br />
to the various requirements or characteristics<br />
of the coffee used, simply lift the cup-warming<br />
plate and adjust the pressure switch screw;<br />
UK<br />
23
UK<br />
when this is turned clockwise, the pressure<br />
drops and vice versa (the tested machine is normally<br />
set at about 0.8 - 0.9 bar).<br />
During installation the pump pressure must be<br />
set at 9 bar. This pressure is shown on the pressure<br />
gauge when the machine is dispensing.<br />
USING THE VAPORISER<br />
To use the steam, simply turn the steam tap<br />
anticlockwise. The flow of steam from the<br />
nozzle can be adjusted.<br />
During steam dispensing, keep all body parts<br />
away from the nozzle and do not put your<br />
hands underneath the nozzle - burn hazard.<br />
m WARNING DANGER OF BURNING<br />
To obtain cream when heating milk, push the<br />
steam nozzle down to the bottom of the full<br />
container by 3/4 (preferably truncated-cone<br />
24
shaped). When the milk starts boiling, move<br />
the steam nozzle up and down, so it skims the<br />
milk, with small vertical movements to obtain<br />
the required cream. At the end of each operation,<br />
remember to carefully clean the steam<br />
nozzle with a damp cloth.<br />
USING HOT WATER<br />
To use the hot water, simply turn the hot-water<br />
tap anticlockwise.<br />
During the dispensing of hot water, never<br />
touch the nozzle with body parts or place your<br />
hands underneath the nozzle - burn hazard.<br />
m WARNING DANGER OF BURNING<br />
PREPARING ESPRESSO COFFEE<br />
Release the filter-holder from the unit and fill it<br />
with one or two doses of ground coffee depending<br />
on the filter used. Press the coffee using<br />
the presser provided and, before fitting the filterholder<br />
back on the machine, clean the round<br />
edge of the filter so as to remove any coffee residues<br />
which, in the long-term, could affect the<br />
perfect seal of the unit and filter-holder.<br />
In the case of the Venus/S version, turn the<br />
dispenser lever and return this to its initial position<br />
once the quantity of dispensed coffee is<br />
considered enough.<br />
In the case of the Venus/V version, to dispense<br />
the coffee, the required-dose button must be<br />
pressed. This is marked by graphics.<br />
1 2 3 4 5<br />
There are 4 possibilities to dose coffee delivery:<br />
key 1, one small coffee ; key 2, one long coffee<br />
; key 3, two small coffees ; key 4, two<br />
long coffees . Key 5 for continued coffee<br />
delivery serves for semiautomatic use of the<br />
machine.<br />
The 4 possibilities for each unit can obviously<br />
be predetermined during installation by programming<br />
the quantity of coffee for each single<br />
key and for each single unit depending on<br />
the various needs.<br />
After dispensing, if no more coffees have to be<br />
made, leave the filter-holder fitted to the unit<br />
so it stays hot. The dispensing units are kept<br />
hot by the circulation of hot water and their<br />
temperature is kept constant whatever the<br />
operating conditions.<br />
UK<br />
25
UK<br />
HOW TO PROGRAMME THE DOSES<br />
To open the dose programming function for<br />
each of the groups, press and hold down key 5<br />
for 5 seconds.<br />
GROUP BUTTON PAD<br />
1 2 3 4 5<br />
key 5 . This procedure is the same for each<br />
of the groups, with the sole limit that only one<br />
group can be programmed at a time; the other<br />
groups will continue to operate as normal.<br />
CUP REST HEIGHT ADJUSTMENT<br />
It is possible to adjust the height of the cup<br />
rests so that different-sized cups can be used<br />
by proceeding as follows:<br />
Access to the programming mode is signalled<br />
by the 5 buttons, which will begin to flash.<br />
Press any of the dose keys to start delivery from<br />
the group; once the required amount has been<br />
poured, press key 5 to stop delivery and<br />
store the dose in the memory. After the dose<br />
has been stored, the relevant key will switch off<br />
while the others will continue to flash. It is<br />
now possible to proceed to set another dose or<br />
to exit the programming function by pressing<br />
1 Release the lock nut 1 in fig. 1.<br />
2 Tighten/loosen the cup rest 2 in fig. 1 by<br />
turning it anticlockwise/clockwise to<br />
increase or reduce its height to the required<br />
level.<br />
3 Tighten the lock nut 1 in fig. 1.<br />
1 2<br />
fig.1<br />
26
ADJUSTING THE TURBOCREAM NOZZLE<br />
(IF FITTED)<br />
To increase/reduce the amount of air injected<br />
into the milk from the TurboCream nozzle (and<br />
therefore to increase/reduce the amount of<br />
foam in the heated milk) proceed as illustrated<br />
in fig. 1:<br />
1 Loosen the stainless steel tube (1) as illustrated<br />
in fig. 2.A.<br />
2 To increase/reduce the amount of air,<br />
tighten (turning clockwise) or loosen<br />
(turning anticlockwise) the Teflon tube<br />
(2) as illustrated in fig. 2.B.<br />
3 Tighten the stainless steel tube again.<br />
fig.2.A<br />
fig.2<br />
Remarks: By reducing or increasing the length<br />
(tightening or loosening) the tube/Teflon tube<br />
by a few fractions of a mm/mm, there is a<br />
2<br />
1<br />
fig.2.B<br />
significant difference in the amount of foam in<br />
the heated milk.<br />
AUTOMATIC CLEANING CYCLE<br />
Group automatic cleaning cycle<br />
The cleaning cycle is comprised of two stages:<br />
washing (with blind filter and puly caff detergent)<br />
and rinsing (with blind filter only). Each<br />
stage lasts for 10 deliveries of 10 seconds each<br />
at 5-second intervals. The cycles can be started<br />
all together or individually for each group.<br />
To access the automatic cleaning mode, first<br />
switch the machine off and then on again, holding<br />
down the keys 5 of the first (on the left<br />
looking at the machine from the front) and<br />
second (central) groups during the initial Flashtest.<br />
At the end of the Flash-test the 5 and 2<br />
keys of all groups will begin to flash.<br />
UK<br />
27
UK<br />
A washing cycle is started for a group by pressing<br />
the 2 key for that group. Once the<br />
washing cycle is complete, it is possible to use<br />
a rinse cycle on the same group by pressing the<br />
1 key again. To perform the rinse cycle at a<br />
later time, switch off the machine: the machine<br />
card will store any cleaning cycles that need<br />
to be completed in its memory. In fact, the next<br />
time that the machine is switched on, the<br />
machine card will automatically open the<br />
group cleaning status without it being necessary<br />
to press the 5 keys . Holding down the<br />
5 keys of the first and second group for 2<br />
seconds will close the cleaning mode in the<br />
event that there are no cycles still to be completed.<br />
For incomplete cycles, hold down the<br />
2 keys for the groups still requiring rinsing.<br />
Holding down the 5 keys for the first and<br />
second groups for another 2 seconds will force<br />
the cleaning mode to close, resetting any information<br />
about incomplete rinses. If the cleaning<br />
cycle is completed, the 2 key of the<br />
group will switch off and if no further rinses are<br />
required, the machine card will exit the cleaning<br />
mode.<br />
CLEANING THE BODYWORK<br />
To ensure the machine maintains its characteristics<br />
intact over the years, it must always be<br />
kept perfectly clean.<br />
Do not use detergent products, only a soft and<br />
clean sponge dipped in water.<br />
Any oxidisation of the bodywork is perfectly<br />
normal as this is made from natural brass or<br />
copper (depending on the version).<br />
CLEANING THE UNIT WITH THE AID OF<br />
THE BLIND FILTER<br />
After replacing the standard filter in the filterholder<br />
with the blind filter provided, pour in<br />
two teaspoons of specific detergent and then<br />
fit the filter-holder in the unit and press the<br />
continuous dispensing button.<br />
After about 30’’ stop dispensing and repeat<br />
this last operation 3 times.<br />
Finally, put the standard filter back in and make<br />
a cup of coffee to be thrown away so as to<br />
remove any remaining detergent residue.<br />
CLEANING THE FILTER AND FILTER-<br />
HOLDER<br />
Mix two teaspoons of specific detergent in half<br />
a litre of boiling water and soak the filters and<br />
filter-holder in the solution for about half an<br />
hour. Afterwards, rinse well under plenty of<br />
running water.<br />
Always use glass or stainless-steel containers<br />
and keep the handles of the filter-holder out of<br />
the detergent liquids.<br />
28
VENUS CENTURY<br />
Herzlichen Glückwunsch! Sie haben eine einzeigartige Kaffeemaschine gewählt.<br />
Bitte, lesen Sie die Gebrauchsanweisung sorgfältig durch, insbesondere die Hinweise<br />
zur Einstellung Ihrer „Venus Century“. Sie werden bemerken, wie es einfach ist,<br />
köstliche Kaffees und schaumige Capuccinos zuzubereiten. Mit der Zeit wird Ihnen<br />
auch wohl bewusst, dass Ihre Maschine sehr wenig Wartung erfordert.<br />
D<br />
<strong>Victoria</strong> <strong>Arduino</strong><br />
29
D<br />
30
D<br />
VENUS CENTURY<br />
Modell: Venus Bar 3 Brühgruppen - Nettogewicht: 76 Kg – Bruttogewicht: 86 Kg - Wärmeleistung: 1800 W - Boilerkapazität 12 l Volts 208-<br />
240V 50/60Hz Größe: L 490 mm H 1070 mm T 490 mm – Blech: Edelstahl<br />
Das Zulassungszeichen bescheinigt, dass alle Maschinen überaus gründlichen Prüfungen und Kontrollen unterzogen wurden.<br />
31
ALLGEMEINES BEI LIEFERUNG<br />
D<br />
SICHERHEITSHINWEISE<br />
Diese Gebrauchsanweisung ist ein<br />
wesentlicher Bestandteil dieses Produktes und ist<br />
dem Verbraucher zu liefern. Bitte, lesen Sie die<br />
Hinweise dieser Gebrauchsanweisung<br />
aufmerksam durch, da sie wichtige Angaben zu<br />
einer sicheren Installation, Gebrauch und<br />
Wartung enthält. Bewahren Sie sie auch für<br />
späteres Nachschlagen auf.<br />
Nach dem Auspacken sicherstellen, dass das<br />
Gerät unversehrt ist. Im Zweifelfall das Gerät<br />
nicht benutzen, sondern wenden Sie sich an<br />
fachkundiges Personal.<br />
Die Verpackungselemente dürfen nicht in der<br />
Reichweite von Kindern gelassen werden, da es<br />
sich um potentielle Gefahrenquellen handelt und<br />
sollten nicht gedankenlos fortgeworfen werden,<br />
weil sie die Umwelt belasten.<br />
m UMWELTGEFAHR<br />
Vor dem Anschluss des Gerätes prüfen, ob<br />
die Betriebsdaten auf dem Typenschild mit den<br />
Bemessungswerten des Stromversorgungsnetzes<br />
übereinstimmen. Das Gerät muss gemäß den<br />
geltenden Vorschriften des Landes, wo das<br />
Gerät gebraucht wird, den Hinweisen des<br />
Herstellers und von fachkundigem Personal<br />
installiert werden.<br />
Der Hersteller übernimmt keine Haftung für<br />
Schäden, falls die Anlage nicht geerdet ist. Um<br />
die elektrische Sicherheit dieses Gerätes zu<br />
gewährleisten, ist es erforderlich, dass ein<br />
zugelassener Elektriker mit zertifiziertem<br />
Befähigungsnachweis die Erdung installiert und<br />
gleichzeitig prüft, ob die elektrische Leistung<br />
der Anlage mit der auf dem Schild<br />
angegebenen Höchstleistung des Gerätes<br />
übereinstimmt.Insbesondere muss er auch<br />
prüfen, ob die Kabelquerschnitte für die<br />
Leistungsaufnahme des Gerätes geeignet sind.<br />
Adapter, Mehrfachstecker und Verlängerungskabel<br />
sind verboten. Falls sie aber unbedingt benutzt<br />
werden müssen, wenden Sie sich an einen<br />
Elektriker mit Fachausweis.<br />
Die Maschine ist in Übereinstimmung mit den<br />
örtlichen Gesundheitsvorschriften für<br />
Wasserversorgungsanlagen zu installieren.<br />
Deswegen wenden Sie sich an einen anerkannten<br />
32
Techniker für Ihre Wasserversorgungsanlage.<br />
Dieses Gerät ist nur zu den Zwecken zu<br />
verwenden, die in diesem Handbuch bestimmt<br />
werden. Der Hersteller übernimmt keine Haftung<br />
für ggf. aufgrund falschem, unsachgemäßen<br />
oder unvernünftigem Gebrauch entstehende<br />
Schäden.<br />
m WARNUNG!<br />
Vor dem Gebrauch lesen Sie die ganze<br />
Gebrauchsanweisung oder mindestens die<br />
Sicherheitshinweise und Einstellung des Gerätes<br />
durch.<br />
Bei der Verwendung eines elektrischen<br />
Gerätes sind einiger grundsätzlichen Regeln stets<br />
einzuhalten, d.h.:<br />
• das Gerät mit nassen Händen oder Füßen nicht<br />
berühren;<br />
• das Gerät mit bloßen Füßen nicht benutzen;<br />
• Verlängerungskabel in als Dusche oder<br />
Badezimmer genutzten Räumen nicht benutzen;<br />
• Stromkabel nicht ziehen, um das Gerät vom<br />
Versorgungsnetz zu trennen;<br />
• das Gerät nicht den Witterungseinflüssen<br />
aussetzen (Regen, Sonne, usw.);<br />
• das Gerät nicht von Kindern oder unbefugtem<br />
Personal, das das Handbuch nicht durchgelesen<br />
und/oder gut verstanden hat, benutzen lassen.<br />
Vor jeder Wartungsarbeit muss der<br />
zugelassene Techniker erst den Schalter der<br />
Maschine ausschalten und dann den Stecker<br />
herausziehen.<br />
b. Bei den Reinigungsarbeiten ist die<br />
Maschine auf Energiezustand “O” zu stellen, d.h.<br />
„Schalter der Maschine AUS und Stecker<br />
herausgezogen“ und ausschließlich die<br />
Hinweise dieser Gebrauchsanweisung einhalten.<br />
Bei Störungen oder mangelhaftem Betrieb,<br />
das Gerät ausschalten. Es ist strikt verboten, es<br />
eigenmächtig zu reparieren. Sich nur an<br />
fachkundiges Personal wenden.<br />
Die Instandsetzung der Produkte darf nur von<br />
dem Hersteller oder der zugelassenen<br />
Kundendienststelle durchgeführt werden, wobei<br />
nur Originalersatzteile zu verwenden sind.<br />
Wenn die oben angeführten Hinweise nicht<br />
eingehalten werden, kann die Sicherheit des<br />
Gerätes beeinträchtigt werden.<br />
Bei der Installation muss der zugelassene<br />
Elektriker mit Fachausweis in Übereinstimmung<br />
mit den geltenden Sicherheitsvorschriften einen<br />
einpoligen Schalter mit Kontaktabstand ≥ 3 mm<br />
montieren.<br />
Um Überhitzungen zu vermeiden, ist es<br />
D<br />
33
empfehlenswert, das Stromkabel komplett<br />
abzurollen.<br />
mit 15 cm Abstand von Wänden und/oder<br />
anderen Maschinen aufstellen.<br />
D<br />
Das Stromkabel dieses Gerätes darf vom<br />
Verbraucher selbst nicht ersetzt werden. Wenn<br />
es beschädigt ist, das Gerät ausschalten und für<br />
das Auswechseln nur Fachpersonal hinzuziehen.<br />
Falls das Gerät nicht mehr benutzt werden<br />
sollte, ist es empfehlenswert es stillzulegen,<br />
indem man nach Herausziehen des Netzsteckers<br />
das Stromkabel abschneidet.<br />
m ACHTUNG! UMWELTGEFAHR<br />
Die Maschine belastet die Umwelt: Die für die<br />
Entsorgung zuständigen Stellen hinzuziehen<br />
oder sich an den Hersteller wenden, um die<br />
einschlägigen Informationen zu erhalten.<br />
Wenn die Dampfdüse benutzt wird, mit<br />
Vorsicht vorgehen und die Hände unter die Düse<br />
nicht legen oder sie unmittelbar nach dem<br />
Gebrauch berühren.<br />
m Achtung! Verbrennungsgefahr<br />
m ACHTUNG! VERBRENNUNGSGEFAHR<br />
Vor jeder Tätigkeit wie Installation, Wartung,<br />
Ausladen, Einstellung muss der qualifizierte<br />
Bediener immer Arbeitshandschuhe und<br />
Unfallverhütungsschuhe anziehen.<br />
Um die Belüftung zu fördern, die Maschine<br />
34
D<br />
BESCHREIBUNG DER TASTEN UND<br />
BETRIEBSFÄHIGKEIT DER MASCHINE<br />
Symbol <strong>Victoria</strong> <strong>Arduino</strong><br />
Kuppel<br />
Druckmesser Kessel<br />
Tassenwärmerplatte mit doppeltem Zugang<br />
Bedienungsfeld<br />
Heißwasserdüse<br />
Abtropfschale<br />
Seriennummernschild<br />
Siebträger<br />
Schild mit begrenzter Nummerierung<br />
Dampfdüse<br />
Ein-Aus-Schalter<br />
35
TRANSPORT UND HANDHABUNG<br />
IDENTIFIZIERUNG DER MASCHINE<br />
m ACHTUNG! STOSS- UND QUETSCHGEFAHR<br />
m ACHTUNG! STOSS- UND QUETSCHGEFAHR<br />
D<br />
Bei jeder Mitteilung mit dem Hersteller <strong>Victoria</strong><br />
<strong>Arduino</strong>, Seriennummer der Maschine stets<br />
angeben.<br />
Die Maschine wird durch Paletten transportiert,<br />
welche mehrere Maschinen innerhalb eines<br />
Kartons enthalten. Die Kartone sind mit Rippen<br />
befestigt.<br />
Vor Transport- oder Handhabungstätigkeiten<br />
muss der Bediener:<br />
• Handschuhe und Unfallverhütungsschuhe<br />
sowie einen Schutzanzug mit Gummiband am<br />
Rand anziehen.<br />
Die Paletten müssen durch geeignete Hebezeuge<br />
transportiert werden (z.B. Stapler).<br />
Während der Handhabung muss der Bediener<br />
darauf achten, dass keine Personen, Sachen oder<br />
Gegenstände in der Nähe des Arbeitsbereichs vorliegen.<br />
Die Palette bis etwa 30 cm vom Boden langsam<br />
aufheben und Ladungsbereich erreichen. Erst<br />
nachdem geprüft worden ist, dass keine<br />
Hindernisse, Sachen oder Personen vorliegen, ist es<br />
möglich die Ladung durchzuführen.<br />
Sobald man den Bestimmungsort immer mit einem<br />
geeigneten Hebezeug (z.B. Stapler) gelangt und<br />
sicherstellt, dass Sachen oder Personen in dem<br />
Entladebereich nicht vorhanden sind, die Palette<br />
auf den Boden legen und sie ca. 30 cm vom Boden<br />
bis zum Lagerraum transportieren.<br />
Vor dem folgenden Vorgang prüfen, ob die<br />
Ladung in Ordnung ist und mit dem Schneiden der<br />
Rippen nicht herunterfällt.<br />
Der Bediener soll die Rippen schneiden und die<br />
Waren einlagern, wobei er immer Handschuhe und<br />
Unfallverhütungsschuhe tragen muss; bei dieser<br />
Tätigkeit die technischen Merkmale des Produktes<br />
bzw. das Gewicht der zu lagernden Maschine<br />
berücksichtigen und sinngemäß vorgehen.<br />
m ACHTUNG! UMWELTGEFAHR<br />
Nach dem Auspacken der Maschine, die Palette<br />
oder Behälter nicht gedankenlos fortwerfen, da<br />
eine Umweltgefahr besteht.<br />
36
HINWEISE FÜR DIE INSTALLATION<br />
Nachdem geprüft worden ist, dass keine Teile<br />
in der Verpackung fehlen, beide Füßen montieren<br />
und die Maschine auf den Aufstellort<br />
legen.<br />
Wassereinlass des Wasserreinigers mit der<br />
Wasserfassung verbinden, Auslassrohr des<br />
Wasserreinigers mit dem Pumpeneinlass<br />
anschließen, dann Ansaugrohr mit dem<br />
Pumpenauslass verbinden. Dann das mitgelieferte<br />
Abflussrohr in das entsprechenden<br />
Verbindungsstück unter dem<br />
Maschinensockel hineinstecken und es mit<br />
der entsprechenden Schelle befestigen.<br />
Wärmeplatte und Wärmeband für<br />
Tassenvorwärmung, Kuppel, Abtropfschale<br />
und Adler auf ihren Sitz legen.<br />
Darüber hinaus zum Ausrichten der Maschine<br />
die verstellbaren Füße einstellen.<br />
Prüfen, ob die Bemessungswerte der<br />
Elektroanlage mit den elektrischen Angaben<br />
auf dem Typenschild des Gerätes übereinstimmen.<br />
Stromkabel der Maschine mit der Pumpe verbinden<br />
und Netzstecker in eine geerdete<br />
Steckdose stecken.<br />
Man empfiehlt, Drosselungen der Rohre zu<br />
vermeiden, den Abfluss besonders aufmerksam<br />
zu beachten und ein Stromkabel mit<br />
demselben Querschnitt zu benutzen, falls das<br />
mitgelieferte Kabel unzureichend ist.<br />
Die Maschine muss stets mit einem automatischen<br />
Schalter angemessener Leistung gesichert<br />
sein.<br />
Der Hersteller haftet nicht für ggf. Sach- oder<br />
Personenschäden, die infolge der<br />
Nichteinhaltung der geltenden<br />
Sicherheitsnormen entstehen.<br />
INBETRIEBNAHME<br />
Hauptschalter von Stellung „0“ auf Stellung<br />
„1“ drehen, damit der Boiler richtig gefüllt<br />
wird. Um den korrekten Wasserstand zu erreichen,<br />
kann es notwendig sein, die Maschine<br />
mehrmals auszuschalten und den Schalter<br />
noch auf Stellung 1 zu drehen. Erst nachdem<br />
der höchste Wasserstand erreicht ist, ist es<br />
möglich den Schalter auf Stellung 2 zu bringen.Nach<br />
ca. 20 Min erreicht die Maschine den<br />
Betriebsdruck, der am Manometer mit zwei<br />
Skalen abgelesen werden kann.<br />
Um den Betriebsdruck des Boilers (und daher<br />
D<br />
37
D<br />
die Temperatur) in Abhängigkeit der verschiedenen<br />
Erfordernisse oder der Eigenschaften des eingesetzten<br />
Kaffees zu modifizieren, ist es ausreichend die<br />
Wärmeplatte zu heben und die Druckschalter-<br />
Schraube einzustellen; wenn man sie im<br />
Uhrzeigersinn dreht, sinkt der Druck und umgekehrt<br />
(normalerweise ist die geprüfte Maschine auf 0,8 -<br />
0,9 bar eingestellt). Bei der Installation ist der<br />
Pumpendruck auf 9 bar einzustellen, dieser Druck<br />
wird am Manometer abgelesen, wenn sich die<br />
Maschine im Brühvorgang befindet.<br />
EINSATZ DER DAMPFDÜSE<br />
Um den Dampf zu benutzen, ist es genug, den<br />
Dampfhahn gegen den Uhrzeigersinn zu<br />
drehen: Die von der Dampfdüse austretende<br />
Dampfmenge ist verstellbar. Während des<br />
Dampfaustrittes die Teile der Düse nicht berühren<br />
und die Hände unter die Düse nicht legen.<br />
m ACHTUNG! VERBRENNUNGSGEFAHR<br />
38
Um den Schaum bei der Erwärmung der Milch<br />
zu erzeugen, das Dampf-Mundstück bis zum<br />
Boden eines (möglicherweise kegelstumpfförmigen)<br />
Behälters eintauchen, der mindestens<br />
zu 3/4 l gefüllt werden sollte.<br />
Sobald die Milch kocht, das Dampf-Mundstück<br />
auf die Oberfläche verschieben und die Milch<br />
durch leichte senkrechte Bewegungen streifen,<br />
um den gewünschten Schaum zu erzeugen.<br />
Nach jedem Vorgang, sorgfältig die<br />
Dampfdüse mit einem feuchten Tuch reinigen.<br />
GEBRAUCH DES HEISSWASSERS<br />
Um Heißwasser zu benutzen, ist es genug, den<br />
Heißwasserhahn gegen den Uhrzeigersinn zu<br />
drehen.<br />
Während des Heißwasseraustritts die Teile der<br />
Düse nicht berühren und die Hände unter die<br />
Düse nicht legen.<br />
m ACHTUNG! VERBRENNUNGSGEFAHR<br />
ESPRESSOZUBEREITUNG<br />
Siebträger von der Brühgruppe herausnehmen<br />
und eine oder zwei Portionen Mahlkaffee je nach<br />
dem Siebtyp einsetzen; den Kaffee durch den mitgelieferten<br />
Stopfer pressen und vor dem Einsetzen<br />
des Siebträgers in die Gruppe, den ringförmigen<br />
Rand des Siebes reinigen, um eventuelle verbliebene<br />
Kaffeereste zu beseitigen, die mit der Zeit die<br />
Dichtheit von Gruppe und Siebträger beeinträchtigen<br />
könnten. Bei dem Modell Venus/S den<br />
Kaffeeauslauf-Hebel drehen und ihn in die<br />
Originalstellung bringen, sobald die ausgelaufene<br />
Kaffeemenge ausreichend ist.<br />
Bei dem Modell Venus/V die Taste der gewünschten<br />
Dosierung, die durch die Beschriftung ersichtlich<br />
ist, drucken, um den Kaffee zu brühen.<br />
1 2 3 4 5<br />
Die dosierte Ausgabe erfolgt auf 4 verschiedene<br />
Weisen:<br />
Taste 1 ein kurzer Kaffee ; Taste 2 ein dünner<br />
Kaffee ; Taste 3 zwei kurze Kaffees ;<br />
Taste 4 zwei dünne Kaffees . Die Taste 5<br />
Dauerausgabe Kaffee sieht den halbautomatischen<br />
Einsatz der Kaffeemaschine vor.<br />
Diese vier Optionen pro Gruppe können natürlich<br />
bei der Installation vorprogrammiert werden,<br />
indem die Menge pro Taste und Gruppe<br />
beliebig eingestellt werden kann.<br />
Nach dem Brühvorgang und falls keine Kaffees<br />
ständig zuzubereiten sind, Siebträger in der<br />
Gruppe lassen, damit sie warm bleibt. Die<br />
Brühgruppen sind mit einem Thermoblock-<br />
Heizsystem ausgestattet, das einen totalen<br />
Heißwasserumlauf garantiert; dadurch bleibt<br />
ihre Temperatur unter jeder Betriebsbedingung<br />
konstant.<br />
D<br />
39
PROGRAMMIERUNG DER DOSEN<br />
Um in den Programmierstatus der Dosen jeder<br />
einzelnen Gruppe zu gelangen, ist die Taste 5<br />
5 Sek. lang zu drücken.<br />
DRUCKTASTENSATZ GRUPPE<br />
fahren oder der Programmierstatus anhand der<br />
Taste 5 beendet werden.<br />
Diese Prozedur ist für jede Gruppe gleich; es<br />
darf aber nur eine Gruppe auf einmal in den<br />
Programmierstatus gelangen. Die anderen<br />
Gruppen arbeiten weiterhin völlig normal.<br />
D<br />
1 2 3 4 5<br />
Der Programmiereingang wird durch das<br />
Blinken der 5 Tasten angezeigt. Die Betätigung<br />
einer x-beliebigen Dosistaste aktiviert die<br />
Gruppenausgabe; nach Erreichen der gewünschten<br />
Menge wird die Ausgabe durch die<br />
Betätigung der Taste 5 unterbrochen und<br />
die bis zu diesem Moment ausgegebene Dosis<br />
gespeichert. Die Taste der soeben gespeicherten<br />
Dosis bleibt anschließend aus, während die<br />
anderen Tasten weiterhin blinken. Nun kann<br />
mit der Einstellung einer weiteren Dosis fortge-<br />
HÖHENEINSTELLUNG DER TASSENTEL-<br />
LER<br />
Es besteht die Möglichkeit, die Höhe der<br />
Tassenteller einzustellen, um unterschiedlich<br />
große Tassen verwenden zu können. Hierzu:<br />
1 Die Anzugmutter 1 der Abb. 1 lösen.<br />
2 Den Teller 2 der Abb. 1 gegen den/im<br />
Uhrzeigersinn<br />
drehend<br />
anschrauben/abschrauben, um seine<br />
Höhe wie gewünscht zu verringern oder<br />
erhöhen.<br />
3 Die Anzugmutter 1 der Abb. 1 wieder<br />
anziehen.<br />
1 2<br />
fig.1<br />
40
REGELUNG DER DÜSE TURBOCREAM<br />
(SOFERN VORGESEHEN)<br />
Um die über die Düse TurboCream eingespritzte<br />
Menge Milch zu erhöhen/senken (und folglich<br />
den Prozentsatz an Creme in der geschlagenen<br />
Milch zu erhöhen/senken), ist gemäß der<br />
Abb. 1 vorzugehen:<br />
1 Die Edelstahlkanüle (1) abschrauben,<br />
siehe hierzu Abb.2.A.<br />
2 Um die Luftmenge zu erhöhen/senken,<br />
ist die Teflonkanüle (2) (im Uhrzeigersinn<br />
drehend) anzuschrauben/abzuschrauben<br />
(gegen den Uhrzeigersinn drehen); siehe<br />
Abb. 2.B.<br />
3 Die Edelstahlkanüle erneut anschrauben.<br />
Abb.2.A<br />
2<br />
1<br />
Abb.2.B<br />
fig.2<br />
Hinweis: Die Verkleinerung oder Verlängerung<br />
(An- oder Abschrauben) der Teflonkanüle um einige<br />
mm-Fraktionen oder mm führt zu unterschiedlich<br />
dickem Milchschaum.<br />
AUTOMATISCHER REINIGUNGSZYKLUS<br />
Automatischer Gruppenreinigungszyklus<br />
Der Reinigungszyklus umfasst 2 Stufen:<br />
Waschvorgang (mit Blindfilter und<br />
Reinigungsmittel puly caff) und Spülvorgang (nur<br />
mit Blindfilter) mit jeweils 10 zehn Sekunden langen<br />
Ausgaben und einer dazwischen liegenden<br />
Pause von 5 Sekunden. Die Zyklen können für jede<br />
einzelne Gruppe gleichzeitig und voneinander<br />
unabhängig aktiviert werden. Um in den Status<br />
automatische Reinigung zu gelangen, ist die<br />
Maschine aus- und während des einleitenden<br />
Lamp-tests wieder einzuschalten. Dabei die Tasten<br />
5 der ersten (die linke Gruppe, wenn man die<br />
Maschine vor sich hat) und der zweiten Gruppe<br />
(mittlere Gruppe) drücken. Nach dem Lamp-test<br />
beginnen die Tasten 5 und die Tasten 2 aller<br />
D<br />
41
D<br />
Gruppen zu blinken. Bei der Betätigung einer<br />
Taste 2 wird der Waschzyklus der betreffenden<br />
Gruppe eingeleitet. Nach dem Waschzyklus kann<br />
für dieselbe Gruppe der Spülzyklus vorgenommen<br />
werden, indem erneut die Taste 1 betätigt wird.<br />
Soll der Spülzyklus zu einem späteren Zeitpunkt<br />
ausgeführt werden, ist einzig allein die Maschine<br />
abzuschalten: Die Karte behält die Speicherung<br />
der zu beendenden Reinigungszyklen bei. Bei der<br />
darauffolgenden Einschaltung wird die Karte<br />
automatisch in den Status Gruppenreinigung<br />
gelangen, ohne hierfür die Tasten 5 drücken zu<br />
müssen. Die 2 Sekunden lange Betätigung der<br />
Tasten 5 der ersten und zweiten Gruppe schließt<br />
den Reinigungsstatus, sofern keine zu beendenden<br />
Zyklen vorliegen. Andernfalls blinken weiterhin<br />
die Tasten 2 der Gruppen, in denen noch<br />
der Spülzyklus auszuführen ist. Werden die Tasten<br />
5 der ersten und zweiten Gruppe für weitere 2<br />
Sekunden gedrückt, wird die Schließung des<br />
Reinigungsstatus forciert, indem die Angabe über<br />
die noch zu beendenden Spülverfahren auf Null<br />
gestellt wird. Wird der Reinigungszyklus beendet,<br />
schaltet sich die Taste 2 der Gruppe aus. Die<br />
Karte schließt den Reinigungsstatus, sobald keine<br />
weiteren Spülverfahren mehr vorliegen.<br />
REINIGUNG DES GEHÄUSES<br />
Damit sich die Maschine ihre Merkmale mit der<br />
Zeit unverändert hält, ist es erforderlich die<br />
Maschine ständig pflegen und reinigen.<br />
Keine Reinigungsmittel anwenden, sondern einfach<br />
einen weichen, sauberen Schwamm mit<br />
Wasser verwenden.<br />
Eventuelle Oxidationen des Gehäuses sind ganz<br />
normal, da es aus natürlichem Messing oder<br />
Kupfer (je nach der Ausführung) ist.<br />
REINIGUNG DER GRUPPE DURCH BLIND-<br />
FILTER<br />
Das normale Sieb des Siebträgers durch mitgelieferten<br />
Blindfilter austauschen, zwei Löffel<br />
spezielles Reinigungsmittel dazugeben,<br />
Siebträger in die Gruppe einsetzen und anschließend<br />
Dauerbrühtaste drucken. Nach ca. 30<br />
Min den Auslauf stoppen und diesen Vorgang<br />
dreimal wiederholen. Anschließend das normale<br />
Sieb wieder einlegen und einen Kaffee probeweise<br />
brühen lassen, um eventuelle<br />
Reinigungsmittelrückstände zu entfernen.<br />
SIEB- UND SIEBTRÄGERREINIGUNG<br />
Zwei Löffel spezielles Reinigungsmittel in 1/2<br />
Liter kochendes Wasser geben und Siebe und<br />
Siebträger für eine halbe Stunde in die Lösung<br />
eintauchen. Danach mit fließendem Wasser reichlich<br />
ausspülen. Behälter aus Glas oder rostfreiem<br />
Stahl benutzen und die Griffe des<br />
Siebträgers von der Lösung fernhalten.<br />
42
E<br />
VENUS CENTURY<br />
¡Felicidades! Usted ha elegido una maquina verdaderamente espectacular.<br />
Lea atentamente lo que el manual de instrucciones aconseja hacer para “preparar” su<br />
“Venus Century”. Se dará cuenta de cuánto es fácil hacer óptimos cafés y cremosos<br />
capuchinos. Con el paso del tiempo, se dará Usted cuenta también de cuanta poca<br />
manutención hará falta.<br />
<strong>Victoria</strong> <strong>Arduino</strong><br />
43
E<br />
44
VENUS CENTURY<br />
Modelo: Venus Bar 3 Grupos - Peso neto: 76 Kg - Peso bruto: 86 Kg - Potencia térmica: 1800 W - Capacidad caldera 12 lt Volts 208-240V<br />
50/60Hz Dimensiones: L 490 mm A 1070 mm P 490 mm - chapa: Acero inoxidable<br />
E<br />
La marca de aprovación certifica que todas las máquinas han sido sometidas a cuidadosas pruebas y controles<br />
45
NOTAS GENERALES A LA ENTREGA<br />
E<br />
REGLAS DE SEGURIDAD<br />
El presente manual constituye parte<br />
integrante y esencial del producto y tendrá que<br />
ser entregado al usuario. Lea atentamente las<br />
advertencias contenidas en el presente manual ya<br />
que encontrará importantes indicaciones sobre la<br />
seguridad de la instalación, sobre la utilización y<br />
su manutención.<br />
Guarde cuidadosamente este manual para<br />
ulteriores consultas.<br />
Después de desembalar la maquina,<br />
asegúrese de la integridad del aparato. En caso<br />
de duda no utilice la maquina y pregunte al<br />
personal profesionalmente cualificado. No hay<br />
que dejar los elementos del embalaje al alcance<br />
de los niños porque son potenciales fuentes de<br />
peligro, ni tampoco hay que dispersarlos en el<br />
ambiente.<br />
m ¡ATENCIÓN PELIGRO DE CONTAMINACIÓN!<br />
Antes de conectar el aparato asegúrese de<br />
que los datos de la placa respondan a los de la<br />
red de distribución eléctrica. La instalación tiene<br />
que efectuarse según las normas vigentes en el<br />
País donde la maquina se instala, según las<br />
instrucciones del constructor y por personal<br />
cualificado.<br />
No se puede considerar el constructor<br />
responsable por eventuales daños producidos<br />
por la falta de la toma de tierra de la<br />
instalación. Para la seguridad eléctrica de este<br />
aparato es obligatorio predisponer la instalación<br />
de la toma de tierra, pidiendo a un electricista<br />
con idoneidad técnicacertificada, que averigüe<br />
que la potencia eléctrica de la instalación es<br />
adecuada a la potencia máxima del aparato<br />
indicada en la placa.<br />
En particular tendrá también que comprobar<br />
que la sección de los cables de la instalación es<br />
idónea a la potencia absorbida por el aparato.<br />
Se prohibe el uso de adaptadores, enchufes<br />
múltiples, y alargadores.<br />
Si su uso es indispensable será necesario llamar<br />
a un electricista acreditado.<br />
La maquina tiene que ser instalada en<br />
conformidad con las reglas sanitarias locales<br />
46
actuales para los implantes hidráulicos. Por eso<br />
para el implanto hidráulico contactar con un<br />
técnico autorizado.<br />
Ese aparato podrá ser utilizado solamente<br />
para los usos descritos en este manual.<br />
El constructor no podrá ser considerado<br />
responsable de los eventuales daños causados<br />
por usos impropios, erróneos e irracionales.<br />
m ADVERTENCIA<br />
Antes de utilizar la maquina lea completamente<br />
el manual de uso o por lo menos las reglas de<br />
seguridad y de puesta a punto.<br />
El uso de un cualquier aparato eléctrico<br />
comporta la observancia y el cumplimiento con<br />
algunas reglas fundamentales. En particular:<br />
• No toque el aparato con las manos o los pies<br />
mojados;<br />
• No use el aparato descalzo;<br />
• No use alargadores en locales como la bañera<br />
o la ducha;<br />
• No tire el cable de alimentación, para<br />
desconectar el aparato de la red de alimentación;<br />
• No deje expuesto el aparato a agentes<br />
atmosféricos (lluvia, sol, etc.);<br />
• No permita que el aparato sea utilizado por<br />
niños, o por personal no autorizado y que no<br />
haya leído y bien entendido este manual.<br />
El técnico autorizado tiene que, antes de<br />
efectuar cualquiera operación de manutención,<br />
desconectar el enchufe después de haber<br />
apagado el interruptor de la maquina.<br />
bis Para las operaciones de limpieza poner la<br />
maquina a estado energético “O”, o sea<br />
“interruptor maquina apagado y el enchufe<br />
desconectado” y respete exclusivamente lo que<br />
está escrito en este manual.<br />
En caso de avería o de mal funcionamiento<br />
del aparato, apáguelo. Está severamente<br />
prohibido intervenir. Contacte exclusivamente<br />
con personal profesionalmente cualificado.<br />
La eventual reparación de los productos tendrá<br />
que ser efectuada solamente por la casa<br />
constructora o por un servicio de asistencia<br />
autorizado utilizando exclusivamente recambios<br />
originales.<br />
La falta de respeto de lo que está escrito aquí<br />
puede comprometer la seguridad de la maquina.<br />
A la instalación, el electricista acreditado<br />
tendrá que contar con un interruptor unipolar<br />
como está previsto por las actuales normas de<br />
seguridad con una distancia de apertura de los<br />
contactos igual o superior a los 3 mm.<br />
E<br />
47
E<br />
Para evitar recalentamientos peligrosos se<br />
recomienda extender totalmente de<br />
alimentación por la totalidad de su largura.<br />
El cable de alimentación de este aparato no<br />
tiene que ser substituido por el usuario. En caso<br />
de daño, apague el aparato y por su substitución<br />
contacte exclusivamente con personal<br />
profesionalmente cualificado.<br />
Si decide de no volver a utilizar jamás un<br />
aparato de ese tipo recomendamos de<br />
hacerlo inoperante después de haber<br />
desconectado el enchufe, cortado el cable de<br />
alimentación.<br />
m ¡ATENCIÓN PELIGRO DE CONTAMINACIÓN!<br />
No disperse la maquina en el ambiente: para el<br />
vertido contacte con un centro de servicios<br />
autorizado o con el constructor que dará<br />
indicaciones sobre lo necesario.<br />
Para favorecer la aireación de la maquina<br />
ponerla a unos cm 15 de la pared de otras<br />
maquinas.<br />
Durante el uso del tubo vapor, tenga mucho<br />
cuidado y no meta las manos debajo de eso y no<br />
la toque después del uso.<br />
m ¡ATENCIÓN PELIGRO DE QUEMADURAS!<br />
Acuérdese de que antes de efectuar<br />
cualquiera operación de instalación,<br />
manutención, descargue, regulación, el operador<br />
cualificado tiene que ponerse los guantes de<br />
trabajo y los zapatos apropiados para prevenir<br />
accidentes.<br />
48
DESCRIPCION MANDOS Y<br />
OPERABILIDAD MAQUINA<br />
Símbolo <strong>Victoria</strong> <strong>Arduino</strong><br />
Cúpula<br />
Manómetro caldera<br />
Cuadro de mandos<br />
Superficie para calentar tazas<br />
con doble acceso<br />
Tubo/grifo agua caliente<br />
Cajón de descarga<br />
Porta filtro<br />
Placa con numeración limitada<br />
Tubo vapor<br />
Placa con número de serie<br />
Interruptor maquina<br />
E<br />
49
TRANSPORTE Y MOVIMIENTO<br />
E<br />
IDENTIFICACION MAQUINA<br />
Para cualquier comunicación con el constructor<br />
<strong>Victoria</strong> <strong>Arduino</strong>, tener a mano siempre el número<br />
de matricula de la maquina.<br />
La maquina es transportada en pallett con más<br />
maquinas dentro de cajas aseguradas al pallett con<br />
unas cimbras.<br />
• ponerse unos guantes y unos zapatos para prevenir<br />
infortunios y un mono con elásticos a las extremidades.<br />
El transporte del pallett se efectuará con un medio<br />
de levantamiento adecuado (tipo carretilla elevadora<br />
o toro).<br />
m ¡ATENCIÓN PELIGRO DE CHOQUE O APLASTADO!<br />
El operador durante toda la movilización, tendrá<br />
que asegurarse que no haya gente, cosas o objetos<br />
en el área de operación.<br />
Levantar lentamente el pallett a unos 30 cm de<br />
tierra y alcanzar la zona de carga. Después de<br />
haber verificado que no hay obstáculos, cosa o<br />
personas, proceder al cargamento.<br />
Alcanzado el destino, siempre con un medio adecuado<br />
de levantamiento (ej. Carretilla elevadora<br />
o toro), después de haberse asegurado de que<br />
no hay cosas o personas en el área de descargue,<br />
poner el carretilla a tierra y movilizarlo a unos 30<br />
cm de tierra, hasta la área de almacenamiento.<br />
m ¡ATENCIÓN PELIGRO DE CHOQUE O APLASTADO!<br />
Antes de la siguiente operación comprobar que<br />
el cargamento está en la posición correcta y que<br />
cortando las cimbras o cuerdas no se caiga.<br />
El operador con guantes y zapatos apropiados<br />
para prevenir infortunios, procederá al corte de<br />
las cimbras o cuerdas y al almacenamiento del<br />
producto, para esta operación consultar las<br />
características técnicas sobre el producto para ver<br />
el peso de la maquina que hay que almacenar y<br />
actuar consecuentemente.<br />
m ¡ATENCIÓN PELIGRO DE CONTAMINACIÓN!<br />
Un vez quitada y retirada la maquina del pallett o<br />
contenedor, no dispersarlo en el medio ambiente,<br />
peligro de contaminación.<br />
50
INSTRUCCIONES PARA LA INSTALACION<br />
Después de haber comprobado con que no falte<br />
nada en el embalaje, instale los 2 pequeños<br />
pedestales que faltan y poner la maquina en el<br />
sito previsto. Conecta la entrada del agua del<br />
depurador al grifo del agua, conectan el tubo<br />
de salida del depurador con la entrada de la<br />
pompa, conecta después el tubo de descarga <br />
a la salida de la pompa. Insertan en fin el tubo di<br />
descarga dado en dotación en el enlace previsto<br />
bajo el basamento de la maquina asegurando<br />
la firmeza con las bandas apropiadas.<br />
Ponga en los apropiados alojamientos el plato<br />
calienta tazas, la banda calienta tazas, la cúpula,<br />
los cajones de descarga y en fin el águila.<br />
Después cuidar la posa en plano accionando<br />
sobre los apropiados pedestales de regulación.<br />
Controle que las características de la instalación<br />
eléctrica son compatibles con los datos eléctricos<br />
escritos en la tarjeta de identificación de la<br />
maquina. Conecte el cable eléctrico y que<br />
sale de la maquina con la pompa y el enchufe<br />
de alimentación a una toma de corriente<br />
con toma de tierra. Si raccomanda di evitare<br />
strozzature nei tubi, di curare lo scarico e di<br />
usare un cavo elettrico di pari sezione, qualora<br />
quello fornito non fosse sufficiente. Se<br />
recomienda evitar el estrangulamiento de los<br />
tubos, cuidar la descarga y usar un cable eléctrico<br />
de par sección, si lo que es abastecido no<br />
es suficiente. La maquina tiene siempre que<br />
ser protegida con un interruptor automático<br />
de adecuada potencia. La empresa no responde<br />
de ningún daño a cosas o personas que<br />
derive de la falta de observancia de las vigentes<br />
normas de seguridad.<br />
MESA EN FUNCION<br />
Dar la vuelta al interruptor general de la posición<br />
0 a la posición 1 para consentir que la caldera<br />
se llene correctamente. Para alcanzar el<br />
nivel adecuado de "lleno" puede ser necesario<br />
más veces apagar la maquina y volver a poner<br />
el interruptor general en la posición 1.<br />
Solamente después que el nivel máximo resulta<br />
alcanzado es posible poner el interruptor en<br />
la posición 2. Después de unos 20 minutos la<br />
maquina habrá alcanzado la presión de ejercicio<br />
que se puede ver del manómetro a doble<br />
escala. Para modificar la presión de ejercicio de<br />
la caldera (y por eso la temperatura) en función<br />
de las diferentes exigencias o de las caracterí-<br />
E<br />
51
sticas del café utilizado es bastante levantar el<br />
plato calienta tazas y accionar sobre el tornillo<br />
del presóstato, girando en sentido horario se<br />
provoca una disminución de la presión y viceversa<br />
(normalmente la maquina probada es<br />
regulada a unos 0,8 - 0,9 bar).<br />
La presión de la pompa en fase de instalación<br />
tiene que ser reglada a la presión de 9 bar, tal<br />
presión es evidenciada por el manómetro a<br />
maquina en estado de erogación.<br />
E<br />
USO DEL VAPORIZADOR<br />
Para utilizar el vapor es bastante con que dé la<br />
vuelta en sentido opuesto a las agujas del reloj<br />
al grifo del vapor: es posible una regulación del<br />
flujo de vapor en salida del tubo.<br />
Durante la erogación del vapor, non toque con<br />
las partes del cuerpo el tubo ni tampoco ponga<br />
las manos bajo del tubo.<br />
m ¡ATENCIÓN PELIGRO DE QUEMADURA!<br />
52
Para obtener la crema durante el calentamiento<br />
de la leche, inmergir el grifo del vapor en fondo<br />
al recipiente lleno por 3/4 (preferiblemente a<br />
forma tronco - cónica). Cuando la leche ha llegado<br />
al estado de ebullición mover el grifo del<br />
vapor sobre la superficie rozando la leche con<br />
pequeños movimientos en sentido vertical para<br />
obtener la crema deseada. Al final de cada operación<br />
acordarse de limpiar cuidadosamente el<br />
tubo vapor con un trapo húmedo.<br />
UTILIZO AGUA CALIENTE<br />
Para utilizar el agua caliente es bastante con<br />
que gire en sentido opuesto a las agujas del<br />
reloj el grifo del agua caliente.<br />
Durante la erogación del agua caliente, no<br />
toque con las partes del cuerpo el tubo ni tampoco<br />
poner las manos debajo del tubo.<br />
m ¡ATENCIÓN PELIGRO DE QUEMADURA!<br />
PREPARACIÓN DEL CAFÉ’ ESPRESSO<br />
Desenganche el porta filtro del grupo e introducir<br />
una o dos dosis de café’ molido según el filtro<br />
el filtro utilizado; prense el café’ con la apropiada<br />
prensa pequeña abastecida en dotación y<br />
antes de enganchar el porta filtro al grupo, limpiar<br />
el borde redondo del filtro para quitar eventuales<br />
residuos de café que a lo largo podrían<br />
comprometer la perfecta tenida del grupo y del<br />
porta filtro. En la versión Venus/S giren la leva de<br />
erogación y reposicionarla en la posición inicial<br />
cuando Usted piensa suficiente la dosis de café<br />
erogada. En la versión Venus/V para erogar el<br />
café hace falta empujar el botón relativo a la<br />
dosis deseada reconocible por la gráfica.<br />
1 2 3 4 5<br />
Existen 4 posibilidades de erogación dosificada:<br />
botón 1 un café corto ; botón 2 un<br />
café largo ; botón 3 dos cafés cortos ;<br />
botón 4 dos cafés largos . El botón 5 café<br />
contínuo permite utilizar la máquina de<br />
manera semiautomática.<br />
Estas 4 posibilidades por cada grupo pueden<br />
ser obviamente predeterminadas en fase de<br />
instalación programando la cantidad de café<br />
por cada individual botón y por cada grupo<br />
según las diferentes exigencias. Acabada la<br />
erogación en el caso no tenga Usted que volver<br />
a hacer otro café enseguida, deje el porta<br />
filtro enganchado al grupo para que se quede<br />
siempre caliente. Los grupos de erogación son<br />
termocompensados a circulación total de<br />
agua caliente por lo tanto se quedan a temperatura<br />
constante en cualquiera condición de<br />
ejercicio.<br />
E<br />
53
PROGRAMACIÓN DE LAS DOSIS<br />
Para entrar en la fase de programación dosis de<br />
cada uno de los grupos necesaria apretar<br />
durante 5 segundos el botón 5 .<br />
TECLADO GRUPO<br />
botón 5 . Este procedimiento es idéntico para<br />
cadauno de los grupos, el único vínculo es que<br />
solamente un grupo a la vez puede entrar en programación;<br />
los otros grupos continuan trabajando<br />
normalmente.<br />
E<br />
1 2 3 4 5<br />
La entrada en programación se señala con la intermitencia<br />
de los 5 pulsantes. Apretando cualquiera<br />
de los botones dosis se acciona la erogación del<br />
grupo; una vez alcanzada la cantidad deseada<br />
apretando el botón 5 se interrumpe la erogación<br />
y se memoriza la dosis hasta entonces erogada.<br />
Después de que el botón de la dosis recien<br />
memorizada permanece acabado mientras los<br />
otros botones continuan la intermitencia y se<br />
puede proceder con el ajuste de otra dosis o bien<br />
salir del estado de programación mediante el<br />
REGULACIÓN ALTURA PLATITOS APOYA-<br />
TAZAS<br />
Se puede ajustar la altura de los platitos donde<br />
apoyan las tazas para poder utilizar las tazas de<br />
diferentes dimensiones. Operativamente:<br />
1 desbloquear la tuerca de regulación 1 de<br />
la fig. 1<br />
2 enroscar/desenroscar girando en sentido<br />
contrario a las agujas del reloj/ en sentido<br />
de las agujas del reloj el platito 2 de<br />
la fig. 1 para disminuir/aumentar la altura<br />
hasta llevarlo al nivel deseado<br />
3 Bloquear de nuevo la tuerca de regulación<br />
1 de la fig. 1.<br />
1 2<br />
fig.1<br />
54
REGULACIÓN DISPOSITIVO TURBO-<br />
CREAM (SI ESTÁ INSTALADO)<br />
Para aumentar/disminuir la cantidad de aire<br />
inyectado en la leche mediante dispositivo<br />
TurboCream (y por lo tanto aumentar/disminuir<br />
el porcentaje de crema e la leche montada)<br />
proceder como se indica en fig. 1:<br />
1 Desenroscar la cánula de acero inoxidable<br />
(1) como se indica en fig.2.A.<br />
2 Para aumentar/disminuir la cantidad de<br />
aire enroscar (girando en sentido de las<br />
agujas del reloj)/desenroscar (girando en<br />
sentido contrario de las agujas del reloj)<br />
la cánula de teflón (2) como se indica en<br />
fig. 2.B.<br />
3 Enroscar de nuevo la cánula de acero<br />
inoxidable.<br />
fig.2.A<br />
fig.2<br />
Observaciones: Reduciendo o aumentando la<br />
longitud ( enroscándola o desenroscándola) de<br />
la cánula, cánula de teflón de alguna fracción<br />
2<br />
1<br />
fig.2.B<br />
di mm. o mm. Se obtienen sensibles diferencias<br />
en el nivel de crema de la leche montada.<br />
CICLO AUTOMÁTICO DE LIMPIEZA<br />
Ciclo automático de limpieza grupos<br />
El ciclo de limpieza consta de 2 fases: lavado<br />
(con filtro ciego y detergente puly caff) y aclarado<br />
(solamente con filtro ciego), cadauna de<br />
las 10 erogaciones de 10 segundos con intervalos<br />
de 5 segundos entre ellas. Los ciclos se<br />
pueden iniciar contemporáneamente e independientemente<br />
para cada grupo.<br />
Para entrar en la fase de limpieza automática<br />
hay que apagar la máquina y volver a encenderla<br />
manteniendo apretados los botones 5<br />
del primer (grupo de la izquierda mirando la<br />
máquina desde delante) y del segundo (grupo<br />
central) grupo durante el Lamp-test inicial. Al<br />
finalizar el Lamp-test empiezan a destellar los<br />
E<br />
55
E<br />
botones 5 y los botones 2 de todos los<br />
grupos. Apretando un botón 2 empieza el<br />
ciclo de lavado del grupo correspondiente.<br />
Acabado el ciclo de lavado se puede efectuar el<br />
ciclo de aclarado del mismo grupo, volviendo a<br />
apretar el botón 1 . Si se desea realizar el<br />
ciclo de aclarado en un segundo momento es<br />
suficiente apagar la máquina: la tarjeta mantiene<br />
memorizados los ciclos de limpieza por terminar.<br />
Con un encendido ulterior de la máquina<br />
la tarjeta entrará automáticamente en la<br />
fase de limpieza grupos, sin apretar los botones<br />
5 . Apretando los botones 5 del primer y<br />
segundo grupo durante 2 segundos salimos de<br />
la fase de limpieza en el caso en que no haya<br />
ciclos por terminar, si no permanecerán intermitentes<br />
los botones 2 de los grupos en los<br />
que se tiene todavía que realizar el ciclo de<br />
aclarado. Manteniendo los botones 5 del primer<br />
y segundo grupo durante otros 2 segundos<br />
forzamos la salida de la fase de limpieza<br />
poniendo a cero la información de los aclarados<br />
por terminar. Si el ciclo de limpieza se completa<br />
el botón 2 del grupo se apaga; si no<br />
hay más aclarados para efectuar la tarjeta sale<br />
de la fase de limpieza.<br />
LIMPIEZA DEL CHASIS/EXTERIOR<br />
Para que la maquina mantenga inalteradas las<br />
propias características en el tiempo, hace falta<br />
cuidar asiduamente la limpieza de la misma.<br />
No use ningún producto detergente, use solamente<br />
una esponja blanda y bien limpia con un<br />
poco de agua. Eventuales oxidaciones del exterior<br />
son totalmente normales porque esta está<br />
hecha de latón o cobre naturales (según los<br />
modelos).<br />
LIMPIEZA DEL GRUPO CON EL AUXILIO<br />
DEL FILTRO CIEGO<br />
Después de haber substituido el filtro normal en el<br />
porta filtro con el ciego abastecido, poner en ello<br />
dos cucharillas del detersivo especifico y luego<br />
enganchar el porta filtro en el grupo y empujar el<br />
botón de erogación continua.<br />
Después de unos 30’’ parar la erogación y repetir<br />
por 3 veces esa ultima operación. En fin restaurar<br />
el filtro normal y erogar un café para tirar para quitar<br />
cada eventual residuo de detergente.<br />
LIMPIEZA DE LOS FILTROS Y PORTA FILTROS<br />
Ponga dos cucharillas del detergente especifico<br />
en medio litro de agua hirviente y sumergir en<br />
ella los filtros y porta filtros por media hora más<br />
o menos. Después lave en abundante agua fresca.<br />
Tenga cuidado de usar recipientes en cristal<br />
o acero inox y mantener las cachas del porta filtro<br />
fuera de los líquidos detergentes.<br />
56