Premier - Instruction Manual.pdf
Premier - Instruction Manual.pdf
Premier - Instruction Manual.pdf

You also want an ePaper? Increase the reach of your titles
YUMPU automatically turns print PDFs into web optimized ePapers that Google loves.
GENERAL INSTRUCTIONS AND SAFETY WARNINGEnglish1This book is an integral and essentialpart of the product and must be given tothe user. Read this book carefully. It provides importantinformation concerning safety of installation, useand maintenance. Save it for future reference.2After un packing, make sure theappliance is complete. In case ofdoubts, do not use the appliance, but consult a qualifiedtechnician. The packing items which are potentiallydangerous (plast-bags, polystyrene foam, nails,etc.) must be kept out of children's reach.3 Before connecting the appliance makethe rating plate data correspond withhe mains. This plate is on the front panel of theappliance at the top and to the right. The appliancemust be installed by qualified technicians in accordancewith current standards and manufacturer'snstructions. Incorrect installation could harm ornjure persons, animals, or things for which themanufacturer cannot be considered liable. Electricsafety of the appliance is assured only when anefficient ground connection is made as required byexisting safety regulations. This safety requirementmust be verified and in case of doubt a professionalskilled expert must be called on to check thew i r i n g .The manufacturer is not liable for any damage causeddue to failure to ground the system .Make sure the electric power of the system is sufficientto absorb the maximum power input statedon the plate. In case of doubt, contact a qualifiedechnician who must also make sure in particularhat the size of the wiring cables is sufficient toabsorb power input.We recommend against using adapters, multiplesockets or extensions.f they prove necessary, only use extensions, singleor multiple adapters or plugs that meet safetyregulations, making sure, however, not to exceedhe rated current limit marked on the single adaperand extension and the maximum input markedon the multiple adapteur.4 This appliance must only be used forthe designed purpose. Any other usageis considered incorrect and therefore dangerous.The manufacturer shall not be liable for any damagecaused due to improper, incorrect and unreasonableuse.5The following basic rules must beobserved when using any electricappliance:- do not touch the appliance when hands or feet arewer or damp- do not use the appliance when barefoot;- do not use extensions in bath or shower rooms- do not pull the supply cord out of the socket todisconnect it from the mains- do not leave the appliance exposed to atmosphericagents (tain, sun, etc.) unless expressly providedfor;- do not let the appliance be used by children oranyone not familiar with it.6Before servicing the appliance, disconnectit from the mains by pulling out theplug or switching off the electricity.6/aTo clean the appliance, follow theinstructions in this book.7 If the appliance breaks down or fails towork properly, switch it off and do notattempt repairs or other operations. Contact qualifiedexperts only.Repairs should only be made by the manufacturer orauthorized service centres. Only original spare partsmust be used.Failure to observed the above, could damage theappliance or make it unsafe.8For installation, an omnipolar switchmust be used in accordance withsafety regulations with over 3 mm between conta c t s .91 0To avoid dangerous overheating, makesure the supply cord is fully uncoiled.Do not obstruct exhaust or dissipatigrids, in particular the cup warmer.11The user must not replace the appliancesupply cord. If the cord is damaged,switch off the appliance and have a qualified technicianchange the cord.12If no longer using the appliance, werecommend making it inoperative bydisconnecting the supply cord and cutting it.17
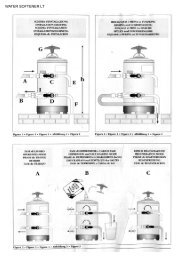
GENERAL INSTRUCTIONS<strong>Instruction</strong>s for installingthe “PREMIER”Make sure nothing is missing in thepacking. Position the machine in the placeprovided, make sure it is leveled and adjustthe feet if necessary.Place the water softener in the space provided.Remember that in all the PREMIERmodels the pump is built into the machineand this simplifies hook-up operations considerably.Before hooking up the water to themachine, let the water run from thewater softener to eliminate impuritiesand greasy deposits.Then connect the water and electricity asshown in Fig. 3.Make sure there are no narrowings in thepiping and that drainage is efficient. If theelectric wire supplied is not sufficient, useone with the same cross section and makesure the system is equipped with efficientearthing and connect it to the machineusing the yellow-green wire.THE MACHINE MUST ALWAYS BE PRO-TECTED WITH AN ADEQUATELY POWE-RED AUTOMATIC SWITCH.The Company shall not be liable for anydamage to persons or things because offailure to observe safety standards.For proper operation, the machine requiresa water pressure not higher than 4 bar. Ifhigher, install a pressure reducer upstreamof the softener.The water inlet pipe must have an internaldiameter of not less than 8 mm.N.B.: Before conneting the machine to the18electric main check that the machine voltageand the net voltage are compatible (Figs.12-13-14), if not, modify as necessary.Setting up the machinefor operationBefore supplying electricity to the machine,make sure the water level is sufficient in theboiler by checking the height in the glasssight level (No. 2 - Figs. 1-2).Even though all the machines are equippedwith an automatic level system, during theinitial phase it is a good rule to fill the boilermanually to prevent any possible damageto the heating element and to make surethe electronic protection device (in modelPREMIER/V only) doesn't switch on whichstops the machine if the automatic level isconnected for more than 60 seconds.Should this happen, simply switch themachine off and on so it can start up againnormally.To fill manually the boiler. Pull torward thevalve to fill manually the boiler, as for pictures1-2 n. 7.At this point the machine cam be turned onby working the general switch (No. 1 - Figs.1-2) and the pilot lamp will light up.During the heating phase, always leave thesteam tap open to normalize the pressureinside the boiler and to keep the liquid to beheated from being sucked into the boiler.After being on for about 20 minutes, themachine reaches working pressure. Thiscan be read on the two-scale pressuregauge (No. 3 - Figs. 1-2).To change the working pressure (and consequentlythe temperature) according to thevarious requests or the characteristics ofthe coffee used, simply raise the top andwork the pressure-switch screw (No. 7 Fig.4), turning it clockwise to lower the pressureand counter clockwise to raise it (normallythe standard rested machine is set at about1.1 -1.2 bar).The pump is adjusted during testing to aworking pressure of 9 atm. This pressure isshown on the pressure gauge (No. 3 - Figs.1-2, lower sector) during the delivery phase.Whenever the pressure has to be changed,raise the top as for the other adjustmentsand turn the pumping element screw (No. 6- Fig. 5) as necessary to reach the desiredpump motor pressure. Should the desiderresult not be achieved even when turningthe adjustment screw all the way, the pumpingelement must be replaced.For a new one, contact the nearest authorizedservice centre.To use the steamand the hot waterTo use the steam and the hot water simplypull forward the appropriate levers (No. 4,Fig. 1) which are in an extremely practicaland accessible position.These levers make it possible to regulate thesteam and the water from the various nozzlesgradually and can also stop the steamwhen steam pressure is at a maximum.The steam nozzles can be moved in theusual manner.To froth the milk during heating, push thesteam nozzle to the bottom of the container(preferably a conical container) for 3-4seconds. When the milk begins to heat
move the steam nozzle to the surface,skimming the milk with short vertical movementsin order to obtain the creamy texturedesired.Remember to clean the steam nozzle thoroughlywith a damp cloth afther each operation.N . B . The <strong>Premier</strong> 3 groups version isequipped with:- two steam pipes (No. 5 - Pict. 2);- one hot water pipe (No. 6 - Pict. 2).Steam can be obtained by acting on lever(No. 4 - Pict. 2), hot water can be obtainedby acting on lever (No. 13 - Pict. 2).Preparation of espresso coffee1) Unhook the filter holder from the unit andadd one or two measures of coffee dependingon the filter used press down the coffeewith the tool provided and before connectingthe filter holder to the unit, with thepalm of your hand clean the filter ring toremove any excess coffee which in the longterm could interfere with the perfect sealbetween the unit and the filter holder.2) In the PREMIER/S version press the coffeedelivery switch and when the desireddose is obtained, press it again.In the PREMlER/V-version, to have the coffee,press the pushbutton relative to thedesired dose as shown on diagram:There are 4 measure possibilities: 1 normalcoffee, 2 normal coffees, 1 long coffee, 2long coffees. These 4 possibilities for eachunit can naturally be preset during thenstallation phase by programming theamount of coffee for each single cup andfor each unit as needed. To programmethese amounts, proceed as follows: Pressthe key of the unit in which thedoses are to be programmed and then,without releasing the STOP, presskey for the same unit.Entrance into the programming state issignalled by the flashing of theLEDand the LEDS fo the doses on the pushbuttonpanel of the unit used.Now press the key for pouring one measure.Only the LED for the programmed dose willremain on. When the coffee has reachedthe desired level in the cup, pressand the dose will be memorized in a protectedmemory zone.At this point the LEDs will start flashingagain to the exclusion of the LED for thedose that has just been programmed.Proceed similarly for the other doses of theunit and to return to working condition,presstwice consecutively.In addition to the 4 measure possibilities, itis also possible in any case to stop pouringat any time by pressing the , buttonor to continue pouring by pressing thebutton.Pouring of the preset dose is completed inany case independently of the fineness ofthe grind since the amount of coffee and notthe pouring time is measured electronically.3) After pouring the coffee and even ifanother is not to be poured immediately,leave the filter holder hooked to the unit soit remains warm. The delivery units arethermocompensated with total circulation ofhot water so the units remain at constanttemperature in every working condition.General cleaning instructionsThe machine should be cleaned very thoroughlyin order to maintain its maximalperformance.All the steel and chromed parts includingthe steam and hot water nozzles should becleaned with a damp cloth.The stainless shower inside the groupshould be disassembled every week andcleaned carefully so that all the holes areperfectly free. To do this, simply uncrew thecentral screw of the group with a normalscrewdriver.To clean the groupwith the blind filterReplace the normal filter in the filter-holderwith the blind filter provided, place 2 teaspoonsof detergent in the filter, reconnectthe filter-holder to the group and push thedistribution push-button. After approx. 30seconds stop distribution and repeat thisoperation three times.Finally, replace the normal filter and make acoffee which is to be thrown away in orderto remove all remaining soap residues.To clean the filtersand filter-holdersPlace 2 teaspoons of specific detergent inhalf a litre of boiling water and leave the filtersand filter-holders to soak for approx,half an hour.19
Rinse thoroughly under running water.Remember to use glass or stainless steelcontainers and keep the handles of the filter-holdersout of the soapy liquid.RegenerationIn order to prevent the formation of limedeposits inside the boiler and the heatexchangers, the water softener shouldalways be perfectly efficient. The cationicresins should therefore be regularly regeneratedat the established dates.The regenerating times depend on thequantity of coffee distributed daily and thehardness of the water in the area.The following graph gives an approximateindication of regeneration times for the typeD/8 softener for machines with up to 2groups and type D/12 for machines with 3or 4 groups.to the left (Fig. 10C) - allow the salt water todrain from the pipe F until fresh water isrunning (1/2 hour), taste to be sure. Returnlever D to the left (Fig. 10D).*Coarse sea saltGrobes MeersalzGros sel de cuisineSal grueso de cocinafig. 10Coming into playof trouble diagnosis systemThe delivery of each unit has a time limitwhich if reached causes the unit to stop andthe trouble is signalled by the flashingLED.To eliminate the blockage, press theTesting for regular operation of the automaticlevel gaugeTo prevent the machine from flooding, analarm has been fitted to regulate the maximumtime of operation of the automaticlevel. If the electric valve of the automaticlevel remains open for more than 60seconds, it is disconnected automaticallyand the trouble is signalled by the flashingLEDs.The pump is disconnected at the sametime. To start up the machine again, voltagemust be removed for at least 3 seconds.Maximum delivery duration 120 seconds(delivery time limit).Maximum automatic level charge 90seconds (automatic level time limit).The automatic level is provided with amanual control to permit charging the boiler.button of the unit involved.Once the generation times have been setproceed as follows: Switch the machine offplace a 2 litre container under the pipe E(Fig. 10A). Turn the levers C and D from leftto right (Fig. 10B), remove the tap byunscrewing the knob G and fill with coarsesalt (2 pounds for the D/8, 3 pounds for theD/1 2) .Replace the tap and reposition only lever CTesting for regular operation of the flowtransducerIf the machine operates irregularly, the troubleis signalled by the flashing of theon the pushbutton panel of the unit involved.In this case delivery is not stopped but if theoperator does not intervene manually andpress the STOP, the appliance is blockedupon reaching the time limit.20
Technical characteristicsPower supply 220 Vac Input 7 VAMinimum duration of memory with powerelectronic box not fed: 60 days.Maximum time for restoring memory 15hours with power electronic box fed.The power box can meter up to a maximumof 2 units with a maximum dose of 9999implulses for each unit.The amount of water delivered depends onthe type of transducer used (with DIGMESAreed transducer about 8 liters).Technical notesfor correct installationProtection fuses are connected in the electronicbox so that connection of an externalprotection is not necessary.The switches are positioned according to thefollowing table:Installationof the pushbutton panelsThe pushbutton panels are connected tohe electronic box by a 20-way cable andthey are parallel with each other.For correct operation, each pushbuttonpanel on its respective unit must be personaizedand operation of the electric valve fordelivery of the unit permitted.This personalization is effected by numberedswitches located inside the pushbuttonpanel.21