You also want an ePaper? Increase the reach of your titles
YUMPU automatically turns print PDFs into web optimized ePapers that Google loves.
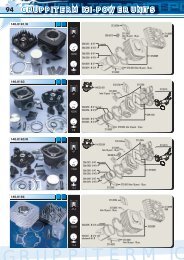
KITS 142.0087-142.0087/ST. Place the provided base gasket and mark with a scriber the<br />
zone to remove with a miller to get a better gas flow. For all the models with a crankcase<br />
without the rear branch pipe: mill the branch pipe and be careful not to damage the base<br />
gasket face (fig. I). Spark plug: L78C Champion scale. Carburetion:<br />
carburettor main jet min. jet atomizer needle gas valve ignition jet<br />
PHBG 19 AD 94 48 AN 262 W16 40 60<br />
KITS 142.0100-142.0104. Remove the valve lifter from the original head and fit it on the<br />
new one. Then assemble the cylinder and the head. Check the tightness and lock the nuts<br />
equally. Advance: as original, marked on the face of the flywheel.<br />
Spark plug: L78C thermic grade on Champion scale.<br />
KITS 142.0154-142.0155-142.0156. Spark plug: C53 Champion.<br />
KIT 144.0150. For some engines it may happen that the cylinder collar does not enter the<br />
crankcase smoothly. <strong>In</strong> this case, modify the crankcase as per figure M.<br />
To achieve the best performance of this kit you have to align the ports of the crankcase<br />
together with those of the cylinder. Carefully close the inlet of the crankcase with some<br />
stopping and place the new base gasket. Mark with a scriber the zone to remove.<br />
Take off the base gasket and go on with the alignment. Blow in a jet of compressed air,<br />
remove the stopping and fill the crankcase with petrol. Make the crankshaft rotate and<br />
remove the working residuals, blowing in a jet of compressed air.<br />
Carburetion: Carburettor Bing 1/14/161, 70 main jet. Spark plug: L82C Champion.<br />
KIT 146.0800. The 122-123 Rotax can be equipped with two different kinds of exhaust<br />
valves: the first with mechanical control, the second with electric control. Our cylinder can be<br />
assembled on both versions. If the pneumatic valve is installed, fit the provided nozzle in the<br />
hole near the valve seat, to improve the pneumatic exhaust valve performance.<br />
The outrigger of the nozzle inside the exhaust pipe has been optimized to work both with<br />
the original muffler and with the Polini one. We recommend not to modify the mentioned<br />
outrigger and not to fit exhaust systems that were not tested on our kit. If the valve with<br />
the electric control is fitted, close the hole near the valve seat with the provided conical pin;<br />
use a punch and a hammer to fit the valve in its seat. The original valve is used for both<br />
the two models. Before the assembling, wash the valve with petrol. Fit the valve group on<br />
the cylinder and check that the valve can move smoothly in its seat. To achieve the best<br />
performance of the engine, it is worth to verify that the compression ratio corresponds to the<br />
one we recommend. To allow this adjustment, the kit is provided with 3 base gaskets with the<br />
following thicknesses: 0,5 / 0,8 / 1 mm. After having assembled the cylinder and the head,<br />
bring the piston to the top dead centre (T.D.C.) and inject, using a graduated syringe, some<br />
oil in the spark plug hole; fill the combustion chamber, including the spark plug hole threads.<br />
The oil volume should be included between 13,3 and 13,7 cm 3 . If this measure is not<br />
achieved, we suggest your replacing the base gasket, starting from the 0,5 mm one.<br />
Each 0,1 mm of thickness corresponds to a volume variation of 0,28 cm 3 . Carburetion:<br />
carburettor main jet min. jet atomizer needle<br />
PHBH28RD 130 55 AV 264 X56<br />
VHSB34LD 158-155 36 original K56<br />
ATTENTION: NOT GUARANTEED GOODS. By using high sophisticated instruments in<br />
thermostatic chamber qualified technicians check the appropriate dimensions to establish the<br />
right connection between piston and cylinder. The steadfastness in doing this gauging allows<br />
us to exclude whatever possibility of seizure caused by a wrong connection between piston<br />
and cylinder; for this reason THE GUARANTEE DOES NOT COVER THE CYLINDER<br />
GROUP. The assembling of this cylinder group highly improves the performance; for this<br />
reason a complete service of the block, of the crankshaft and of the bearings is recommended.<br />
We suggest to check the carburetion and inspect and clean the exhaust system.<br />
Furthermore, according to the variations and alterations that have been made to carburettors<br />
and to exhaust systems by the different manufacturers during the years, we suggest a<br />
specific set up of the carburetion for each model. (The set up could differ from the data we<br />
have suggested in the assembling instructions).<br />
KIT 166.0079. Carburetion: replace the main jet with the provided one. Spark plug: L78C<br />
Champion. Advance: as original.<br />
FRANÇAIS<br />
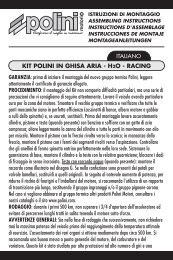
KIT POLINI EN ALUMINIUM AIR - H2O<br />
GARANTIE: avant de commencer avec le montage du nouveau groupe thermique Polini,<br />
lire attentivement le certificat de garantie ci-joint.<br />
DEROULEMENT: le montage du kit n’entraîne pas de difficultés particulières, mais il y a<br />
des précautions à suivre attentivement. Nettoyer soigneusement le véhicule, la partie du<br />
moteur en particulier. Démonter le vieux groupe thermique et vérifier que toutes les parties<br />
mécaniques soient en parfait état (roulements de vilebrequin, vilebrequin, cage à aguille de<br />
l’axe) et, si usagées, prévoir le remplacement. Avant le montage, nettoyer soigneusement le<br />
cylindre, le piston et la culasse (si présente) avec de l’essence et souffler à l’aide d’un jet à