flexa led - Relcogroup.de
flexa led - Relcogroup.de
flexa led - Relcogroup.de

You also want an ePaper? Increase the reach of your titles
YUMPU automatically turns print PDFs into web optimized ePapers that Google loves.
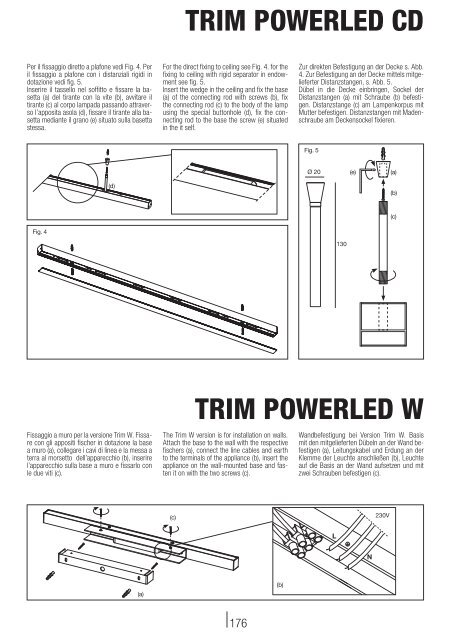
Per il fi ssaggio diretto a plafone vedi Fig. 4. Per<br />
il fi ssaggio a plafone con i distanziali rigidi in<br />
dotazione vedi fi g. 5.<br />
Inserire il tassello nel soffi tto e fi ssare la basetta<br />
(a) <strong>de</strong>l tirante con la vite (b), avvitare il<br />
tirante (c) al corpo lampada passando attraverso<br />
l’apposita asola (d), fi ssare il tirante alla basetta<br />
mediante il grano (e) situato sulla basetta<br />
stessa.<br />
Fig. 4<br />
(d)<br />
Fissaggio a muro per la versione Trim W. Fissare<br />
con gli appositi fi scher in dotazione la base<br />
a muro (a), collegare i cavi di linea e la messa a<br />
terra al morsetto <strong>de</strong>ll’apparecchio (b), inserire<br />
l’apparecchio sulla base a muro e fi ssarlo con<br />
le due viti (c).<br />
(a)<br />
(c)<br />
TRIM POWERLED CD<br />
For the direct fi xing to ceiling see Fig. 4. for the<br />
fi xing to ceiling with rigid separator in endowment<br />
see fi g. 5.<br />
Insert the wedge in the ceiling and fi x the base<br />
(a) of the connecting rod with screws (b), fi x<br />
the connecting rod (c) to the body of the lamp<br />
using the special buttonhole (d), fi x the connecting<br />
rod to the base the screw (e) situated<br />
in the it self.<br />
Fig. 5<br />
Ø 20<br />
TRIM POWERLED W<br />
The Trim W version is for installation on walls.<br />
Attach the base to the wall with the respective<br />
fi schers (a), connect the line cables and earth<br />
to the terminals of the appliance (b), insert the<br />
appliance on the wall-mounted base and fasten<br />
it on with the two screws (c).<br />
176<br />
(b)<br />
Zur direkten Befestigung an <strong>de</strong>r Decke s. Abb.<br />
4. Zur Befestigung an <strong>de</strong>r Decke mittels mitgelieferter<br />
Distanzstangen, s. Abb. 5.<br />
Dübel in die Decke einbringen, Sockel <strong>de</strong>r<br />
Distanzstangen (a) mit Schraube (b) befestigen.<br />
Distanzstange (c) am Lampenkorpus mit<br />
Mutter befestigen. Distanzstangen mit Ma<strong>de</strong>nschraube<br />
am Deckensockel fi xieren.<br />
L<br />
130<br />
(e)<br />
N<br />
230V<br />
(a)<br />
(b)<br />
Wandbefestigung bei Version Trim W. Basis<br />
mit <strong>de</strong>n mitgelieferten Dübeln an <strong>de</strong>r Wand befestigen<br />
(a), Leitungskabel und Erdung an <strong>de</strong>r<br />
Klemme <strong>de</strong>r Leuchte anschließen (b), Leuchte<br />
auf die Basis an <strong>de</strong>r Wand aufsetzen und mit<br />
zwei Schrauben befestigen (c).<br />
(c)