CIPREA D 24 - 32 A - Joannes
CIPREA D 24 - 32 A - Joannes
CIPREA D 24 - 32 A - Joannes

Create successful ePaper yourself
Turn your PDF publications into a flip-book with our unique Google optimized e-Paper software.
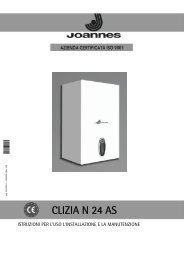
<strong>CIPREA</strong> D <strong>24</strong> - <strong>32</strong> A<br />
|<br />
|<br />
|<br />
|<br />
|<br />
|<br />
|<br />
|<br />
|<br />
|<br />
|<br />
EN<br />
1. GENERAL INSTRUCTIONS<br />
• Carefully read the instructions contained in this instruction booklet.<br />
• After boiler installation, inform the user regarding its operation and give him this<br />
manual, which is an integral and essential part of the product and must be kept with<br />
care for future reference.<br />
• Installation and maintenance must be carried out by professionally qualified personnel,<br />
according to current regulations and the manufacturer's instructions. Do not carry<br />
out any operation on the sealed control parts.<br />
• Incorrect installation or inadequate maintenance can result in damage or injury. The<br />
Manufacturer declines any liability for damage due to errors in installation and use<br />
or failure to follow the instructions.<br />
• Before carrying out any cleaning or maintenance operation, disconnect the unit from<br />
the power supply using the system switch and/or the special cut-off devices.<br />
• In case of a fault and/or poor operation, deactivate the unit and do not attempt to<br />
repair it or directly intervene. Contact professionally qualified personnel. Repair/replacement<br />
of the products must only be carried out by professionally qualified using<br />
original spare parts. Failure to comply with the above could affect the safety of the<br />
unit.<br />
• This unit must only be used for its intended purpose. Any other use is considered<br />
improper and therefore dangerous.<br />
• The packing materials are potentially hazardous and must not be left within the<br />
reach of children.<br />
• The images given in this manual are a simplified representation of the product. In<br />
this representation there may be slight and insignificant differences with respect to<br />
the product supplied.<br />
2. OPERATING INSTRUCTIONS<br />
2.1 Introduction<br />
<strong>CIPREA</strong> D <strong>24</strong> - <strong>32</strong> A is a high-efficiency heat generator for heating and domestic hot water<br />
production, running on natural gas or LPG, equipped with an open-flue burner with<br />
electronic ignition and microprocessor control system, designed for installation indoors<br />
or outdoors in a partially protected place (in compliance with EN 297/A6) for temperatures<br />
to -5°C.<br />
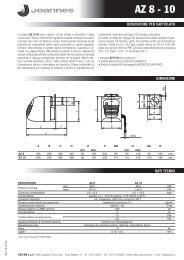
2.2 Control panel<br />
Panel<br />
5 1 2 10 15 7<br />
2.3 Lighting and turning off<br />
Connection to the power supply<br />
• During the first 5 seconds the display will also show the card software release.<br />
• Open the gas cock ahead of the boiler.<br />
• The boiler is now ready to function automatically whenever domestic hot water is<br />
drawn or in case of a heating demand (generated by Room Thermostat or Remote<br />
Temperature Control).<br />
Turning the boiler off and lighting<br />
Press the on/off button (detail 7 - fig. 1) or 5 seconds.<br />
fig. 2 - Turning the boiler off<br />
When the boiler is turned off, the PCB is still powered. Domestic hot water and heating<br />
are disabled. The antifreeze system remains activated. To relight the boiler, press the<br />
on/off button (detail 7 fig. 1) again for 5 seconds.<br />
fig. 3<br />
The boiler will be immediately ready to operate whenever domestic hot water is drawn<br />
or in case of a heating demand (generated by Room Thermostat or Remote Temperature<br />
Control)<br />
B<br />
The antifreeze system does not work when the power and/or gas to the unit are<br />
turned off. To avoid damage caused by freezing during long idle periods in winter,<br />
it is advisable to drain all water from the boiler, DHW circuit and system; or<br />
drain just the DHW circuit and add a suitable antifreeze to the heating system,<br />
complying with that prescribed in sec. 3.3.<br />
2.4 Adjustments<br />
Summer/Winter Switchover<br />
Press the summer/winter button (detail 6 - fig. 1) for 2 seconds.<br />
The display activates the Summer symbol (detail 10 - fig. 1): the boiler will only deliver<br />
domestic hot water. The antifreeze system remains activated.<br />
To deactivate the Summer mode, press the summer/winter button (detail 6 - fig. 1)<br />
again for 2 seconds.<br />
Heating temperature adjustment<br />
Use the heating buttons (details 3 and 4 - fig. 1) to adjust the temperature from a min. of<br />
30°C to a max. of 85°C; it is advisable not to operate the boiler below 45°C.<br />
|<br />
|<br />
|<br />
|<br />
|<br />
|<br />
|<br />
|<br />
|<br />
bar<br />
fig. 4<br />
Hot water temperature adjustment<br />
Use the DHW buttons (details 1 and 2 - fig. 1) to adjust the temperature from a min. of<br />
40°C to a max. of 50°C.<br />
|<br />
|<br />
11 3 4 12 16 6 17<br />
fig. 1 - Control panel<br />
Panel key fig. 1<br />
1 DHW temperature setting decrease button<br />
2 DHW temperature setting increase button<br />
3 Heating system temperature setting decrease button<br />
4 Heating system temperature setting increase button<br />
5 Display<br />
6 "Sliding Temperature" Menu - Summer/Winter mode selection - Reset button<br />
7 Unit On/Off - Economy/Comfort mode selection button<br />
10 Summer mode<br />
11 Multifunction<br />
12 Eco (Economy) mode<br />
15 Burner lit and actual power level (flashing during combustion fault function)<br />
16 Service Tool connection<br />
17 Water gauge<br />
Indication during operation<br />
Heating<br />
During a heating demand (generated by Room Thermostat or Remote Timer Control) the<br />
display shows the actual heating delivery temperature (detail. 11 - fig. 1) and, during<br />
heating standby time, the message “d2”<br />
Domestic hot water (DHW)<br />
During a DHW demand (generated by drawing domestic hot water) the display shows<br />
the actual DHW outlet temperature (detail 11 - fig. 1) alternating with the message “SA”<br />
(DHW) and, during DHW standby time, the message “d1“.<br />
Fault<br />
In case of a fault (see cap. 4.4) the display shows the fault code (detail 11 - fig. 1) and,<br />
during safety standby times, the messages "d3" and "d4".<br />
|<br />
|<br />
|<br />
|<br />
fig. 5<br />
Room temperature adjustment (with optional room thermostat)<br />
Using the room thermostat, set the temperature required in the rooms. If the room thermostat<br />
is not installed, the boiler will keep the system at the set system delivery setpoint<br />
temperature.<br />
Room temperature adjustment (with optional remote timer control)<br />
Using the remote timer control, set the required temperature in the rooms. The boiler will<br />
adjust the system water according to the required room temperature. For operation with<br />
remote timer control, please refer to the relevant instruction manual.<br />
ECO/COMFORT selection<br />
The unit has a function that ensures a high domestic hot water delivery speed and maximum<br />
comfort for the user. When the device is activated (COMFORT mode), the water<br />
contained in the boiler is kept hot, thereby ensuring immediate availability of hot water<br />
on opening the tap, without waiting times.<br />
The user can deactivate the device (ECO mode) by pressing the eco/comfort button<br />
(detail 7 - fig. 1). In ECO mode the display activates the ECO symbol (detail 12 - fig. 1).<br />
To activate the COMFORT mode, press the eco/comfort button (detail 7 - fig. 1) again.<br />
|<br />
|<br />
|<br />
|<br />
20 EN cod. 3541A341 - 05/2011 (Rev. 00)