Register and win! - KARCHER SATTER
Register and win! - KARCHER SATTER
Register and win! - KARCHER SATTER
Create successful ePaper yourself
Turn your PDF publications into a flip-book with our unique Google optimized e-Paper software.
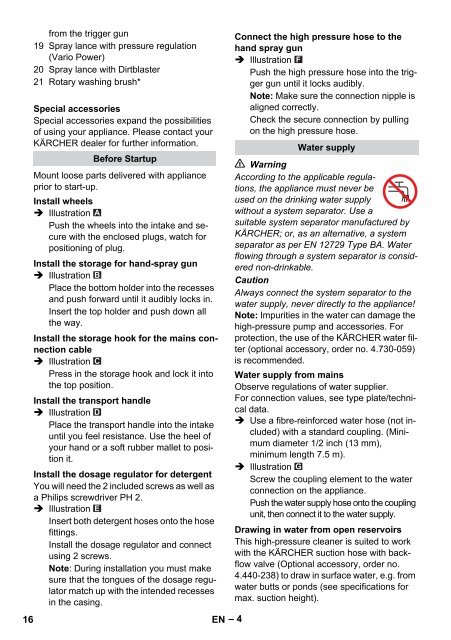
from the trigger gun<br />
19 Spray lance with pressure regulation<br />
(Vario Power)<br />
20 Spray lance with Dirtblaster<br />
21 Rotary washing brush*<br />
Special accessories<br />
Special accessories exp<strong>and</strong> the possibilities<br />
of using your appliance. Please contact your<br />
KÄRCHER dealer for further information.<br />
Before Startup<br />
Mount loose parts delivered with appliance<br />
prior to start-up.<br />
Install wheels<br />
Illustration<br />
Push the wheels into the intake <strong>and</strong> secure<br />
with the enclosed plugs, watch for<br />
positioning of plug.<br />
Install the storage for h<strong>and</strong>-spray gun<br />
Illustration<br />
Place the bottom holder into the recesses<br />
<strong>and</strong> push forward until it audibly locks in.<br />
Insert the top holder <strong>and</strong> push down all<br />
the way.<br />
Install the storage hook for the mains connection<br />
cable<br />
Illustration<br />
Press in the storage hook <strong>and</strong> lock it into<br />
the top position.<br />
Install the transport h<strong>and</strong>le<br />
Illustration<br />
Place the transport h<strong>and</strong>le into the intake<br />
until you feel resistance. Use the heel of<br />
your h<strong>and</strong> or a soft rubber mallet to position<br />
it.<br />
Install the dosage regulator for detergent<br />
You will need the 2 included screws as well as<br />
a Philips screwdriver PH 2.<br />
Illustration<br />
Insert both detergent hoses onto the hose<br />
fittings.<br />
Install the dosage regulator <strong>and</strong> connect<br />
using 2 screws.<br />
Note: During installation you must make<br />
sure that the tongues of the dosage regulator<br />
match up with the intended recesses<br />
in the casing.<br />
16 EN – 4<br />
Connect the high pressure hose to the<br />
h<strong>and</strong> spray gun<br />
Illustration<br />
Push the high pressure hose into the trigger<br />
gun until it locks audibly.<br />
Note: Make sure the connection nipple is<br />
aligned correctly.<br />
Check the secure connection by pulling<br />
on the high pressure hose.<br />
Water supply<br />
Warning<br />
According to the applicable regulations,<br />
the appliance must never be<br />
used on the drinking water supply<br />
without a system separator. Use a<br />
suitable system separator manufactured by<br />
KÄRCHER; or, as an alternative, a system<br />
separator as per EN 12729 Type BA. Water<br />
flo<strong>win</strong>g through a system separator is considered<br />
non-drinkable.<br />
Caution<br />
Always connect the system separator to the<br />
water supply, never directly to the appliance!<br />
Note: Impurities in the water can damage the<br />
high-pressure pump <strong>and</strong> accessories. For<br />
protection, the use of the KÄRCHER water filter<br />
(optional accessory, order no. 4.730-059)<br />
is recommended.<br />
Water supply from mains<br />
Observe regulations of water supplier.<br />
For connection values, see type plate/technical<br />
data.<br />
Use a fibre-reinforced water hose (not included)<br />
with a st<strong>and</strong>ard coupling. (Minimum<br />
diameter 1/2 inch (13 mm),<br />
minimum length 7.5 m).<br />
Illustration<br />
Screw the coupling element to the water<br />
connection on the appliance.<br />
Push the water supply hose onto the coupling<br />
unit, then connect it to the water supply.<br />
Dra<strong>win</strong>g in water from open reservoirs<br />
This high-pressure cleaner is suited to work<br />
with the KÄRCHER suction hose with backflow<br />
valve (Optional accessory, order no.<br />
4.440-238) to draw in surface water, e.g. from<br />
water butts or ponds (see specifications for<br />
max. suction height).


