MDR 3 - RM
MDR 3 - RM
MDR 3 - RM
- No tags were found...

You also want an ePaper? Increase the reach of your titles
YUMPU automatically turns print PDFs into web optimized ePapers that Google loves.
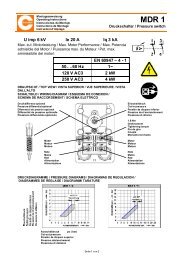
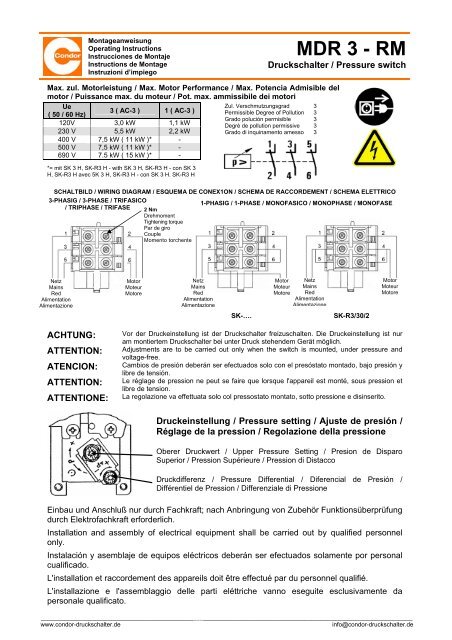
MontageanweisungOperating InstructionsInstrucciones de MontajeInstructions de MontageInstruzioni d’impiego<strong>MDR</strong> 3 - <strong>RM</strong>Druckschalter / Pressure switchMax. zul. Motorleistung / Max. Motor Performance / Max. Potencia Admisible delmotor / Puissance max. du moteur / Pot. max. ammissibile dei motoriUe( 50 / 60 Hz)3 ( AC-3 ) 1 ( AC-3 )120V 3,0 kW 1,1 kW230 V 5,5 kW 2,2 kW400 V 7,5 kW ( 11 kW )* -500 V 7,5 kW ( 11 kW )* -690 V 7.5 kW ( 15 kW )* -*= mit SK 3 H, SK-R3 H - with SK 3 H, SK-R3 H - con SK 3H, SK-R3 H avec 5K 3 H, SK-R3 H - con SK 3 H. SK-R3 HZul. VerschmutzungsgradPermissible Degree of PollutionGrado polución permisibleDegré de pollution permissiveGrado di inquinamento amesso33333SCHALTBILD / WIRING DIAGRAM / ESQUEMA DE CONEX1ON / SCHEMA DE RACCORDEMENT / SCHEMA ELETTRICO3-PHASIG / 3-PHASE / TRIFASICO1-PHASIG / 1-PHASE / MONOFASICO / MONOPHASE / MONOFASE/ TRIPHASE / TRIFASE 2 NmDrehmomentTightening torquePar de giroCoupleMomento torchenteNetzMainsRedAlimentationAlimentazioneMotorMoteurMotoreNetzMainsRedAlimentationAlimentazioneMotor NetzMoteur MainsMotore RedAlimentationAlimentazioneMotorMoteurMotoreSK-….SK-R3/30/2ACHTUNG:ATTENTION:ATENCION:ATTENTION:ATTENTIONE:Vor der Druckeinstellung ist der Druckschalter freizuschalten. Die Druckeinstellung ist nuram montiertem Druckschalter bei unter Druck stehendem Gerät möglich.Adjustments are to be carried out only when the switch is mounted, under pressure andvoltage-free.Cambios de presión deberán ser efectuados solo con el presóstato montado, bajo presión ylibre de tensión.Le réglage de pression ne peut se faire que lorsque l'appareil est monté, sous pression etlibre de tension.La regolazione va effettuata solo col pressostato montato, sotto pressione e disinserito.Druckeinstellung / Pressure setting / Ajuste de presión /Réglage de la pression / Regolazione della pressioneOberer Druckwert / Upper Pressure Setting / Presion de DisparoSuperior / Pression Supérieure / Pression di DistaccoDruckdifferenz / Pressure Differential / Diferencial de Presión /Différentiel de Pression / Differenziale di PressioneEinbau und Anschluß nur durch Fachkraft; nach Anbringung von Zubehör Funktionsüberprüfungdurch Elektrofachkraft erforderlich.Installation and assembly of electrical equipment shall be carried out by qualified personnelonly.Instalación y asemblaje de equipos eléctricos deberán ser efectuados solamente por personalcualificado.L'installation et raccordement des appareils doit être effectué par du personnel qualifié.L'installazione e l'assemblaggio delle parti eléttriche vanno eseguite esclusivamente dapersonale qualificato.______________________________________________________________________________________________________________Seite 1 von 3www.condor-druckschalter.deinfo@condor-druckschalter.de
DRUCKDIAGRAMME / PRESSURE DIAGRAMS / DIAGRAMAS DE REGULACION /DIAGRAMMES DE REGLAGE / DIAGRAMMI TARATUREEinschaltdruck *pu (bar)Cut-in pressurePresión de disparo inferiorPression de d’enclenchementPressione di attacco*<strong>MDR</strong> 3 EA in Position / l Auto<strong>MDR</strong> 3 EA in position / l Auto<strong>MDR</strong> 3 EA en posición / l Auto<strong>MDR</strong> 3 EA dans position / lAuto<strong>MDR</strong> 3 EA in posizione / l AutoAusschaltdruckCut-out pressurePresión de disparo superiorPression déclenchementPressione di distaccopo ( bar)ANBAU DER MODULE / MOUNTING ADD-ON MODULES / MONTAJE DE LOS MODULES /MONTAGE DES MODULES / MONTAGIO DEI MODUL0,4 Nm1. - Nase wie im Piktogramm schräg einsetzen2. - Modul nach hinten kippen3. - Befestigungsschrauben festdrehenWechsel bereits montierter Module:in umgekehrter Reihenfolge verfahren1. - Insertar el tetón como en la pictografia2. - Presionar hacia atras3. - Apretar tornillosCambiar módulos ya montados: proceder al inverso1. - Inserire obliquamente il beccuccio come daschema illustrativo2 - Raddrizzare il modulo3. - Serrare le viti di fissagioSostituzione rnoduli: procedere in senso inverso1. - Insert catch as shown2. - Push the module backwards3. - Tighten screwsChanging matented modules: proceed inreverse1. - Insérer le teton en oblique2. - Pousser le module vers I´arrieré3. - Serrer les vis de fixationPour remplacer un module: fait I´opérationinverseHaubenbefestigung / Cover fastening / Fijación de la tapa / Fixation par coiffe / Fissaggiocoperchio: 1 Nm /Anbau der Module / Add-on Modules / Módules Montables I Modules complementaires / I Moduli:s. Katalog / see catalogue / ver cátalogo / voyez notre catalogue / vedere catalogo______________________________________________________________________________________________________________Seite 2 von 3www.condor-druckschalter.deinfo@condor-druckschalter.de
Kurzschlußschutzeinrichtung für <strong>MDR</strong> 3 / Protection against short-circuit for <strong>MDR</strong> 3 / Proteccióncontra corto circuito para <strong>MDR</strong> 3 / Protection contre court-circuit pour <strong>MDR</strong> 3 / Protezione controcorto circuito per <strong>MDR</strong> 3 Iq ≤ 50kAType / Tipo Koordination Type “1” Koordination Type “2”Co-ordination Type “1” Co-ordination Type “2”Coordinación Tipo “1” Coordinación Tipo “2”Coordination Type “1” Coordination Type “2”Coordinamento Tipo “1” Coordinamento Tipo “2”Überstromrelais max. Sich. gl oder LS-Schalter (400 V)Overload relais max. Fuse (slow) or McB (400 V)Relé térmico max. Fusible (retardado) o Automatico (400 V)Relais disjoncteur max. Fusible (retardé) ou Disjoncteur Automatiques (400 V)Relé termico max. Fusible (ritardarto) o Interruptore modulare (400 V)400 V 690 V 400 V 690 VSK-R3/1,0 80 A 63 A 6 A 4 ASK-R3/1,6 80 A 63 A 10 A 6 ASK-R3/2,5 80 A 63 A 20 A 10 ASK-R3/4,0 80 A 63 A 35 A 20 ASK-R3 (H)6.3 . 24 80 A 63 A 35 A 35 ASK-R3 (H)/SK-R3(H-S) 80 A 63 A 35 A 35 ACMotornennstrom am Excenter des SK-R3 Überstromrelaiswie abgebildet einstellen.Use dial to adjust the overload relay SK-R3 to the ratedmotor current as shownUsar la excêntrica para ajustar el relé têrrnico SK-R3 a lacorriente nominal del motor como en la pictografiaDêplacé l'excentrique du thermique SK-R3 a la valeur ducourant nominal du moteur comme indiquéTorare la corrente nominale del motore sul relais termicoSK-R3 agendo sull'eccentrico come indicatoHorsepower Ratings und Short Cimuit Proteejan acc. to UL 508 Max. Operating pressure *Conrad Block 110 - 120 V 220 - 240 V 440 - 480 V 550 - 600 V Short Circuit Protection <strong>MDR</strong> 3 / 6 - <strong>RM</strong> 90 psi / 600 kPaType 1-ph 3-ph 1-ph 3-ph 1-ph 3-ph 1-ph 3-ph max. V max. Fuse <strong>MDR</strong> 3 / 11- <strong>RM</strong> 160 psi 11100 kPaSK-R3/1 - - - - - ½ - ½ 600 15 A <strong>MDR</strong> 3 / 16- <strong>RM</strong> 230 psi / 1600 kPaSK-R3/1,6 - -1 / 10 ⅓ - ¾ - 1 600 15 A* see pressure diagramsSk-R3/2 - -1 / 6 ½ ½ 1 ½ 1½ 600 15 ASk-R3/4 ⅛ ½ ⅓ 1 1 2 1½ 3 600 15 ASK-R3/6,3 ¼ ¾ ½ 1½ 2 3 2 5 600 25 ASk-R3/10 ½ 1 1½ 3 3 5 3 7½ 600 40 ASK-R3/16 1 2 2 5 5 10 7½ 10 600 60 ASK-R3/20 1½ 3 3 - - - 10 - 600 80 ASK-R3/24 2 - - 7½ 7½ - 10 - 600 100 ASK-R3H16 1 2 2 5 5 10 7½ 10 600 60 ASK-R3H/20 1½ 3 3 - - - 10 15 600 80 ASK-R3H/24 2 - - 7½ 7½ 15 10 20 600 100 ASK-R3/30/2 2 - 5 - - - - - 240 110 A1. Suitable for use an a circuit capable of delivering not more than 5 kA rms symmetrical Amperes, 600 Voltsmaximum ( 240 Volts for SK-R3/30/2 ) when protected by nontime delay fuses as noted in the tableabove.2. Suitable for group fusing of 5 kA rms symmetrical Amperes 600 V, 3-ph maximum ( SK-R3/30/2 240V. 1-ph max. ) when protected by time delay fuses rated max. 100 A.3. Use 75° copper wire AWG 10 -AWG 143. AC Motor Load5. Break all lines6. Trip current is 125% of dial settingCondor Pressure Control GmbHWarendorfer Straße 47 – 51D-59320 EnnigerlohTelefon: +49 (0) 25 87 / 89 – 0Telefax: +49 (0) 25 87 / 89 - 14030.310.93.006 02.11.2005info@condor-cpc.comwww.condor-cpc.com______________________________________________________________________________________________________________Seite 3 von 3www.condor-druckschalter.deinfo@condor-druckschalter.de