Geca Simply - Cronot. mecc. giornal. da parete - Mgelettroforniture
Geca Simply - Cronot. mecc. giornal. da parete - Mgelettroforniture
Geca Simply - Cronot. mecc. giornal. da parete - Mgelettroforniture

Create successful ePaper yourself
Turn your PDF publications into a flip-book with our unique Google optimized e-Paper software.
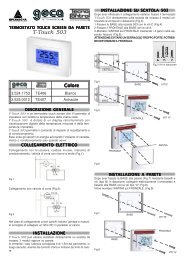
<strong>Simply</strong>CRONOONOTERMOSTERMOSTAT OA CURSORIALIMENTAZIONEDopo aver fissato la Base alla <strong>parete</strong> della vostra abitazione prendere il<strong>Cronot</strong>ermostato <strong>Simply</strong> e rimuovere il coperchio delle batterie posto sulretro utilizzando un comune cacciavite. Dopodichè inserire 3 batterie ministilomod. AAA nell’apposito vano facendo attenzione alla polarità indicata. Fig.6Succesivamente riposizionare il coperchio batterie nella propria sede.Coperchio batterie1.5V AAA 1.5V AAADESCRIZIONE GENERALE<strong>Simply</strong> è un cronotermostato a cursori <strong>da</strong> <strong>parete</strong> <strong>giornal</strong>iero che Vi permettedi programmare la temperatura della Vostra casa ogni ora del giorno.<strong>Simply</strong> è dotato di un display per la visualizzazione della temperatura edell’ora attuale modificabile mediante comandi semplici e funzionali che nefacilitano la programmazione anche <strong>da</strong> seduti grazie alla possibilità di estrazione<strong>da</strong>lla propria Base.<strong>Simply</strong> evita gli sprechi di energia azionando l’impianto di riscal<strong>da</strong>mento ocondizionamento solo quando serve.INSTALLAZIONE<strong>Simply</strong> può essere montato su <strong>parete</strong> (Fig.1) o su scatola 503 (Fig.2).In entrambe i casi, l’altezza consigliata è di 1,5m <strong>da</strong>l pavimento, in luogo asciutto,esente <strong>da</strong> correnti d’aria e lontano <strong>da</strong> fonti di calore. Per fissare la Base,utilizzare le apposite viti in dotazione.Fig.1 - Installazione a <strong>parete</strong>BaseIViti Viti “B” “B”Viti in dotazioneFig.6Tasto progr.Manuale ( )Fig.71.5V AAAINDICAZIONE COMANDI TASTIERATasto ON-OFF ( ) Tasto Estate ( ) / Inverno ( )-TastoOra,Minuti, °C+TastoOra,Minuti, °CACCENSIONE & SPEGNIMENTO°Tasto SET oraAccendere il cronotermostato <strong>Simply</strong> premendo il tasto ON/OFF “ ”.Sul display apparirà il simbolo INVERNO “ ” e per due secondi apparirà lascritta On. . .(Fig.8).Successivamente la scritta On verrà sostituita <strong>da</strong>lla temperatura misurata <strong>da</strong>lcronotermostato <strong>Simply</strong> (Fig.9).Fig.2 - Installazione su scatola 503COLLEGAMENTO ELETTRICOI morsetti per il collegamento elettrico sono situati nella Base sulla quale verràmontato il cronotermostato <strong>Simply</strong> (Fig.3).Dopo aver rimosso il coperchietto della Base, procedere coi collegamentielettrici.(Fig.4-Fig.5).Collegamento con bruciatore, cal<strong>da</strong>iamurale, impianto di condizionamento,valvola di zona con ritorno a molla:Base230 Vac 5AN.A.CN.C.Fig.3 - Morsetti relèCollegamento con valvola di zona:<strong>Simply</strong><strong>Simply</strong>Fig.4Fig.5Nel caso di collegamento a forti carichi induttivi (pompe o motori), si consigliadi collegare un filtro RC in parallelo al carico.ABViti “A”Fig.8Fig.9Il cronotermostato <strong>Simply</strong> ora è acceso, sul display infatti comparirà il simbolodella mo<strong>da</strong>lità INVERNO “ ” .Per spegnere il cronotermostato basta semplicemente ripremere il tasto ON/OFF “ ”.Sul display sparirà il simbolo INVERNO e apparirà la scritta OFF, (Fig.10) sostituitasuccessivamente <strong>da</strong>lla temperatura misurata <strong>da</strong>l <strong>Simply</strong> (Fig.11).Fig.10Fig.11IMPOSTAZIONE OROLOGIOPer impostare l’Ora attuale tenere premuto per 3 secondi il tasto SET.I numeri della parte sinistra del display iniziano a lampeggiare.Tramite le freccie regolare l’Ora.Per memorizzare l’Ora e per regolare i Minuti premere il tasto SET.I Minuti iniziano a lampeggiare.Tramite le freccie regolare i Minuti.Per memorizzare i Minuti premere il tasto SET.L’orario adesso è memorizzato.CERTIFICATO DI GARANZIADA COMPILARE E SPEDIRE IN CASO DI GUASTOAPPARECCHIO : <strong>Cronot</strong>ermostato a cursori <strong>Simply</strong>Numero di serie (s.n.) ______________________________________________RIVENDITORETimbro:Data di acquisto:_____/_____/_____UTILIZZATORECognome e nome _________________________________________________Via _______________________________________________ n° ___________C.A.P. ________________ Città _____________________________________Telefono ________________________________________________________°°
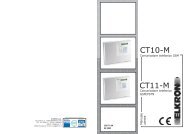
PROGRAMMA AUTOMATICO<strong>Simply</strong> grazie ai suoi 24 Cursori permette di impostare per ogni ora dellagiornata la temperatura desiderata. Sul frontale sono tampografati verticalmentei gradi di riferimento per le mo<strong>da</strong>lità ESTATE / INVERNO. In orizzontaleinvece sono riportate le 24 ore delle giornata. Fig.12Fig.12Scala gradiMo<strong>da</strong>lità ESTATE(<strong>da</strong> 18°C a 30°C)ORE giornataIndicazione modo di funzionamento INVERNOIndicazione modo di funzionamento ESTATEIndicazione modo di funzionamento MANUALEIndicazione pile scaricheScala gradiMo<strong>da</strong>lità INVERNO(<strong>da</strong> 8°C a 25°C)In colore VERDE sono indicati i gradi della mo<strong>da</strong>lità ESTATE e in coloreGrigio sono indicati i gradi della mo<strong>da</strong>lità INVERNO .Le temperature della mo<strong>da</strong>lità ESTATE vanno <strong>da</strong> 18°C fino ai 30°C mentre letemperature della mo<strong>da</strong>lità INVERNO vanno <strong>da</strong>gli 8°C fino ai 25°C.In mo<strong>da</strong>lità ESTATE il cronotermostato può coman<strong>da</strong>re impianti dicondizionamenti,di conseguenza attiverà il carico quando la temperatura ambienteè più alta di quella impostata <strong>da</strong>ll’utente.In mo<strong>da</strong>lità INVERNO il cronotermostato <strong>Simply</strong> fuziona <strong>da</strong> termoregolatoreattivando la cal<strong>da</strong>ia quando la temperatura ambiente è più bassa di quellaimpostata <strong>da</strong>ll’utente.Dopo aver selezionato con il tasto la mo<strong>da</strong>lità desiderata tra ESTATE eINVERNO, procedere con la regolazione dei 24 Cursori .<strong>Simply</strong> grazie al suo display grafico, rende la programmazione di facile utilizzo.Il display visualizza contemporaneamente sia l’orario al quale si sta modificandola temperatura, sia la temperatura che si sta impostando. Fig.13.Per esempio, nel caso in cui si debba modificare la temperatura delle ore 9 sidovrà, spostare il Cursore delle 9 sulla temperatura desiderata (es. 23°C), ildisplay pertanto visualizzerà:Ore giornata (9:00)Fig.13Sulla parte sinistra, l’ora al quale sista modificando la temperatura (H 09)Cursore temperaturaSulla parte destra la temperaturaimpostata tramite il Cursore (23°C).Indicazione chiusura contatto relèCONDIZIONI GENERALI DI GARANZIAIL PRESENTE CERTIFICATO E' L' UNICO DOCUMENTO CHE DA' DIRITTO ALLA RIPARAZIONEDEL PRODOTTO IN GARANZIA- Il prodotto é GARANTITO per un periodo di 24 mesi <strong>da</strong>lla <strong>da</strong>ta di acquisto.- Non sono coperti <strong>da</strong> GARANZIA eventuali <strong>da</strong>nni derivati <strong>da</strong> manomissioni,uso edinstallazione errati o impropri.- La GARANZIA è vali<strong>da</strong> solo se debitamente compilata.- In caso di difetti coperti <strong>da</strong> GARANZIA, il produttore riparerà o sostituirà il prodottogratuitamente.PRESTAZIONI FUORI GARANZIA:Trascorsi i termini o la durata della GARANZIA le eventuali riparazioni verranno addebitatein funzione alle parti sostituite e al costo della manodopera°SETUna volta spostati i Cursori delle ore interessate in corrispondenza dei gradivoluti il cronotermostato <strong>Simply</strong> si abilita automaticamente dopo due secondicirca. Sul frontale del cronotermostato <strong>Simply</strong> si otterrà così un grafico dell’an<strong>da</strong>mentodelle temperature relative alla giornata odierna di facile comprensione.Quando la temperatura ambiente sarà più bassa della temperatura impostata,il cronotermostato <strong>Simply</strong> attiverà la cal<strong>da</strong>ia facendo apparire suldisplay il simbolo fiamma “ ”. Fig.14°Fig.14N.B. In qualsiasi momento si voglia sapere la temperatura di una determinataora basta semplicemente premere uno dei due tasti freccia ; sul displayapparirà la temperatura dell’ora attuale, (es. H15 20°C) e sempre coi tastifreccia ad ogni pressione verranno visualizzate le temperature impostatenelle diverse ore del giorno.Qualora il Cursore non fosse posizionato correttamente lungo la colonna deigradi, il display visualizzerà l’anomalia con la scritta “E” e l’orario corrispondente.In figura 15 viene mostrato un’anomalia alle ore 09:00.°Fig.15Più anomalie verranno visualizzate in sequenza, solamente quando si andrà amodificare una qualsiasi temperatura del giorno. A fine programmazionecontrollare sempre sul display con i tasti se vi sono anomalie presentiPer eliminare l’anomalia basta semplicemente riposizionare il Cursore.Dopo la programmazione e l’inserimento del <strong>Cronot</strong>ermostato <strong>Simply</strong>nella propria Base, premere uno dei tasti per aggionare lacommutazione del relè.FUNZIONAMENTO MANUALE E ANTIGELOPremendo il tasto di fig.7 il cronotermostato entra nel funzionamentomanuale.Ora <strong>Simply</strong> si comporta come un semplice termostato ambiente.La regolazione avviene impostando la temperatura con i tasti “ ” .La temperatura impostata, leggibile sul display, verrà mantenuta fino a che nonsi uscirà <strong>da</strong>l funzionamento manuale, premendo nuovamente il tasto .Il funzionamento manuale può essere utilizzato come FUNZIONE ANTIGELOimpostando la temperatura programmata a 5°C in modo <strong>da</strong> preservare l’impiantoidraulico <strong>da</strong>i guasti causati <strong>da</strong>l gelo.Se dopo la programmazione non avvenisse la prevista commutazionedel relè e/o del simbolo della fiamma spegnere e riaccendere ilcronotermostato <strong>Simply</strong> dopo averlo inserito nella apposita Base.SCARICA DELLE BATTERIE<strong>Simply</strong> è dotato di due soglie di scarica delle batterie. Superata la prima sogliacompare il simbolo (fig.16) mentre l’apparecchio continua a funzionareregolarmente. Al raggiungimento della secon<strong>da</strong>, <strong>Simply</strong> blocca completamentele sue funzioni di termoregolazione mentre il display presenta l’ora, latemperatura ed il simbolo di batteria scarica ( ) lampeggiante. Durante lasostituzione delle pile, <strong>Simply</strong> rimane acceso per 1 minuto in assenza dialimentazione.°Fig.16INIZIALIZZAZIONEAppena alimentato <strong>Simply</strong> effettua un ciclo di controllo accendendo tutti isegmenti del display e attivando il carico per pochi secondi.FUNZIONE RESETNel caso ci fosse la necessità di annullare il programma inserito (per esempiodopo una prova di programmazione) premere contemporaneamente i tastiper 2 secondi ca.Rilasciando i tasti, <strong>Simply</strong> riparte con l’inizializzazione descritta in precedenza.CARATTERISTICHE TECNICHEAlimentazione:3 pile ministilo alcaline <strong>da</strong> 1,5V - tipo AAA.Autonomia pile:oltre 1 anno.Controllo automatico della scarica delle pile con 2 soglie d’intervento.Sostituzione delle pile senza perdita di <strong>da</strong>ti (1 minuto)Campo di regolazione: <strong>da</strong> 8 a 25°C in inverno, <strong>da</strong> 18 a 30°C in estate.Differenziale termico: +0,2°C.Programmazione: <strong>giornal</strong>iera con steep di 0,5°C in mo<strong>da</strong>lità AUTO-MATICA e di 0,2°C in mo<strong>da</strong>lità MANUALEPossibilità di programmare qualsiasi temperatura compresa nei campi diregolazione in ogni ora del giorno.Minimo intervallo impostabile: 1 oraProgramma ESTATE / INVERNO.Orologio al quarzo.Visualizzazione programma, ora e temperatura correntiPortata contatti: 230Vac 5A carico resistivoInstallazione: a <strong>parete</strong> o su scatola 503Colori disponibili: Bianco e antraciteDimensioni: 153x85x31Peso: 215gr pile incluseGECA Srl via E.Fermi n°98 25064 Gussago (BS) Tel. 030 3730218Fax 030 3730228 E-mail:info@gecasrl.it - http://www.gecasrl.itLa GECA s.r.l. si riserva il diritto di apportare qualsiasi modifica, estetica o funzionale, senza preavviso alcuno ed in qualsiasi momento.dis.1034068 cod.2.710.2140 Made in Italy
<strong>Simply</strong>SliderchronothermostatPOWER SUPPLYOnce the Base is fixed on to the wall of your house, take the <strong>Simply</strong>programmable chronothermostat and remove the batteries cover using ascrewdriver.Insert 3 batteries type AAA. (Pic. 6) according to the polarity indicated insideof the compartment, then bring the batteries cover to its original position.Batteries cover1.5V AAA 1.5V AAAG.B.1.5V AAAFEATURES<strong>Simply</strong> is a wall mounting <strong>da</strong>ily programmable by means of slideschronothermostat, which allows to program the temperature of your home foreach hour of the <strong>da</strong>y and each <strong>da</strong>y of the week.<strong>Simply</strong> has a digital display showing actual temperature and time, easy tochange with simple and functional buttons, that help to plans the setting, evensitting removing the thermostat from its wallsupport.<strong>Simply</strong> save energy expenses operating the heating or air conditioningsystems only when required.INSTALLATION<strong>Simply</strong> can be installed on to the wall (Pic.1) or on an electrical box type“503” (Pic. 2). Install the chronothermostat at about 1,5m above the floor, in adry place, away form draughts and heat sources. To properly fix the Basemounting screws are supplied.Pic.1 - Wall mountingPic.2 - Installation on electrical box 503ELECTRICAL WIRINGTerminals for the electric connection are placed on the Base, where theprogrammable chronothermostat <strong>Simply</strong> will be mounted. (pic.3)Remove the housing of the Base before proceeding with the electricconnections(Pic.4-Pic.5)Connection to burner, wall-mountedboiler, air-conditioning system, springreturnzone valve:Pic.4<strong>Simply</strong>Mounting screwssuppliedPic.5BaseBase230 Vac 5APic.3 - Relay TerminalsConnection with zone valve:<strong>Simply</strong>N.A.CN.C.In case of connection with high inductive loads (pumps or motors), it isadvisable to connect an RC filter parallel to the load.AScrews “B”BScrews “A”Pic.6KEYBOARD FUNCTIONS INDICATIONSON-OFF key ( ) Summer key ( ) / Winter key ( )-Manual programmingKeykey ( )Hour,minutesFig.7Key+Hour,minutesOPERATING THE CHRONOTHERMOSTAT°SET hour keyTurn on the <strong>Simply</strong> programmable chronothermostat by pressing the keyON/OFF ( ).The Winter symbol and the ON sign will appear for 2 seconds on thedisplay (Pic. 8).The On sign will be replaced by the temperature indications, measured fromthe programmable chronothermostat <strong>Simply</strong>. (Pic. 9)Pic. 8Pic. 9Now the <strong>Simply</strong> programmable chronothermostat is turned on and theWINTER symbol will appear on the display.To turn the programmable thermostat off, press again the ON/OFF key.The WINTER symbol disappears and the OFF sign will appear on the display(Pic.10), replaced, immediately after, by the temperature measured by the<strong>Simply</strong> (Pic. 11).Pic. 10Pic. 11CLOCK SETTINGPress for 3 seconds the SET key to set the actual hour.Numbers on the left side of the display start to flash.Regulate the Hour through indicators .Press the SET key to memorize the hour and to adjust the Minutes.Minutes start to flash.Adjust the Minutes through indicators .Press the SET key to memorize minutes.Clock in now set.WARRANTY CERTIFICATETO FILL IN AND SEND BACK IN CASE OF FAULTY PRODUCTDEVICE : Slider chronothermostat <strong>Simply</strong>Serial Number (s.n.) _______________________________________________________________RISELLERStamp: Buying <strong>da</strong>te:_____/_____/_____USERSurname and Name ________________________________________________________________Address __________________________________________________________________________Z.I.P. CODE ________________ City __________________________________________________Telephone number _________________________________________________________________°°
AUTOMATIC PROGRAMThanks to its 24 sliders, the programmable cronothermostat <strong>Simply</strong> allowsto set the desired temperature for each hour of the <strong>da</strong>y.The temperature degrees references are vertically printed on the face of thechronothermostat, for SUMMER/WINTER modes 24 hours of the <strong>da</strong>yreferences are horizontally printed (pic. 12).Scala gradiMo<strong>da</strong>lità ESTATE(<strong>da</strong> 18°C a 30°C)ORE giornataScala gradiMo<strong>da</strong>lità INVERNO(<strong>da</strong> 8°C a 25°C)Pic.12SUMMER temperature degrees are in GREEN colour and WINTERtemperature degrees in GREY colour.Temperatures for SUMMER setting are from 18°C to 30°C, while for WINTERsetting they are from 8°C to 25°C.The programmable chronothermostat <strong>Simply</strong> with SUMMER settingcontrols air-conditioning systems and it switch on the load when the roomtemperature is higher than temperature set.The programmable chronothermostat <strong>Simply</strong> with WINTER settingcontrols the heating system switching on the boiler when the room temperatureis lower than temperature set.Once SUMMER or WINTER mode is set and the desired temperatureis selected, proceed with the adjustment of the 24 sliders.<strong>Simply</strong> allows an easy programming, thanks to its graphic display.The display shows at the same time temperature to set and timing of setting(Pic. 13).For example, to modify the temperature at 9.00 o’clock, move the slider of 9hour to the desired temperature (ex. 23°C).On the display it will appear:Once the sliders are positioned at desired hours corresponding to the requireddegrees, the programmable chronothermostat <strong>Simply</strong> automatically runsafter two seconds.A diagram of the <strong>da</strong>ily temperature will appear for an easy understanding.When the room temperature is lower than set temperature, <strong>Simply</strong> activatesthe boiler and the display shows the flame symbol . (Pic.14)Pic.14N.B. To know the temperature set at a specific hour, press one of the arrowkeys ; on the display the actual hour and temperature (ex. H15 20°C)appear.Pressing the arrow keys the temperatures set at different hours of the <strong>da</strong>ycan be seen. In case of incorrect positioning of the slider on the degreescolumn, the display will show “E” and the wrong timing. (See pic. 15 with a faultat 09 hours).Pic.15Several faults are shown in sequence only when modifying any temperature ofthe <strong>da</strong>y.Once the setting is completed, always check with keys if no faultsappear on the display.Any fault can be cancelled by moving the slider.Press one of the key to up<strong>da</strong>te the relay switching, after havingprogrammed and inserted the chronothermostat <strong>Simply</strong> into its Base.FROST PROTECTION AND MANUAL SETTINGPressing the key (pic.7) the programmable chronothermostat is set tomanual mode. Now <strong>Simply</strong> works as a simple room chronothermostat withtemperature setting by the keys .The set temperature will be kept till the manual mode will be left by pressingagain the key .Manual mode can be used for FROST PROTECTION setting the programmedtemperature at 5°C to prevent freezing the system.If the relay switching and/or the flame symbol did not happen afterthe programming, turn off and on the chronothermostat <strong>Simply</strong> afterhaving inserted it in the Base.°°Day hour (9:00)Temperature cursorUSED BATTERIES<strong>Simply</strong> has 2 used batteries thresholds indicators. Once the first one isreached, the symbol (pic16) appears while the chronothermostatcontinues to operate. Once the second threshold is reached , <strong>Simply</strong> stopsthe temperature control functions while the display shows the temperature,time and flashes the symbol of used battery <strong>Simply</strong> has a permanentmemory of one minute to keep your program setting during the batteryreplacement. (pic. 16)°Pic.13On the left side, hour at which thetemperature is changed (H 09)WINTER modeSUMMER modeMANUAL modeOn the right side, temperature setthrough the slider (23°C).Exhausted batteries indicationRelay close modeGENERAL WARRANTY CONDITIONSTHE PRESENT CERTIFICATE IS THE ONLY DOCUMENT WHICH GIVES YOUTHE RIGHT TO THE PRODUCT REPAIR UNDER WARRANTY- The product is GUARANTEE for a period of 24 months from the buying <strong>da</strong>te.- Evenctual <strong>da</strong>mages originated from tampering, illegal opening, inappropriate or wronguse or installation are not covered by the WARRANTY.- GUARANTEE is valid only if properly filled in.- In case of faults covered by the WARRANTY, the producer will repair or replace theproduct free of charge.OUT OF WARRANTY PERFORMANCES:Elapsed the terms or the period of WARRANTY, evenctual repair activities will becharged in relation to the replaced parts and to the labour costs.°SETPic.16START UPWhen wired, <strong>Simply</strong> makes a control cycle lighting up all the display segmentsand switching the load for few seconds.RESET FUNCTIONTo cancel a set program (i.e aftes a programming tenetative), press for approx2 seconds both keys .Releasing the keys <strong>Simply</strong> reset to the previously described operation.TECHNICAL FEATURESPower supply 3 alkaline batteries type AAA 1,5VBatteries lifeOver 1 yearAutomatic control of used batteries with 2 thresholdsBatteries replacement without <strong>da</strong>ta lossTemperature levels from 8 to 25°C winter mode, from 18 to 30°C summer modeThermal differential ±0,2°CPrograms <strong>da</strong>ily with 0,5°C steps in AUTOMATIC mode and 0,2°C steps in MANUALmodePossibility to program any temperature level within the range of every hours of the <strong>da</strong>ilySettingMinimum setting range 1 hourSUMMER/WINTER ProgramQuartz clockProgram visualization present time and temperatureContact rating230Vac 5A (resistive load)Installation to the wall or on an electrical box type “503”ColourWhiteDimensions153x85x31mmWeight215 gr (batteries included)GECA Srl via E.Fermi n°98 25064 Gussago (BS) Italy Tel. +39 030 3730218Fax +39 030 3730228 E-mail:info@gecasrl.it - http://www.gecasrl.itGECA s.r.l. reserves the right to make any aesthetic or functional modification to the without prior notice at any time.dis.1034068 cod.2.710.2140 Made in Italy