5 - Fimo GmbH
5 - Fimo GmbH
5 - Fimo GmbH

Create successful ePaper yourself
Turn your PDF publications into a flip-book with our unique Google optimized e-Paper software.
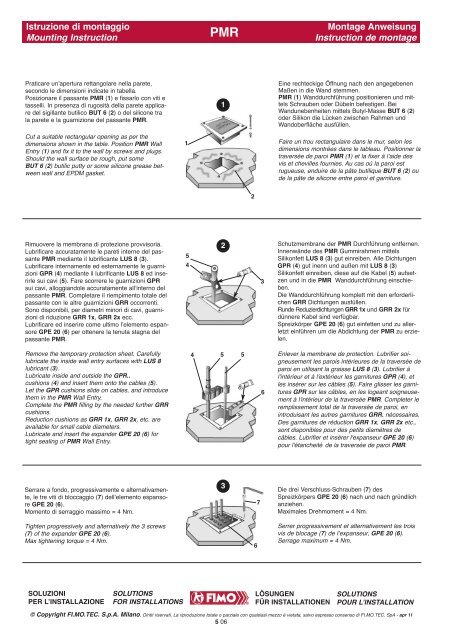
Istruzione di montaggioMounting InstructionPMRMontage AnweisungInstruction de montagePraticare un’apertura rettangolare nella parete,secondo le dimensioni indicate in tabella.Posizionare il passante PMR (1) e fissarlo con viti etasselli. In presenza di rugosità della parete applicaredel sigillante butilico BUT 6 (2) o del silicone trala parete e la guarnizione del passante PMR.1Eine rechteckige Öffnung nach den angegebenenMaßen in die Wand stemmen.PMR (1) Wanddurchführung positionieren und mittelsSchrauben oder Dübeln befestigen. BeiWandunebenheiten mittels Butyl-Masse BUT 6 (2)oder Silikon die Lücken zwischen Rahmen undWandoberfläche ausfüllen.Cut a suitable rectangular opening as per thedimensions shown in the table. Position PMR WallEntry (1) and fix it to the wall by screws and plugs.Should the wall surface be rough, put someBUT 6 (2) butilic putty or some silicone grease betweenwall and EPDM gasket.1Faire un trou rectangulaire dans le mur, selon lesdimensions montrées dans le tableau. Positionner latraversée de paroi PMR (1) et la fixer à l’aide desvis et chevilles fournies. Au cas où la paroi estrugueuse, enduire de la pâte butilique BUT 6 (2) oude la pâte de silicone entre paroi et garniture.2Rimuovere la membrana di protezione provvisoria.Lubrificare accuratamente le pareti interne del passantePMR mediante il lubrificante LUS 8 (3).Lubrificare internamente ed esternamente le guarnizioniGPR (4) mediante il lubrificante LUS 8 ed inserirlesui cavi (5). Fare scorrere le guarnizioni GPRsui cavi, alloggiandole accuratamente all’interno delpassante PMR. Completare il riempimento totale delpassante con le altre guarnizioni GRR occorrenti.Sono disponibili, per diametri minori di cavi, guarnizionidi riduzione GRR 1x, GRR 2x ecc.Lubrificare ed inserire come ultimo l’elemento espansoreGPE 20 (6) per ottenere la tenuta stagna delpassante PMR.5423Schutzmembrane der PMR Durchführung entfernen.Innenwände des PMR Gummirahmen mittelsSilikonfett LUS 8 (3) gut einreiben. Alle DichtungenGPR (4) gut inenn und außen mit LUS 8 (3)Silikonfett einreiben, diese auf die Kabel (5) aufsetzenund in die PMR Wanddurchführung einschieben.Die Wanddurchführung komplett mit den erforderlichenGRR Dichtungen ausfüllen.Runde Reduzierdichtungen GRR 1x und GRR 2x fürdünnere Kabel sind verfügbar.Spreizkörper GPE 20 (6) gut einfetten und zu allerletzteinführen um die Abdichtung der PMR zu erzielen.Remove the temporary protection sheet. Carefullylubricate the inside wall entry surfaces with LUS 8lubricant (3).Lubricate inside and outside the GPR..cushions (4) and insert them onto the cables (5).Let the GPR cushions slide on cables, and introducethem in the PMR Wall Entry.Complete the PMR filling by the needed further GRRcushions.Reduction cushions as GRR 1x, GRR 2x, etc. areavailable for small cable diameters.Lubricate and insert the expander GPE 20 (6) fortight sealing of PMR Wall Entry.4556Enlever la membrane de protection. Lubrifier soigneusementles parois intérieures de la traversée deparoi en utilisant la graisse LUS 8 (3). Lubrifier àl'intérieur et à l'extérieur les garnitures GPR (4), etles insérer sur les câbles (5). Faire glisser les garnituresGPR sur les câbles, en les logeant soigneusementà l'intérieur de la traversée PMR. Completer leremplissement total de la traversée de paroi, enintroduisant les autres garnitures GRR. nécessaires.Des garnitures de réduction GRR 1x, GRR 2x etc.,sont disponibles pour des petits diamètres decâbles. Lubrifier et insérer l'expanseur GPE 20 (6)pour l'étancheité de la traversée de paroi PMR.Serrare a fondo, progressivamente e alternativamente,le tre viti di bloccaggio (7) dell’elemento espansoreGPE 20 (6).Momento di serraggio massimo = 4 Nm.37Die drei Verschluss-Schrauben (7) desSpreizkörpers GPE 20 (6) nach und nach gründlichanziehen.Maximales Drehmoment = 4 Nm.Tighten progressively and alternatively the 3 screws(7) of the expander GPE 20 (6).Max tightening torque = 4 Nm.6Serrer progressivement et alternativement les troisvis de blocage (7) de l’expanseur, GPE 20 (6).Serrage maximum = 4 Nm.SOLUZIONIPER L’INSTALLAZIONESOLUTIONSFOR INSTALLATIONSLÖSUNGENFÜR INSTALLATIONENSOLUTIONSPOUR L’INSTALLATION© Copyright FI.MO.TEC. S.p.A. Milano. Diritti riservati. La riproduzione totale o parziale con qualsiasi mezzo è vietata, salvo espresso consenso di FI.MO.TEC. SpA - apr 115 06