Mod. POCKET HP-24 User Manual Mod. POCKET HP-24 Manuale ...
Mod. POCKET HP-24 User Manual Mod. POCKET HP-24 Manuale ...
Mod. POCKET HP-24 User Manual Mod. POCKET HP-24 Manuale ...

You also want an ePaper? Increase the reach of your titles
YUMPU automatically turns print PDFs into web optimized ePapers that Google loves.
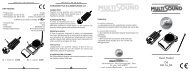
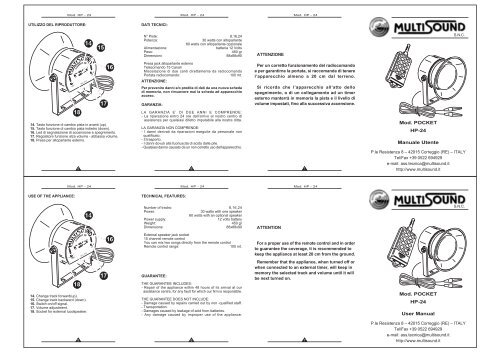
14. Change track forward(up).<br />
15. Change track backward (down).<br />
16. Switch on/off signal.<br />
17. Volume adjustment.<br />
18. Socket for external luodspeaker.<br />
<strong>Mod</strong>. <strong>HP</strong> - <strong>24</strong> <strong>Mod</strong>. <strong>HP</strong> - <strong>24</strong><br />
UTILIZZO DEL RIPRODUTTORE: DATI TECNICI:<br />
18<br />
14. Tasto funzione di cambio pista in avanti (up).<br />
15. Tasto funzione di cambio pista indietro (down).<br />
16. Led di segnalazione di accensione e spegnimento.<br />
17. Regolatore funzione alza volume - abbassa volume.<br />
18. Presa per altoparlante esterno.<br />
5<br />
<strong>Mod</strong>. <strong>HP</strong> - <strong>24</strong> <strong>Mod</strong>. <strong>HP</strong> - <strong>24</strong><br />
USE OF THE APPLIANCE: TECHNICAL FEATURES:<br />
18<br />
5<br />
15<br />
17<br />
17<br />
16<br />
16<br />
N° Piste: 8,16,<strong>24</strong><br />
Potenza: 30 watts con altoparlante<br />
60 watts con altoparlante opzionale<br />
Alimentazione: batteria 12 Volts<br />
Peso: 450 gr<br />
Dimensioni: 88x88x90<br />
Presa jack altoparlante esterno<br />
Telecomando 15 Canali<br />
Miscelazione di due canti direttamente da radiocomando<br />
Portata radiocomando: 100 mt.<br />
ATTENZIONE:<br />
Per prevenire danni e/o predita di dati da una nuova scheda<br />
di memoria, non rimuovere mai la scheda ad apparecchio<br />
acceso.<br />
GARANZIA:<br />
LA GARANZIA E’ DI DUE ANNI E COMPRENDE:<br />
- La riparazione entro <strong>24</strong> ore dall’arrivo al nostro centro di<br />
assistenza per qualsiasi difetto imputabile alla nostra ditta.<br />
LA GARANZIA NON COMPRENDE:<br />
- I danni derivati da riparazioni eseguite da personale non<br />
qualificato.<br />
- Il trasporto.<br />
- I danni dovuti alla fuoriuscita di acido dalle pile.<br />
- Qualsiasi danno causato da un non corretto uso dell’apparecchio.<br />
Number of tracks: 8,16,<strong>24</strong><br />
Power: 30 watts with one speaker<br />
60 watts with an optional speaker<br />
Power supply: 12 volts battery<br />
Weight: 450 gr<br />
Dimensions: 88x88x90<br />
External speaker jack socket<br />
15 channel remote control<br />
You can mix two songs directly from the remote control<br />
Remote control range: 100 mt.<br />
GUARANTEE:<br />
6<br />
THE GUARANTEE INCLUDES:<br />
- Repair of the appliance within 48 hours of its arrival at our<br />
assistance centre, for any fault for which our firm is responsible.<br />
THE GUARANTEE DOES NOT INCLUDE:<br />
- Damage caused by repairs carried out by non -qualified staff.<br />
- Transportation.<br />
- Damages caused by leakage of acid from batteries.<br />
- Any damage caused by improper use of the appliance.<br />
6<br />
ATTENZIONE<br />
<strong>Mod</strong>. <strong>HP</strong> - <strong>24</strong><br />
Per un corretto funzionamento del radiocomando<br />
e per garantirne la portata, si raccomanda di tenere<br />
l’apparecchio almeno a 20 cm dal terreno.<br />
Si ricorda che l’apparecchio all’atto dello<br />
spegnimento, o di un collegamento ad un timer<br />
esterno manterrà in memoria la pista e il livello di<br />
volume impostati, fino alla successiva accensione.<br />
ATTENTION<br />
7<br />
<strong>Mod</strong>. <strong>HP</strong> - <strong>24</strong><br />
For a proper use of the remote control and in order<br />
to guarantee the coverage, it is recommended to<br />
keep the appliance at least 20 cm from the ground.<br />
Remember that the appliance, when turned off or<br />
when connected to an external timer, will keep in<br />
memory the selected track and volume until it will<br />
be next turned on.<br />
7<br />
<strong>Mod</strong>. <strong>POCKET</strong><br />
<strong>HP</strong>-<strong>24</strong><br />
<strong>Manual</strong>e Utente<br />
P.le Resistenza 8 – 42015 Correggio (RE) – ITALY<br />
Tel/Fax +39 0522 694929<br />
e-mail: ass.tecnica@multisound.it<br />
http://www.multisound.it<br />
<strong>Mod</strong>. <strong>POCKET</strong><br />
<strong>HP</strong>-<strong>24</strong><br />
<strong>User</strong> <strong>Manual</strong><br />
P.le Resistenza 8 – 42015 Correggio (RE) – ITALY<br />
Tel/Fax +39 0522 694929<br />
e-mail: ass.tecnica@multisound.it<br />
http://www.multisound.it
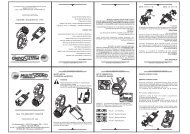
UTILIZZO DEL RADIOCOMANDO:<br />
Fig. 2<br />
<strong>Mod</strong>. <strong>HP</strong> - <strong>24</strong> <strong>Mod</strong>. <strong>HP</strong> - <strong>24</strong> <strong>Mod</strong>. <strong>HP</strong> - <strong>24</strong> <strong>Mod</strong>. <strong>HP</strong> - <strong>24</strong><br />
Tasti 1 - 8 funzione di cambio pista - Tasti A, B, C funzione<br />
di cambio blocco.<br />
Questo riproduttore può gestire fino a <strong>24</strong> canti suddivisi in tre<br />
blocchi da otto piste. I tasti numerati da 1 a 8 posti sul radiocomando<br />
(Fig. 1), selezionano direttamente le otto piste che compongono<br />
il blocco mentre i tasti posti in fondo al telecomando (Fig. 2)<br />
selezionano i tre differenti blocchi A, B, C. Esempio: per riprodurre<br />
la pista otto del terzo blocco (quaglia 7/mf) della memory premere<br />
il tasto C (Fig. 2) per selezionare l’ultimo blocco e premere il tasto<br />
cambio pista 8 (Fig. 1) per riprodurre la quaglia 7/mf. Ora il<br />
riproduttore che si trova nel blocco C, riprodurrà solo i canti che<br />
si trovano in questa sezione. Per selezionare un canto che si<br />
trova in un altro blocco ripetere la procedura sopra descritta.<br />
TASTO BLOCCO A TASTO BLOCCO B TASTO BLOCCO C<br />
1- Tordo B.1<br />
2- Tordo B.2<br />
3- Tordo B.3/PL4<br />
4- Schiamazzo 2<br />
5- Tordo S.<br />
6- Allodola 4/B<br />
7- Allodola 7/P<br />
8- Allodola 1/TR4<br />
2<br />
Mix<br />
1- Marzaiola 2<br />
2- Codone 2<br />
3- Alzavola 2<br />
4- Fischione 3<br />
5- Oca Lomb.<br />
6- Oca Gran<br />
7- Oca Selv.<br />
8- Oche Misto<br />
1<br />
USE OF THE REMOTE CONTROL :<br />
Pic. 2<br />
Mix<br />
2<br />
1- Fagiano<br />
2- Tortora<br />
3- Colombaccio<br />
4- Beccaccia<br />
5- Pernice R.<br />
6- Quagliaia 10<br />
7- Quagliaia 6/F<br />
8- Quagliaia 7/MF<br />
Fig. 1<br />
Buttons 1-8 track changing function - Buttons A,B,C track<br />
group changing function:<br />
This player can manage up to <strong>24</strong> songs divided into three groups,<br />
each of which consists of eight tracks. The buttons numbered<br />
from one to eight on the remote control (pic.1) select directly the<br />
eight tracks composing the group, while the buttons, below these<br />
ones (pic.2), select the three different groups A,B,C. For example:<br />
to play the track number 8 in the third group of the memory<br />
(quail 7/mf), press the button C to select the last group, and press<br />
the black button track 8 to play the quail 7/mf. Now the player,<br />
set on group C, can play only the songs of this section. To select<br />
a song of another group, repeat the procedure described above.<br />
1<br />
Mix<br />
2<br />
Tasto 9 (II) funzione pausa:<br />
Se premuto entra o esce dalla pausa<br />
Tasti 10-11 (+/-) funzione volume:<br />
Se premuto il tasto 10 alza il volume, il tasto 11 abbassa il volume.<br />
Tasto 12( ) funzione di miscelazione canti e blocco totale:<br />
Se premuto una volta abilita o cancella la funzione di miscelazione.<br />
Se premuto fino a spegnimento l’apparecchio si blocca senza<br />
possibilità di riaccenderlo con il telecomando (led rosso<br />
lampeggiante).<br />
N.B. La funzione di blocco totale dell’apparecchio non spegne il<br />
riproduttore ma ne inibisce completamente il regolare<br />
funzionamento. Per spegnere completamente l’apparecchio<br />
bloccato agire sullo switch 16 on-off.<br />
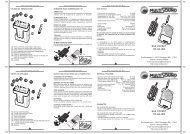
CODICE DEL RADIOCOMANDO:<br />
Tutti i Radiocomandi sono programmati con lo stesso codice,per<br />
personalizzarlo procedere come segue:<br />
1. Rimuovere il coperchio dal vano pile.<br />
2. Togliere la prima pila .<br />
3. Premere il tasto rosso 13 all’interno del Radiocomando (Fig. 3)<br />
4. Mantenendo premuto il tasto 13, premere il tasto nero 1 esterno<br />
del cambio piste.<br />
5. Rilasciare quindi in successione il tasto 13 e dopo 2 3 secondi<br />
il tasto 1.<br />
1<br />
13<br />
Fig. 3<br />
TRASFERIMENTO DEL CODICE PERSONALIZZATO<br />
DAL RADIOCOMANTDO ALL’APPARECCHIO<br />
1. Ad apparecchio spento premere il tasto (UP-14) del cambio<br />
piste (Fig. 4).<br />
2. Accendere l’apparecchio (Fig. 5) mantenendo sempre premuto<br />
il tasto 14-UP.<br />
3. A questo punto il led del riproduttore comincia a lampeggiare<br />
e l’apparecchio si mette in attesa del nuovo codice proveniente<br />
dal radiocomando.<br />
Rilasciare il tasto 14-UP e premere 2 volte il tasto 1 del cambio<br />
pista del radiocomando (Fig. 6).<br />
4. Il riproduttore riprende il normale funzionamento con il nuovo<br />
codice assegnato.<br />
Con questa procedura il riproduttore funzionerà solo con il suo<br />
radiocomando.<br />
MISCELAZIONE DEI CANTI:<br />
Con questa funzione è possibile ascoltare due canti<br />
contemporaneamente.<br />
1. Selezionare un blocco da 8 piste con uno dei tre tasti (A,B,C)<br />
del radiocomando. (Fig. 2)<br />
2. Selezionare la prima pista (canto base con cui sarà possibile<br />
mixare tutti gli altri canti presenti sulla memoria) che si<br />
vuole riprodurre con i tasti posti sul radiocomando.<br />
(Fig. 1)<br />
3. Premere una volta il tasto 12( ) posto sul radiocomando<br />
(Fig.1) per mettere in memoria la pista prescelta che rimarrà<br />
impostata come pista base.<br />
4. Con i tasti di cambio pista ora potete selezionare un<br />
secondo canto della memoria da aggiungere alla riproduzione<br />
della pista base scelta in precedenza (Punto 2).<br />
5. Per riprendere il normale funzionamento del riproduttore senza<br />
miscelazione premere un’altra volta il tasto 12 ( ) del<br />
vostro radiocomando. A questo punto la pista base<br />
precedentemente selezionata verrà eliminata e verrà riprodotta<br />
solo l’ultima pista che si era scelta di mixare con la pista base.<br />
N.B. E’ POSSIBILE MISCELARE FRA DI LORO ANCHE PISTE<br />
DI DUE BLOCCHI DIVERSI.<br />
L’apparecchio accetta sia le schede nuove (colore rosso) che le<br />
vecchie schede tipo pocket.<br />
Fig. 4<br />
2 3<br />
Fig. 6<br />
4<br />
<strong>Mod</strong>. <strong>HP</strong> - <strong>24</strong> <strong>Mod</strong>. <strong>HP</strong> - <strong>24</strong> <strong>Mod</strong>. <strong>HP</strong> - <strong>24</strong> <strong>Mod</strong>. <strong>HP</strong> - <strong>24</strong><br />
BUTTON A BUTTON B BUTTON C<br />
1 - Song Thrush 1<br />
2 - Song Thrush 2<br />
3 - Song Thrush 3/PL4<br />
4 - Racket 2<br />
5 - Redwing<br />
6 - Skylark 4/B<br />
7 - Skylark 7/P<br />
8 - Skylark 1/TR4<br />
2<br />
Mix<br />
1 - Garganey 2<br />
2 - Pintail 2<br />
3 - Teal 2<br />
4 - Widgeon 3<br />
5 - White-fronted Goose<br />
6 - Bean Goose<br />
7 - Greylag Goose.<br />
8 - Geese Mix<br />
1 - Pheasant<br />
2 - Turtle Dove<br />
3 - Woodpigeon<br />
4 - Woodcock<br />
5 - Red-legged Partridge<br />
6 - Quail 10<br />
7 - Quail 6/F<br />
8 - Quail 7/MF<br />
Pic. 1<br />
Button 9 (II) pause function:<br />
If you press it, you start or stop the pause function.<br />
Buttons 10-11 (+/-) volume function:<br />
Button 10 turns the volume up, button 11 it turns it down.<br />
Button 12( ), songs mixing and stop function:<br />
If you press it once, it selects the mixing function. IIf you press<br />
it until the player stops, it will not be possible to swith it on again<br />
through the remote control (red flashing led).<br />
Be careful: the stop function of the player (button 12...) doesn’t<br />
swith it off completely but it inhibits its regulare functioning. To<br />
switch off completely the stopped device use the switch on off<br />
button 16.<br />
CODE OF THE REMOTE CONTROL:<br />
All remote controls are programmed with the same code, to<br />
customise it.<br />
1. Remove cover C from the battery compartment.(Pic.3)<br />
2. Remove the first battery A1. .<br />
3. Press button 13 inside the remote control.<br />
4. Keeping button 13 pressed, press the button 1 for track<br />
changing.(Pic.3)<br />
5. Release button 13 and after 2-3 seconds release button 1.<br />
1<br />
13<br />
Pic. 3<br />
14<br />
Pic. 4<br />
2 3<br />
Pic. 6<br />
4<br />
Fig. 5<br />
TRANSFER OF THE CUSTOMISED CODE FROM THE<br />
REMOTE CONTROL TO THE APPLIANCE.<br />
16<br />
1. When the device is switched off, press the track changing<br />
(pic.4) button (UP-14)<br />
2. Turn the device on (pic.5)<br />
3. Now the led of the player starts flashing and the device moves<br />
to the stand by position waiting fora anew code coming from<br />
the remote control.<br />
4. Press twice the track changing button on the remote control<br />
pic.3)<br />
5. The player starts its regularfunctioning again through the new<br />
code sent by the remote control.<br />
Through this procedure the appliance will operate through its<br />
own remote control only.<br />
14<br />
Pic. 5<br />
SONGS MIXING:<br />
1. Select a group of tracks through one of the three (A,B,C)<br />
buttons on the bottom of the remote control (pic.2)<br />
2. Select the first track (basic track with which it will be possible<br />
to mix any song in the memory) through the buttons on the<br />
remote control.(Pic.6)<br />
3. Press once the button 12 ( ) on the remote control to set<br />
the selected track in memory. This will be set up as the basic<br />
track.<br />
4. Through the buttons it is now possible to select any song in<br />
the memory to add and mix with the basic track selected before<br />
(point 2).<br />
5. Press again the button 12 ( ) on the remote control to set<br />
the player back to its normal function without song mixing. Now<br />
the basic track previously selected will be cancelled, and the<br />
device will play only the last track which was chosen to mixed<br />
with the basic track.<br />
IMPORTANT: The basic track and the second track chosen<br />
for the mixing can be taken from two different groups.