

KitchenAid 10450GF - Cooker - 10450GF - Cooker EN (F064457) Istruzioni per l'Uso
KitchenAid 10450GF - Cooker - 10450GF - Cooker EN (F064457) Istruzioni per l'Uso
KitchenAid 10450GF - Cooker - 10450GF - Cooker EN (F064457) Istruzioni per l'Uso

You also want an ePaper? Increase the reach of your titles
YUMPU automatically turns print PDFs into web optimized ePapers that Google loves.
TWIN GRILL<br />
CAUTION - ACCESSIBLE PARTS MAY BECOME HOT WH<strong>EN</strong> THE GRILL IS USED.<br />
YOUNG CHILDR<strong>EN</strong> SHOULD BE KEPT AWAY.<br />
GRILLING SHOULD NEVER BE UNDERTAK<strong>EN</strong> WITH THE GRILL DOOR CLOSED.<br />
The grill control is designed to provide variable heat control of either the full width of the grill or just the grill half.<br />
Turning the control knob clockwise will switch on the full width and turning anticlockwise will switch on just the<br />
grill half.<br />
A gentle flow of air will be blown from underneath the control panel when the grill is in use.<br />
If the fan fails to blow air beneath the control panel when the grill is in use, you should contact your<br />
service engineer immediately (see back page).<br />
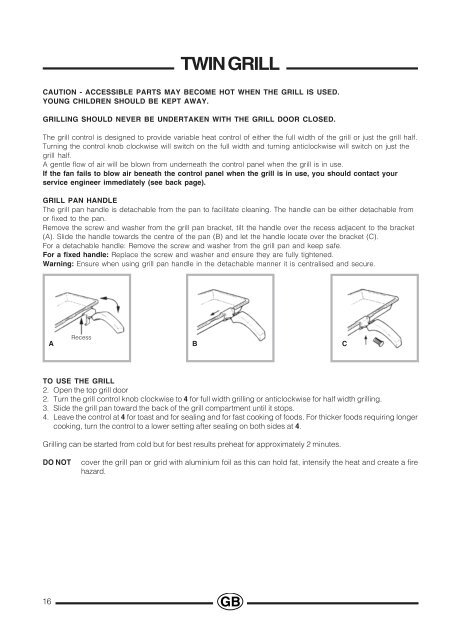
GRILL PAN HANDLE<br />
The grill pan handle is detachable from the pan to facilitate cleaning. The handle can be either detachable from<br />
or fixed to the pan.<br />
Remove the screw and washer from the grill pan bracket, tilt the handle over the recess adjacent to the bracket<br />
(A). Slide the handle towards the centre of the pan (B) and let the handle locate over the bracket (C).<br />
or a detachable handle: Remove the screw and washer from the grill pan and keep safe.<br />
or a fixed handle: Replace the screw and washer and ensure they are fully tightened.<br />
Warning: Ensure when using grill pan handle in the detachable manner it is centralised and secure.<br />
A<br />
Recess<br />
B<br />
C<br />
TO USE THE GRILL<br />
2. Open the top grill door<br />
2. Turn the grill control knob clockwise to 4 for full width grilling or anticlockwise for half width grilling.<br />
3. Slide the grill pan toward the back of the grill compartment until it stops.<br />
4. Leave the control at 4 for toast and for sealing and for fast cooking of foods. or thicker foods requiring longer<br />
cooking, turn the control to a lower setting after sealing on both sides at 4.<br />
Grilling can be started from cold but for best results preheat for approximately 2 minutes.<br />
DO NOT<br />
cover the grill pan or grid with aluminium foil as this can hold fat, intensify the heat and create a fire<br />
hazard.<br />
16


