

KitchenAid 10450GF - Cooker - 10450GF - Cooker EN (F064457) Istruzioni per l'Uso
KitchenAid 10450GF - Cooker - 10450GF - Cooker EN (F064457) Istruzioni per l'Uso
KitchenAid 10450GF - Cooker - 10450GF - Cooker EN (F064457) Istruzioni per l'Uso

Create successful ePaper yourself
Turn your PDF publications into a flip-book with our unique Google optimized e-Paper software.
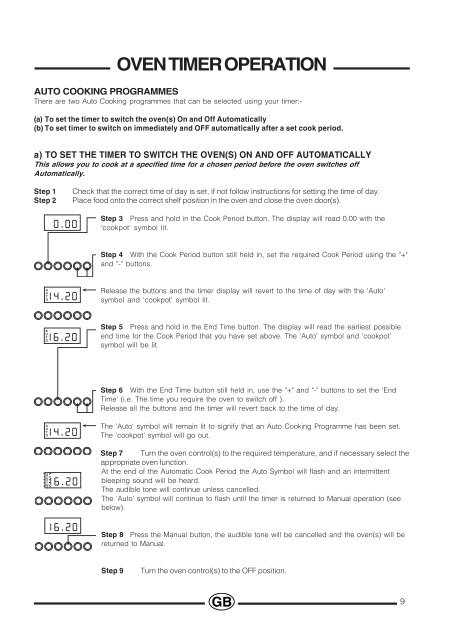
OV<strong>EN</strong> TIMER OPERATION<br />
AUTO COOKING PROGRAMMES<br />
There are two Auto Cooking programmes that can be selected using your timer:-<br />
(a) To set the timer to switch the oven(s) On and Off Automatically<br />
(b) To set timer to switch on immediately and O automatically after a set cook <strong>per</strong>iod.<br />
a) TO SET THE TIMER TO SWITCH THE OV<strong>EN</strong>(S) ON AND O AUTOMATICALLY<br />
This allows you to cook at a specified time for a chosen <strong>per</strong>iod before the oven switches off<br />
Automatically.<br />
Step 1<br />
Step 2<br />
0.<br />
00<br />
Check that the correct time of day is set, if not follow instructions for setting the time of day.<br />
Place food onto the correct shelf position in the oven and close the oven door(s).<br />
Step 3 Press and hold in the Cook Period button. The display will read 0.00 with the<br />
'cookpot' symbol lit.<br />
Step 4 With the Cook Period button still held in, set the required Cook Period using the "+"<br />
and "-" buttons.<br />
.<br />
A<br />
U<br />
T<br />
O14<br />
20<br />
Release the buttons and the timer display will revert to the time of day with the 'Auto'<br />
symbol and 'cookpot' symbol lit.<br />
.<br />
A<br />
U<br />
T<br />
O16<br />
20<br />
Step 5 Press and hold in the End Time button. The display will read the earliest possible<br />
end time for the Cook Period that you have set above. The 'Auto' symbol and 'cookpot'<br />
symbol will be lit.<br />
.<br />
A<br />
U<br />
T<br />
O14<br />
20<br />
.<br />
A<br />
U<br />
T<br />
O16<br />
20<br />
16.<br />
20<br />
Step 6 With the End Time button still held in, use the "+" and "-" buttons to set the 'End<br />
Time' (i.e. The time you require the oven to switch off ).<br />
Release all the buttons and the timer will revert back to the time of day.<br />
The 'Auto' symbol will remain lit to signify that an Auto Cooking Programme has been set.<br />
The 'cookpot' symbol will go out.<br />
Step 7 Turn the oven control(s) to the required tem<strong>per</strong>ature, and if necessary select the<br />
appropriate oven function.<br />
At the end of the Automatic Cook Period the Auto Symbol will flash and an intermittent<br />
bleeping sound will be heard.<br />
The audible tone will continue unless cancelled.<br />
The 'Auto' symbol will continue to flash until the timer is returned to Manual o<strong>per</strong>ation (see<br />
below).<br />
Step 8 Press the Manual button, the audible tone will be cancelled and the oven(s) will be<br />
returned to Manual.<br />
Step 9<br />
Turn the oven control(s) to the O position.<br />
9


