

KitchenAid XBP 40TC SX 2V FB - Hob - XBP 40TC SX 2V FB - Hob EN (F030359) Istruzioni per l'Uso
KitchenAid XBP 40TC SX 2V FB - Hob - XBP 40TC SX 2V FB - Hob EN (F030359) Istruzioni per l'Uso
KitchenAid XBP 40TC SX 2V FB - Hob - XBP 40TC SX 2V FB - Hob EN (F030359) Istruzioni per l'Uso

You also want an ePaper? Increase the reach of your titles
YUMPU automatically turns print PDFs into web optimized ePapers that Google loves.
<strong>Hob</strong>s installation<br />
Suitable precautions must be taken to ensure that the<br />
installation is in compliance with current accident-prevention<br />
regulations regarding electrical and gas connections.<br />
For trouble-free o<strong>per</strong>ation of the appliance set into kitchen<br />
units, the minimum distances indicated in fig.3 should be<br />
complied with and the adjoining surfaces and rear wall should<br />
be capable of withstanding a surface tem<strong>per</strong>ature of 65 °C.<br />
Installation above a built-in oven<br />
Both the electricity supply cable and the gas pipe must not<br />
touch hot parts of the oven housing, in order to avoid<br />
overheating.<br />
Suitable air vents should be provided for as shown in fig.3<br />
(inlet at least 200 cm² from the bottom, outlet at least 120<br />
cm² from the top part) to allow adequate ventilation inside<br />
the housing unit.<br />
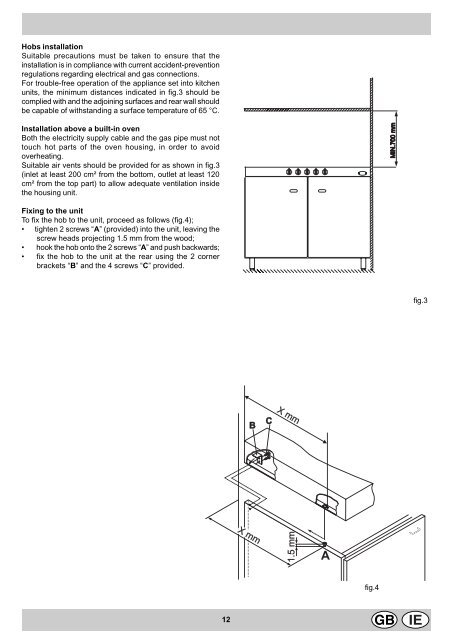
Fixing to the unit<br />
To fix the hob to the unit, proceed as follows (fig.4);<br />
• tighten 2 screws “A” (provided) into the unit, leaving the<br />
screw heads projecting 1.5 mm from the wood;<br />
• hook the hob onto the 2 screws “A” and push backwards;<br />
• fix the hob to the unit at the rear using the 2 corner<br />
brackets “B” and the 4 screws “C” provided.<br />
fig.3<br />
B<br />
C<br />
Xmm<br />
Xmm<br />
1.5 mm<br />
A<br />
fig.4<br />
12


