Your Poolcare Solution Instruction Manual La solution ... - Poolmaid
Your Poolcare Solution Instruction Manual La solution ... - Poolmaid
Your Poolcare Solution Instruction Manual La solution ... - Poolmaid

You also want an ePaper? Increase the reach of your titles
YUMPU automatically turns print PDFs into web optimized ePapers that Google loves.
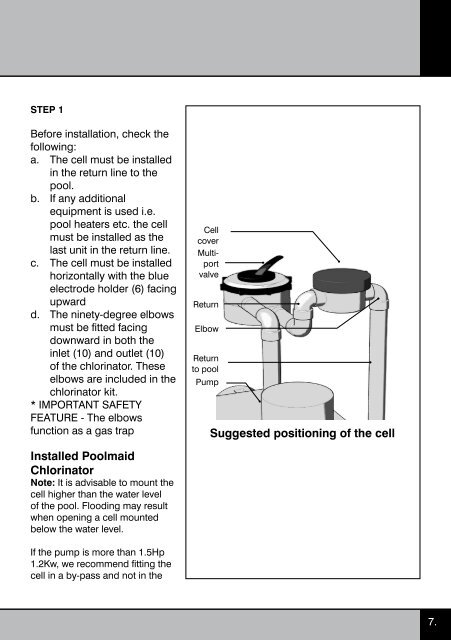
STEP 1<br />
Before installation, check the<br />
following:<br />
a. The cell must be installed<br />
in the return line to the<br />
pool.<br />
b. If any additional<br />
equipment is used i.e.<br />
pool heaters etc. the cell<br />
must be installed as the<br />
last unit in the return line.<br />
c. The cell must be installed<br />
horizontally with the blue<br />
electrode holder (6) facing<br />
upward<br />
d. The ninety-degree elbows<br />
must be fitted facing<br />
downward in both the<br />
inlet (10) and outlet (10)<br />
of the chlorinator. These<br />
elbows are included in the<br />
chlorinator kit.<br />
* IMPORTANT SAFETY<br />
FEATURE - The elbows<br />
function as a gas trap<br />
Installed <strong>Poolmaid</strong><br />
Chlorinator<br />
Note: It is advisable to mount the<br />
cell higher than the water level<br />
of the pool. Flooding may result<br />
when opening a cell mounted<br />
below the water level.<br />
If the pump is more than 1.5Hp<br />
1. Kw, we recommend fitting the<br />
cell in a by-pass and not in the<br />
Cell<br />
cover<br />
Multiport<br />
valve<br />
Return<br />
Elbow<br />
Return<br />
to pool<br />
Pump<br />
Suggested positioning of the cell<br />
7.