katalog ARIOSTEA kolekcja Full Body
You also want an ePaper? Increase the reach of your titles
YUMPU automatically turns print PDFs into web optimized ePapers that Google loves.
100 . 101<br />
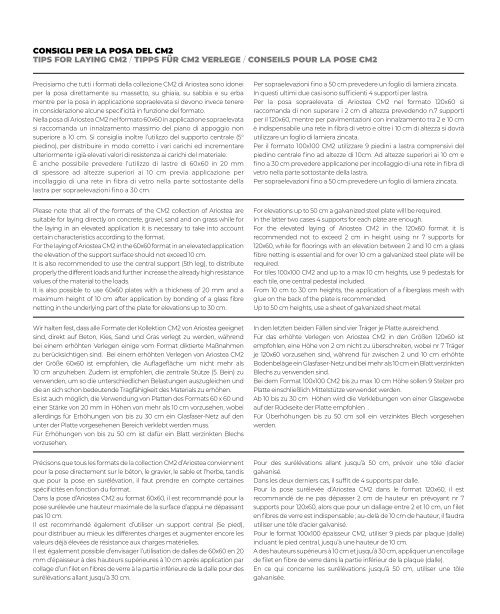
CONSIGLI PER LA POSA DEL CM2<br />
TIPS FOR LAYING CM2 / TIPPS FÜR CM2 VERLEGE / CONSEILS POUR LA POSE CM2<br />
STUCCATURA E PULIZIA FINALE<br />
JOINTING AND FINAL CLEANING / VERFUGUNG UND ENDREINIGUNG / JOINTOIEMENT ET NETTOYAGE FINAL<br />
Precisiamo che tutti i formati della collezione CM2 di Ariostea sono idonei<br />
per la posa direttamente su massetto, su ghiaia, su sabbia e su erba<br />
mentre per la posa in applicazione sopraelevata si devono invece tenere<br />
in considerazione alcune specificità in funzione del formato.<br />
Nella posa di Ariostea CM2 nel formato 60x60 in applicazione sopraelevata<br />
si raccomanda un innalzamento massimo del piano di appoggio non<br />
superiore a 10 cm. Si consiglia inoltre l’utilizzo del supporto centrale (5°<br />
piedino), per distribuire in modo corretto i vari carichi ed incrementare<br />
ulteriormente i già elevati valori di resistenza ai carichi del materiale.<br />
È anche possibile prevedere l’utilizzo di lastre di 60x60 in 20 mm<br />
di spessore ad altezze superiori ai 10 cm previa applicazione per<br />
incollaggio di una rete in fibra di vetro nella parte sottostante della<br />
lastra per sopraelevazioni fino a 30 cm.<br />
Please note that all of the formats of the CM2 collection of Ariostea are<br />
suitable for laying directly on concrete, gravel, sand and on grass while for<br />
the laying in an elevated application it is necessary to take into account<br />
certain characteristics according to the format.<br />
For the laying of Ariostea CM2 in the 60x60 format in an elevated application<br />
the elevation of the support surface should not exceed 10 cm.<br />
It is also recommended to use the central support (5th leg), to distribute<br />
properly the different loads and further increase the already high resistance<br />
values of the material to the loads.<br />
It is also possible to use 60x60 plates with a thickness of 20 mm and a<br />
maximum height of 10 cm after application by bonding of a glass fibre<br />
netting in the underlying part of the plate for elevations up to 30 cm.<br />
Wir halten fest, dass alle Formate der Kollektion CM2 von Ariostea geeignet<br />
sind, direkt auf Beton, Kies, Sand und Gras verlegt zu werden, während<br />
bei einem erhöhten Verlegen einige vom Format diktierte Maßnahmen<br />
zu berücksichtigen sind. Bei einem erhöhten Verlegen von Ariostea CM2<br />
der Größe 60x60 ist empfohlen, die Auflagefläche um nicht mehr als<br />
10 cm anzuheben. Zudem ist empfohlen, die zentrale Stütze (5. Bein) zu<br />
verwenden, um so die unterschiedlichen Belastungen auszugleichen und<br />
die an sich schon bedeutende Tragfähigkeit des Materials zu erhöhen.<br />
Es ist auch möglich, die Verwendung von Platten des Formats 60 x 60 und<br />
einer Stärke von 20 mm in Höhen von mehr als 10 cm vorzusehen, wobei<br />
allerdings für Erhöhungen von bis zu 30 cm ein Glasfaser-Netz auf den<br />
unter der Platte vorgesehenen Bereich verklebt werden muss.<br />
Für Erhöhungen von bis zu 50 cm ist dafür ein Blatt verzinkten Blechs<br />
vorzusehen.<br />
Précisons que tous les formats de la collection CM2 d’Ariostea conviennent<br />
pour la pose directement sur le béton, le gravier, le sable et l’herbe, tandis<br />
que pour la pose en surélévation, il faut prendre en compte certaines<br />
spécificités en fonction du format.<br />
Dans la pose d’Ariostea CM2 au format 60x60, il est recommandé pour la<br />
pose surélevée une hauteur maximale de la surface d’appui ne dépassant<br />
pas 10 cm.<br />
Il est recommandé également d’utiliser un support central (5e pied),<br />
pour distribuer au mieux les différentes charges et augmenter encore les<br />
valeurs déjà élevées de résistance aux charges matérielles.<br />
Il est également possible d’envisager l’utilisation de dalles de 60x60 en 20<br />
mm d’épaisseur à des hauteurs supérieures à 10 cm après application par<br />
collage d’un filet en fibres de verre à la partie inférieure de la dalle pour des<br />
surélévations allant jusqu’à 30 cm.<br />
Per sopraelevazioni fino a 50 cm prevedere un foglio di lamiera zincata.<br />
In questi ultimi due casi sono sufficienti 4 supporti per lastra.<br />
Per la posa sopraelevata di Ariostea CM2 nel formato 120x60 si<br />
raccomanda di non superare i 2 cm di altezza prevedendo n.7 supporti<br />
per il 120x60, mentre per pavimentazioni con innalzamento tra 2 e 10 cm<br />
è indispensabile una rete in fibra di vetro e oltre i 10 cm di altezza si dovrà<br />
utilizzare un foglio di lamiera zincata.<br />
Per il formato 100x100 CM2 utilizzare 9 piedini a lastra comprensivi del<br />
piedino centrale fino ad altezze di 10cm. Ad altezze superiori ai 10 cm e<br />
fino a 30 cm prevedere applicazione per incollaggio di una rete in fibra di<br />
vetro nella parte sottostante della lastra.<br />
Per sopraelevazioni fino a 50 cm prevedere un foglio di lamiera zincata.<br />
For elevations up to 50 cm a galvanized steel plate will be required.<br />
In the latter two cases 4 supports for each plate are enough.<br />
For the elevated laying of Ariostea CM2 in the 120x60 format it is<br />
recommended not to exceed 2 cm in height using nr 7 supports for<br />
120x60, while for floorings with an elevation between 2 and 10 cm a glass<br />
fibre netting is essential and for over 10 cm a galvanized steel plate will be<br />
required.<br />
For tiles 100x100 CM2 and up to a max 10 cm heights, use 9 pedestals for<br />
each tile, one central pedestal included.<br />
From 10 cm to 30 cm heights, the application of a fiberglass mesh with<br />
glue on the back of the plate is recommended.<br />
Up to 50 cm heights, use a sheet of galvanized sheet metal.<br />
In den letzten beiden Fällen sind vier Träger je Platte ausreichend.<br />
Für das erhöhte Verlegen von Ariostea CM2 in den Größen 120x60 ist<br />
empfohlen, eine Höhe von 2 cm nicht zu überschreiten, wobei nr 7 Träger<br />
je 120x60 vorzusehen sind, während für zwischen 2 und 10 cm erhöhte<br />
Bodenbeläge ein Glasfaser-Netz und bei mehr als 10 cm ein Blatt verzinkten<br />
Blechs zu verwenden sind.<br />
Bei dem Format 100x100 CM2 bis zu max 10 cm Höhe sollen 9 Stelzer pro<br />
Platte einschließlich Mittelstütze verwendet werden.<br />
Ab 10 bis zu 30 cm Höhen wird die Verklebungen von einer Glasgewebe<br />
auf der Rückseite der Platte empfohlen .<br />
Für Überhöhungen bis zu 50 cm soll ein verzinktes Blech vorgesehen<br />
werden.<br />
Pour des surélévations allant jusqu’à 50 cm, prévoir une tôle d’acier<br />
galvanisé.<br />
Dans les deux derniers cas, il suffit de 4 supports par dalle.<br />
Pour la pose surélevée d’Ariostea CM2 dans le format 120x60, il est<br />
recommandé de ne pas dépasser 2 cm de hauteur en prévoyant nr 7<br />
supports pour 120x60, alors que pour un dallage entre 2 et 10 cm, un filet<br />
en fibres de verre est indispensable ; au-delà de 10 cm de hauteur, il faudra<br />
utiliser une tôle d’acier galvanisé.<br />
Pour le format 100x100 épaisseur CM2, utiliser 9 pieds par plaque (dalle)<br />
incluant le pied central, jusqu’à une hauteur de 10 cm.<br />
A des hauteurs supérieurs à 10 cm et jusqu’à 30 cm, appliquer un encollage<br />
de filet en fibre de verre dans la partie inférieur de la plaque (dalle).<br />
En ce qui concerne les surélévations jusqu’à 50 cm, utiliser une tôle<br />
galvanisée.<br />
Con collanti a presa normale, stuccare il pavimento dopo 24/48 ore, se si<br />
utilizzano adesivi rapidi dopo 4h.<br />
- Soprattutto sui materiali levigati lucidati utilizzare stucchi cementizi con colori<br />
tono su tono, evitando su materiali chiari, stucchi di colore scuro e viceversa.<br />
Per la stuccatura di queste superfici non adoperare stucchi epossidici o malte<br />
flessibili a base di materiali sintetici (Flexfughe) soprattutto se a contrasto col<br />
colore del materiale e non aggiungere additivi/lattici allo stucco. Essi infatti<br />
rendono estremamente difficoltosa l’eliminazione dei residui con i normali<br />
prodotti di pulizia. Se si decide comunque di utilizzare questa tipologia di<br />
stucco, testarli sempre prima sul materiale.<br />
- Stendere lo stucco con spatola gommata su tutta la superficie del materiale.<br />
- Stuccare piccole superfici per volta, asportando le quantità eccedenti con<br />
spugne o stracci umidi (di sola acqua pulita) o utilizzare apposite macchine<br />
per togliere lo stucco eccedente, quando ancora il velo di stucco è umido.<br />
When the floor has been laid using normal setting adhesives, joint the tiles<br />
after 24/48 hours, in the case of quick setting adhesives, after 4 hours.<br />
- Especially with honed and polished materials, use cement-based grout with<br />
tone on tone colours (if possible avoid dark coloured grouts like black,blue,<br />
red with light coloured materials and vice-versa). For jointing these surfaces,<br />
do not use epoxy grouts or flexible mortar with a synthetic base (Flexfughe)<br />
especially if the colour contrasts with the material and do not add additives/<br />
latex to the grout. These products in fact make it extremely difficult to<br />
eliminate the residues with normal cleaning products. Should this kind of<br />
grout be used anyway, take care of testing it on the material beforehand.<br />
- Spread the grout with a rubber spatula all over the material surface.<br />
- Joint small areas at a time, removing the excess with damp sponges or rags<br />
(using only clean water) or with special machines for removing the excess<br />
grout while this is still damp.<br />
Bei der Verlegung mit normal härtenden Klebern, den Boden nach 24 / 48<br />
Stunden, bei der Verwendung von Schnellklebern bereits nach 4 Stunden<br />
verfugen.<br />
- Insbesondere auf den glanzpolierten Materialien sollten Zementkitte in<br />
ähnlichen Farbtönen verwendet werden (es sollte vermieden werden, auf<br />
hellen Materialien dunkle, beispielsweise schwarze, blaue oder rote Kitte zu<br />
verwenden; dasselbe gilt für helle Kitte auf dunklen Fliesen).<br />
- Für das Verfugen dieser Oberflächen auf keinen Fall kunsthartzgebundenen<br />
Fugenmörtel oder bewegliche Mörtel auf Basis von synthetischen Materialien<br />
(z.B. Flexfughe) verwenden, vor allem nicht in Kontrastfarbe zur Fliese.<br />
Außerdem dürfen dem Kitt keine Zusatzstoffe oder Latex zugeschlagen<br />
werden, da durch diese Zuschläge die Entfernung der Restrückstände mit den<br />
normalen Reinigungsmitteln extrem erschwert wird. Sollen Sie sich dennoch<br />
für einen kunsthartzgebundenen Fugenmörtel entscheiden, testen Sie diesen<br />
vorher auf dem Material.<br />
- Den Kitt mit einer Gummispachtel auf der gesamten Materialoberfläche<br />
gleichmäßig auftragen.<br />
- Die kleinen Oberflächen einzeln verfugen und die entsprechenden<br />
Restrückstände mit einem feuchten Schwamm oder Lappen (der nur in reines<br />
En cas de pose avec des adhésifs à prise normale, jointoyer le sol après 24/48<br />
heures; si l’on utilise des adhésifs à prise rapide, après 4h.<br />
- Sur les matériaux polis lustrés surtout, utiliser des mortiers-joints avec des<br />
couleurs ton sur ton (éviter si possible sur des matériaux de couleur claire<br />
des mortiers de couleur foncée comme le noir, le bleu, le rouge et vice-versa).<br />
Pour le jointoiement de ces surfaces, ne pas utiliser Mastics époxydes ou de<br />
mortiers flexibles à base de matériaux synthétiques (Flexfughe) surtout s’il y a<br />
contraste avec la couleur du matériau, et ne pas ajouter d’additifs/lactiques au<br />
mastic. En effet, ces derniers rendent l’élimination des résidus extrêmement<br />
difficile avec les nettoyants normaux. Si de toute façon on décide de continuer à<br />
utiliser ce type de mortier il faudra toujours le tester avant.<br />
- Etaler le mortier à la spatule caoutchoutée sur toute la surface du matériau.<br />
- Jointoyer de petites surfaces à la fois en enlevant les quantités en excès avec<br />
une éponge ou des chiffons humidifiés (exclusivement d’eau propre) ou<br />
utiliser des machines spéciales pour enlever le mortier en excès quand le<br />
- Un’adeguata pulizia iniziale è fondamentale sia per valorizzare la brillantezza,<br />
sia per assicurare la pulibilità e la semplicità di manutenzione ordinaria.<br />
La pulizia iniziale va quindi effettuata immediatamente dopo la posa,<br />
utilizzando prodotti a base acida, strofinando energicamente e sciacquando<br />
abbondantemente con acqua. In questo modo sarà possibile eliminare i<br />
residui di stucco, collante, cemento, ecc. E’ possibile utilizzare tutti i detergenti<br />
disponibili sul mercato, con unica esclusione dei prodotti contenenti acido<br />
fluoridrico (composti e derivati) come previsto dalla norma EN 14411.<br />
- Si raccomanda una accurata protezione del pavimento posato. Qualora sia<br />
necessario eseguire altre operazioni quali tinteggiatura, lavori idraulici o<br />
qualsiasi altro lavoro, si consiglia, terminata la posa, di coprire il pavimento<br />
con teli PVC o AIRBALLS o tessuti.<br />
- Proper initial cleaning is fundamental both for enhancing its aesthetic and<br />
shine characteristics and for restoring its original characteristics of easy cleaning<br />
and ease of ordinary maintenance. It is therefore very important that initial<br />
cleaning is carried out immediately after installation, rubbing hard with acidbased<br />
products, followed by abundant rinsing with water. In this way it will be<br />
possible to eliminate the residues of grout, adhesive, cement, etc. It is possible<br />
to use any of the detergents available on the market, with the exclusion only of<br />
products containing hydrofluoric acids (composites and derivates) according<br />
to EN standard 14411.<br />
- The floor must be carefully protected. Should it be necessary to carry out other<br />
operations such as decorating, plumbing or any other kind of work, once the<br />
floor has been installed it is advisable to cover it with PVC or AIRBALLS sheets<br />
or cloths.<br />
Wasser getaucht wurde) entfernen, oder spezielle Maschinen für das Entfernen<br />
von Restrückständen verwenden, wobei der Kitt noch feucht sein muß.<br />
- Eine korrekte anfängliche Reinigung ist besonders wichtig, weil somit<br />
sowohl die ästhetischen Besonderheiten und der Glanz des Materials<br />
hervorgehoben werden, und zudem die zukünftigen und lang<br />
anhaltenden Eigenschaften der einfachen Reinigung und der praktischen<br />
regelmäßigen Pflege dieses Materials zur Geltung kommen können.<br />
Es ist deshalb sehr wichtig, daß die erste Reinigung mit säurehaltigen<br />
Reinigungsmitteln sofort nach der Verlegung des Materials erfolgt, wobei<br />
die Fliesen fest zu reiben und dann gründlich mit frischem Wasser zu spülen<br />
sind. Auf diese Weise können alle Restrückstände von Kitt, Kleber, Zement<br />
usw. gründlich entfernt werden. Zu diesem Zweck können alle erhältlichen<br />
Reinigungsmittel verwendet werden, mit Ausnahme aller Produktartikel,<br />
die Fluorwasserstoffsäure (Verbindungen und Derivate) enthalten, laut der<br />
Vorschrift EN 14411.<br />
- Es wird empfohlen, den verlegten Boden sorgfältig zu schützen. Sollten<br />
andere Arbeiten, wie zum Beispiel das Färben, das Verlegen von Heizungs und<br />
Wasserleitungen oder ähnliches erforderlich sein, empfehlen wir den Boden<br />
nach dem Verlegen mit Planen aus PVC, AIRBALLS oder Gewebebahnen<br />
abzudecken.<br />
voile de mortier est encore humide.<br />
- Un nettoyage initial adapté est d’une importance fondamentale aussi bien<br />
pour mettre en valeur les caractéristiques esthétiques et de brillance, que pour<br />
rétablir les caractéristiques de facilité de nettoyage et d’entretien ordinaire.<br />
C’est la raison pour laquelle il est fondamental que le nettoyage initial soit<br />
effectué immédiatement après la pose, en utilisant des produits à base acide,<br />
en frottant énergiquement et, par la suite, en frottant abondamment avec de<br />
l’eau. Il sera ainsi possible d’éliminer les résidus de mortier, d’adhésif, de ciment,<br />
etc. Il est possible d’utiliser tous les nettoyants disponibles sur le marché, à<br />
l’exception des produits contenant de l’acide fluorhydrique (composés et<br />
dérivés) comme le prévoit la norme EN 14411.<br />
- Il est recommandé de protéger soigneusement le sol posé. S’il s’avère nécessaire<br />
d’exécuter d’autres opérations comme la peinture, les travaux de plomberie<br />
ou autre, une fois la pose terminée, nous conseillons de couvrir le sol avec des<br />
bâches en PVC ou AIRBALLS ou avec du tissu.


