You also want an ePaper? Increase the reach of your titles
YUMPU automatically turns print PDFs into web optimized ePapers that Google loves.
MftN,URL~ DINt<br />
USEASMANURl<br />
MANUEL D"INSTRUCTIONS<br />
BEDIENUNGSANI.EITUNG
Caro Amieo,<br />
ti ringraziamo e ei eomp/imentiamo eon te, per aver see/to di<br />
sparare eon una pistola PARDINI. La tua arma nasee dalla progettazione<br />
di un tiratore attivo a livello agonistieo per diversi anni, viene<br />
realizzata da personale speeializzato, eon i piu moderni maeehinari<br />
e seeondo Ie teen%gie piu avanzate. Essa viene provata da tiratori<br />
di ogni parte del mondo ed al piu alto liveI/o. La eollaborazione<br />
di tutte queste persone, ehe ben eonoseono /e tue esigenze, riesee<br />
ad offrirti un prodotto valido in ogni oeeasione. Per ogni tua<br />
riehiesta saremo eomunque lieti di darti i eonsigli piu appropriati.<br />
Grazie aneora!<br />
ATTENZIONE!<br />
NORME PER IL MANEGGIO DELLE ARMI<br />
Le armi richiedono cautela nell'uso e nella manutenzione e possono divenire oggetti<br />
pericolosi se non si ea conoscenza delloro funzionamento.<br />
Per tale ragione, consigliamo di leggere attentamente iI manuale di istruzione, prima<br />
dell'uso e di interpellarci per qualunque chiarimento.<br />
Considerate dunque I'arma <strong>com</strong>e se fosse sempre carica e, di conseguenza, non puntatela<br />
mai verso Ie persone e non tenete il dito sui grilletto, se non al momenta dello sparo.<br />
Non manomettete ne modificate I'arma in quanto, oltre a far decadere la garanzia, cia pua<br />
pregiudicarne la sicurezza.<br />
Tutti i lavori sulle armi devono essere eseguiti da personale autorizzato.<br />
Le pistole Pardini non necessitano di particolari cure per il mantenimento in efficienza. Si<br />
consiglia di mantenere leggermente lubrificate, con un velo di olio fine, Ie parti metalliche visibili.<br />
Le parti in movimento (corsoio, pistone, piani di scatto ecc.), hanno lubrificanti solidi di lunga<br />
durata e quindi non necessitano di una lubrificazione costante. Non utilizzare detergenti su<br />
parti in movimento per non asportare i suddetti.<br />
Una volta ogni 12 - 24 mesi, oltre ad una totale revisione dell'arma, si consiglia iI ripristino di<br />
tali grassi, utilizzandone dello stesso tipo.<br />
Nel caso che I'arma rimanga inutilizzata per lunghi periodi lubrificare anche I'interno della<br />
canna. AI momenta del riutilizzo, ricordarsi di asportare i residui d'olio ancora presenti, per non<br />
alterare Ie prestazioni dell'arma.
Dear Friend,<br />
Congratulations and thank you for choosing to shoot a Pardini pistol.<br />
Your pistol has been designed and developed by a succesful shooter<br />
with a long and distinguished record of performance and is<br />
manufactured by skilled staff using advanced technology. Testing<br />
has been carried out by some of the world's top shooters. This cooperation<br />
means that we can offer a product to suit your personal<br />
requirements.<br />
However, please feel free to contact us with your, <strong>com</strong>ments and<br />
suggestions at any time.<br />
Many thanks!<br />
CAUTION!<br />
HOW TO HANDLE FIREARMS<br />
Firearms must be handled correctly during their use and maintenance.<br />
Lack of familiarity in how they should be handled can cause accidents.<br />
For this reason always handle the pistol as if it was loaded and never<br />
point it at anyone. In addition, keep your finger off the trigger, unless you<br />
are about to shoot.<br />
Please note that unauthorised tampering or modifications made to the<br />
pistol will void the manufacturer's guarantee. Only authorised gunsmiths<br />
should be used to repair Pardini pistols.<br />
Pardini pistols do not require any particular care in order to keep them<br />
in good working order. However, we suggest that you keep all external<br />
surfaces lightly oiled. P!ease note that all moving parts (slide, piston,<br />
bearing surfaces etc.)-I1ave been treated with long lasting lubricants and<br />
do not require constant maintenance. Never use detergent oils on moving<br />
parts, nor remove any of the above mentioned lubricants applied by the<br />
manufacturer.<br />
Once every 12 to 24 months, we suggest a <strong>com</strong>plete overhaul of your<br />
pistol by your local agent.<br />
Should the pistol remain unused for a long period, we suggest you also<br />
lubricate the barrel. However, do not forget to remove this lubrication<br />
before shooting again, in order to maintain accuracy.<br />
Cher ami tireur sportif,<br />
Avec nos remerciements, nous vous felicitons d'avoir choisi de tirer<br />
avec un pistolet PARDINI. Cette arme est concue par un tireur qui<br />
possede plusieurs annees d'experience dans la <strong>com</strong>petition de haut<br />
niveau, elle est realisee par un personnel specialise <strong>com</strong>petent avec<br />
/'outil/age Ie plus modeme et la technologie la plus avancee. Les essais<br />
et la mise au point ont ete acheves avec la collaboration des meilleurs<br />
tireurs du monde entier.<br />
Cependant nous sommes a votre disposition pour tous les<br />
renseignements, les plus appropries. Notre meil/eure image de marque<br />
sera celie de vos succes!<br />
REMARQUES IMPORTANTES POUR LE MANIEMENT DES ARMES!<br />
Les armes doivent iHre maniees correctement pendant I'utilisation et<br />
I'entretien, elles peuvent devenir dangereuses si I'on meconnait leur<br />
fonctionnement.<br />
Nous conseillons donc de lire attentivement les instructions suivantes<br />
et meme de nous adresser une demande de renseignements<br />
<strong>com</strong>plementaires en cas de doute.<br />
II faut toujours manipuler une arme avec les memes precautions, qu'elle<br />
soit chargee ou non, surtout en ne la dirigeant pas vers d'autres<br />
personnes avec Ie doigt sur la detente.<br />
Toutes operations mecaniques autres que celles des reglages et<br />
entretiens normaux entrainent la fin de la garantie. Gonfier les reparations<br />
a nos distributeurs-armuriers qualifies.<br />
Les armes PARDINI fonctionnent parfaitement avec un minimum de<br />
soins. Nous conseillons de lubrifier les pieces en vue avec de I'hulle<br />
fine. Les pieces plus difficHes d'acces (piston, engagement de gachette,<br />
etc...) sont garnis a I'usine d'un lubrifiant plus epais et de longue duree<br />
suffisant pour 12 ou 24 mois mais que I'on doit preserver en n'utilisant<br />
pas d'huiles detergentes sur les autres parties.<br />
Si I'arme reste inutilisee pendant long temps, iI est utile de huiler<br />
legerement I'interieur du canon mais iI ne faut pas oublier de Ie secher<br />
avant I'emploi.<br />
-<br />
~
Sehr geehrter Freund des SchieBsports I Der Umgang mit SchuBwaffen<br />
Herzlichen GlOckwunsch und Danke, daB Sie sich fur eine Pardini-<br />
Pistole entschieden haben. Ihre Pistole wurde von einem<br />
erfolgreichen Schutzen, der schon seit langem durch Spitzenleistung<br />
bekannt ist, entworfen und entwlckelt. Hergestellt wlrd Ihre PIstole<br />
von erfahrenen Mitarbeitern mit fortschrittlicher Technologie. Fur<br />
die Testserien wurden einige der namhaftesten Schutzen der Welt<br />
verpflichtet. Diese Zusammenarbeit macht es m6glich,..daB wir<br />
Ihnen ein Produkt anbieten k6nnen, das Ihren personllchen<br />
Bedurfnissen entspricht. Jedoch z6gern Sie nicht, sJch anuns zu<br />
wenden, denn mit Ihrer Kritik und Ihren Vorschlagen smd Sle<br />
jederzeit willkommen.<br />
Vielen Dank!<br />
ACHTUNG!<br />
DER UMGANG MIT SCHUSSWAFFEN<br />
SchuBwaHen mussen wahrend Gebrauch und Wartung fehlerfrei gehandhabt<br />
werden. 1st man mit del' korrekten Handhabung nicht vertraut, so kann dies zu<br />
Unlallen fuhren.<br />
Aus diesem Grund sollte Ihre Pistole stets so behandelt werden, als ob sie geladen<br />
ware. AuBerdem zielen Sie nie mit del' Pistole auf jemanden und halten Sie Ihre<br />
Finger yom Abzug lern, wenn Sie nicht schieBen wollen.<br />
Bitte nehmen Sie zur Kenntnis, daB unbefugtes Herumbasteln odeI' Veranderungen<br />
an del' WaHe zu einem Verlust der Herstellergarantie luhren. Nul' autorisierte<br />
. Buchsenmacher durfen Reparaturen an Pardini-Pistolen durchfUhren. Pardini-<br />
Pistolen ben6tigen keine besondere Pflege, um ihre Funktionslahigkeit zu erhalten.<br />
Jedoch schlagen wir vor, daraul zu achten. daB aile auBeren Flachen leicht einge61t<br />
sind.<br />
Bitte beachten Sie, daB aile beweglichen Teile (Schlitten bzw. VerschluB, Kolben,<br />
Lager etc.) mit lang anhaltenden Schmiermitteln behandelt wurden und deswegen<br />
keiner standigen Pllege bedurfen. Verwenden Sie weder Reinigungsmittel auf den<br />
beweglichen Teilen, noch entfernen Sie die yom Hersteller aulgebrachten, oben<br />
erwahnten Schmiermittel.<br />
Wir emplehlen Ihnen. Ihre Pistole aile 12 bis 24 Monate bei Ihrem Handler vollstiindig<br />
uberholen zu lassen. Sollte Ihre Pistole uber einen langeren Zeitraum hinweg nicht<br />
benutzt werden, so emplehlen wir den Laul einzuolen. Wenn Sie wieder schieBen<br />
wollen, dann vergessen Sie nicht, dieses 01 zu entlernen; sonst leidet die<br />
SchuBprazision darunter.<br />
,<br />
P:;-<br />
Estimado Amigo,<br />
Le felicitamos y Ie agradecemos que haya escogido para disparar<br />
una pistola Pardini. Su pistola se ha disenado y se ha desarrollaci°<br />
por un tiradorexitoso con un largoy distinguido record de actuaclo~,<br />
y se ha fabricado por personal especializado usando la tecnologla<br />
mas avanzada. Siendo probadas en su desarrollo por algunos de<br />
los mejores tiradores del mundo. Por medio de esta colaboraci6n<br />
podemos ofrecer un producto que satisface los mas personales I<br />
requerimientos.<br />
Sin embargo, por favor siemtase libre para hacernos IIegar sus<br />
observaciones y sugerencias cuando quiera.<br />
iMuchas gracias!<br />
AVISO!<br />
COMO MANEJAR LAS ARMAS DE FUEGO<br />
Las armas de fuego deben manipularse correctamente durante su uso y<br />
mantenimiento.<br />
La lalta de lamiliaridad en su manipulacion puede ser una causa de accidentes.<br />
POl' esta razon siempre maneje la pistol a <strong>com</strong>o si estuviera cargada<br />
y nunca<br />
la apunte contra nadie.<br />
Ademas, mantenga su de do luera del gatillo, a menos que usted este a punto<br />
de disparar.<br />
POl' lavor, tenga presente que las seiiales de manipulacion 0 modificaciones<br />
desautorizadas hechas a la pistola anularan la garantia del labricante. Las<br />
pistolas Pardini unicamente deben ser reparadas por armeros autarizado.s.<br />
Las pistolas Pardini no requieren ningun cuidado particular en su conservaclon<br />
I<br />
para que mantenga su buen luncionamiento. Sin embargo, nosotros sugerimos<br />
que usted mantenga la superficie extern a engrasada ligeramente. Porlavor<br />
tenga en cuenta que todas las partes moviles ( la corredera. el cierre, superficies<br />
de rodamientos,<br />
y no necesitan<br />
etc.) se han tratado mucho tiempo<br />
un mantenimienlo con stante.<br />
con lubricantes duraderos<br />
Nunca use detergente en grasa en las partes moviles, ni quite cualquiera del<br />
antedicho lubricante aplicado pOl' el fabricante.<br />
Una vez cada 12 a 24 meses, nosotros sugerimos un <strong>com</strong>pleto repaso de su<br />
pistola par su agente local.<br />
Si la pistola no se usa durante un periodo largo de tiempo, nosotros<br />
. .<br />
tam bien<br />
re<strong>com</strong>endamos que usted lubrilique el canon. Sin embargo, no olvide de<br />
quitar esta lubricacion antes de disparar de nuevo para mantaner la precision.
MOD. K 22 cal. 22 I.r.
~~<br />
PISTOlA MODEllO K22 CALIBRO 22 L.R<br />
SCHEDA TECNICA<br />
Monocolpo da <strong>com</strong>petizione nella special ita olimpica dei 50 mt. cal. 22 L.R. Scatto, contrappesi, mire<br />
micrometriche regolabili ed intercambiabili.<br />
Lunghezza canna mm. 300/rifling 60 x 450 mm. Linea di mira variabile da mm. 345 a mm. 420. Peso 1100<br />
grammi. Impugnatura anatomica in legno di noce. Tecnologia innovativa. Sistema PARDINI.<br />
SISTEMA DI CARICAMENTO<br />
Appoggiato il dito poll ice sui cursore (1), con il dito indice alzare iI manettino della leva di armamento (2)<br />
che si aprira automaticamente. Posizionare la cartuccia al centro della camera di armamento, quindi<br />
abbassare la leva fino ad ottenere una chiusura a scatto. Spingere in basso 10 stecker (3) per attivare il<br />
sistema di scatto. La K22 e pronta al tiro.<br />
REGOlAZIONE SCATTO E GRlllETTO (vedi disegno)<br />
VITE N" 4: permette al grilletto di posizionarsi avanti e indietro, ruotare su asse orizzontale e trasversale<br />
a destra e a sinistra.<br />
VITE N° 5: permette al grilletto di alzarsi, abbassarsi e ruotare su se stesso.<br />
VITE N" 6: regola 10 scatto: girando in senso orario si riduce I'aggancio dei piani di scatto.<br />
VITE N° 7: regola il peso delle scatto: girando in senso ,orario aumenta il peso delle scatto.<br />
REGOlAZIONE LINEA DI MIRA E CONTRAPPESI<br />
Linea di mira variabile da mm. 345 a mm. 420. La regolazione si oUiene allentando la vite di bloccaggio<br />
sui mirino e facendolo scorrere nella guida. Per regolare la posizione dei contrappesi agire sulle viti di<br />
bloccaggio.<br />
REGOlAZIONE TACCA DI MIRA<br />
La vite anteriore destra regola I'alzo, la vite posteriore sinistra regola la deriva (1 click = 8 mm. a 50 metri).<br />
La vite esagonale posta sui lata sinistro della foglia ne regola I'ampiezza da 2,60 a 4,60 mm.<br />
SMONTAGGIO GRUPPO OTTURATORE<br />
Aprire la leva di armamento (2), sfilare il perno (8), spingere avanti iI cursore fermo otturatore (1). Can la<br />
pistola rivolta verso il basso, azionare 10stecker e premere il grilletto. L'otturatore scorrera avanti, mettendosi<br />
in posizione ottimale per essere estratto dalla K22.
MODEL K22 .22 L.R. CALIBER<br />
TECHNICAL SPECIFICATION<br />
Single shot for the exacting olympic 50 M discipline. 22 L.R. cal. The trigger<br />
mechanism and micrometric sights are adjustable and the counterweight and<br />
front sight are interchangeable.<br />
Barrel length mm. 300/rifling 6 D x 450 mm. The sight radius can be adjusted<br />
between 345 mm. and 420 mm. Weight 1100 gr. Anatomical wainut grip<br />
availabie. New technology PARDINI system.<br />
LOADING THE PISTOL<br />
Place your thumb on the bolt slide stop (1) and raise the cocking lever (2) with<br />
your index finger so that it opens automatically. Place a cartidge in the loading<br />
chamber and then lower the cocking lever (2) until it locks closed.<br />
Push down the set lever (3) to cock the firing mechanism. The K22 is ready<br />
to file.<br />
ADJUSTMENTS<br />
SCREW N° 4:<br />
SCREW W 5:<br />
SCREW N° 6:<br />
SCREW N° 7:<br />
adjusts the trigger positions both longitudinally, and<br />
horizontally from right to left.<br />
adjusts the trigger height and rotation around its axis.<br />
sets the left-off, turning clockwise reduces sear<br />
engagements.<br />
sets the trigger left off weight, turning clockwise increases<br />
the weight.<br />
COUNTERWEIGHT AND SIGHT ADJUSTMENTS<br />
The sight radius can be adjusted between 345'mm. and 420 mm. To adjust<br />
slacken off the foresight locking screw, move the foresight to the desired<br />
position and than re-tighten the screw. To adjust the position of the counterweight<br />
slacken off the looking screw. move it as required and then retighten Ihe scew.<br />
REARSIGHT ADJUSTMENTS<br />
The front right screw adjusts height (up/down) the back left screw adjusts<br />
windage (left to right) (one click=8 mm.). The hexagonal screw at the center<br />
of the left side of the rearsight adjusts the width of the rearsight aperture<br />
(adjustable from 2,60 to 4,60 mm) Turning clockwise increases the width.<br />
DISMANTLING THE BOLT ACTION<br />
Open the cocking lever (2) and push out the pin (8) push the bolt slide stop<br />
forward and turn the pistol upside down. Set and press the trigger.<br />
The bolt will move forward and can be easily removed from the K22.<br />
MODELE K22 CALIBRE .22LR<br />
FICHE TEHNIQUE<br />
- Monocoup pour la discipline olympique it 50m.<br />
Ligne de mire, detente, et contrepoids sont micrometriques et reglables.<br />
Longeur canon mm. 300lrifling 6DX450 mm. Ligne de mire regable de mm.<br />
345 a mm. 420. Poids<br />
Pardini.<br />
1100 gr. Cross en noyer. Nouvelle technologie systeme<br />
SYSTEME DE CHARGEMENT - Appurer Ie pouce sur Ie point n°. 1 et avec<br />
I'index relever Ie levier n°. 2 qui s'ovvrira automatiquement.<br />
Positionez la cartouche au centre oe la prechambre de chargement et<br />
refermer<br />
Appurer<br />
la culasse en<br />
vers Ie bas Ie levier<br />
rabattant<br />
n°. 3 pour<br />
la piece n°.<br />
armer Ie systeme<br />
2 vers I'avant.<br />
de detente Ie K22<br />
est pret II tirer<br />
REGLAGE DE L'ARME<br />
Vis n° 4: permet de reculer ou d'avancer la detente, et de I'orienter vers la<br />
droite ou vers la gauche sur un axe horizontal.<br />
Vis n° 5: permet de deplacer la detente en hauteur et de la pivoter sur un<br />
axe vertical.<br />
Vis n° 6: n§glage de I'accrochage, tourner la vis n° 6 dans Ie sens des aiguilles<br />
d'une montre jusqu'au declenchement du mechanisme de detente. A ce<br />
moment revenir d'I/4 de tour dans Ie sens inverse et vous obtiendrez un<br />
depart net et franc.<br />
Vis n° 7: reglage du poids de I'accrochage: tourner la vis n° 7 dans Ie sens<br />
des aiguilles d'une montre pour augmenter Ie poids. Apres chaque changement<br />
de po ids, verifier I'accrochage (manipulation precedente)<br />
DEMONTAGE DE LA CULASSE - Ouvrir la culasse, retirer la chevile n° 8<br />
et rabattre Ie levier d'armement sans Ie verrouiller. Basculer Ie pistolet vers<br />
Ie bas, armer Ie mechanisme de detente et tirer. La culasse glissera vers<br />
I'avant et vous pourrez I'enlever. Pour remonter la culasse installer la culasse<br />
dans son emplacement, remettre la cheville n° 8 et Ie K22 est pret a fonctionner.<br />
REGLAGE DE LA MIRE - La ligne de mire est reglable de 345 mm a 420<br />
mm. Le reglage s'effectue en devissant la vis n° 9 pour permettre au guidon<br />
de coulisser d'avant en arriere.<br />
REGLAGE DE LA HAUSSE ET DES CONTREPOIDS<br />
- La vis anterieure<br />
droite regie la hauteur. Si Ie tir est haut, tourner cette vis dans Ie sens des<br />
aiguilles d'une montre et inversement pour un tir bas. La vis posterieure<br />
gauche regie la derive. Si Ie tir est a gauche tourner cette vis dans Ie sens<br />
des aiguilles d'une montre, et inversement pour un tir a droite. La vis<br />
hexagonale place II gauche de la plancheUe de hausse permet de regler<br />
I'ecartement du cran de mire. II s'elargit en turnent dans Ie sens des auguilles<br />
d'une montre.(reglable de 2,60 II 4,60 mm) Pour Ie diminuer tourner cette<br />
vis dans les sens des aiguilles d'une montre et inversement pour I'augmenter.<br />
Pour regler la position des contrepoids, agir sur les vis de bloc~e.<br />
~7
MODELL K22<br />
TECHNISCHE EIGENSCHAFTEN<br />
Einzellader - Pistole fOr die Olympische Disziplin "Freie Pistole" Ober die SOm Distanz.<br />
Kaliber 22l.rVerstellbarer Abzug und Micrometervisier. Laufliinge 300 mm, Draliliinge<br />
450 mm mit 6 ZOgen Die Visierlinie ist yon 345 mm bis 420 mm verstellbar. Das<br />
Gewicht betragt 1100 g. Die verschiedenen Formgrille sind aus Nul3baumholz<br />
gefertigt. Die Walle ist nach neuestem Pardini-Technologiesystem hergestellt.<br />
SPANNVORGANG-LADEVORGANG<br />
Den Daumen der linken Hand vor dem Verschlul3hebel auf das System<br />
abstOtzen und mit dem Zeigefinger unter den herausstehenden BOgel der<br />
Ladeklappe (Nr. 2) greifen. Diesen van unten anheben. Nach Uberwinden<br />
des Kniehebelwiederstandes wird der Verschluss durch Federkralt vollstandig<br />
geoffnetr Die Patrone in das Patranenlager einfOhren und den VerschluBhebel<br />
schliel3en bis er einrastet. Nun den Stecherhebel (Nr. 3) betatigen urn den<br />
Auslosemechanismus zu aktivieren. Die Walle ist nun schul3bereit.<br />
EINSTELLEN DES ABZUGS<br />
Schraube n04: Nach Losen dieser Schraube kann der Abzug nach vome, nach<br />
hinten und zur Seite gedreht werden.<br />
Schraube nOS: Nach Losen dieser Schraube kann das AbzugszOngel nach oben,<br />
nach unten und zur seite gedreht werden.<br />
Schraube nU6: Diese Schraube regelt den Ubergrill an der Abzugsklinke. Drehen<br />
im Uhrzeigersinn verringert den Abzugsklin'kenObergrill. Gegen<br />
den Uhrzeigersinn erhoht sich der AbzugsklinkenObergrill.<br />
Schraube n07: Einstellen des Abzugsgewichtes. Drehen im Uhrzeigersinn erhoht<br />
das Abzugsgewicht. Drehen entgegen dem Uhrzeigersinn verringert<br />
das Abzugsgewicht.<br />
EINSTELLUNG DER VISIERUNG-LAUFGEWICHTE<br />
Die Visierlinie ist van 345 mm bis 420 mm verstellbar. Nach Losen der<br />
Komhalteschraube kann man die Visierlinie beliebig einstellen (verschiebares<br />
korn). Die vardere, rechte Schraube am visier ist fOr die Hohenverstellung<br />
des Kimmenblattesse verantwortlich: (+) bei TiefschOssen (-) bei<br />
HochschOssen. Die hintere, linke Schraube am Visier ist fOr die seitliche<br />
Verstellung des Kimmenblattes verantwortlich: nach rechts bei LinksschOssen<br />
und nach links bei RechtsschOssen drehen (1 Click= 8mm bei 50 m) Die<br />
sechseckige Schraube an der linken Seite des Kimmenblattes dient zum<br />
verstellen desselben (van 2,60-4,60 mm verstellbar). Drehen im Uhrzeigersinn<br />
vergrossert den Kirnrnenausschnitt, entgegen wird er verkleinert . Die<br />
IT>ufgewichte sind nach Losen der Inbusschrauben individuell zu verschieben.<br />
ZERLEGEN DES BLOCKVERSCHLUSSES<br />
Verschlul3hebel ollnen, den Stilt (Nr. 8) herausziehen. Sicherungsschieber<br />
(Nr. 1) nach vomedrOcken. Stecher betatigen und Abzugsmechanismus auslosen.<br />
.slockverschluss entnehmen.<br />
~8<br />
MODELO K22, CALIBRE 22LR<br />
DESCRIPCION TECNICA<br />
Pistola monotiro de <strong>com</strong>petici6n para la especialidad olimpica de 50 m.cal.22<br />
L.R.<br />
Linea de miras , disparador y contrapeso micrametricos y regulables.<br />
Longitud del canon mm.300/rifling 6 0 x 450 mm. Longitud de linea de miras<br />
regulable de 345 mm. a 420 mm. Peso 1100 gr. Empunaduras anatomicas<br />
de noga!. Nueva tecnologia sistema de PARDINI.<br />
CARGA DE LA PISTOLA<br />
Situe su dedo pulgar sobre el seguro(1) presionandolo hacia del ante, y can<br />
el dedo Indice levantar la palanca de carga (2) de manera que esta se abra<br />
automaticamente. Coloque un cartucho en el media la camara de carga y<br />
baje la palanca (2) hasta que quede <strong>com</strong>pletamente cerrada. Presione hacia<br />
abajo la palanca (3) para montar el sistema de disparo. La K22 esta lista<br />
para disparar.<br />
REGLAJES DEL DISPARADOR<br />
Tomillo N° 4: Permite regular el gatillo longitudlnalmente, y horizontalmente<br />
de derecha a izquierda.<br />
Tomillo N° 5: ajusta la alture del gatillo y la rotacion alrededor de su eje.<br />
Tomillo NU 6: regula la salida del mecanisme de dispara. Con el mecanisme<br />
de disparo montado, girando el tomillo nO. 6 en 01 santido do las agujas del<br />
reloj, se reduce el recorrido del punta de salida hasta dispararse. En este<br />
y ustad obtendra una salida limpia y<br />
momenta girar en 01 santido inverso<br />
seca.<br />
Tomillo N° 7: regula el peso de la salida del disparador, girando en sentido<br />
horario aumenta el peso, en sentido contrario disminuye.<br />
REGULACIONDE LA LINEA DE MIRAS<br />
La longitud de miras es regulable de 345mm. a 420mm. La regulacion se<br />
obtiene aflojando el tomillo de bloqueo en la mira y haciendolo desplazar en la guia.<br />
REGULACION DEL ALZA Y DE LOS CONTRA PESOS<br />
EI tomillo anterior derecho regula la alture. Si el tira esta alto mover el tomillo<br />
en el sentido de las agujas del reloj, mover en sentido inverso para un tiro<br />
bajo. EI tornillo posterior Izquierdo regula la direcci6n, (un clic = Bmm en 50<br />
m). EI tornillo hexagonal a ixquierda de la hoja del alza, ajusta la anchura<br />
de la abertura de la mira (ajustable de 2,60 a 4,60mm). Aumenta girando<br />
en el sentido de las agujas del reloj. Para ajustar la posicion de los contrapesos,<br />
actuar sabre los tornillos de bloqueo<br />
DESMONTAJE DEL GRUPO OBTURADOR<br />
Abrir la palanca de carga (2) y retirar el pasador (8) empujar hacia delante<br />
el segura que retiene el obturador (1); can la pistola dirigida hacia abajo,<br />
accionar el pelo y apretar el gatillo. EI obturador se desplazara hacia delante,<br />
poniendose en posicion optima para ser extraido de la K22.
(})<br />
#1<br />
~
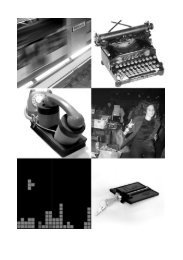
MOD. K22 cal. 22 LR<br />
MOD. HP cal. 32 S & W MOD. SP cal. 22 LR<br />
CD<br />
Elettronic trigger<br />
mechanism<br />
MOD. GPE cal. 22 Short @ ~:~~~~~~~trjgger<br />
.
,<br />
--...--<br />
PISTOLE PARDINI Madella GPE - SP - HP<br />
CARATTERISTICHE<br />
Le pistole di questa serie sono state progettate per II tira a 25 metri:<br />
la GPE per la specialita ISSF Pistola Automatica, evoluzione del modello GPS<br />
curato da Ralph Shumann, dotata di scatto e/ettranico.<br />
la SP per la specialita ISSF Pistola Standard e Standard Donne;<br />
la HP per la specia/ita ISSF Pistola Grosso Calibro e per Ie gare CISM.<br />
Le impugnature sono intercambiabili, ricavate da blocco unico di legno di noce.<br />
II sistema di funzionamento e a massa battente con chiusura labile. L.:otturatore<br />
(in lega per i modelli GPE e in acciaio speciale per i modelli SP e HP) e del<br />
tipo baricentro avanzato can percussore flottante. L.:alimentazione si ha mediante<br />
caricatore monofiliare da cinque colpi, posta davanti al grilletto, trattenuto da<br />
dente di ritegno alia base; I'espulsore e solidale al carici:1lore e I'estrattore e<br />
imperniato lateralmente sui fianco destro dell'otturatore. La particolare inclinazione<br />
del caricatore e I'elevatore basculante permettono aile cartucce di presentarsi<br />
in camera di scoppio in posizione molto lineare. II meccanismo di scatto e<br />
contenuto interamente nella parte posteriore dell'arma: nella GPE a pacchetto<br />
estraibile, nella SP e HP imperniato direttamente sui telaio.<br />
Numerosi fattori evidenziano I'accurata pragettazione delle pistole Pardini: /a<br />
scelta oUimale dei rapporti di leva, la posizione estremamente bassa dell'asse<br />
della canna e della linea di mira, I'angolazione dell'impugnatura congeniale<br />
all'anatomia del paisa, 10 scorrlmento coassiale dell'otturatore rispetto alia<br />
canna, sono alcune delle peculiari caratteristiche delle pistole Pardini. Esse<br />
sono inoltre dotate di un contrappeso dinamico multifunzione di nuova<br />
progettazione (modello Heinrich Ries), che permette di ammortizzare il rinculo,<br />
di annullare Ie vibrazioni del mirino durante 10sparo e di essere personalizzato<br />
mediante pesi da inserire internamente che vengono forniti in dotazione.<br />
II modello GPE e dotato di scatto elettronico di nuova concezione, progettato<br />
con un sistema antischock per la protezione dei <strong>com</strong>ponenti interni che garantisce<br />
la massima affidabilita di esercizio.
PARDINI PISTOLS, GPE - SP - HP MODELS<br />
FEATURES<br />
These pistols have been designed for 25 metre shooting as follows:<br />
The GPE model for the ISSF Rapid Fire Pistol match, evolved from<br />
the Rail Shumann model' and fitted with an electronic trigger<br />
mechanism.<br />
The SP model for the ISSF. Standard Pistol match. The HP model for<br />
the ISSF Center Fire Pistol and other Center Fire matches (CISM).<br />
Interchangeable grips are made from one piece wainut blanks.<br />
The operating system is a delayed blow-back type. The bolt (light<br />
alloy for the GPE model and special steel for the SP an HP models)<br />
closes slightly in front of the centre of gravity and is fitted with a freefloating<br />
firing pin.<br />
Cartridges are fed from a five shot magazine, located in front of the<br />
trigger and held in place by a frame mounted magazine catch. The<br />
ejector is built into the magazine and the extractor claw is mounted<br />
on the right hand side of the bolt.<br />
The angle of the magazine and follower plate is designed to give<br />
perfect cartridge feeding into the chamber.<br />
The trigger mechanism is contained in the rear of the pistol; in the<br />
GPE models it is extractable and, in the SP and HP models, it is<br />
directly into the frame.<br />
Numerous features indicate the design quality of Pardini's pistols:<br />
optimum and efficient design of the firing mechanism, the barrel axis<br />
and line of sight are both extremely low, the inclination of the grip is<br />
<strong>com</strong>fortable for the anatomy of the wrist and the coaxial movement<br />
of the bolt in relation to the barrel are some of the most important<br />
characteristics of Pardini's pistols.<br />
The pistols are also equipped with a new dynamic multifunction<br />
counter-weight (mod Heinrich Ries) that allows a reduction in recoil<br />
and annuls any vibration of the front sight during firing. The counterweight<br />
can be personalised to the firer by inserting alternative weights.<br />
The GPE model is flited with a new design of electronic trigger<br />
incorporating an antishock mechanism that guarantees perfect<br />
functionality during firing.<br />
PISTOLES PARDINI, MODELE GPE - SP - HP<br />
OONNES TECHINIQUES<br />
Cettes armes sont concues pour Ie tir a 25 m. des disciplines UIT<br />
La GPE pour la specialite ISSF pistolet automatique, evolution du<br />
modele GPS prepare pas Ralf Shumann, dote d'une detente<br />
electronique.<br />
HP: Pistolet Sport Gros calibre et Vitesse olympique.<br />
Les POIGNEES des trois armes sont interchangeables, taillees dans<br />
Ie meilleur noyer et sans mecanique et I'interieur afin de faciliter les<br />
adaptations personnelles des formes du bois.<br />
Le principe de fonctionnemment est semi-automatique a culasse<br />
mobile. La cuJasse est en alliage leger dans Ie modele GPE et en<br />
acler special dans les modele SP et HP, Ie centre de gravite est<br />
avance et Ie percuteur est flottant.<br />
L'alimentation pour 5 coups est assuree par un chargeur monocarcasse<br />
place lateralement sous la culasse.<br />
L'inclinaison particuliere du chargeur et un elevateur basculant<br />
permettent Line presentation favorable des munitions tout a fait dans<br />
I'axe de la chambre.<br />
Le mecanisme de detente est entierement place dans la partie<br />
posterieure des pistoJets: il est amovible sur Ie GPE et directement<br />
goupille dans la carcasse sur les SP et HP.<br />
De nombreux facteurs mettent en evidence un projet soigne des<br />
pistolets Pardini:<br />
La position extremement basse de "axe du canon et de la ligne de<br />
mire, la pente de la crosse adaptee a I'anatomie du poignet, Ie<br />
deplacement lineaire de la culasse dans I'axe du canon, sont quelques<br />
caracteristiques des pistolets PARDINI.<br />
lis sont egalement dotes de contrepoids dynamiques multifonction<br />
d'un nouveau concept (mod. Heinrich Ries), loges a I'interieur et fournis<br />
par la maison PARDINI, qui permettent de reduire Ie recul, d'annuler<br />
les vibrations du guidon pendant Ie tir et de personnaliser<br />
I' equilibre<br />
du pistolet.<br />
.<br />
Le modele GPE est dote de detente electronique de nouvelle conception,<br />
avec un systeme antichoc pour la protection des <strong>com</strong>posants interieurs qui<br />
garanti la fiabilite maximum d'exercice.<br />
"
PARDINI- SPORTPISTOLEN, GPE - HP - SP MODELLE<br />
TECHNISCHE MERKMALE<br />
Die Pardini "P" -Modellreihe wurde fOr die verschiedenen Disziplinen<br />
der SchuBentfernung von 25 Metern entwickelt:<br />
Das GPE Modell fOr die ISSF Disziplin Olyrnpische Schneilleuerpislole,<br />
eine Weiterentwicklung des GPS-Modells in Zusarnmenarbeit mit Rail<br />
Schumann, mil einem elektronischen Abzugsmechanismus.<br />
Das SP Modell fOr die ISSF Disziplinen "Sportpislole" und "Standardpistole".<br />
Das HP Modell lOr die ISSF Disziplin "GroBkaliberpistole" und andere<br />
"G roBkaliberpistolen"-Wettkample.<br />
Die Grille dieser drei Modelle sind untereinander austauschbar, aus<br />
einem StOck NuBbaumholz gelertigt, genau im Rahmen eingepaBt<br />
und kommen ohne inn ere mechanische Teile aus.<br />
Die Pistolen sind verz6gerte ROckstoBlader. Der VerschluB, ein<br />
konzentrischer Bolzen (beim Modell GPE aus Leichtmetall, bei den<br />
Modellen SP und HP aus Spezialstahl), schlieBt knapp vor dem<br />
Sehwerpunkt der Walle und beinhaltet einen Irei beweglichen<br />
Sehlagbolzen.<br />
Die PatronenzulOhrung erfolgt aus einem 5-SehuB-Magazin das vor<br />
dem Abzug plaziert wurde und von einem Magazinhalter im Rahmen<br />
gehalten wird. Der Auswerfer ist in das Magazin integriert und die<br />
Auszieherkralle ist an der rechten Seite des Versehlusscs angebracht.<br />
Die optimale Neigung des Magazins erm6glicht ein per/ektes,<br />
geradliniges EinfOhren dcr Patrone ins Patronenlager. Der<br />
Abzugsmcchanismus befindet sich vollstandig im hinteren Teil der<br />
Pistole: beim GPE Modell ist er herausnehmbar, bei den Modellen<br />
SP und HP ist er am Rahmen belestigt.<br />
Viele wichtige Merkmale erh6hen die Funktionalitat und Wertigkeit<br />
der Pardini Sportpistolen. Die Seelenachse des Laufes und des<br />
Visieres liegen sehr niedrig. Der an die natOrliche Anatomie des<br />
Handgelenkes angepaBte Grillwinkel und das Verhaltnis des Laufes<br />
zum Schlitten sind einige der wichtigsten Eigenschaften der Pardini<br />
Pistolen. Die Wallen sind mit einem ROckstoBdampfungssystem<br />
(Modell Heinrich Ries) ausgestattet. Die 4 im Laufmantel federnd<br />
gelagerten Bolzen erm6glichen ein last rOckstoBlreies SchieBen.<br />
Das Modell GPE ist mit einem elektronischen Abzug, der unter<br />
Anwendung neuester Technologien entwickelt wurde, ausgestattet.<br />
Das elektronische Abzugsystem ist mit einer Antischockummantelung<br />
versehen, um die inneren Teile zu schOtzen und somit eine zuverlassige<br />
~nd siehere Funktion zu gewahrleisten<br />
_t:14<br />
LAS PISTOLAS DE PARDINI, MODELOS GPE-SP- HP,<br />
CARACTERISTICAS<br />
Estas pistolas se han disenado para el liro a 25 m, corno se describe<br />
a continuacion:<br />
EI modelo GPE para las <strong>com</strong>peticiones I.S.F.F. de Pistola Veloeidad,<br />
(GPE con un equipamiento especial re<strong>com</strong>endado par Rail Shumann.<br />
EI model a SP para las <strong>com</strong>peticiones I.S.S.F. de Pistola Estandar.<br />
EI modele HP para las <strong>com</strong>peticiones I.S.S.F. de pistola de Fuego<br />
Central y otras <strong>com</strong>peticiones de Grueso Calibre.<br />
Las empunaduras intercambiables labricadas de una pleza de nogal.<br />
La corredera tiene un amortiguador de retroceso en la parte de atras.<br />
EI cierre labricado en aleacion ligera para el modelo GPE. en acero<br />
especial para los modelos SP y HP, esta ligeramente par delante del<br />
centro de gravedad y es accionado al librarse la aguja percutora<br />
Ilotante.<br />
La alimentacion se lIeva a cabo con un cargador de cinco tiros,<br />
localizado en el armazon delante del disparador y sujeto par un pestillo<br />
que retiene el cargador. EI expulsor va integrado en la teja del cargador<br />
y la una extractora esta montada en ellado de la derecha del cenojo.<br />
La particular inclinacion del cargador y el mecanisme de elevacion<br />
del proyectil, permite la perlecta alineacion de la recamara.<br />
EI mecanisme de disparo esta integrado <strong>com</strong>pletamente en Ie parte<br />
de atras de la pistola; en el modele GPE es extraible y en el modele<br />
SP y HP esta disenado directamente sobre el armazon<br />
Muchos son los elementos importantes, que incrementan el meticuloso<br />
diseno de las pistolas Pardini, la posicion del eje de los canones y<br />
de la linea de punter/a es sumamente baja, la inclinacion de la<br />
empunadura es adecuada con la anatomia de la muiieca, los<br />
deslizamientos coaxiales del cerrojo resfJecto a los del canon, es una<br />
de las caracteristicas mas importantes de las pistolas Pardini.<br />
Las armas tam bien estan equipadas can un nuevo proyecto de<br />
contrapesos dinamicos multiluncion (mod. Heinrich Ries) esto permite<br />
una reduceion del retroceso, puede anular cualquier vibracion de la<br />
parte delantera durante el disparo y puede personificarse a traves de<br />
pesos intercambiables suministrados par la fabrica, que estEm alojados<br />
en el interior del contrapeso.
I ~.<br />
~f-\U, ~~~ ~ t\t~<br />
SMONTAGGIO E RIMONTAGGIO DELL'ARMA<br />
1- Togliere il caricatore.<br />
2- Togliere la vite esagonale.<br />
3- Impugnare I'arma con la mana sinistra e slilare insieme<br />
canna, contrappeso e otturatore, tenendo I'arma rivolta<br />
verso il basso.<br />
4- Separare I'otturatore della canna.<br />
5- Rimontare con operazione inversa.<br />
Si rac<strong>com</strong>anda di impugnare I'arma con la mana sinistra e di<br />
rivolgerla verso il basso soprattutto in lase di montaggio,<br />
lacendo attenzione al corretto posizionamento della molla, e<br />
di togliere il caricatore prima di iniziare dette operazioni.<br />
PULIZIA E LUBRIFICAZIONE DEI MODELL! SP HP E GPE<br />
ELETTRONICA E MECCANICA:<br />
Per la pulizia della canna usare prima gli scovoli di ottone in<br />
dotazione e poi un pan no. Per avere iImassimo della precisione<br />
e del lunzionamento assicurarsi che tutto il piombo sia state<br />
rimosso.<br />
Mettere una goccia di olio nei punti di contatto tra otturatore<br />
e canna usando un semplice lubrilicante senza additivi 0<br />
solventi. Non u'sarc solventi 0 oli nei meccanismi di scatto.<br />
AI massimo ogni 5,000 colpi smontare e pulire i caricatori.<br />
~FS~~~2~~--<br />
DEMONTAGE ET REMONTAGE<br />
1- Enlever Ie chargeur.<br />
2- Oter la vis.<br />
3-Demonter en meme temps les contrepoids, Ie canon et la<br />
cullasse en maintenant I'arme retourm3e vers Ie bas.<br />
4- Separer la culasse du canon.<br />
Sole remontage s'alfectue en sens inverse.<br />
II est rec<strong>com</strong>ande d'effectuer Ie demontage et Ie remontage<br />
en maintenant I'arme orientee vers Ie bas, en laisant bien<br />
attention au positionnement correct du ressort apres avoir pris<br />
soin d'enlever Ie chargeur avant de <strong>com</strong>mencer cette operation.<br />
Pour I'interieur des canons, utilisez Ie necessaire de nettoyage<br />
livre avec votre pistolet, pour Ie graissage exterieur canon<br />
culasse, une huile minerale fluide qui ne contienne pas d'additils<br />
ou de solvants.<br />
Pour Ie mecanisme de detente n'utilisez aucun type de lubriliant<br />
(huile, graisse ou solvant).<br />
-<br />
~5
DISMANTLING AND REASSEMBLY<br />
1- Remove the magazine and 'prove' the<br />
pistol safe.<br />
2- Undo and remove the hexagonal screw<br />
under the muzzle.<br />
3- With the pistol pointing downwards<br />
carefully, pull off the <strong>com</strong>bined barrel<br />
and bolt assembly.<br />
4- Separate the bolt from the barrel unit.<br />
5- Reassembly is carried out in the reverse<br />
order.<br />
WARNING - It is extremely important to<br />
remember to remove the magazine before<br />
attempting to dismantle the pistol. Pay<br />
particular attention that the recoil spring<br />
is correctly fitted when reassembling. Both,<br />
dismantiling and reassembly should be<br />
carried out with the pistol pointing<br />
downwards.<br />
CLEANING AND LUBRICATION OF THE<br />
SP HP GPE ELECTRONIC AND<br />
MECHANICAL TRIGGER MODELS:<br />
Use first a properly sized brass brush on<br />
the chamber and bore and then clean the<br />
bore with a patch. Insure that all lead is<br />
removed to insure top accuracy and<br />
function.<br />
Lubrificate the contact points (where the<br />
bolt rides on the barrel and guide pins)<br />
with a simple lubricant with no additive.<br />
Do not use solvent or oils on the trigger<br />
mechanism.<br />
At least every 5.000 rounds disassemble<br />
and thoroughly clean the magazines.<br />
,<br />
,","1 h<br />
ZERLEGEN UND MONTAGE<br />
I - Enlfernen Sie das Magazin und stellen<br />
Sie sicher, das die Pistole nicht geladen<br />
ist.<br />
2 - Lbsen Sie die Sechskantschraube unter<br />
der MOndung.<br />
3 - Wahrend Sie die MOndung nach unten<br />
halten, entfernen Sie die<br />
zusammenhangenden Teile aus Lauf I<br />
Laufmantel I Verschluss sowie<br />
SchlieBfederfOhrungsstange I<br />
SchlieBfeder.<br />
4 - Trennen Sie den VerschluB vom Lauf.<br />
5 - Die Montage wird in umgekehrter<br />
Reihenfolge durchgefOhrt.<br />
WARNUNG: Bevor Sie mit dem Zerlegen<br />
der Pistole beginnen, dOrfen Sie nicht<br />
vergessen das Magazin herauszunehmen.<br />
Achten Sie auBerdem darauf, daB die<br />
SchlieBfeder wahrend des Zusammenbaus<br />
genau sitzt. Sowohl beim Zerlegen, als<br />
auch beim Zusammenbau ist darauf zu<br />
achten, daB die MOndung stets nach unten<br />
zeigt.<br />
REINIGUNG UND WARTUNG DER<br />
MODELLE SP HP GPE ELEKTRONIK<br />
IMECHANIK:<br />
Reinigung: Reinigen der Uiufe mit den<br />
mitgelieferten Reinigungsbursten. Fur die iiu!?'ere<br />
Pflege und leichte Schmierung von Lauf und<br />
Schlitten gutes Feinmechanikerol benutzen.<br />
Fur den Abzugsmechanismus keine Ole oder<br />
Losungmittel benutzen.<br />
DESMONTAJE Y MONTAJE DEL ARMA-<br />
1- Extraer el cargador<br />
2- Quitar el tornillo hexagonal que hay<br />
debajo del canon<br />
3- Con la pistola apuntando hacia abajo,<br />
sacar la <strong>com</strong>binacion de canon y cierre<br />
del armazon<br />
4- Separar el cierre del dispositivo del<br />
canon<br />
5- Para montar el arm a realizar estas<br />
operaciones en orden inverso<br />
ADVERTENCIA -Es sumamente<br />
importante recordar que debe sacar el<br />
cargador antes de <strong>com</strong>enzar a desmontar<br />
la pistola. Prestar especial atencion en<br />
que tanto la aguja <strong>com</strong>o el muelle esten<br />
perfectamente colocados a la hora de<br />
montar la pistola. Se re<strong>com</strong>ienda realizar<br />
el montaje y desmontaje manteniendo al<br />
arma orientada hacia abajo.<br />
LlMPIEZA Y LUBRIFICATION DE LOS<br />
MODELOS SP HP GPE ELECTRONICA<br />
Y MECANICA:<br />
Limpieza del canon con escobillones en<br />
dotacion.Poner una gota de aceite en los<br />
puntos de contacto entre corredera y<br />
canon usando un simple lubricante sin<br />
aditivos 0 disolventes.Para el mecanismo<br />
de disparo no usar ningun tipo de aceite<br />
0 de disolventes.
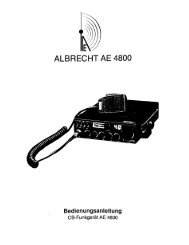
SCATTO GPE ELETTRONICO<br />
TRIGGER MECHANISM, GPE ELEC.<br />
DETENTE, GPE ELEC.<br />
ABZUG, GPE ELEKT.<br />
MECANISMO DE DISPARO, GPE ELEC.<br />
SISTEMA REGOLAZIONE SCATTO<br />
MODELL! GPE MECC. CAL. 22 CaRTa<br />
SI RACCOMANoA 01 AGIRE SULLE VITI 01 REGOLAZIONE CON<br />
MaLTA GRAoUAL!TA'<br />
VITE A:<br />
VITE B:<br />
VITE C:<br />
VITE D:<br />
serve per posizionare il grilletto.<br />
serve per regolare la percorsa del grilletto.<br />
girando in senso orario, aumenta la pressione sui grilletto<br />
per far partire il colpo;<br />
girando in senso antiorario, tale pressione diminuisce.<br />
funziona da trigger-stop: arresta la corsa del grilletto<br />
dopo la partenza del colpo.<br />
N.B. Dopo aver finito di sparare, spengere I'interrutore ed effettuare<br />
uno scatto a vuoto.<br />
-'--<br />
t/I<br />
~7
TRIGGER ADJUSTMENT<br />
MODEL,GPE ELECTR. 22SHCALIBER<br />
PLEASE NOTE THAT ALL SCREWS MUST BE REGULATED<br />
SLOWLY AND CAREFULLY<br />
SCREW A:<br />
SCREW B:<br />
SCREW C:<br />
SCREW D:<br />
Unscrew to adjust trigger position<br />
Adjusts the trigger "free play"<br />
CAUTION: if turned too far the mechanism will not<br />
recock.<br />
Turn clockwise to increase the trigger weight and<br />
anticlockwise to reduce it.<br />
This operates as a trigger-stop and reduces<br />
overtravel after these shot breaks.<br />
N.B. When you have finished shooting, switch the electronic<br />
mechanism off, let the slide go forward and release the trigger<br />
(dry fire).<br />
EINSTELLEN DES ABZUGS<br />
GPE MODELLE ELEKT. KALIBER.22 KURZ<br />
BITTE BEACHTEN SIE, DASS ALLE SCHRAUBEN LANGSAM<br />
UND VORSICHTIG EINGESTELLT WERDEN MUSSEN.<br />
SCHRAUBE A: Losen der Schraube<br />
des AbzugzOngels.<br />
ermoglicht die Einstellung<br />
SCHRAUBE B: Stellt das Abzugsspiel ein. ACHTUNG: Wird<br />
die Schraube zu weit gedreht, so lost der<br />
Mechanismus nicht mehr aus.<br />
SCHRAUBE C: Drehen im Uhrzeigersinn vergrbBert das<br />
Abzugsgewicht, drehen gegen den<br />
Uhrzeigersinn verringert es.<br />
SCHRAUBE D: Diese Schraube dient als Trigger-Stop.<br />
HINWEIS: nach Ausschalten den Abzug noch einmal betatigen<br />
um den Kondensator zu entladen!!!<br />
-<br />
~18<br />
REGLAGE DE LA DETENTE:<br />
MODELE GPE ELECTR. - CALIBRE 22 COURT<br />
IL EST RECOMMANDE D'AGIR TRES PROGRESSIVEMENT SUR<br />
LES VIS DE REGLAGE<br />
VIS A : sert a regler la position de la queue de detente<br />
VIS B : sert a regler la pre-course de la queue de detente<br />
VIS C : sert a regler Ie poids de la detente: visser, augmente Ie<br />
poids ; devisser, diminue Ie poids.<br />
VIS D : trigger-stop: permet de regler la course de la queue de<br />
detente apres Ie depart du coup.<br />
ATTENTION! En I'absence totale de course libre, Ie coup ne peut<br />
pas partir.<br />
N.B : Apres avoir fini de tirer, eteindre I'interrupteur et effectuer un<br />
tir a sec.<br />
MECANISMO DE DISPARO<br />
REGULACIONES DEL DISPARADOR<br />
MODELO GPE ELECT., CALIBRE 22SH<br />
POR FAVOR, TENGA PRESENTE QUE LOS TORNILLOS DEBEN<br />
GIRARSE DE FORMA PROGRESIVA V GRADUAL.<br />
TORNILLO A: Sirve para regular la posicion del gatillo<br />
TORNILLO B: Sirve para regular el recorrido previo a la salida<br />
del disparo. ATENCION: Si se deja demasiado corto el mecanisme<br />
no se rearma.<br />
TORNILLO C: Girando en sentido horario se reduce, en senti do<br />
contrario se aumenta<br />
TORNILLO D: Regula el recorrido de despues de la salida del<br />
disparo, girar en sentido horario para disminuirlo. En ausencia total<br />
de recorrido la pistola no dispara.<br />
NOTA: Despues de haber terminado de disparar, apagar el interruptor<br />
y efectuar un disparo en vacio.
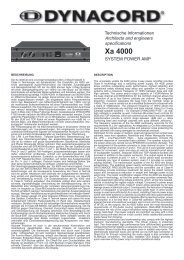
SISTEMA DI REGOLAZIONE SCATTO<br />
MDDELLD<br />
MDDELLO<br />
HP GALIBRO<br />
SP GALlBRD<br />
32 S&W'<br />
22 LR.<br />
.<br />
SI RACCOMANDA DI ESEGUIRE lE REGOlAZIONI CON l'ARMA<br />
ROVESCIATA (vedi disegno) E DI AGIRE SUllE VITI DI<br />
REGOlAZIONE CON MOlTA GRADUALITA (1/4 di giro per ogni<br />
intervento)<br />
VITE RG:<br />
VITE CS:<br />
VITE PS:<br />
VITE PG:<br />
VITE PP:<br />
VITE TS:<br />
VITE CP:<br />
per posizionare il grilletto.<br />
girando in sensa orario si allunga la corsa del 20 tempo di<br />
scatto, girando in sensa antiorario, tale corsa diminuisce,<br />
fino a s<strong>com</strong>parire.<br />
(interna alia vite CS), girando in sensa orario aumenta il<br />
peso del 20 tempo, girando in sensa antiorario, tale peso<br />
diminuisce.<br />
serve per regolare ilgiusto aggancio della leva disconnettrice<br />
sui controcane: girando in sensa orario, elimina la percorsa<br />
del grilletto avanti il 10 tempo di scatto.<br />
permette un'ampia regolazione del peso del 10 tempo di<br />
scatto. Girando in sensa antiorario si raggiunge un peso<br />
inferiore al kg, girando in sensa<br />
superiore a 1,360 kg.<br />
orario si raggiunge un peso<br />
IDc;\ 0<br />
funziona da trigger-stop: girando in sensa orario si accorcia<br />
la corsa a vuoto del grilletto, dopa la partenza del colpo,<br />
fino a farla s<strong>com</strong>parire.<br />
ATTENZIONE!: girando troppo questa vite in sensa orario<br />
10scatto non si aziona piLI.<br />
girando in sensa orario, diminuisce la corsa del 10 tempo,<br />
fino ad annullarla. ATTENZIONE!: girando troppo in sensa<br />
orario, il controcane non riesce piu ad agganciare il cane<br />
e 10 scatto non si arm a piu; inoltre, dopa aver agito su<br />
questa vite, e necessaria agire sulla vite PG, per regolare<br />
di nuovo il giusto aggancio della leva disconnettrice sui<br />
controcane.<br />
SCATTO SP E HP<br />
TRIGGER MECHANISM SP, HP<br />
DETENTE SP, HP<br />
ABZUG SP, HP<br />
MECANISMO DE DlSPARO SP,HP<br />
@<br />
#I<br />
~9<br />
@
,<br />
~')('\<br />
TRIGGER ADJUSTMENT<br />
HP MODEL, 32 5& W CALIBER<br />
5P MODEL, 22 L.R. CALIBER<br />
ALL ADJUSTMENTS SHOULD BE CARRIED OUT HOLDING<br />
THE PISTOL UPSIDE DOWN.<br />
CARE SHOULD BE TAKEN WHEN ADJUSTING THE<br />
MECHAN ISM. NEVER TURN ANY SCREW MORE THAN 1/4 OF<br />
TURN AT A TIME.<br />
SCREW RG: Unscrew 10adjusllrigger position.<br />
SCREW CS: Turn clockwise to lengthen second stage travel and<br />
vice versa unlil il disappears (single stage trigger).<br />
SCREW PS: Inside screw CS. Turn clockwise to increase second<br />
stage weight and vice versa.<br />
SCREW PG: This regulates the disconneclor engagement on the<br />
sear. Turn clockwise to reduce the freeplay before<br />
the first stage trigger.<br />
SCREW PP: Give a wide range of adjustment in the 1st stalle<br />
weight. Turning clock wise increases the weight to<br />
over 1360 grams and vice versa reduces Ihe weight<br />
10less then 1000 grams.<br />
SCREW TS: This function as an adjustable trigger-stop. Turn<br />
clockwise to reduce over-travel.<br />
CAUTION: if this screw is adjusted too far clockwise,<br />
the trigger will lease to function.<br />
SCREW CP:Turn clockwise to reduce first stage travel. CAUTION:<br />
if this screw is adjusted too far clockwise the sear<br />
will not re-engage. Once the desired adjustment is<br />
achieved. ALWAYS re-adjust screw PG, to ensure<br />
that the disconnector is correctly adjusted on the<br />
sear.<br />
REGLAGE DE LA DETENTE<br />
MODEL Hp, CALIBRE 32 5& W<br />
MODEL 5P, CALIBRE 22 L.R.<br />
Ces modeles oHrent un systeme de detente a double bossette<br />
dont les poids et les longueurs respectifs peuvent etre regles.1I<br />
esl re<strong>com</strong>mande de proceder aux reglages, sur I'arme retournee<br />
et en agissant par 1/4 de tour sur les diverses vis.<br />
VIS RG :Position de la queue de detente<br />
VIS CS : Visser pour augmenter la course de la seconde bossette<br />
VIS PS : Placee dans la vis CS. Visser pour augmenter Ie poids<br />
de la seconde bossette<br />
VIS PG : Sert a regler la course de la premiere bossette : visser<br />
diminue la longueur de la course.<br />
ATTENTION: Si la course est trop courte, il faudra alors regler<br />
la vis CP afin de permettre a la barrette de separation de se<br />
remettre en place.<br />
VIS CP : Fonctionne en parallel Ie avec la vis PG. Visser pour<br />
reduire la longueur de la premiere bossette, jusqu' a I'annuler si<br />
souhaite.<br />
ATTENTION: Visser a I ' exces risque d'empecher l'armement.De<br />
plus, apres avoir agi sur celie vis, il est necessaire de regler a<br />
nouveau PG.<br />
VIS TS : Trigger-stop: permel de regler la course de la queue de<br />
detente apres Ie depart du coup.<br />
ATTENTION: En I'absence totale de course libre, Ie coup ne peut<br />
pas partir.<br />
VIS PP : Permet Ie reglage du poids de la premiere course de la<br />
detente.Devisser pour alleindre un poids inferieur a 1Kg, visser<br />
pour atteindre un poids superieur it 1,360Kg.
EINSTELLEN DES ABZUGS<br />
HP MODELL, KALIBER .32 S&W<br />
SP MODELL KALIBER .22 L.R.<br />
ALLE EINSTELLUNGEN SOLLTEN BEl UMGEDREHTER PISTOLE<br />
DURCHGEFUHRT WERDEN (GRIFF ~ACH OBEN). DER<br />
MECHANISMUS SOLLTE NUR MIT GROSSTER SORGFALT<br />
EINGESTELLT WERDEN. VERDREHEN SIE KEINE SCHRAUBE<br />
UM MEHR ALS EINE VIERTEL UMDREHUNG AUF EINMAL.<br />
SCHRAUBE RG: Losen der Schraube ermoglicht die Einstellung<br />
des AbzugzOngels.<br />
SCHRAUBE CS: Drehen im Uhrzeigersinn verlangert den<br />
Druckpunkt und drehen gegen den Uhrzeigersinn<br />
verringert diesen, bis kein Weg mehr vorhanden<br />
ist (kein Druckpunkt mehr spOrbar).<br />
SCHRAUBE PS: Innerhalb der Schraube CS. Drehen im<br />
Uhrzeigersinn vergroBert das Gewicht am<br />
Druckpunkt und umgekehrt.<br />
SCHRAUBE PG: Diese Schraube stellt das Abzugsspiel ein.<br />
SCHRAUBE PP: Problemloses Einstellen von 1000g auf 1360g<br />
durch Erhohen bzw. Verringern des<br />
Vorzugsgewichtes. Drehen in Uhrzeigersinn<br />
vergrossert das Gewicht des Vorzugsweges,<br />
entgegengesetzt verkleinert es das Gewicht des<br />
Vorzugsweges.<br />
SCHRAUBE TS: Diese Schraube dient als einstellbarer Trigger-<br />
Stop. Drehen im Uhrzeigersinn verringert die<br />
Ruckwartsbewegung des Abzugs nach dem<br />
ACHTUNG:<br />
Auslosen.<br />
Wird die Schraube zu weit im Uhrzeigersinn<br />
gedreht, so lost der Abzugsmechanismus nicht<br />
mehr aus.<br />
SCHRAUBE CP: Drehen im Uhrzeigersinn verkOrzt den<br />
Vorzugsweg.<br />
ACHTUNG: Wird die Schraube zu weit im Uhrzeigersinn gedreht, so<br />
16stder Abzugsstollen nicht mehr aus. 1stdie Schraube CP eingestellt<br />
worden, dann muB IMMER die Schraube PG nocheinmal eingestellt<br />
werden.<br />
REGULACION DEL DISPARADOR<br />
MOOELO Hp, CALIBRE 32 S& Ii1/,<br />
MODELO SP, CALIBRE 22 L.R.<br />
ESTAS PISTOLAS DISPONEN DE UN DISPARADOR DE DOS<br />
TIEMPOS EN LOS CUALES ES POSIBLE REGULAR<br />
LOS PESOS Y LONGITUDES RESPECTIVAS, ES<br />
RECOMENDABLE PROCEDER AL REGLAJE CON EL ARMA<br />
VUEL TA Y GfRANDO UN CUARTO DE VUEL TA COMO MAxlMO<br />
CADA TORNfLLO.<br />
TORNILLO RG: Regula la posici6n de la cola del disparador.<br />
TORNILLO CS: Este tamilla regula el recorrido del segundo tiempo.<br />
TORNILLO PS: Situado dentro del tomillo CS, sirve para aumentar<br />
0 disminuir el peso del segundo tiempo<br />
TORNILLO PG: Regula el recorrido libre anterior al segundo tiempo.<br />
Girar en sentido horario para reducir esta pre-carrera<br />
TORNILLO PP: Permite regular el peso del primer tiempo, girar en<br />
sentido contrario alas agujas del reloj para conseguir un peso<br />
inferior a 1 Kg. Yen senti do horario para un peso superior a 1,360<br />
Kg.<br />
TORNILLO TS: Regula el TRIGGER- STOP ( recorrido posterior a<br />
la salida del disparo) girando en sentido horarlo disminuye. Atenci6n,<br />
en ausencia total de carrera fibre la pistola no funciona<br />
TORNILLO CP: Girar en sentido horario para reducir el recorrido del<br />
primer tiempo hasta anularlo si 10 desea. Atenci6n, sl se gira en<br />
exceso se arriesga a que no pueda montar el arma, ademas despues<br />
de actuar sabre este tomillo es necesario volver a regular el tomillo<br />
PG.<br />
,<br />
~21
1148-7~<br />
:::E:<br />
-<br />
~22<br />
1167-<br />
11tb-M<br />
IIbZ-~ \<br />
:;~\<br />
110l.-M~<br />
) \ \=;\ """<br />
1168M<br />
::~:<br />
,,;' I~~::~" /<br />
' ffr<br />
#~<br />
J. :::<br />
'<br />
~'l.';'~~' , I<br />
_M~_#,<br />
r. 1115<br />
~<br />
~;G. J ''.ld '"<br />
""". r / ... #/<br />
1IS1<br />
1It5-M~<br />
"",.::t<br />
.<br />
('~ IIO'l<br />
1 r :~:~<br />
Ill""-'<br />
~:<br />
l ~~~Q 1,<br />
,<br />
'>
:~~-<br />
J.A".<br />
,.,~ ~<br />
"<br />
'~-S \:if ;<br />
".'- [;='- \<br />
:;~:~~ ~<br />
~ '' r:'<br />
IO~<br />
11::::::~<br />
~<br />
«\\:;\~'-Ie)'~ 1M "'-."-1125 -10<br />
- ---- "7I<br />
c~::'~ ~i<br />
.<br />
.<br />
/< '. '<br />
J~IOO<br />
.<br />
~r<br />
'<br />
.<br />
/~~, ~.~~<br />
~ ,,",s,<br />
"" -<br />
.- ;. \ "II'"<br />
=-" "i-.. \<br />
..<br />
~"56<br />
-- -" I<br />
~<br />
, - ~ 8-.<br />
9, I!)<br />
"- '---,05'"'<br />
CW<br />
- . '-II,~l ,,~.;::tJ~, "";';Ji;o,'~ ,-------<br />
C:', -' 11,' 109-..'./'" ""'-'L<br />
4~<br />
-c 7<br />
v/<br />
! "--<br />
~:A~~~<br />
_~.<br />
Li~<br />
~ //~t<br />
" '-I~e<br />
'~lm9<br />
rr ~ '"<br />
/ - r £ "<br />
,,\\\~<br />
~ tI ~ '~'11)<br />
\'<br />
119; ~~<br />
~""<br />
"
~<br />
-<br />
~24<br />
~---<br />
74°_-<br />
7_39.<br />
J38<br />
737<br />
236<br />
~S -<br />
.L34<br />
733_' ?<br />
}3.2.<br />
731<br />
730<br />
729<br />
2..28_-<br />
7:27._-<br />
,/<br />
~~<br />
~@<br />
7_4~ 1~ 744 7~5 746 747 ?~C! ,~ ~q ZEJ. ~~ Z-~ 154 ~.~~- 7-~~ 7~7 r~~ 1..Q.l ?-~_2, 703 7~4 2Q-.? 196<br />
.> I<br />
-::d51' ~ "', ~" ~,!i<br />
-<br />
',., ',<br />
;~ '<br />
I<br />
\<br />
\LI' f) '<br />
-- -0<br />
I~~<br />
,<br />
'<br />
~<br />
,l" ,<br />
-,."<br />
",./<br />
crI ~.-~<<br />
- ,'«6 '-<br />
".<br />
./<br />
'<br />
'G('<br />
,<br />
'"<br />
, ~ .<br />
j~~/<br />
--'<br />
'0 " , et'- \.<br />
~~;! ,<br />
"-<br />
"1W<br />
,<br />
1/<br />
,.../ ~<br />
("<br />
J<br />
"',<br />
/"<br />
I<br />
' J I ///<br />
'<br />
//J .,..-/) ,/' / ./'" /.:,<br />
/'" //' -:;/<br />
~J>'<br />
r~#<br />
/<br />
~i<br />
,,/<br />
'"<br />
...-<br />
;<br />
.<br />
~,,~-:-:<br />
,<br />
'......<br />
'" """"", " "<br />
""'::-~<br />
~<br />
1 "<br />
' 'i<br />
I 1 TiS<br />
I I<br />
J<br />
717<br />
"""""<br />
I<br />
718<br />
I<br />
"719<br />
715<br />
I<br />
..L<br />
726<br />
.l<br />
725<br />
.l ...L<br />
724 723 722<br />
7~i<br />
'720<br />
;<br />
"<br />
.~<br />
---<br />
I<br />
_L-<br />
/14<br />
e'~<br />
~c-<br />
"<br />
~7~ ,/<br />
( ~~'<br />
)~, -:~J£W<br />
713<br />
711<br />
I<br />
712<br />
.7°7<br />
,708<br />
7"l<br />
-----<br />
12.9~<br />
MOD. SP<br />
710 ,<br />
-I-'
.841- -<br />
"",<br />
-, l<br />
842 843<br />
I ---<br />
J I<br />
, I<br />
: I<br />
,I<br />
844<br />
T<br />
i<br />
845<br />
r-<br />
l<br />
.<br />
84<br />
,-Q ill ~- 848 8~9<br />
I<br />
~(f()) I<br />
I I' I ~<br />
850<br />
852<br />
85'<br />
.8.\<br />
T T T It/./ J<br />
,~<br />
_.<br />
~ ',~ l~~ ,<br />
,<br />
83~_/--<br />
','/'~ .,<br />
'-<br />
/1 ' ).,;::/.?:': ~<br />
'"<br />
~<br />
--$<br />
83~-_ r~<br />
'<br />
-<br />
,<br />
,<br />
.<br />
','", "'-"' '/ ,-,-,?/j~I<br />
.<br />
' ' ';<br />
/ '"<br />
"'-' ~<br />
c<br />
. ~y-~<br />
--=?',/", ><br />
~' '-~'-.<br />
;'~w.<br />
'<br />
<br />
MOD. HP<br />
(11<br />
~25
",<br />
~<br />
CONTRAPPESO REGOLABILE MULTIFUNZIONE IN DOTAZIONE GPE - SP - HP MOD.<br />
INTEGRAL ADJUSTABLE MULTIFUNCTION COUNTERWEIGHT GPE - SP - HP MOD.<br />
CONTRE POIDS REGABLE MULTIFONTION EN DOTATION SP - HP - GPE MOD.<br />
VERSTELLBARES, ZUR AUSSTATTUNG GEHORENDES GEGENGEWICHT GPE - SP - HP MOD.<br />
CONTRAPESO MUL TIFUNCIONAL AJUSTABLE EN PESO MOD. GPE-SP-HP<br />
CD<br />
distanziale f-i\<br />
inferiore\<br />
@)<br />
~@<br />
"°<br />
\ rondelll<br />
r<br />
peso aggiuntivoJ<br />
n.4 gr.17/cad.<br />
alloggio per<br />
pesi aggiuntivi<br />
@ piastrina------<br />
IIJ ~<br />
~~ti fis:,aggio<br />
plastnna<br />
lm<br />
mOllaJ<br />
@<br />
alloggio distanziale<br />
e vite fissaggio<br />
/8\ vite fissaggio<br />
\!:V contrappeso<br />
~\\\\\\\\\\\\\\\\\\\\\~<br />
\ .<br />
CD additional weight<br />
@ spring<br />
@ top plate<br />
@) top plate<br />
fixing screws<br />
@) lower spacer<br />
([) wascer<br />
@ cou nterweig ht<br />
fixing screw<br />
[5j<br />
CDZusatzgewicht 4 51. a 10g.<br />
@ Feder<br />
@ Plattchen<br />
@ Befestigungsschrauben<br />
fOr Plallchen<br />
@Unteres DistanzstOck<br />
(j) Unterlegscheibe<br />
@Befestigungsschraube<br />
Gegengewicht<br />
CD Poids additionnel<br />
@ Ressort<br />
@ Platine<br />
@ Visde fixationplatine<br />
@ Entretoiseinferieure<br />
(j) Rondelle<br />
@ Visde fixationcontrepoids<br />
Q) Peso adicional<br />
@ Muelle<br />
@ Tara del contrapeso<br />
@ Tornillos de fijacion de la tapa<br />
@ Paso interior<br />
cD Arandela<br />
@ Tornillo que fija el contrapeso
ISTRUZIONI PER L'USO<br />
IIcontrappeso in dotazione della Vostra pistola Pardini e castruita<br />
per adattarsi aile Vostre esigenze.<br />
Togliendo la PIASTRINA (4), svitando Ie viti (5), si ha accesso a<br />
4 fori intorno alia canna. Tali fori costituiscono gli alloggi per i PESI<br />
AGGIUNTIVI (1) in dotazione.<br />
Per utilizzare i PESI AGGIUNTIVI (gr. 17 ciascuno) e indispensabile<br />
usare Ie molle in dotazione.<br />
E possibile inserire nell'alloggio prima la malia, poi il peso e quindi<br />
il grana di fissaggio. In questo caso il peso aggiuntivo costituisce<br />
un tradizionale incremento di peso.<br />
Se si inserisce prima il peso e poi la malia, si ottiene una<br />
contrappesatura che oscilla durante il rinculo dell'arma, contribuendo<br />
ad aumentare la stabilita. La teoria relativa e stata studiata e<br />
sperimentata da HEINRICH RIES e usata dalla PARDINI ARMI<br />
su Sua gentile concessione.<br />
Usando un numero inferiore di pesi aggiuntivi rispetto ai quattro<br />
in dotazione si possono ottenere equilibraturre personali dell'arma.<br />
Si consiglia di sperimentare Ie varie soluzioni possibili al fine di<br />
ottenere quella piu vantaggiosa per VoL<br />
Nota: - utilizzare sempre I'apposita rondella (7) tra il DISTANZIALE<br />
INFERIORE (6) e la testa della vite di fissaggio (8).<br />
- e disponibile (optional) un DISTANZIALE INFERIORE in acciaio<br />
(quello in dotazione e in leg a leggera). II distanziale in acciaio<br />
pesa 25 grammi piu di quello lega.<br />
Come opzional sana disponibili pesi in Tungsteno di gr.35 I'uno.<br />
,<br />
~27'
INSTRUCTIONS FOR USE<br />
The adjustable counterweight of your Pardini pistol is made<br />
to suit your personal preferences.<br />
Remove the screws (5) and TOP PLATE (4) to gain access<br />
to the four holes around the barrel.<br />
These holes are made to house the ADDITIONAL WEIGHTS<br />
(1), supplied.<br />
In order to fit the ADDITIONAL WEIGHTS (17 grams each),<br />
it is imperative to use the springs.<br />
A traditional weight increase is obtained by first inserting the<br />
spring (2) into the housing, followed by the additional weight<br />
(1).<br />
Alternatively, by inserting the additional weight (1) first into<br />
the housing, followed by the spring (2) , it is possible to obtein<br />
a counterweight that oscillates during recoil and increases<br />
stability. The theory behind this has been studied and<br />
experimented by HEIRICH RIES and used by PARDINI with<br />
his kind permission.<br />
It is possible to obtain your own preferred balance of the<br />
pistol, by using fewer than of the four weights supplied. We<br />
re<strong>com</strong>mend that you experiment with the available options to<br />
find the most suitable one for you.<br />
NB: - always use the special washer (7) between the LOWER<br />
SPACER (6) and the head of the fixing screw (8).<br />
- a LOWER SPACER of steel weighing 25 grams more than<br />
the alloy one supplied, is available as an optional extra.<br />
Tungsten counterweight rods are available as an option, each<br />
tungsten rod weighs 35 grams.<br />
#I<br />
'-'''°<br />
MODE D'EMPLOI<br />
Le contrepoids fourni avec Ie pistolet Pardini, est conc;:u pour<br />
s'adapter avos exigences.<br />
Apres avoir devissees les vis (5) et avoir enleve la PLATINE (4),<br />
on a acces aux 4 treus autour du canon. Ces treus forment les<br />
emplacements pour les palos SUPPLEMENTAIRES (1) fournis<br />
avec I'arme.<br />
Pour utiliser les palos SUPPLEMENTAIRES 17 gr. chacun), il<br />
est indispensable d'utiliser les ressorts.<br />
On peut meltre dans I'emplacement d'abord Ie ressort et puis Ie<br />
poids; dans ce cas, Ie poids supplementaire constitue un<br />
accroissement traditionnel de poids.<br />
On place ensuite d'abord Ie poids et puis Ie ressort; on obtient<br />
ainsi un contrepoids qui varie durant Ie recul du pistolet et accro1t<br />
ainsi la stabilite. La theorie relative a ete etudiee et experimentee<br />
par HEIRICH RIES et utilisee par Pardini, avec sa gracieuse<br />
concession.<br />
En utilisant un nombre inferieur de poids supplementaires, par<br />
rapport aux quatre fournis, on peut obtenir des equilibrages<br />
personnels de I'arme. IIest conseille d'experimenter les diverses<br />
solutions possibles afin d'obtenir la plus avantageuse pour vous.<br />
NOTE: - utiliser toujours la rondelle speciale (7) I'ENTRETOISE<br />
INFERIEURE (6) et la tete de la vis de fixation (8).<br />
- en option, est disponible une ENTRETOISE INFERIEURE en<br />
acier (celie fournie est en alliage leger). L'entretoise en acier pese<br />
25 grammes de plus de celie en alliage.<br />
Sont disponibles egalement en accessoire, des poids en Tungstene<br />
de 35 gr.chacun.
BETRIEBSANLEITUNG<br />
Das zur Ausstattung Ihrer Pardini-Pistole gehorende Gegengewicht<br />
wurde entwickelt um KundenbedOrfnissen gerecht zu werden.<br />
Durch herausdrehen der Schrauben (5) und entfemen des<br />
PLATTCHENS (4). hat man Zugang zu vier, um der Lauf<br />
positionierten, Locher. Diese Locher stellen das Gehause fOr die<br />
zur StandardausrOstung geh6renden ZUSATZ-GEWICHTE (1), dar.<br />
FOr die Benutzung der ZUSATZ-GEWICHTE (17 g. pro Gewicht),<br />
ist es unerlasslich, die fest gespannten Federn, zu verwenden.<br />
Es ist moglich, zuerst die Feder und dann das Gewicht in das<br />
Gehause, einzufUgen. In diesem Fall, verursacht das Zusatz-Gewicht<br />
eine herkommliche Gewichts-Zunahme.<br />
Wenn zuerst das Gewicht und dann die Feder eingenfOgt werden,<br />
wird ein Gegengewicht erzielt das, wahrend des ROckschlags der<br />
Watte, in Schwingung gerat und somit eine Verbesserung der<br />
Stabilitat zur Foige hat.<br />
Diese Theorie wurde yon HEINRICH RIES entwickelt und getestet<br />
sow ie, dank seiner freundlichen Genehmigung, yon Pardini<br />
angewandt.<br />
Durch verwenden yon weniger als vier der zur AurOstung gehorenden<br />
Zusatz-Gewichte, erzielt man einen individuellen Gewichtsaugleich<br />
der Walfe. Es wird empfohlen, die verchiedenen Moglichkeiten zu<br />
testen damit die ideale, individuelle Losung gefunden werden kann.<br />
HINWEIS: zwischen UNTEREM DISTANZSTOCK (6) sowie<br />
Befestigungs-schraubenkopf (8), stets Unterlegscheibe (7) benutzen.<br />
UNTERES DISTANZSTOCK ist auch als Variante in Stahl (das zur<br />
Standard-AusrOstung gehorende ist aus Leichtmetall-Material)<br />
verfOgbar.<br />
Das Stahl-DistanzstOck ist 25 g. schwerer als das DistanzstOck aus<br />
Leichtmetall Material. .<br />
Opzional sind Gewichte tOr die ROckstoBdampfung in Wolfram<br />
(Tungsteno) zu je 35 gr. erhaltlich.<br />
INSTRUCCIONES DE usa<br />
EI contra peso ajustable de su pistola Pardini esta hecho para<br />
satisfacer todas sus necesidades.<br />
Allojelos tomillos (5)de la tapa del oontrapeso (4) para poder tener acceso<br />
a los cuatro orificios alrededor del canon<br />
En estos orificios se alojan los contrapesos adicionales (1) de<br />
17gr cad a uno.<br />
Para utilizar los PESOS ADICIONALES, es necesario utilizar 105<br />
muelies y tornilios de fijacion , 105tomillos deben estar oompletamente<br />
apretados.<br />
EI aumento tradicional del peso del arma , se realiza insertando<br />
primero el muelie (2) en el alojamiento y despues se coloca el peso<br />
adiclonal (1).<br />
Alternativamente, insertando primero el peso adicional (1) seguido<br />
del muelie (2) se obtiene un contra peso que oscila durante el<br />
retroceso del arma de fuego, y que aumenta la estabilidad. Esta<br />
teoria esta estudiada y experimentada par HEINRICHRIES Yse<br />
utiliza por PARDINI con su amable permiso. Es posible obtener su<br />
equilibrio preferido del arma utilizando un numero inferior a 10cuatro<br />
pesos adicionales que se proparcionan. Nosotros re<strong>com</strong>endamos<br />
que usted experimente las opciones disponibles para encontrar la<br />
mas conveniente para usted.<br />
NB: - siempre utilice la arandela especial (7) entre el hueco inferior<br />
(6) y la cabeza del tornillo de fijacion (8).- esta disponible (opcional)<br />
un peso de acero de 25 gr. <strong>com</strong>o suplemento extra. Estan disponibles<br />
opcionalmente contrapesos en Tungsteno de 35 gr cada uno.<br />
~<br />
#1
Ii<br />
~30<br />
K2C02
PISTOLE PARDINI CAL. 4,5 MODELLO K 58 - K2, K2L, K2 JUNIOR A CO2 - K2S, K2SL, K2 S JUNIOR AD ARIA COMPRESSA<br />
CARATTERISTICHE<br />
Le pistole di questa serie sono state concepite seguendo Ie esigenze e I'esperienza dell'elite mondiale del tiro e tecnicamente sono quanta<br />
di piu avanzato pub offrire oggi il mercato per Ie gare ISSF a 10 metri.<br />
Le caratteristiche <strong>com</strong>uni a tutti e tre i modelli sono:<br />
i MATERIALI - corpo, cilindro e serbatoio in lega leggera, gli altri particolari in acciai speciali -, iI DISPOSITIVO DI AUTOCAMERATURA<br />
del pallino, il MECCANISMO DI SCATTO diretto, IITRIGGER-TIME velocissimo, I'ANGOLO DI IMPUGNATURA, il PUNTO DI PRESA<br />
dell'arma posto pochi millimetri SOttO I'asse della canna, IL PUNTO DI BILANCIAMENTO molto vicino all'asse del grilletto.<br />
II modello K58 e una pistola a pre<strong>com</strong>pressione d'aria mediante una leva integrale (brevetto Pardini).<br />
La leva segue la linea del cilindro e quella dell'impugnatura, funzionando anche da guardia del grilletto. Durante I'apertura della leva si ha<br />
contemporaneamente e automaticamente, I'arretramento del sistema di cameratura del pallino e I'armamento delle scatto. Alia partenza<br />
del colpo non si ha il minima rinculo in quanta I'aria viene liberata senza ulteriore movimento del pistone.<br />
I modelli K2 - K2L - K2 Junior usano, <strong>com</strong>e propellente il gas CO2 contenuto in un serbatoio intercambiabile posta sotto la canna in asse<br />
parallelo con questa. II modello K2L,e di peso ridatto rispetto alia K2 ed e particolarmente adatto aile donne. II madello K2 JUNIOR che<br />
si differenzia dalla K2 non solo per il peso ma anche per Ie dimensioni ridotte, e particolarmente adatto ai ragazzi.<br />
I modelli K2S- K2SL- K2S JUNIOR usano <strong>com</strong>e propellente I'aria <strong>com</strong>pressa a 250 bar contenuta in un serbatoio intercambiabile anch'esso<br />
posta parallelamente sotto la canna. I modelli ad aria <strong>com</strong>pressa hanno Ie stesse caratteristiche tecnico-balistiche dei modelli a CO2. II<br />
grande pregio delle pistole a CO2 e ad aria <strong>com</strong>pressa e la <strong>com</strong>pleta assenza di sforzo per I'armamento.<br />
L'autonomia del serbatoio e dipendente, per caratteristiche fisiche intrinseche del gas CO2, dalle condizioni ambientali. So no garantite<br />
tuttavla prestazioni eccezionalmente costanti dovute allo studio di un sistema di doppia precamera realizzato dalla nostra azienda per prima<br />
nel mondo. I modelli ad aria <strong>com</strong>pressa so no esenti da problemi derivanti dalle condizioni ambientali. Nonostante la lunghezza della canna<br />
il BARREL-TIME risulta estremamente breve a causa della velocits. che si riesce ad imprimere il pallino. La particolare cura delle canne,<br />
I'esperienza maturata nel corso di una grande quantita di prove balistiche, gli accorgimenti tecnici appropriati ci hanno permesso di ottenere<br />
prestazioni qualitativamente al piu alto livello.<br />
La Pardini Armi fornisce, a richiesta, un kit di trasformazione delle pistole, da CO2 ad aria <strong>com</strong>pressa e viceversa.<br />
-<br />
~
PARDINI PISTOLS CALIBER 4,5 (0.177) - MODELS K58 - K2, K2L, K2<br />
JUNIOR CO2 propulsion - K2S, K2SL, K2S JUNIOR air propulsion<br />
FEATURES<br />
The pistols of this series have been designed according to the requirements<br />
and experience of the worlds best shooters and are technically the most<br />
advanced on the market for the ISSF <strong>com</strong>petition at to meters.<br />
The <strong>com</strong>mon features for the three models are:<br />
The frame, cylinder and gas cylinder are made in light alloy, other parts in<br />
special steel. Other features include: a self-loading mechanism; a fast locktime;<br />
an optimum grip angle; a high grip point (only a few millimetres under<br />
the barrel axis as permitted by ISSF regulation) as well as a centre of balance<br />
very close to the trigger axis.<br />
The K58 model is a pre-<strong>com</strong>pressed air pistol using the Pardini patented,<br />
integral cam lever. The cocking level follows the outline of cylinder and grip<br />
and incorporates the trigger guard. As the cocking lever is operated, it<br />
automatically opens the breech cover bolt assembly and cocks the trigger<br />
mechanism. There is no recoil at the moment of firing because the <strong>com</strong>pressed<br />
air released instantaneously without any piston movement.<br />
The K2, K2L, K2J Models, use CO2 gas propellant in an interchangeable<br />
cylinder, located underneath the barrel and parallel to the axis, the K2L<br />
model is lighter than K2 model making it particulary suitable for ladies.<br />
The K2J model is lighter, and has also smaller dimensions than the K2<br />
model, making it suitable for juniores.<br />
The K2S, K2SL, K2SJ models use <strong>com</strong>pressed air propellant to 250 bar. in<br />
an interchangeable cylinder also placed underneath and parallel to the barrel.<br />
The <strong>com</strong>pressed<br />
models.<br />
air models have the same technical features as the CO2<br />
The great advantage of the CO2 and air pistols, is that no effort is required<br />
to re-Ioad them. CO2 periormance depends largely on environmental condition.<br />
However, wo guarantee exceptionally consistent performances due to the<br />
design of a double pre-chambering system, developed by us, that is the first<br />
of its type in the world. The performance of air pistols is not affected by<br />
enviromental conditions.<br />
In spite the long barrel-length, the pellet has a short barrel time because of<br />
the high velocity acheived. Careful manufacture of the barrels, together with<br />
our experience from a large number of ballistic tests <strong>com</strong>bined with other<br />
appropriate technical developments gives you the opportunity to achieve a<br />
very high standard of periormance. Pardini Armi supplies also by request,<br />
a pistol's conversion kit from CO2 to air, and vice versa.<br />
.<br />
~1?<br />
PISTOLETS PARDINI CALIBRE 4,5 MODELE K58 - K2, K2L, K2 JUNIOR<br />
propulsion a CO2 - K2SL, K2S JUNIOR propulsion a air<br />
DONNES TECHNIQUES<br />
Les pistolets de cette serie ont ete produits selon les exigences et avec<br />
I'experience des meilleurs tireurs du monde pour les <strong>com</strong>petitions ISSF a<br />
10 metres. La technique<br />
trois modeles sont:<br />
en est Ires avancee. Les donnees <strong>com</strong>munes aux<br />
Ie MATERIEL: carcasse, cylindre ot cartouche en alii age leger, les autres<br />
parties sont en aciers speciaux. Le DISPOSITIF D'AUTOCHAMBRAGE du<br />
plomb, Ie MECANISME DE DETENTE direct, Ie tres court TEMPS DE<br />
DETENTE, I'ANGLE DE LA POIGNEE, Ie POINT DE PRISE de I'arme place<br />
seulement peu de millimetres au dessous de I'axe du canon, Ie POINT<br />
D'EQUILIBRAGE, tres proche de I'axe de la detente.<br />
Le modele K58 est un pistolet a pre-<strong>com</strong>pression au moyen d'un levier<br />
integrai (Brevet Pardini). Ce levier suit la ligne du cylindre puis celie de la<br />
poignee en faisant office de pontel. L'ouverture du levier entraine<br />
automatiquement Ie recul du systeme de chambrage du plomb et I'armement<br />
de la detente. Au depart du coup, il n'y a pas de recul car I'air est libere<br />
sans acun mouvement du piston.<br />
Les modeles K2 - K2L - K2J utilsent <strong>com</strong>me gaz propulseur de I'anhydride<br />
carboni que CO2, contenu dans une cartouche interchangeable placee en<br />
dessous du canon, et parallelement a son axe.<br />
Le modele K2L par rapport au K2 a des poids reduits et cst ainsi<br />
particulierement indique pour les dames.<br />
Le modele K2J par rapport au K2, a des dimensions et des poids reduits.<br />
et ainsi est particulierement indique pour les juniors.<br />
Les modeles K2S - K2SL - K2SJ utilisent <strong>com</strong>me propulseur I'air a 250 bar<br />
contenu dans une cartouche interchangeable aussi placee en dessous du canon.<br />
Les modeles a air ont les memes caracteristiques<br />
que les modelles a CO2.<br />
techniques balistiques<br />
Le meilleur atout des armes a CO2 et a air est la <strong>com</strong>plete absence d'effort<br />
pour I'armement. L'autonomie de la cartouche de gaz depend des<br />
caractcristiques physiques, intrinseques du CO2, des conditions ambiantes.<br />
Cependant, les performances sont exeptionnellement constantes grace au<br />
systeme de double chambre d'expansion que notre societe a ete la premiere<br />
a realiser dans Ie monde. Les modeles a air ne dependent pas des conditions.<br />
ambiantes.<br />
Malgre la longueurdu tube, IeTEMPS "DE CANON"est extremement court<br />
de par la haute vitesse initiale du projectile. La qualite d'execution du canon<br />
et I'experience murie au cours de tres nombreuses epreuves balistiques<br />
ainsi que des moyennes techniques appropiees nous permettent d'obtenir<br />
des periormances de plus haut niveau. La maison Pardini fournit sur demande<br />
un kit de transformation du CO2 a air et de I'air au CO2.
pp,RDINI-MATCH-LUFTPISTOLEN, KALIBER 4,5 mm, MODELLE K58 (mlt PISTOLAS PARDINICAL.4,5-MODELOS K58-K2, K2L,K2JUNIOR DE CO2<br />
vorkomprimierter Luft) -K2-K2 light - K2 junior (CO2) - K2 - K2 light -K2 junior K2S, K2SL, K2S JUNIOR DE AIRE COMPRIMIDO<br />
- (PreBluft)<br />
TECHNISCHE MERKMALE<br />
Diese Pistolen wurden gemaB den Anforderungen und der Erfahrung der besten<br />
Schutzen der Welt konstruiert.<br />
Aile drei Modelle haben folgende gemeinsamen Merkmale:<br />
Der Rahmen, der Luft- und der Gasbehiilter sind aus Leichtmetall; die anderen<br />
Metallteile sind aus Spezialstahl.<br />
Weitere Merkmale sind: - schnelle VerschluBzeit<br />
- optimaler Griffwinkel<br />
- hoher Griltpunkt, nur ein paar Millimeter unter der Laufachse<br />
- Schwerpunktlage sehr nahe an der Abzugsachse.<br />
Das Modell K58 ist eine Luftpistole, die mlt vorkomprimierter Luft arbeitet. 55<br />
Kubikzentimeter Luft werden in einer 0,5 Kublkzentimeter graBen Kammer mit<br />
Hilfe eines Spannhebels komprimiert. Der Drehpunkt des fest eingebauten, fUr<br />
Pardini patentierten Spannhebels, befindet sich 280 Millimeter vom Hebelende<br />
entfernt. Der Spannhebal schmiegt sich der AuBenform des Luftbehalters und<br />
des Griltes an und dient gleichzeitig als AbzugsbOgel. Wird der Hebel gespannt.<br />
so bitnet sich automatisch die Ladeklappe und der Abzug wird gespannt. 1m<br />
Moment der SchuBabgabe entsteht kein ROckstoB, denn die Luft wird<br />
verz6gerungsfrei und ohne eine Kolbenbewegung freigesetzt.<br />
Modelle K2, K2 light (Lauf ist 100 9 leichter sowie kOrzere und leichtare<br />
Kartuschen), K2 Junior (kurze und leichte Kartuschen)<br />
Das CO2 befindet sich in einer CO2 - Kartusche die parallei zur Laufachse<br />
unterhalb des Laufes angebracht ist. Das Modell K2 light ist leichter ais Modell<br />
K2, daher ist es besonders fUr Frauen und Kinder geeignet.<br />
CARACTERISTICAS<br />
Las pistolas de esta serie estan concebidas segun las exigencias V la experiencia<br />
de los mejores tiradores del mundo V son las mas avanzadas tecnicamente en<br />
el mercado para las <strong>com</strong>peticiones 1.5.S.F. a 10 metros.<br />
Las caracteristicas <strong>com</strong>unes para los tres modelos son:<br />
EI material, el cuerpo, el cilindro de gas 0 de aire en aleacion ligera, otras<br />
partes en accro especial. Otras caracteristicas incluven: el mecanisme de<br />
carga del balln; el mecanisme de dispara directo; el tiempo de disparo muv<br />
corto, un angulo optimo de la empunadura, al punta alto de la empunadura ,<br />
solo unos milimetros bajo el eje del canon; asi <strong>com</strong>o el centro de gravedad<br />
muv cerca del eje del gatillo.<br />
EI modelo K58 es una pistola de aire pre-<strong>com</strong>primido que utiliza el sistema<br />
patentado Pardini de palanca de levas integrado. La palanca de carga se situa<br />
linealmente al cilindro Va la empunadura, e integra el guardamonte del disparador.<br />
AI hacer funcionar la palanca de carga , se abre automalicarnente la tapa del<br />
sistema de carga del balin V se monta el sistema del mecanisme de disparo.<br />
No hay ningun retrocaso an el momento de salida del balin porque el aire se<br />
sue Ita instantaneamente sin ningun movimiento del piston.<br />
Los modelos K2, K2L. K2 Junior, utilizan para la propulsion gas de CO2 contenido<br />
en un cilindro intercambiable, situ ado horizontal mente debajo del canon V<br />
paralelo al eje.<br />
EI modele K2L es mas ligero que el K2, V as por consiguiente apropiada para<br />
las Damas.<br />
EI modelo K2 Junior es mas ligera, V tambien tiene las dimensiones mas<br />
pequanas que el modele K2, es por consiguiente conveniente para los Juniors.<br />
Das Modell K2 Junior ist ebenfalls leichter ais das Modell K2, hat einen kurzeren<br />
Lauf, dadurch eine kurzere Visierlinie und ist daher besonders fur Einsteiger<br />
und Junioren zu empfehlen.<br />
Modell K2S, K2S light, K2S junior<br />
Diese Modelle werden mit PreBluft betrieben (250 bar). Die PreBluftkartuschen<br />
befinden sich parallel zur Laufachse. Die PreBluftmodelle haben die gleichen<br />
technisch - ballistischen Merkmale wie die CO2 Modelle. Die Handhabung ist<br />
bei beiden Modellen (CO2 und PreBluft) einfach und unk~pliziert.<br />
Aufgrund der phvsikalischen Eigenschaften des CO -Gases. hangt die<br />
Arbeitsweise des Gasbehalters stark von den jeweiligen Gegebenheiten ab.<br />
Trotzdem garantieren wir eine konstante Leistung des Gasbehalters, die durch<br />
ein selbstentwickeltes Zweikammern-System erreicht wird, welches das erste<br />
seiner Art auf der Welt ist.<br />
Trotz der langen Lauflange benbtigt die Diabolo-Kugel nur eine kurze Zeilspanne<br />
bis sie den Lauf verlassen hat; verantwortlich dafur ist die erreichte sehr hohe<br />
Geschwindigkeit. Sorgfaltige Herstellung der Laufa zusammen mit der Erfahrung<br />
aus eincr vielzahl ballistischer Experimente und den dazugehbrigen technischen<br />
Entwicklungen, geban Ihnen die Mbglichkeit ein sehr hohes Leistungsniveau<br />
zu erreichen.<br />
Los modelos K2S, K2SL, K2S Junior, utilizan para la propulsion aire <strong>com</strong>primido<br />
a 250 bar, tambien contenido en un cilindro intercambiable situ ado debajo del<br />
can6n paralelo a su eje. Los modelos de aire <strong>com</strong>primido lienen las mismas<br />
caracteristicas tecnicas y balisticas que los modelos de CO2. Una gran ventaja<br />
de las pistol as de CO2 V de aire <strong>com</strong>primido es la ausencia total de esfuerzo<br />
para su carga. La autonomia del cilindro de gas depende de las caracteristicas<br />
fisicas intrinsecas del CO2 de las condiciones ambientales. Sin embargo,<br />
nosotros garantizamos un funcionamiento excepcionalmente constante debido<br />
al diseno de un sistema de doble pre-camara, el cual ha side total mente<br />
desarrollado por nuestra empresa V fue el primero de su tipo en el mundo.<br />
Los modelos con propulsion de aire no lienen dependencia de las condiciones<br />
ambientales<br />
A pesar de la larga longitud del caMn, el balin esta un corto tiempo en el caMn<br />
debido a la alta velocidad inicial del provectil. La calidad de fabricacion de los<br />
canones junto con la experiencia de un largo numero de pruebas ballsticas<br />
<strong>com</strong>binadas con otras caracteristicas tecnicas apropiadas, nos permite obtener<br />
unos resultados del mas alto nivel. La casa PARDINI tambien proporciona sobre<br />
pedido, un kit de conversion de CO2 a aire V viceversa. ,<br />
~33
,<br />
~<br />
~34<br />
SISTEMA DI REGOLAZIONE SCATTO K2 K2S K58<br />
Regolazione scatto, grilletto e dispositivo di scatto a secco (vedi disegno):<br />
VITE TS: trigger-stop, girando in senso orario diminuisce la corsa del grilletto<br />
dopo 10sparo<br />
VITE CP: corsa 10 tempo, girando in senso orario tale corsa diminuisce<br />
VITE PT: peso 10 tempo, girando in senso orario aumenta il peso<br />
VITE PA: peso aggancio, girando in senso orario aumenta il peso<br />
VITE RG: registrazione posizione grilletto<br />
VITE CA: corsa aggancio piani di scatto, diminuisce girando in senso orario<br />
VITE MP: regola la <strong>com</strong>pressione della molla del percussore<br />
VITE LG: regola la larghezza della tacca di mira, aumenta girando in senso<br />
orario<br />
LEVA SS: A) posizione scatto a secco B) posizione di spare<br />
(;j=0<br />
@
TRIGGER MECHANISM ADJUSTMENTK2 K2S K58<br />
For triggermechanism, trigger and dry fire device adjustment (see<br />
drawing):<br />
TS SCREW:<br />
CP SCREW:<br />
PT SCREW:<br />
PA SREW:<br />
RG SCREW:<br />
CA SCREW:<br />
MP SCREW:<br />
LG SCREW:<br />
SS LEVER:<br />
trigger-stop turning clockwise reduces trigger<br />
overtravel<br />
first stage length, turning clockwise reduces it<br />
first stage weight turning clokwise increases the<br />
weight<br />
let-off weight, turning clockwise, increases it<br />
adjust trigger position<br />
sear engagement turning clokwise reduces it<br />
adjust the <strong>com</strong>pression of the firing pin spring<br />
adjust the width of the reasight aperture, turning<br />
clockwise increases the width<br />
A) dry- fire position B) shoot position<br />
REGLAGE DE LA DETENTE K2 K2S K58<br />
Reg/ages du declenchement, de /a detente et du dispositif de fir<br />
a sec (voir schema):<br />
VISTS:<br />
VIS CP:<br />
VIS PT:<br />
VIS PA:<br />
VIS RG:<br />
VIS CA:<br />
VIS MP:<br />
VIS LG:<br />
LEVIER<br />
Triggerstop, en tournant dans Ie sens des aiguilles<br />
d'une montre, la course de la detente diminue<br />
Pre-course, en tournant dans Ie sens des aiguilles<br />
d'une montre, cette course diminue<br />
Poids de la pre-course, en tournant dans Ie sens<br />
des aiguilles d'une montre, Ie poids augmente<br />
Poids de /'accrochage, en tournant dans Ie sens<br />
des aiguilles d'une montre, Ie poids augmente<br />
Reglage de la position de la detente<br />
Course de I'accrochage, la course diminue en<br />
tournant dans Ie sens des aiguilles d'une montre<br />
Reglage de la <strong>com</strong>pression du ressort de percussion<br />
Regie la largeur du cran de mire, il s'elargit en<br />
tournant dans Ie sens des aiguilles d'une montre<br />
SS: A) position de tir a sec. B) position de tir<br />
'"<br />
~35
,<br />
~<br />
EINSTELLUNG DES ABZUGS K2 K2S K58<br />
Einstellung des Abzugs und der Trockentrainingseinrichtung<br />
TS SCHRAUBE: Triggerstopschraube, drehen im Uhrzeigersinn<br />
verringert die Ruckwartsbewegung des Abzugs<br />
nach dem auslosen des Schusses<br />
CP SCHRAUBE: Einstellen der Lange des Vorweges vor dem<br />
Druckpunkt Drehen im Uhrzeigersinn verringert<br />
sich der Vorweg, entgegen vergroBert er sich<br />
PT SCHRAUBE: Einstellen des Gewichtes vom Vorweg,drehen<br />
im Uhrzeigersinn erhoht das Gewicht des<br />
Vorweges, entgegen wird es kleiner<br />
PA SCHRAUBE: Einstellen des Gewichtes am Druckpunkt, drehen<br />
im Uhrzeigersinn erhoht das Gewicht am<br />
Druckpunkt, entgegen wird es kleiner<br />
RG SCHRAUBE: Losen der Schraube ermoglicht das vor-und<br />
zurucksetzen<br />
Abzugszungels.<br />
sowie die seitliche Verstellung des<br />
CA SCHRAUBE: Einstellen des Klinkenubergriffes, sollte nur vom<br />
Fachmann eingestellt werden!!!<br />
MP SCHRAUBE:Einsteliung der Kompression der<br />
Schlagstuckfeder.<br />
LG SCHRAUBE: Einstellung der Breite des Kimmenausschnittes<br />
(verstellbares Kimmenblatt) Drehen im<br />
Uhrzeigersinn vergroBert den Kimmenausschnitt,<br />
entgegen verkleinert ihn.<br />
SS HEBEL: A) Trockentraining B) scharfer SchuB<br />
MECANISMO DE DlSPARO REGULACIONES DEL SISTEMA<br />
K2 K2S K58<br />
Regulaei6n de tira, disparador y dispositivo de tiro en seeD<br />
(ver diseiio):<br />
TORNILLO TS: Trigger-stop girando en sentido de las agujas<br />
del reloj, disminuye el recorrido posterior a la<br />
salida del disparo.<br />
TORNILLO CP: Recorrido del 1° tiempo, girando en senti do de<br />
las agujas del reloj, el recorrido disminuye<br />
TORNILLO PT: Peso del 10 tiempo, girando en sentido de las<br />
agujas del reloj aumenta el peso, en sentido<br />
contrario disminuye.<br />
TORNILLO PA: Peso del 2° tiempo, girando en sentido de las<br />
agujas del reloj aumenta el peso.<br />
TORNILLO RG: Regula la posicion del disparador.<br />
TORNILLO CA: Regula el recorrido previa a la salida del dispara,<br />
girando en sentido de las agujas del reloj<br />
disminuye el recorrido de enganche del<br />
disparador.<br />
TORNILLO MP: Regula la velocidad de salida del proyectil<br />
TORNILLO LG: Regula la anchura de la abertura de la mira,<br />
aumenta girando en el sentido de las agujas<br />
del reloj.<br />
PALANCASS: A) posicion de tira en seco, B) posicion de disparo
MODEllO K2 - K2l - K2 JUNIOR<br />
SERBATOIO CO2 - SOSTlTUZIONE E RICA RICA<br />
IIserbatoio del gas pua essere sostituito in qualunque momenta<br />
anche se non e <strong>com</strong>pletamente vuoto. Per procedere alia<br />
ricarica del serbatoio vuoto operare <strong>com</strong>e segue:<br />
1) - Svitare il serbatoio della pistol a e svuotarlo<br />
2) - Avvitare il raccordo che viene fornito can la pistola alia<br />
bombola di approvvigionamento;<br />
3) - Operare in modo che la temperatura del serbatoio sia<br />
piu bass a di quella della bombola (per ottenere cia mettere<br />
in frigo iI serbatoio a fare uscire da questo iI minimo<br />
quantitativa di gas che si riesce ad immettere anche a<br />
temperatura ambiente);<br />
4) - Avvitare il serbatoio al raccordo ed aprire iI rubinetto dell a<br />
bombola;<br />
5) - Attendere iltempo necessaria (solitamente pochi secondi)<br />
per il travaso del gas nel serbatoio;<br />
6) - Chiudere il rubinetto della bombola e svitare iIserbatoio;<br />
7) - Pesare il serbatoio: non superare iI peso totale di 225 g<br />
(K2) e 160 9 (K2l e K2 JUNIOR) che equivale ad una<br />
carica ottimale di gas CO2 di circa 53 g (K2) e 35 g (K2l<br />
e K2JUNIOR).<br />
ATTENZIONE<br />
" serbatoio non deve essere esposto a temperature<br />
superiori a 500 - C.<br />
Accertarsi che 10 scatto sia armato prima di iniziare ad<br />
avvitare iI serbatoio.<br />
Si consiglia di avvitare il serbatoio manualmente senza<br />
bloccare e lubrificare la parte filettata del raccordo con una<br />
goccia di olio meccanico.<br />
.<br />
~37
K2 - K2L - K2 JUNIOR MODEL<br />
CO2 CYLINDER- REPLACEMENT AND RECHARGING<br />
The gas cylinder can be replaced at any time even if not <strong>com</strong>pletely<br />
empty.<br />
To recharge an empty cylinder as follow:<br />
1) - Unscrew the cylinder from the pistol and discharge it;<br />
2) - Attach the pressure valve fitting supplied with the pistol to<br />
the gas supply bottle;<br />
3) - Ensure that the temperature of the cylinder is lower than the<br />
supply bottle (this can be achived either by storing the cylinder<br />
in the fridge or, alternatively, be letting out a small quantity<br />
of gas from the cylinder even if filled previously at ambient<br />
temperature );<br />
4)<br />
- Screw the cylinder to the gas bottle fitting and open the supply<br />
bottle tap;<br />
5) - Wait a few seconds for the gas to be transferred to the<br />
cylinder;<br />
6)<br />
- Close the supply bottle tap and unscrew the cylinder;<br />
7)<br />
- Weigh the cylinder. DO NOT EXCEED 225 g (K2) and 160<br />
g (K2L and K2 Junior) this is equivalent to an optimal weight<br />
of gas CO2 of about 53 g (K2) and 35 g (K2L and K2 Junior).<br />
WARNING<br />
Do not expose the cylinder to temperatures exceeding 50°<br />
degrees C (120 degrees Farenhite.)<br />
Check that the pistol is cocked before screwing on the cylinder.<br />
We suggest turning the cylinder on only hand tight (do not<br />
use wrenches!). Lubricate the threaded part of the connector<br />
body with simple lubricant and the O'Ring with silicone<br />
grease.<br />
,<br />
~<br />
MODELE K2- K2L- K2 JUNIOR<br />
CARTOUCHE CO2 - REMPLACEMENT ET REMPLISSAGE<br />
Au besoin, la cartouche peut stre atee et rechargee, msme si elle<br />
n'a pas ete utilisee <strong>com</strong>pletement.<br />
Pour recharger la cartouche vide proceder de cette maniere:<br />
1)<br />
- Oevisser la cartouche et la vider;<br />
2) - Visser Ie raccord de remplissage (fourni avec Ie pistolet) sur<br />
la bouteille d'approvisionement;<br />
3)<br />
- II est necessaire que la temperature de la cartouche soit<br />
inferieure a celie de la bouteille d'approvisionnement (pour<br />
obtenir cela, placer la cartouche dans un refrigerateur ou<br />
faire echapper de celle-ci la petite quantite de gaz qu'on peut<br />
introduire aussi a la meme temperature;<br />
4) - Visser la cartouche sur Ie raccord et ouvrir Ie robinet de la<br />
bouteille d'approvisionement;<br />
5)<br />
- Attendre Ie temps necessaire (quelques secondes pour Ie<br />
6)<br />
-<br />
7) -<br />
remplissage)<br />
Fermer Ie robinet et devisser la cartouche;<br />
Peser la cartouche: ne pas depasser Ie poids de 225 g (K2)<br />
et 160 g (K2L et K2 Junior qui equivaut a une charge optimale<br />
de gaz CO2, a peu pres 53 9 (K2L et K2 Junior).<br />
ATTENTION!<br />
La cartouche ne do it pas etre exposee a la chaleur (maximun<br />
50° C.).<br />
Le dispositif de detente doit stre arme avant de visser la<br />
cartouche. On conseille de visser la cartouche manuellement<br />
sans bloquer et lubrifier la partie filetee du raccord avec une<br />
goutte d'huile minerale fluide qui ne contienne pas d'additifs<br />
ou de solvants.
CO2 MaDELLE K2 - K2 LIGHT - K2 JUNIOR<br />
AUSWECHSELN DES GASBEHALTERS UNO NACHFULLEN<br />
Der Gasbehalter kann jederzeit ausgetauscht werden, auch<br />
dann, wenn er nicht vollstandig leer ist. Um einen leeren<br />
Behalter nachzufOllen, gehen Sie wie folgt vor:<br />
1) - Schrauben Sie den Behalter von der Pistole ab.<br />
2) - Befestigen Sie den mitgelieferten Druckventiladapter an<br />
der GasnachfUliflasche.<br />
3) - Stellen Sie sicher, daB der Gasbehalter eine niedrigere<br />
Temperatur als die NachfUliflasche hat (dies kann entweder<br />
dadurch erreicht werden, daB Sie aus dem gleichwarmen<br />
Gasbehalter eine kleine Menge Gas entweichen lassen,<br />
oder indem Sie den Gasbehalter im KOhlschrank kOhlen).<br />
4) - Schrauben Sie den Gasbehalter auf den<br />
Druckventiladapter und 6ffnen Sie den Gashahn der<br />
GasnachfOliflasche.<br />
5) - Warten Sie efnige Minuten bis der Behalter mit Gas gefUlit ist.<br />
6- SchlieBen 8ie den Gashahn und Schrauben Sie den<br />
Gasbehalter ab.<br />
7) - Wiegen Sie den Gasbehalter: OBERSCHREITEN SIE NICHT<br />
223 Gramm (K2) (160 Gramm bei Modell K2 Light - K2 Junior)<br />
Gesamtgewicht, welches einer optimalen Gasladung von<br />
ungefahr 53 Gramm K2 und 35 Gramm (K2 Light und K2<br />
Junior).<br />
WARNUNG<br />
Gasbehalter nie Temperaturen uber 50 Grad aussetzen.<br />
Stellen Sie sicher, daB der Abzugsmechanismus gespannt<br />
ist, bevor Sie den Gasbehalter an - oder abschrauben<br />
Wir empfehlen Ihnen den Gasbehalter nur von Hand, also<br />
ohne einen SchraubenschlOssel zu verwenden, ab- und<br />
anzuschrauben. Das Gewinde am Adapter s~Ute mit einem<br />
Tropfen Feinmechanikeroel geschmiert werden.<br />
K2-K2L-K2 JUNIOR<br />
CIL/NoRO DE C02- REEMPLAZAMIENTO Y RECARGA<br />
EI cilindro de gas puede ser cambiado en cualquier momenta<br />
aunque no este <strong>com</strong>pletamente vado.<br />
La recarga y vaciado del cilindro se realiza de la siguiente<br />
manera:<br />
1) Saque el cilindro de la pistola y vadelo<br />
2) Coloque el racord de recarga (suministrado con la pistola)<br />
en la botella nodriza .<br />
3) Es necesario que la temperatura del cilindro sea inferior<br />
a la de la botella nodriza<br />
Para conseguirlo introduzca el cilindro en un refrigerador 0<br />
alternativamente vade la pequeFia cantidad de gas que<br />
previamente haya cargado en el cilindro a temperatura<br />
ambiente).<br />
4) Coloque el cilindro de gas en la botella nodriza y abra la<br />
lIave de la misma.<br />
5) Espere unos segundos para que el gas se transfiera al<br />
cilindro.<br />
6) Cierre la lIave de la botella nodriza y desenrosque el<br />
cilindro.<br />
7) Pese el cilindro. Su peso NO DEBE EXCEDER de 225 gr.<br />
(K2) Yde 160 gr.( K2L y K2 Junior) que equivale a una carga<br />
optima de gas de 53 gr.( K2) y de 35 gr. en la (K2L y K2J)<br />
PRECAUCION<br />
EI cilindro no de be estar expuesto a temperaturas que<br />
excedan de 50QC.<br />
Verifique si el mecanisme de disparo esta cargado antes<br />
de colocar un cilindro. Nosotros sugerimos apretar el<br />
cilindro manual mente hasta su bloqueo y lubricar la parte<br />
roscada del reductor can una gota de rubricante sin<br />
aditivos 0 disolventes.<br />
,<br />
~
."<br />
~40<br />
MODEllO K2S- K2Sl K2S JUNIOR<br />
SERBATOIO AD ARIA COMPRESSA SOSTlTUZIONE RICA RICA<br />
II serbatoio ad aria <strong>com</strong>pressa pub essere sostituito in qualsiasi<br />
momenta anche se non e <strong>com</strong>pletamente vuoto.<br />
Per procedere alia ricarica del serbatoio operare <strong>com</strong>e segue:<br />
1) - Svitare il serbatoio dalla pistola.<br />
2) - Avvitare il dispositivo di rica rica ( in dotazione) alia bombola di<br />
approvvigionamento, ad un <strong>com</strong>pressore con potenza di ricarica<br />
a 250 bar oppure alia pompa manuale fornita a richiesta dalla<br />
Pardini Armi.<br />
3) - Avvitare il serbatoio al dispotivo di ricarica<br />
della bombola I<strong>com</strong>pressore oppure azionare<br />
ed aprire il rubinetto<br />
la pompa manuale.<br />
4) - Attendere il tempo necessario<br />
travaso dell'aria dalia bombola<br />
(solitamente<br />
al serbatoio.<br />
pochi second i) per il<br />
Portare la pressione<br />
a 250 bar con iI <strong>com</strong>pressore 0 la pompa manuale.<br />
5) - Chiudere<br />
serbatoio.<br />
II rubinetto della bombola I <strong>com</strong>pressore e svitare il<br />
ATTENZIONE<br />
II serbatoio e fornito di segnalatore di pressione ad anelli posta<br />
nella parte anteriore. Se sono visibili tre linee, il serbatoio e<br />
<strong>com</strong>pletamente carico; due linee visibili corrispondono a meta<br />
carico; una sola linea al serbatoio in fase di esaurimento. Quando<br />
iI dispositivo di misura copre visivamente I'ultima linea, rimane<br />
una residua autonomia di circa 30 colpi.<br />
Prima di avvitare iI serbatoio dell'aria <strong>com</strong>pressa alia pistola<br />
assicurarsi che 10 scatto sia armato mediante arretramento del<br />
sistema di cameratura del pallino.<br />
Si consiglia di avvitare iI.serbatoio manualmente senza bloccare<br />
e lubrificare la parte filettata del raccordo con una goccia di olio<br />
meccanico.
MODEL K2S - K2SL- K2S JUNIOR<br />
AIR CYLINDER<br />
REPLACEMENT AND RECHARGING<br />
The air cylinder can be replaced at any times even if not<br />
<strong>com</strong>pletely empty. To recharge an empty cylinder, proceed as<br />
follows:<br />
1) - Unscrew the cylinder from the pistol<br />
2) - Attach the recharging adaptor (supplied) either to an air<br />
supply bottle, or a <strong>com</strong>pressor delivering 250 bar, or to a<br />
manual pump available on request from Pardini Armi.<br />
3) - Attach the cylinder to the adaptator and either turn the bottle<br />
or <strong>com</strong>pressor's tap on, or act on the manual pump.<br />
4) - Wait for a few seconds for the air to be transferred to the<br />
cylinder, when using either an air bottle or <strong>com</strong>pressor and<br />
in all cases ensure the cylinder pressure reaches 250 bar.<br />
5) - Finally close the supply bottle/<strong>com</strong>pressor tap and unscrew<br />
the cylinder from the charging device.<br />
WARNING<br />
The cylinder is supplied with a pressure signalling device<br />
at the muzzle end of the cylinder: Three silver lines exposed<br />
indicates the cylinder is <strong>com</strong>pletely charged (250 bar<br />
MAXIMUM.) When two silver lines are visible, the cylinder<br />
is one half full and when only 1 line is seen, the cylinder is<br />
near empty. When the last line is covered there are about<br />
30 shots remaining. When installing a newly filled cylinder,<br />
make sure the pistol is cocked before screwing it onto to<br />
the gun only hand tight! Keep the threaded portion of the<br />
connector lubricated with a simple lubricant and the O'Ring<br />
with silicone grease.<br />
MODELE K2S- K2SL K2S JUNIOR<br />
CARTOUCHE AIR<br />
REMPLACEMENT ET REMPLiSSAGE<br />
Au besoin, la cartouche peut etre atee et rechargee, meme si<br />
elle n'a pas ete utilisee <strong>com</strong>pletement.<br />
Pour recharger la cartouche vide proceder de cette maniere:<br />
1) - Oevisser la cartouche du pistolet.<br />
2) - Visser Ie raccord de remplissage (fourni avec Ie pistolet)<br />
sur la bouteille d'approvisionnement, ou a un <strong>com</strong>presseur<br />
de puisance d'a peu pres 250 bars ou a la pompe manuelle<br />
fournie sur demande a la maison Pardini.<br />
3) - Visser la cartouche sur Ie raccord et ouvrir Ie robinet de la<br />
bouteille/<strong>com</strong>presseur, ou actionner la pompe manuelle.<br />
4) - Attendre Ie temps necessaire (quelques secondes) pour Ie<br />
remplissage. Ammener la pression a 250 bars avec Ie<br />
<strong>com</strong>presseur ou la pompe manuelle.<br />
5) - Fermer Ie robinet de la bombonne/<strong>com</strong>presseur et devisser<br />
la cartouche.<br />
ATTENTION<br />
La cartouche est munie de reperes de pression a anneaux,<br />
place anterieurement.<br />
Si trois lignes sont visibles, la cartouche est <strong>com</strong>pletement<br />
pleine, deux lignes correspondent a la moitie de la charge.<br />
Si une seule ligne est visible, la cartouche est en phase<br />
d'epuisement. Quand Ie repere de pression couvre<br />
entierement la derniere ligne, I'autonomie est encore de 30<br />
coups. Le dispositif de detente doit etre arme avant de<br />
visser la cartouche et lubrifier la partie filetee du raccord<br />
avec une goutte d'huile minerale fluide qui ne contienne pas<br />
d'additifs ou de solvants. ill<br />
~
#11<br />
~<br />
PREBLUFT - MODELLE K2S - K2S light - K2S junior<br />
AUSTAUSCHEN UNO NACHFULLEN oER<br />
PREBLUFTKARTUSCHE<br />
Die PreBluftkartusche kann jederzeit ausgetauscht werden, auch<br />
dann, wenn sie nicht vollstandig entleert wurde.<br />
Um eine leere Kartusche zu tOlien gehen Sie wie folgt vor:<br />
1) - Kartusche van der Pistole abschrauben.<br />
2) - Den mitgelieferten Fulladapter auf die PreBluftflasche<br />
schrauben.<br />
3) - Die Kartusche mit maximal 250 bar betOlien.<br />
4) - Kartuschen von der PreBluftflasche entfernen und auf die<br />
Pistole aufschrauben.<br />
WARNUNG!<br />
Die Kartusche ist mit einer Druckanzeige ausgestattet,<br />
Welche durch Ringe den Fi.illstand am Ende der Kartusche<br />
sichtbar macht. Sind 3 silberne Ringe sichtbar, ist die<br />
Kartusche ganz gefi.illt, bei 2 Ringen nur etwa zur Halfte, ist<br />
kein Ring mehr sichtbar, sind noch ca. 30 SchuB moglich.<br />
Vor Ab-u. Anschrauben der Kartusche ist sicher zustellen,<br />
das der Abzugsmechanismus gespannt ist. Das Gewinde<br />
am Adapter soUte mit einem Tropfen Feinmechanikeroel<br />
geschmiert werden.<br />
MODELOS K2S - K2SL - K2S JUNIOR<br />
CARTUCHO DE AIRE<br />
REEMPLAZAMIENTO Y RECARGA<br />
EI cilindro de aire <strong>com</strong>primido se puede cambiar y recargar en<br />
cualquier momento, aunque no se haya utilizado <strong>com</strong>pletamente.<br />
Para recargar el cilindro debe proceder de la siguiente manera:<br />
1)- Quitar el cilindro de la pistola.<br />
2)- Colocar el racord de carga ( suministrado con la pistola)<br />
en la botella nodriza a en un <strong>com</strong>presor can potencia de carga<br />
de 250 Bar. a en una bomba manual de aire.<br />
3)- Roscar el cilindro en el racord y abrir la lIave de la botella<br />
nodriza 0 <strong>com</strong>presor, 0 accionar la bomba manual.<br />
4)- Esperar el tiempo necesario ( algunos segundos) para<br />
transferirse el aire al cilindro, con el <strong>com</strong>presor 0 la bomba<br />
manual hasta que la presion sea de 250 Bar.<br />
5)- Cerrar la lIave de la botella nodriza 0 el <strong>com</strong>presor y<br />
desenroscar el cilindro.<br />
ATENCION<br />
EI cilindro esta equipado con un sistema de senalizacion<br />
de la presion por un anillo situado en la parte delantera.<br />
Si las tres lineas son visibles, el cilindro esta <strong>com</strong>pletamente<br />
lIeno, dos lineas corresponden a media carga, y una linea<br />
indica que el cilindro esta en fase de agotar el aire. Cuando<br />
el anillo de senalizacion de presion esta cubriendo<br />
visiblemente la ultima linea, la autonomia del cilindro es<br />
de 30 disparos. Antes de quitar el cilindro, verificar que el<br />
mecanisme de disparo esta sin armar abriendo el sistema<br />
de carga del proyectil y lubricar la parte roscada del reductor<br />
con una gota de rubricante sin aditivos 0 disolventes.
§.21..<br />
556<br />
555<br />
MOD. K 58<br />
~I!<br />
535<br />
.5~.<br />
53:?<br />
538<br />
M.
,<br />
~<br />
J -<br />
1054 10011056100210081009 1010 1015 1014 1016 1011 10191012 1013 1069 1018 1019 1065<br />
-~<br />
~<br />
.J J<br />
- ' -r -r --l.~;-'--T T)<br />
7<br />
-<br />
-r<br />
/ /<br />
/<br />
-~-<br />
1<br />
T T -r T .<br />
'<br />
'/ "- ""<br />
.--_~06'1<br />
//<br />
1 I I ///--<br />
""<br />
I ~//,- ,<br />
.<br />
c ~/ :'C-d' ". .<br />
I J ,'~.<br />
1020<br />
~<br />
~/<br />
~<br />
, C~, ~~5 'I ) .<br />
,<br />
. J<br />
j // ~.--/.--/ // .// 1021<br />
'c-, ~ /<br />
.<br />
/ /<br />
/ ,,/<br />
1062'<br />
"':<br />
/',/<br />
'>Co:<br />
-~, /<br />
-<br />
l<br />
-I;) / / /<br />
//<br />
1022<br />
--"C'-,. "<br />
.<br />
--- // / ./<br />
' "<br />
XJ58/r=--== ~~~;:: //1024-17/'/,//<br />
;;;;S;<br />
: -<br />
11053-8": --("<br />
?~~t J 1<br />
.,<br />
,<br />
'-<br />
- 1 ~11~ '\t 60<br />
" ~~<br />
/ / ~ v /<br />
/1.,<br />
...<br />
...<br />
-<br />
/-;;/' / 1024.1<br />
0<br />
/ & / .../<br />
/ / 1026<br />
~~ ./ II // 1003<br />
"""-" r ",,'"<br />
";=-- '///"'-, I ~ ~ Lr:-: "<br />
,<br />
..., ~ / /<br />
')~<br />
1004 . i<br />
-<br />
...
ESPLOSO SERBATOIO E RIDUTTORE K2S ARIA<br />
EXPLOSION VIEW K2S AIR CYLINDERAND REDUCER<br />
ECLATE K2S CARTOUCHE ET REDUCTEUR<br />
EXPLOSIONSZEICHNUNG K2S PRESSLUFT BEHALTER UND FOLLADAPTER<br />
DESPIECE DEL CILINDRO DE AIRE Y REDUCTOR K2S<br />
CD<br />
CD \0<br />
T<br />
@'~~ ~'tr°\ R -<br />
0"<br />
@<br />
O~(9)<br />
@ ~ 000 @<br />
.<br />
" ~ 1°1<br />
@<br />
-~ ~ I /<br />
~~@ @ @<br />
~."...~" i<br />
fI ~<br />
Jd r<br />
1/<br />
~ mllll\!\\II!<br />
-@<br />
~ / V ~ I<br />
@ @ @ @ @)<br />
aU='@<br />
J<br />
@<br />
,<br />
~
,<br />
~46<br />
PISTOLE PARDINI - PARDINI PISTOLS - PISTOLES PARDINI - PISTOLAS PARDINI<br />
MODELLO K22 HP SP GP-<br />
model I modele<br />
modelll modele<br />
DATI TECNICI -TECHNICAL DATA - FICHE TECHNIOUE - DATOS TECNICOS<br />
- G~E K58 K2 K2L K2 Junior K2S K2SL K2S Junior<br />
- CALIBRO .22 L.R. .32 S&W .22 L.R. .22 short .22 short 45 .1771 45 .1771 45 .177 45 .177 45(.177 45 .1771 45 .177\<br />
caliber I calibre<br />
kaliber I calibre<br />
ALTEZZA 145mm. 140mm. 140mm. 140mm. 130 mm. 130mm. 140mm. 140mm. 140mm. 140mm. 140mm. 140mm.<br />
height I hauter<br />
h6he I alto<br />
LARGHEZZA 80mm. 49 mm. 49mm. 49mm. 49mm. 47 mm. 49mm. 49mm. 49mm. 49mm. 49 mm. 49mm.<br />
width Ilargeur<br />
breite I ancho<br />
~HEZZA 460 mm. 295 mm. 295 mm. 295 mm. 300 rnm. 395 mm. 410mm. 410mm. 350 mm. 410mm. 410 mm. 360 mm.<br />
overallenght I longueur<br />
gesamtlange I largo<br />
PESO TOTALE 11000. 1100 o. 1100g. 1080 o. 11000. 10700. 11000. 8500. 850 o. 9900. 9000. 9200.<br />
total weight I poids<br />
gesamtgewicht I peso total<br />
FUNZIONAMENTO monoco]po semiauto. semiauto. semiauto. semiauto. monocolDo monocolJ'Q monocoloc monocoloo monocoloo monocoloo monocoloo<br />
action I fonctionnement singleshot semiaut. semiaut. semiaut. semiaut. singleshot singleshot singleshot single shot single shot single shot single shot<br />
funktion I funcionamiento monocoup semi.aut. semi.aut. semi-aut. semi-aut. monocoup monocoup monocoup monocoup monocoup monocoup monocoup<br />
-"-UNGHEZ~.~CANNA 300 mm. 120mm. 120mm. 117mm. 100rnrn. 230 mm. 245 mm. 245 mm. 195mm. 245 mm. 245 mm. 195mm.<br />
barrellenght I longueur du canon<br />
lauflange Iiongitud del canon<br />
TIPO CANNA 6Dx450mm. 6Dx450mm. 6Dx450mm. 6Dx450mm. 6Dx450mm. 12Dx450mm.12Dx450mm. 12[)x450mm 2Dx450mm. 12Dx450mm. 12Dx450mm. 12DX450iiiiii<br />
barrel rifling I type du canon<br />
lauftyp I tipo de canon<br />
LUNGHEZZA LINEA DI MIRA da345a42 220 mm. 220 mm. 242 mm. 285 mm. 325 mm. 370 mm. 370 mm. 320 mm. 370 mm. 370 mm. 325 mm.<br />
sight radius I longueur de ligne de mire<br />
visierlange I distancia entre miras<br />
SPOSTAMENTO PEILCLlC- 8mm. 5mm. 5mm. 5mm. 5mm. 1,8rnrn. 1,8 mm. 1,Bmm. 1,8mm. 1,Bmm. 1,Bmm. 1,Bmm.<br />
adjustment clickI deplacement pour un clie<br />
veranderung pro raste I desplazamiento por click<br />
Con rlserva di modifiche tecniche technical chan es reserved~ lT1odlflcations techni ues reservees Technische Anderunaen vorbehaltenl Se reservan modificaciones tecnicas
PISTOLE PER TIRO DINAMleo - IPse PISTOLS - PISTOLET POUR IPse<br />
IPse PISTOLEN - PISTOLAS PARA TIRO DEPORTIVO Y PARA IPse<br />
- -, -<br />
oco