LC656KA30 LC956KA30 - Elektroshop24
LC656KA30 LC956KA30 - Elektroshop24
LC656KA30 LC956KA30 - Elektroshop24
Create successful ePaper yourself
Turn your PDF publications into a flip-book with our unique Google optimized e-Paper software.
en<br />
Electrical connection<br />
Electrical data:<br />
Are to be found on the name plate inside the appliance<br />
after removal of the filterframe.<br />
Before undertaking any repairs, always<br />
disconnect the extractor hood from the electricity<br />
supply.<br />
Length of the connecting cable: 1.30 m.<br />
This extractor hood corresponds to EC regulations<br />
concerning RF interference suppression.<br />
Risk of electric shock!<br />
The appliance features an EU safety plug. To ensure<br />
protective earthing in a Danish socket, the appliance<br />
must be connected to a suitable plug adapter. This<br />
adapter (permitted up to max. 13 amps) is available<br />
from customer service (spare part no. 616581).<br />
Installation<br />
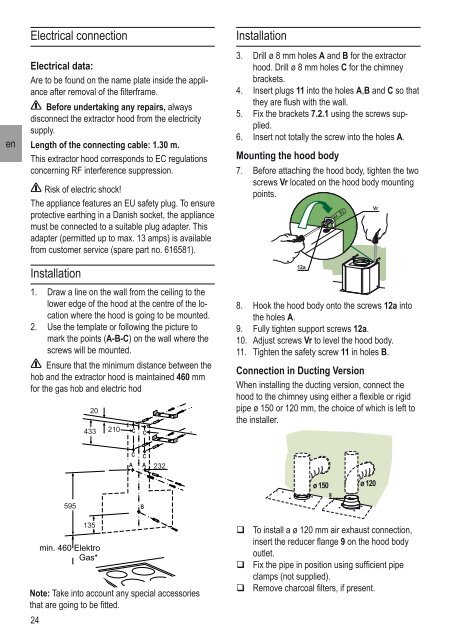
1. Draw a line on the wall from the ceiling to the<br />
lower edge of the hood at the centre of the location<br />
where the hood is going to be mounted.<br />
2. Use the template or following the picture to<br />
mark the points (A-B-C) on the wall where the<br />
screws will be mounted.<br />
Ensure that the minimum distance between the<br />
hob and the extractor hood is maintained 460 mm<br />
for the gas hob and electric hod<br />
20<br />
433<br />
210<br />
C<br />
C<br />
Installation<br />
3. Drill ø 8 mm holes A and B for the extractor<br />
hood. Drill ø 8 mm holes C for the chimney<br />
brackets.<br />
4. Insert plugs 11 into the holes A,B and C so that<br />
they are flush with the wall.<br />
5. Fix the brackets 7.2.1 using the screws supplied.<br />
6. Insert not totally the screw into the holes A.<br />
Mounting the hood body<br />
7. Before attaching the hood body, tighten the two<br />
screws Vr located on the hood body mounting<br />
points.<br />
<br />
8. Hook the hood body onto the screws 12a into<br />
the holes A.<br />
9. Fully tighten support screws 12a.<br />
10. Adjust screws Vr to level the hood body.<br />
11. Tighten the safety screw 11 in holes B.<br />
Connection in Ducting Version<br />
When installing the ducting version, connect the<br />
hood to the chimney using either a flexible or rigid<br />
pipe ø 150 or 120 mm, the choice of which is left to<br />
the installer.<br />
<br />
C<br />
A<br />
C<br />
A<br />
232<br />
595<br />
B<br />
<br />
<br />
<br />
Note: Take into account any special accessories<br />
that are going to be fitted.<br />
24<br />
135<br />
min. 460 Elektro<br />
Gas*<br />
To install a ø 120 mm air exhaust connection,<br />
insert the reducer flange 9 on the hood body<br />
outlet.<br />
Fix the pipe in position using sufficient pipe<br />
clamps (not supplied).<br />
Remove charcoal filters, if present.


