IDL 60 - Indesit
IDL 60 - Indesit
IDL 60 - Indesit

You also want an ePaper? Increase the reach of your titles
YUMPU automatically turns print PDFs into web optimized ePapers that Google loves.
Installation<br />
Positioning the appliance<br />
Place your dishwasher where you want to install it. The<br />
appliance can even be placed so that its sides or back panel<br />
are side by side with furniture or up against the wall. The<br />
dishwasher is provided with water supply and drain hoses,<br />
which can be directed towards the left or right to facilitate<br />
appropriate installation.<br />
Levelling<br />
Once the appliance is positioned, adjust the feet by screwing<br />
them in or out depending on how high you want it and level<br />
it so that it is horizontal; however it must not be tilted by<br />
more than 2° under any circumstances.<br />
If the appliance is level, this will help ensure its correct<br />
operation.<br />
<br />
<br />
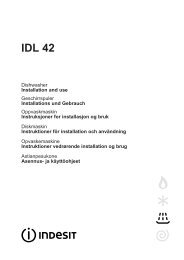
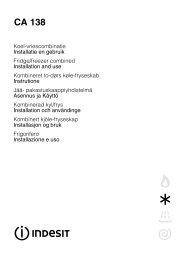
Cold water connection.<br />
This electric household appliance should be connected to<br />
the water mains using the cold<br />
water supply hose provided with<br />
the appliance only. Do not use<br />
a different hose. In the event of<br />
replacements, use original spare<br />
parts only.<br />
Connect the cold water supply<br />
hose to a threaded 3/4 (gas)<br />
connector, inserting the small<br />
filter supplied with the<br />
dishwasher and making sure<br />
that it is fastened tightly in place<br />
(see figure 2).<br />
If the water pipes are new or have not been used for an<br />
extended period of time, let the water run to make sure that<br />
the water is clear and free of impurities. If this precaution is<br />
not taken, there is a risk that the water inlet can get blocked<br />
and damage the appliance.<br />
A<br />
<br />
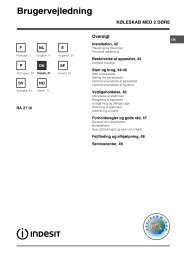
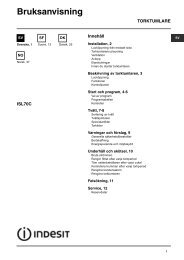
Drain hose connection<br />
Fit the drain pipe into a drain<br />
line with a minimum diameter<br />
of 4 cm or place it over the<br />
sink. Avoid restricting or<br />
bending it. Use the special<br />
plastic elbow provided (see figure)<br />
to position it in the best<br />
possible way. The part of the<br />
pipe marked with the letter A<br />
should be between 40 and<br />
100 cm above the ground.<br />
The pipe should not be immersed in water.<br />
Warning: the special plastic elbow should be fastened firmly<br />
onto the wall to prevent the drain hose from moving and<br />
allowing water to spill outside the drain.<br />
Electrical connection<br />
Plug the appliance into a socket provided with an efficient<br />
earth connection (the system’s earthing is a guarantee of<br />
safety provided for by law), after having checked that the<br />
mains voltage and frequency values correspond to those stated<br />
on the rating plate located on the stainless steel inner door<br />
of the appliance and that the electrical system to which the<br />
dishwasher is connected is sized for the maximum current<br />
indicated on said rating plate. If the power socket to which<br />
the appliance is connected is not compatible with the plug,<br />
replace it with a suitable plug rather than using adapters or<br />
multiple plugs as these could cause overheating or burns.<br />
If the electricity supply wire is damaged, we recommend<br />
you contact authorised Technical Assistance service centres<br />
exclusively for a replacement.<br />
A<br />
Hot water connection<br />
Your dishwasher can be supplied with hot water from the<br />
mains supply (if you have a central heating system with<br />
radiators) at a temperature of no more than <strong>60</strong>°C.<br />
In this case, the wash cycle time will be about 15 minutes<br />
shorter and the wash will be slightly less effective.<br />
The connection must be made to the hot water supply<br />
following the same procedures as those indicated for the<br />
cold water connection.<br />
GB<br />
10